Wednesday, March 31, 2010

Burda 02-2009-123 Self Collar Wrap Blouse, Flutter Sleeve Variation

Burda 02-2009-123 Thumbnail

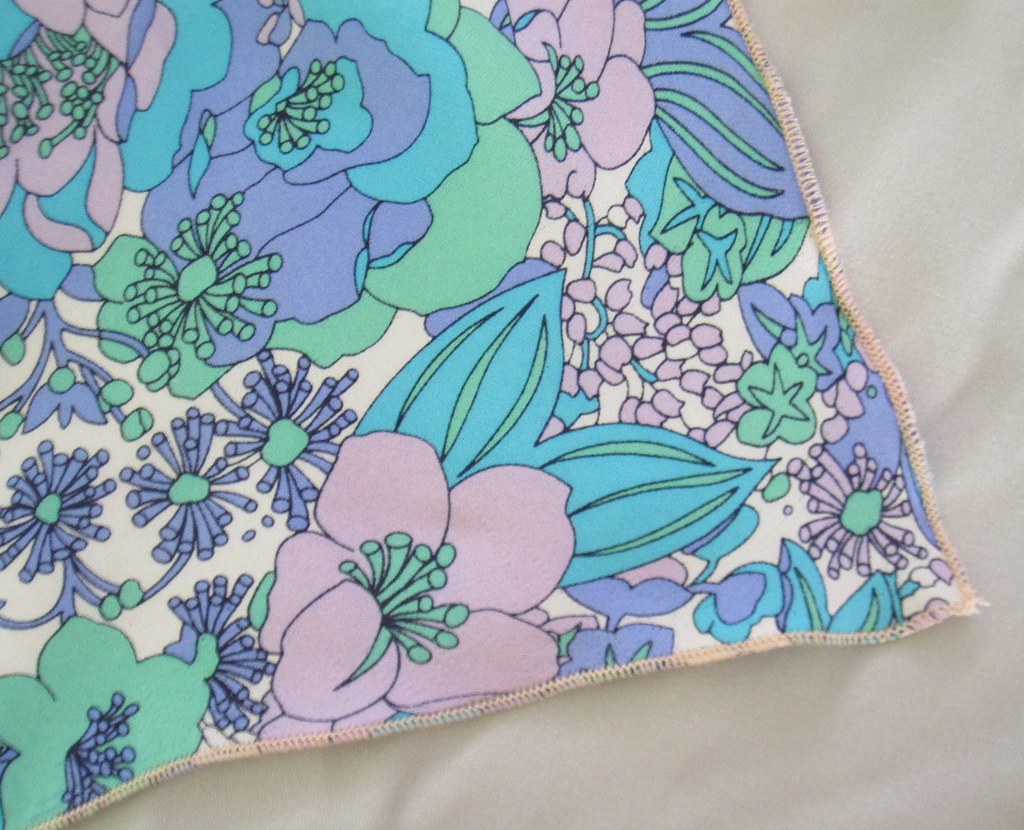
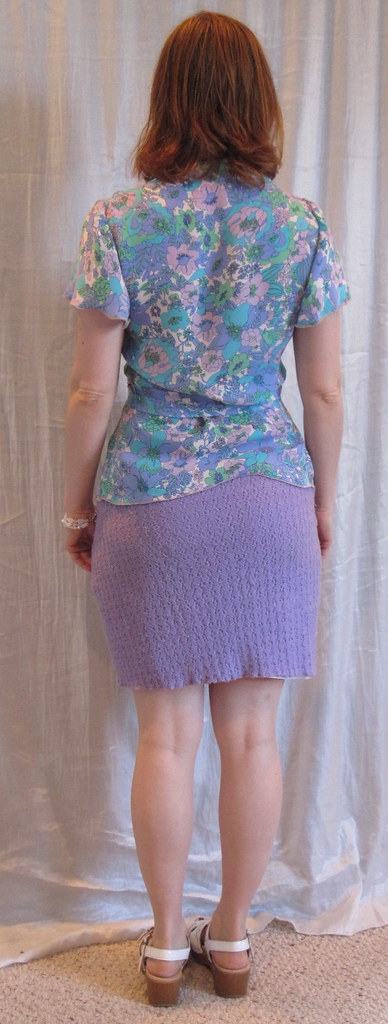
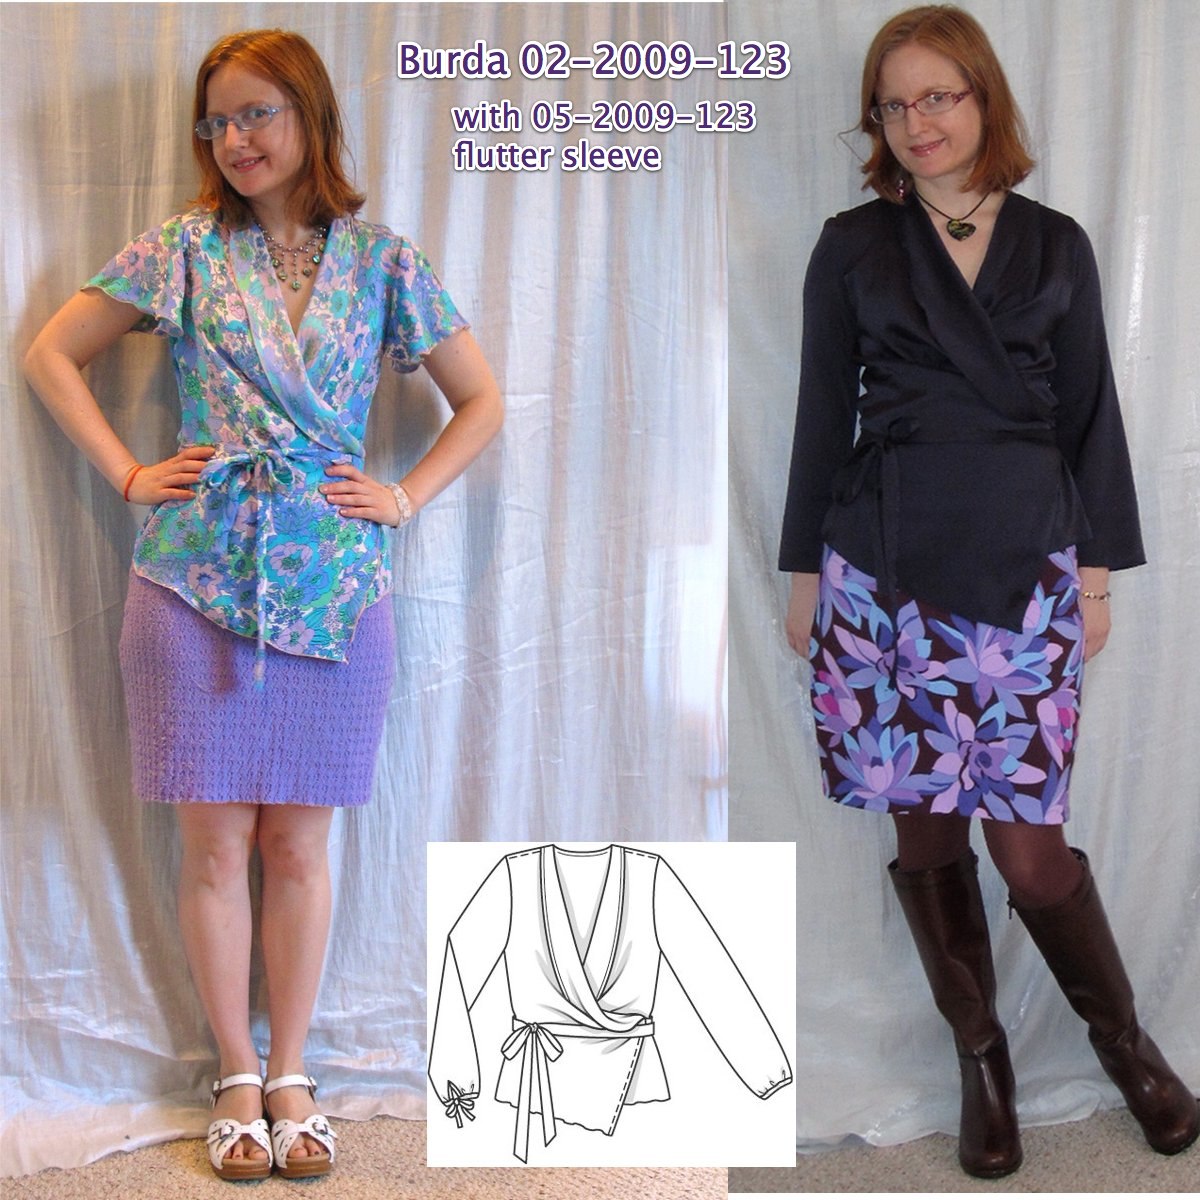
When I first made this lovely blouse, Burda 02-2009-123, I was thrilled to have discovered such a great pattern, pulled from the ashes of Burda's inexplicable styling in the editorial. I immediately pictured it for Spring in a floral silk with a flutter sleeve.

I already had the silk in stash, a georgette purchased 3-4 years ago online, intended to be the lining to my green coat before I knew enough to realize you can't use georgette as a lining. I'm sure I paid a pretty penny for it (although I have no idea how much) and therefore needed the "perfect" pattern before I could cut into it--anything over $6/yd is too go to use, you know.

Having finally found the perfect pattern I didn't want to make it wait too much longer. I went through back issues and found Burda 05-2009-123 with the perfect flutter sleeve. I compared the armscyes to make sure it would fit. The back armscye was identical; the front armscye was slightly different but I figured the gathering would take care of any irregularities and forged ahead. It totally worked.

Serger Rolled Hem French Seams I really didn't change anything other than the sleeve for this variation. For the serger rolled hem, I used the left needle rather than the right needle and I think it works a lot better on my serger to have that little bit of extra space. I am thrilled with the way the hem came out. I did French seams again, and used the same technique of serger-finishing the edges of the opening and then just leaving the opening unsewn on both passes. While working with this silk was like trying to stitch together cobwebs and moonbeams using the morning dew as needle and thread, its airiness and lightweight do make for a nice French seam at the armscye.

SideBack This version came out just as I imagined it and I'm so pleased to have made use of this gorgeous fabric! It has a right side and wrong side, and I was a little nervous about how the self-collar would look, as it is formed from the wrong side of the fabric. You can definitely tell that it's the wrong side, but I don't think it looks bad, more like a design feature. I don't know if the back hem really does have that dip in it, or if I just have it unevenly bloused. Given the difficulty I had in cutting this fabric on grain, I would not be too surprised if the issue is the hem rather than the way I'm wearing it. Oh well.

All photos of both projects are here and the pattern review is here.

I did the photos without flash per Peter's request (and others have urged it over time) but I am just not sold on it. They come out dark and too red and pixielated and no amount of editing seemed to get them to look right. I adjusted the brightness on my camera to be +1 (any more and my legs disappear in a flash of white) and changed the speed to 400 (I tried 200 but apparently I can't stay that still), so I really did give it the college try. I think I'm going to stick with a flash in the future. Sorry, Peter!

Monday, March 29, 2010

Stashoholism Confessional: Back From New York

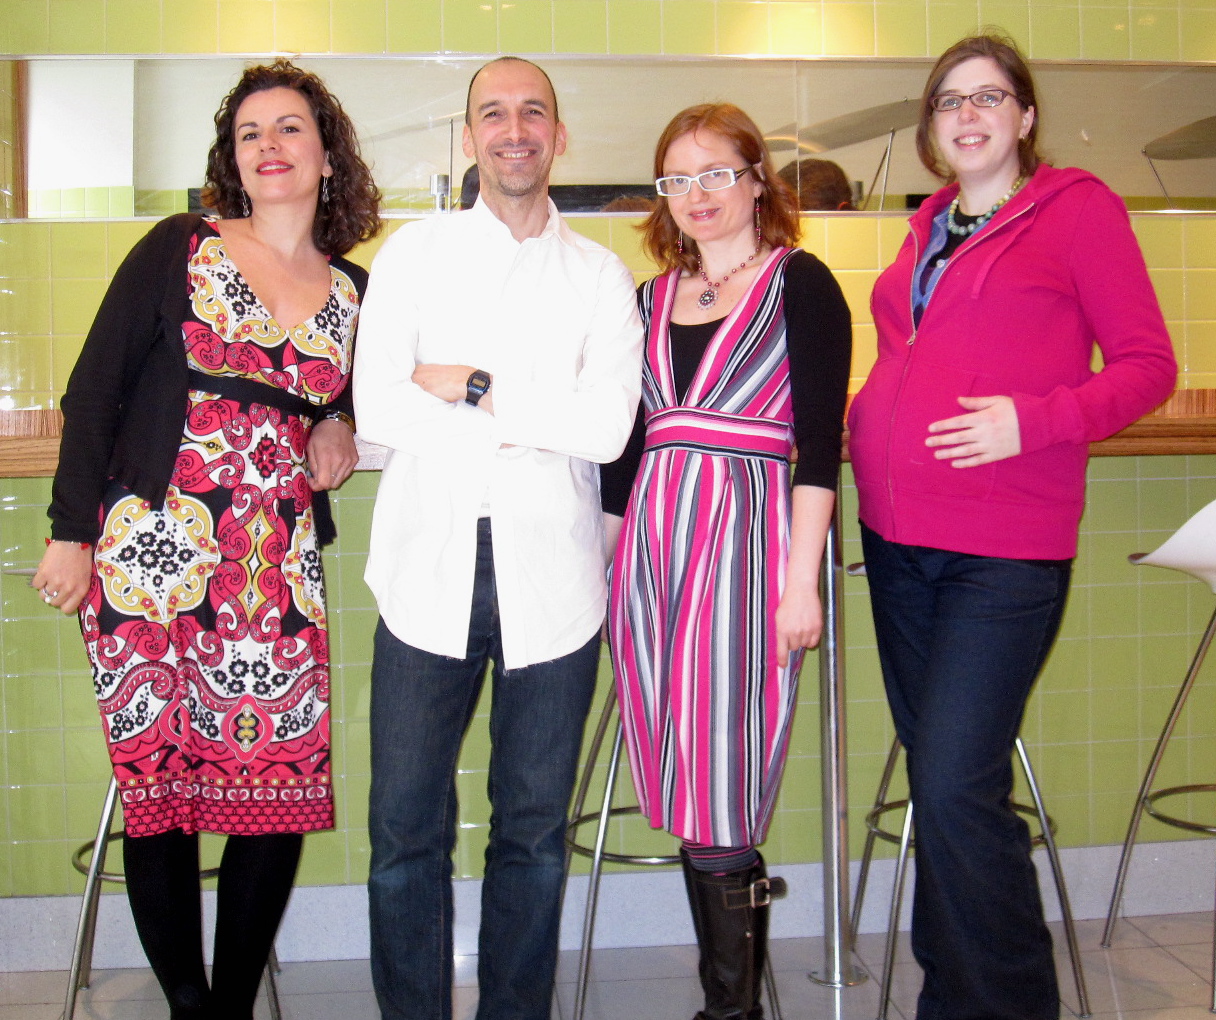
Elizabeth, Peter, Trena, Mikhaela

I had so much fun in New York! I took the Bolt Bus early Friday morning and can highly recommend it for the DC-NYC trip (I'm not affiliated with them in any way)--no pesky stops anywhere else to pick up passengers, only a quick rest stop (much appreciated). Then I headed to Crisp (again, not affiliated) where I met up with Elizabeth, Peter, Mikhaela, and Clio (not pictured) for some delicious falafel. Yum! We gabbed about sewing, fabric, and life in general. We modeled our outfits. Peter's shirt and Elizabeth's dress were hot off the sewing machine, while I was wearing an oldie but goodie, BWOF 09-2007-121, which I made back in 2007 and was so popular it was released as an envelope pattern. I found the matching tights at Target last month and hadn't had the chance to wear them yet, so I took advantage of the cold weather (I'm trying to put a positive spin on the weather) to sneak it in. Then came the piece de resistance, as we headed out for some fabric shopping!

Garment District 4_26_10-1 First stop was Paron. I headed straight for the annex, as usual, where I found some silk organzas for $6/yd. I have been wanting to try silk organza as an underlining for a skirt to see if it actually reduces wrinkling (I am skeptical) but I don't want to pay more for underlining than for the fashion fabric! So when I saw it at that price I snapped up four yards, two in each color. Then it was off to SIL Thread where I got a zipper and some thread (too boring to picture). Then we zipped next door to Spandex House. I was determined to find fabric to make some yoga-type workout pants because all of my gym clothes are old and awful. I found the fabric, now I have to find the motivation to make such a boring project.

Metro Textiles 4_26_10-1 Alas, Clio, Mikhaela, and Peter had to head back to their real lives, but Elizabeth and I powered on to Metro Textiles. As I had promised, I mostly stuck to solid colored fabrics for pencil skirts. Kashi had a variety of colors in a nice twill-weight cotton/lycra so I picked up hot pink, red, purple, and aqua, plus a textured cotton in yellow (that I am contemplating dyeing green; now I wish I'd gotten two yards so I could do one green and one yellow). I love a heavy cotton/lycra blend for a fitted skirt because it hugs nicely *and* wrinkles less. I had to indulge myself a little, so I got a floral cotton lawn shirting (Peter twisted my arm) and a knit print. The remnant is small (who knew Kashi had remnants? He never lets me leave a yard on the bolt!), about 2/3 of a yard, so I'm not sure what I can do with it, but it goes with both the red and pink skirt fabrics and Kashi threw it in for free!

Elizabeth and I hit up several more places but I didn't find anything more. You know that part where "Alexander wept, for there were no more worlds to conquer"? I fear I have reached that with stash. Every time I was drawn to a fabric I had to acknowledge that I already had something similar in stash and walk away from it. This is good for the wallet and for my downstairs neighbors, who would be in danger if I collected fabric ad infinitum, but it is not much fun! I guess the moral of the story is that I need to sew it down so I can start over again.

Elizabeth kindly let me stay with her so I got to meet her adorable son, drink some excellent wine, and enjoy some really fabulous Indian food, plus see her stash!

It was a very productive shopping trip, if a tad too virtuous.

=============

Several people asked about the white skirt I wore with the tie neck blouse in the last post. It is Burda 03-2009-104; I made it last year in white and blue (left off the pockets on the blue) and love it, although the white is hard to wear because, well, it's white and it always comes home with some kind of schmutz on it.

Now that I have 6 straight or pencil skirts to make (I've, um, also ordered an orange twill from Fabric Mart) I'm going to have to find some interesting patterns! Back issues of Burda have some interesting candidates, and I am open to suggestions!

Thursday, March 25, 2010

Burda 02-2008-119 Tie Neck Blouse (and Bonus Skirt)

Burda 02-2008-119 Thumbnail

The project I really need to be working on right now is Simplicity 2497 to wear to a friend's wedding in two weeks. But I really enjoy Pattern Review's Stash Contest every year and have been procrastinating sewing the Simplicity dress out of new fabric to perform the traditional stash sew down. I bought this fabric at G Street in July for the purpose of muslining this blouse, Burda 02-2008-119 and actually followed through on the plan. I underlined the body of the blouse with an Ikea Knoppa sheet and used French seams for the shoulder and side seams.

Waistband Attachment Topstitch Turned Under Edges on Right Side
To get a neat edge on the collar, Burda tells you to hand-stitch the inside collar in place. Yeah right! I followed a tip on a recent tutorial for making a nice collar (and for the life of me I can't remember who it was--if it is your tip please claim it!), which was to sew the collar in place on the inside first, and then topstitch the outside of the collar in place on the right side, rather than the other way around. So simple and so smart! These photos are of the waistband, which I did the same way.


Finish Armscye with Bias Tape Finished Bias Binding at Armscye

I used the same principle on the armscyes. Rather than use a bias binding turned in and topstitched, I wrapped the armscye edge in bias tape so that it shows on the outside. I cut bias strips, folded in half the long way and pressed the crease in place. Then I lined up the raw edges of the bias strips with the edge of the armscye on the wrong side, stitched in place, serged edges, and then folded the bias strip over that seam allowance and topstitched in place. The detail is a little lost in my busy print but I like it as a nice touch.
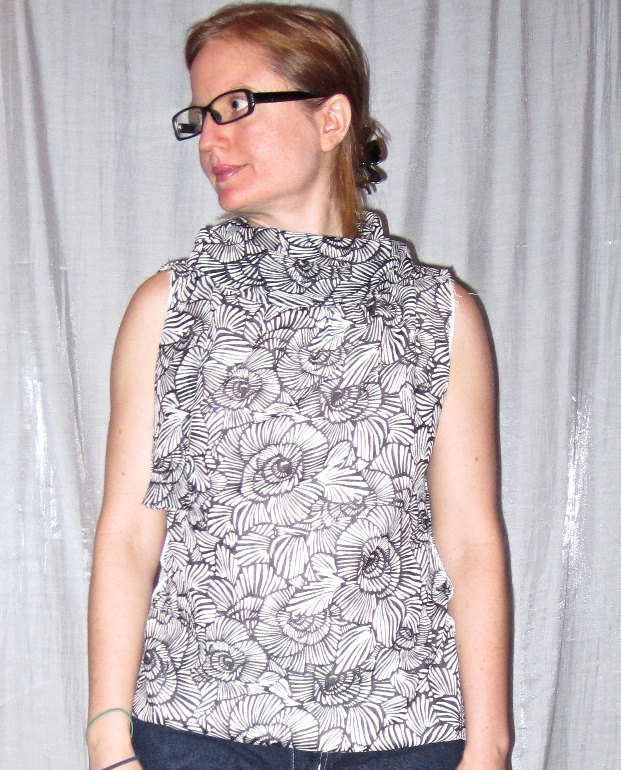


Original Neckline Too High When I first put this together I was not loving it. The neckline was way too high, almost turtleneck-y. I am not a fan of turtlenecks. And although I don't have an absurdly short neck, it is proportional to my body so it's not long either, and I felt like this was making me look like I had no neck. When the Selfish Seamstress made this recently she pointed out that the collar is kind of a cowl neck, which made me think that I could lower that high neck a little and still have a nice drapey collar effect. So I ripped everything off (remember that stitching/serging/topstitching? yeah.) and lowered the front neck two inches. I think I could have cut off even more. Although it is hard to tell with a naked eye that it is different, I feel much more comfortable with the final neckline than the original.

This is a pretty easy pattern--three pieces, no sleeves, no closure or fitting. The collar/tie is a bit of a fabric hog because it's cut on the bias, but that's not a big complaint. Although I enjoy the ease of the loose fitting pullover blouse with no closure, the silhouette is not a comfortable one for me (see also Burda 08-2009-118). It may be one of those things that I end up getting used to after a few years, like 3/4 length sleeves, but for now I like the blouse a lot, but don't love it enough to fill my closet with it.

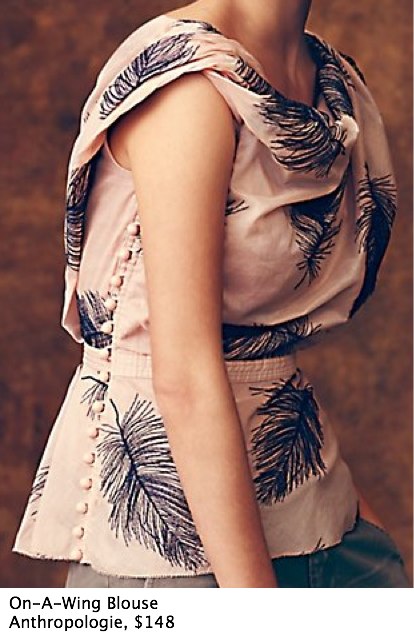
Metro Textiles 6-09On-A-Wing Blouse - Anthropologie.com-2This blouse was meant to be a muslin for the $10/yd yellow silk I bought from Kashi last June (second from left). It has a little more body than a chiffon, but is sheer with a beautiful drape like chiffon. So I don't think I'll make it into this pattern but then what???? I am slightly obsessed with Anthropologie's "On a Wing" blouse (no longer available), with the twisted poofs of airy fabric at the shoulder, but I have not the slightest idea how it was possibly made and don't want to undertake the challenge. So what do I do with this gorgeous fabric, other than let it sit in stash? ]

**edit**
Several people asked about the white skirt worn with this blouse. It is Burda 03-2009-104; I made it last year in white and blue (left off the pockets on the blue) and love it, although the white is hard to wear because, well, it's white and it always comes home with some kind of schmutz on it.

===========================

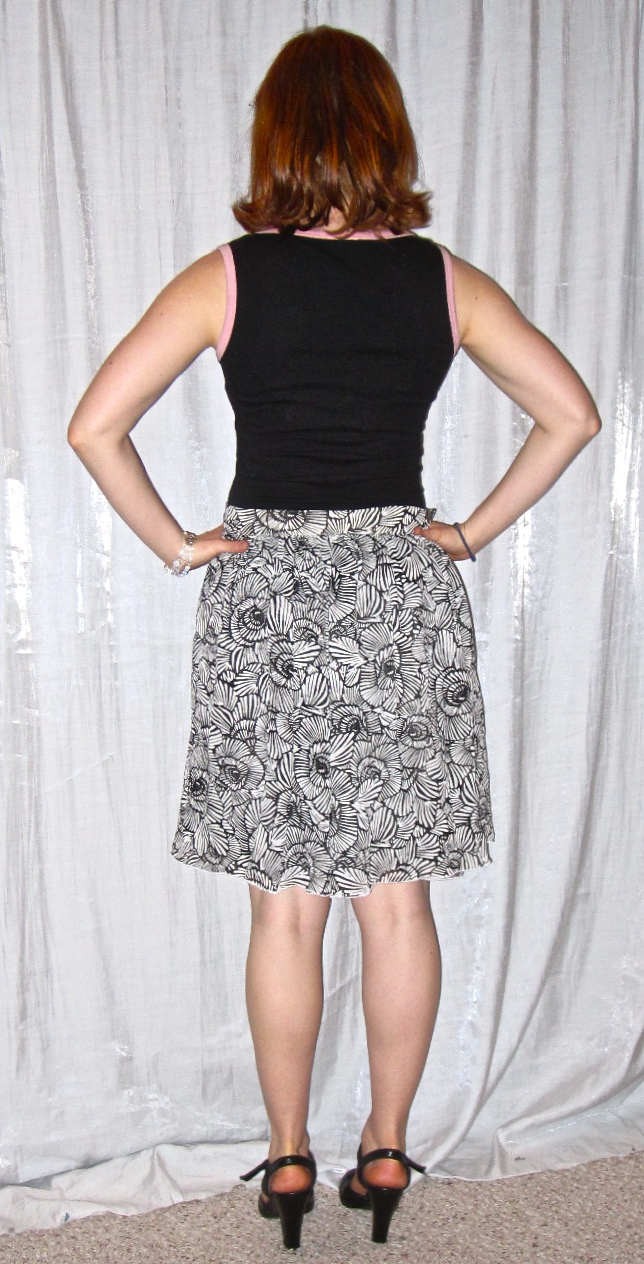
Two Piece Dress Dirndl Back I wanted to finish off this fabric (another yard in the stash contest!) so I made a quick and easy dirndl skirt. The blouse and skirt can even be worn together as a two piece dress. I've always thought "icky" in the past about two-piece dresses, as the term calls to mind hideous knit separates in the same print. But with a wide belt concealing the waistline, I think this makes a fun dress. It can also be worn separately, of course.

This project illustrates why skirts are so dangerous! This took around two and a half hours. So quick and easy! So flirty and flowy! However, I must stop making print skirts. For the 7 or 8 years in which I didn't have time or energy to sew (law school, clerking, big firm) I made skirts almost exclusively, and my uniform was a solid colored knit top and a bright printed A line or dirndl skirt. It is a cute look, but it is literally all I wore for nearly a decade and I am really, really, REALLY over it. It's hard to wear anything but a solid tee with a print skirt. What I really need are solid colored straight or pencil skirts to go with my print tops. Solids are my goal in New York. Although it may kill me.

Skirt FinishI cut as many blocks of fabric as I could that were the proper length and seamed them together with French seams except one. I slapped a zipper into the open seam, then gathered the top edge. I cut a rectangle of lining and pleated it in place (didn't gather to reduce bulk), then I sewed the waistband on as for the collar of the blouse (sew to inside of skirt first, turn over outside and topstitch in place). I interfaced the waistband with a lightweight interfacing, but I think I should have used a heavier weight. I didn't want to hazard a button hole into this lightweight polyester chiffon-ish, so I closed the waistband tab with a large snap. I did a serger rolled hem on the bottom and love it!

Side note: I got my serger from eBay in 2008, a White Speedylock. It is a serviceable but not great machine. I always have trouble with loops along the right needle stitch line on the underside, resulting in an unintentional flatlock on serger-constructed garments, and haven't been able to adjust the tension to fix it. While I was still getting the hang of it I serged over 3 pins, so the knives don't always cut cleanly. The shortest stitch length is not quite short enough to get a solid bead on a serger rolled hem. Ideally it should go in for service and have the knives replaced. But I'm thinking for only double that price I could buy a Brother 1034D for around $200 from Amazon. Probably not this month because I just bought my plane ticket to Montreal which is criminally expensive from DC, but soon. Maybe. People seem really happy with the Brother.

And if you don't mind, can you take a look at my back in the back view? I think my fitting issue is that band of muscle that runs along the paralell line between my armpits. I don't think it's usual to be as wide below the shoulders as in the shoulders, and I think that what may be causing problems with back tightness. Am I on base here?

OK, well I am really chatty today. If you have read this entire post I salute you. All photos are here, the blouse review is here, and the skirt review is here.
Tuesday, March 23, 2010

Burda 08-2009-110, Tweed Pencil Skirt and Tutorial for Machine Stitched Lining Insertion for Invisible Zips

Burda 08-2009-110 Thumbnail

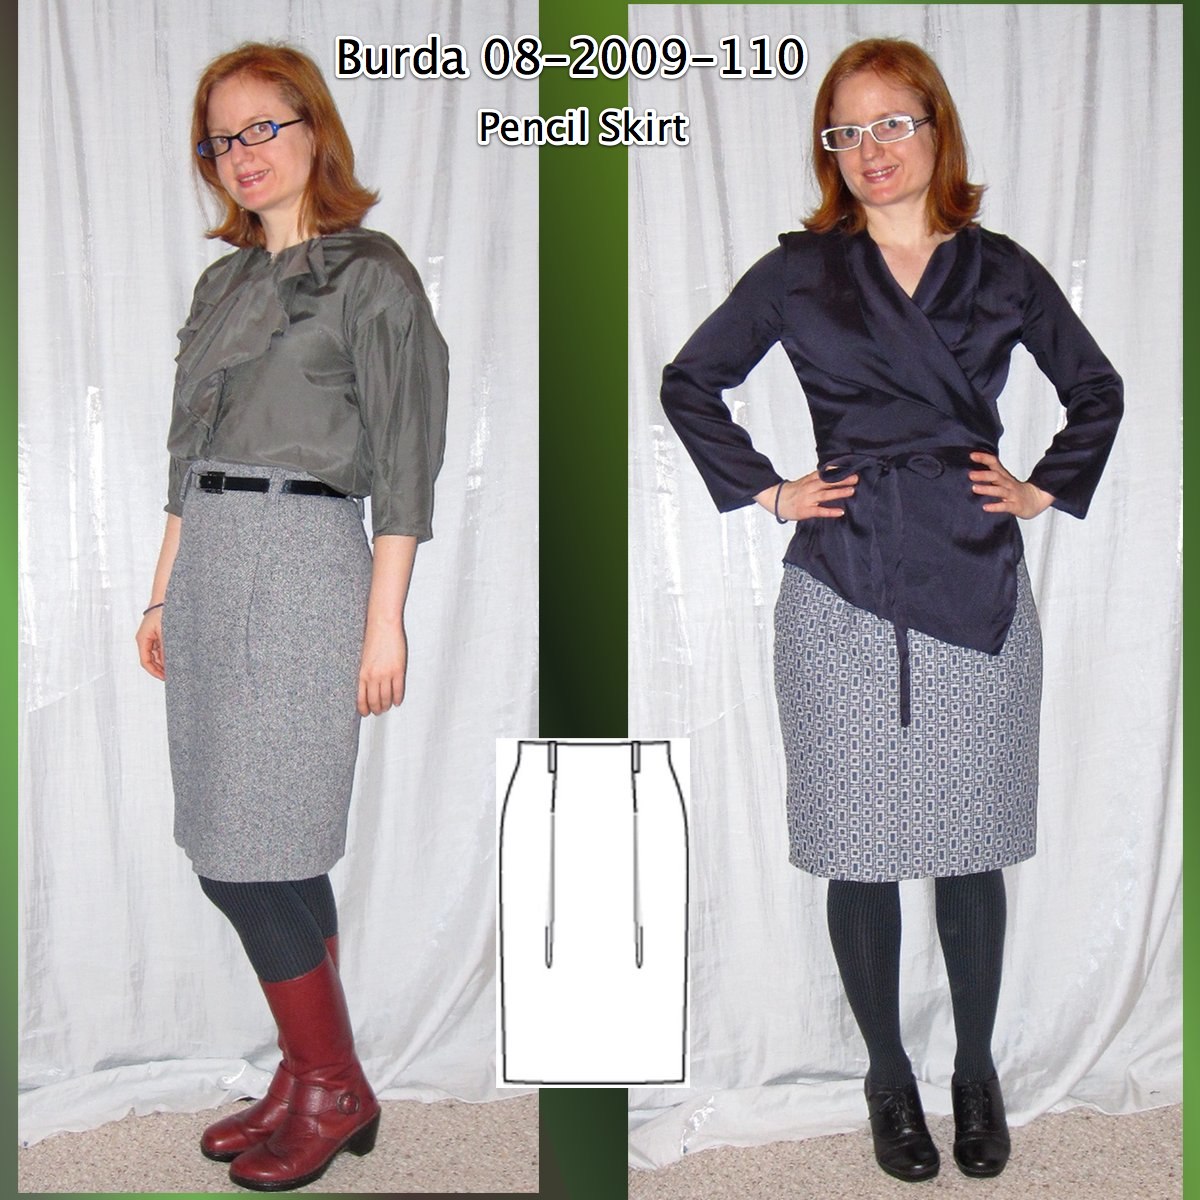
I have been totally into pencil skirts lately so I've been trying out the various Burda magazine patterns. This one is Burda 08-2009-110. I like the higher waist and the front pleats, which give it a little more of an interesting shape.

I made two of these, first in wool tweed from The Carol Collection and then in the rectangles fabric leftover from my Butterick 5321 pleat front sheath when I realized I didn't have any print skirts that matched my navy wrap blouse from Burda 02-2009-123.

For the first I did a swayback adjustment by folding a wedge out of the back below the waistline. Unfortunately, I shouldn't have done this because the back waistline dips down and the belt rides above the skirt. I do like the belt loops, but I left them off for the second skirt as I planned to wear it with the blouse that would cover them.

I shortened the skirt three inches by folding out the pattern above the slit. I cut the slit as drafted but it ended up cutting way, way too high (almost to my bum) and I ended up sewing the top 1.5 inches closed. For the rectangles version, I kept the same length adjustment but shortened the slit by those 1.5 inches.

The pattern includes a facing, but my wool tweed was quite scratchy and I didn't want any of it on the inside. So I fully lined it, using the same pattern as for the outer fabric. This is the method I use for getting a clean, machine stitched lining insertion with an invisible zipper. I am sure I am not the first to come up with it, but in looking at other zipper tutorials I didn't find anything exactly like it--probably because it's so slapdash!


Machine Stitched Lining with an Invisible Zip Tutorial

1. Fully construct the skirt (or dress) and install the invisible zipper in your fashion fabric. Then construct the lining other than the seam for the zipper, which should be left completely unsewn.

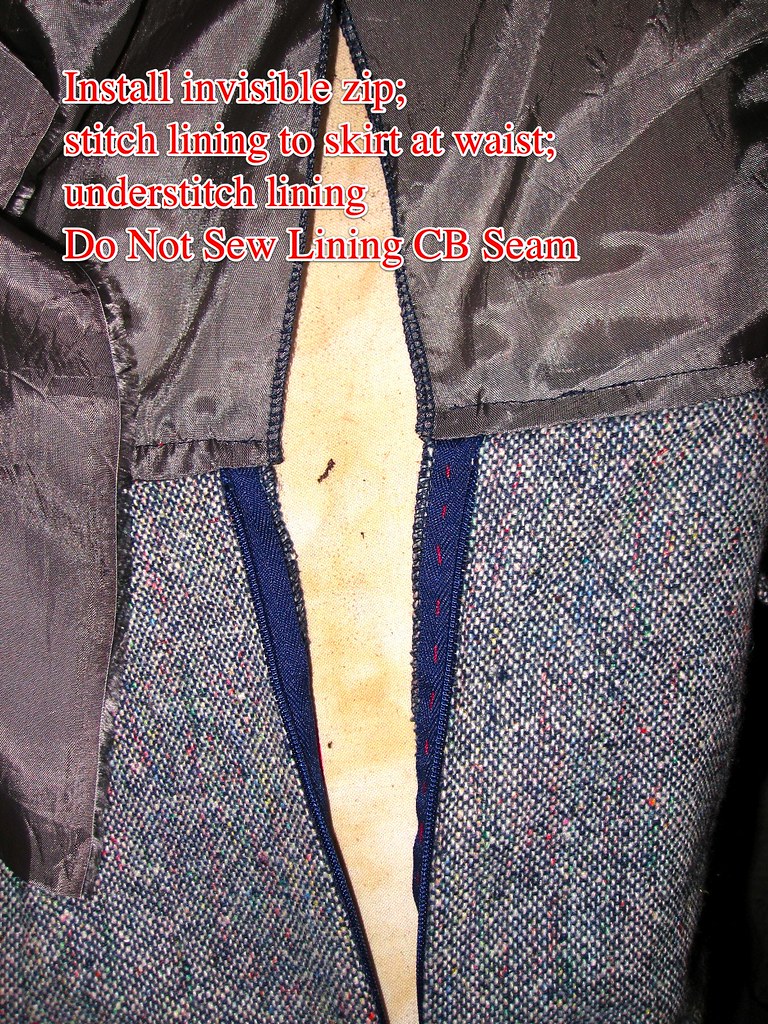
Install Zip and Lining

2. As shown above, stitch the lining to the fashion fabric at the waistband (neckline for a dress), catching the upper edges of the zipper tape and putting your stitch line just slightly above the upper zipper stops. If you prefer, you can stitch 1/4 inch above the upper zipper stops and finish with a hook and eye, which allows you to get a crisper corner on that upper edge. Generally I'm ok with the slightly rounded corner you get by stitching all the way to the zipper teeth.

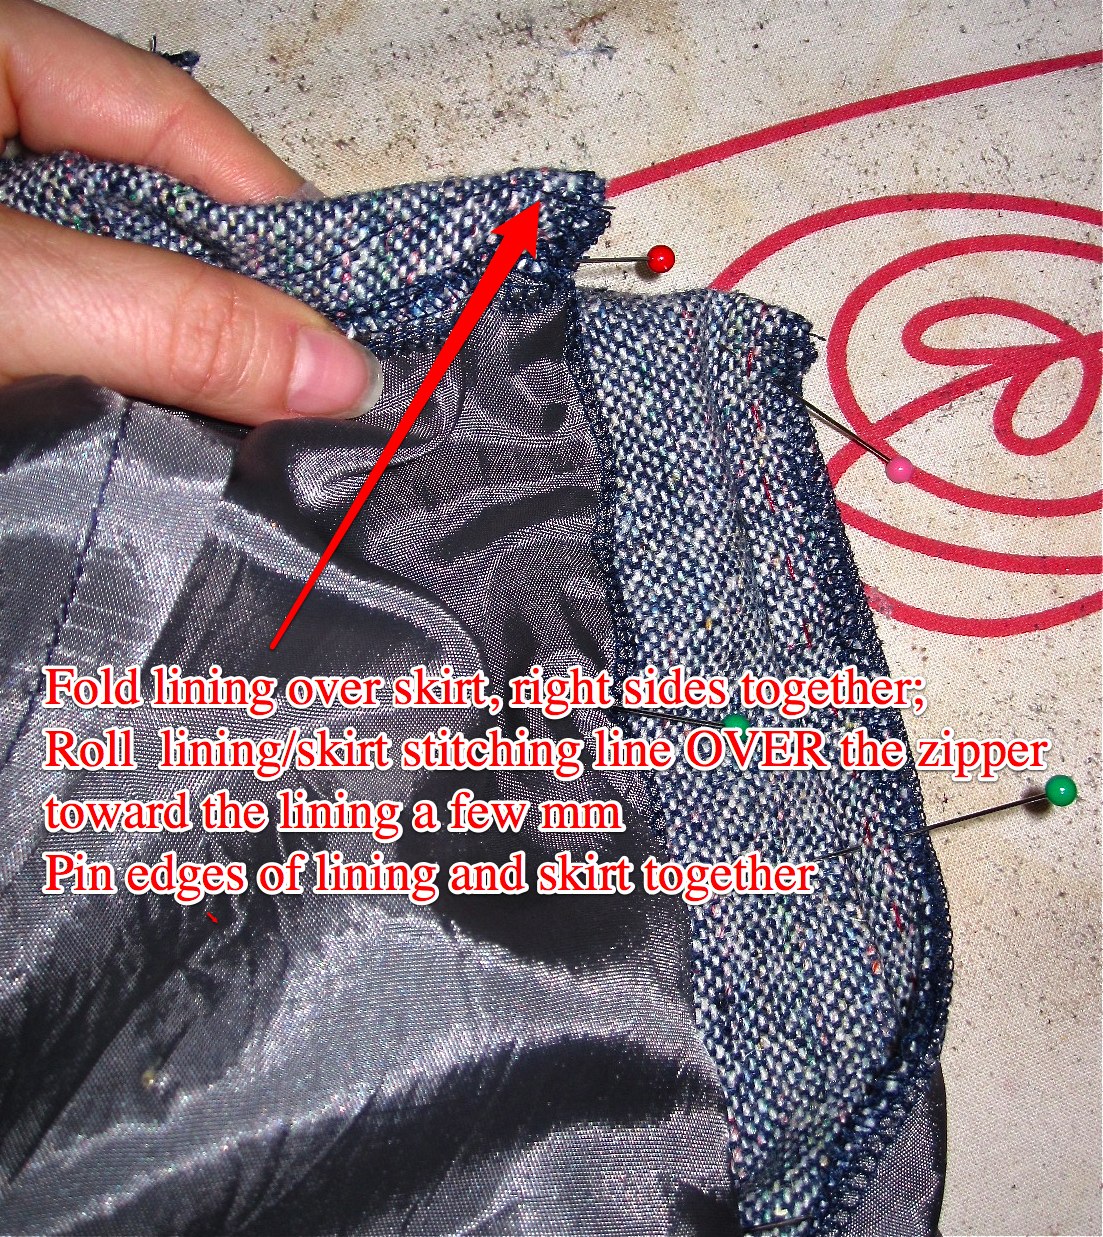
Roll Fashion Fabric Over Lining Slightly

3. Next, place your fashion fabric and lining right sides together, matching outer edges. THIS IS IMPORTANT: Roll your fashion fabric over your lining slightly, so that the waistline seam (where the lining and fashion fabric are sewn together--in a dress this would be the neckline seam) rolls over to the inside a few millimeters. This is what will give you a nice look on the outside and keep the lining from peeking out above the zipper.

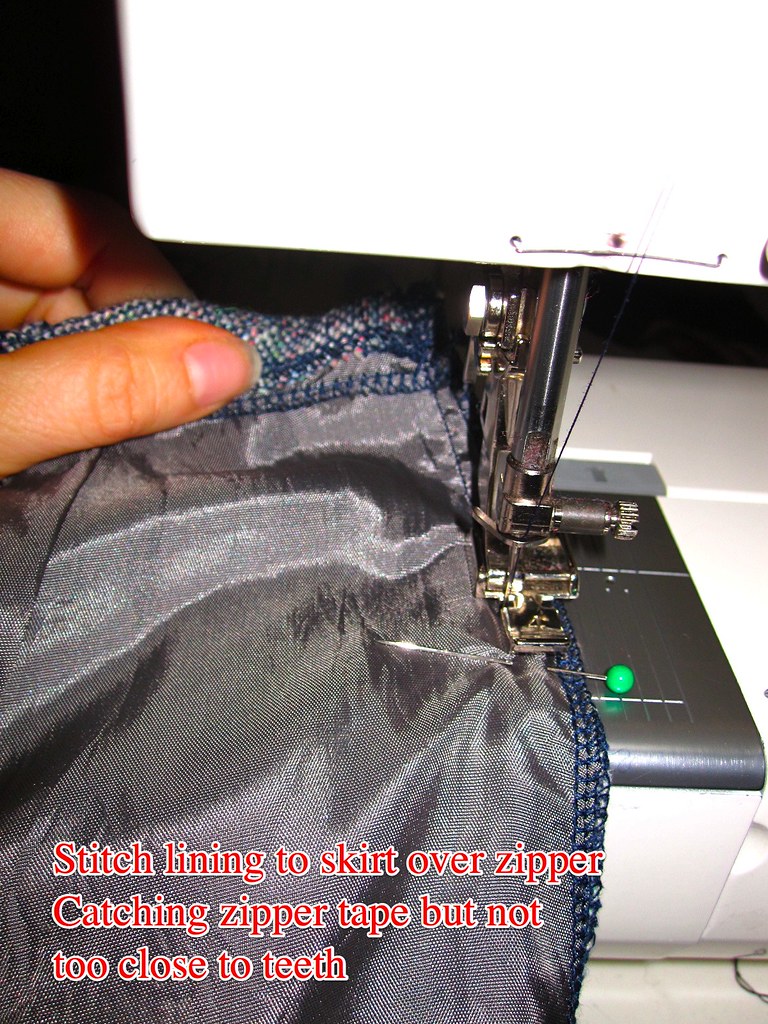
Stitch Lining to Skirt Stitch Skirt to Lining at Zip


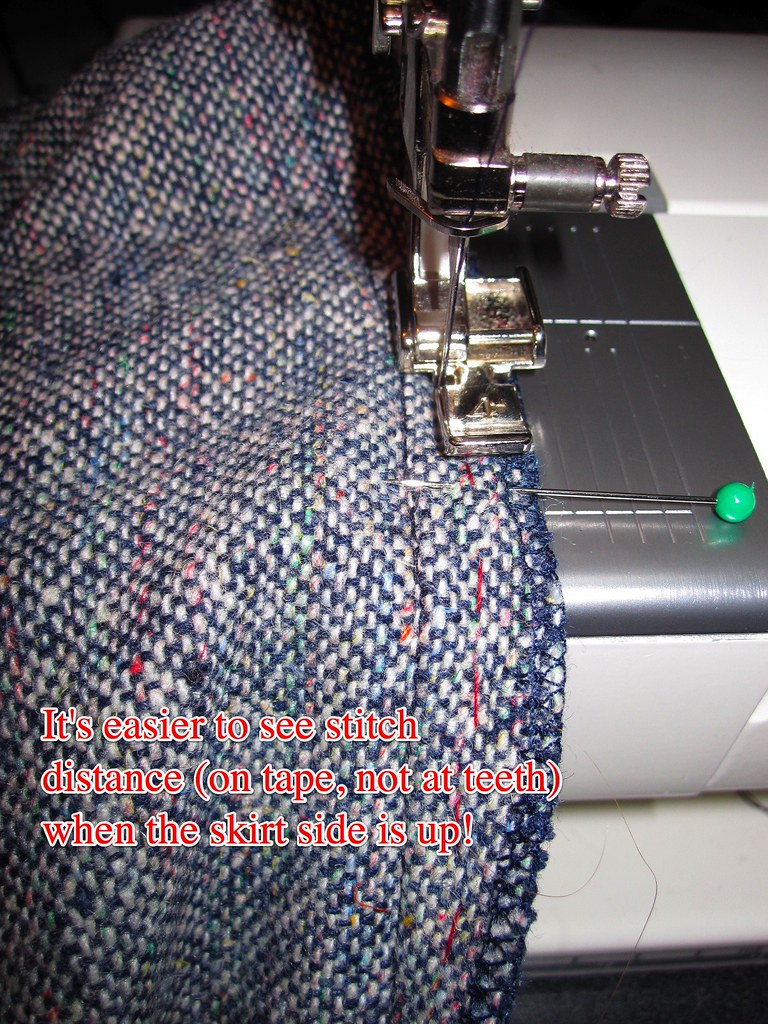
4. Pin those outer edges together, right sides together, maintaining that roll of the fashion fabric to the inside, then use your zipper foot to stitch the lining to the zipper tape. Don't get too close to your zipper teeth or you will make the zipper too difficult to open and close, but be sure to be close enough to catch in the zipper tape. Luckily, if you miss the zipper tape you can just sew another stitch line closer to the teeth, you don't have to rip out the original, too wide line. It's a lot easier to get the spacing right on the side where the fashion fabric is up because you can see your zipper seam line.

Turn Right Side Out Stitch Lining CB Seam


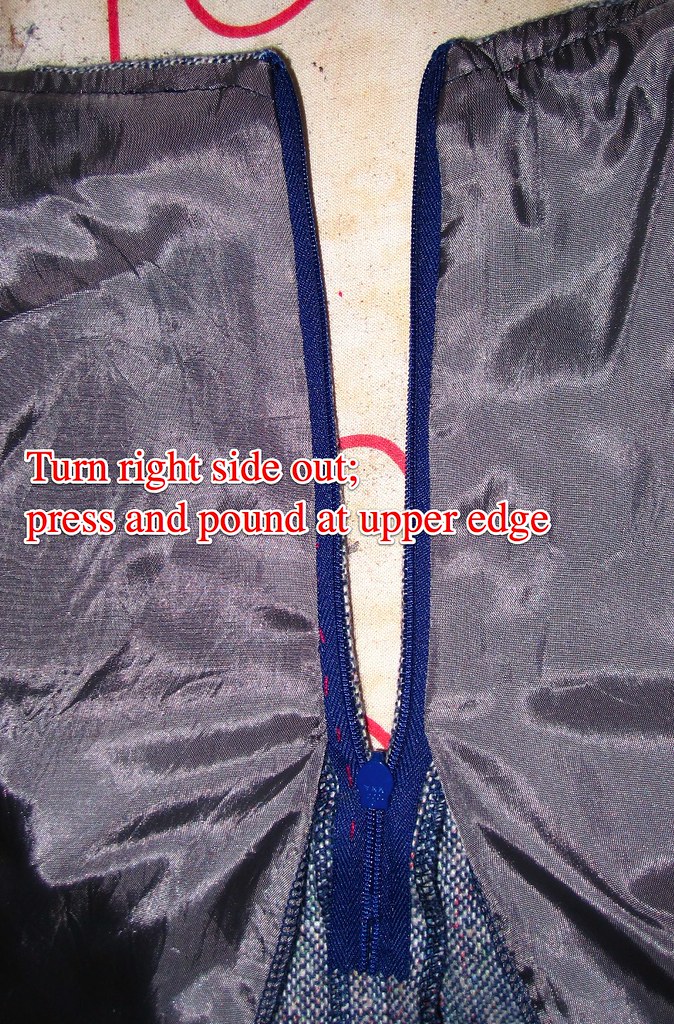
5. Turn the skirt right side out. You are almost there--you can see that the lining has enclosed the zipper tapes and it's already looking good on the inside (I was lazy and did not remove my basting stitch for the invisible zip; I only baste one side in, as explained here. The upper edge is going to have some bulk because the ends of the zipper tape are squished in there, so give it a good steam press and then pound. Then match up the lining edges, right sides together. I generally leave an unsewn opening of a couple of inches just to make sure I don't have any trouble opening the zipper all the way. Stitch the lining seam and press open.

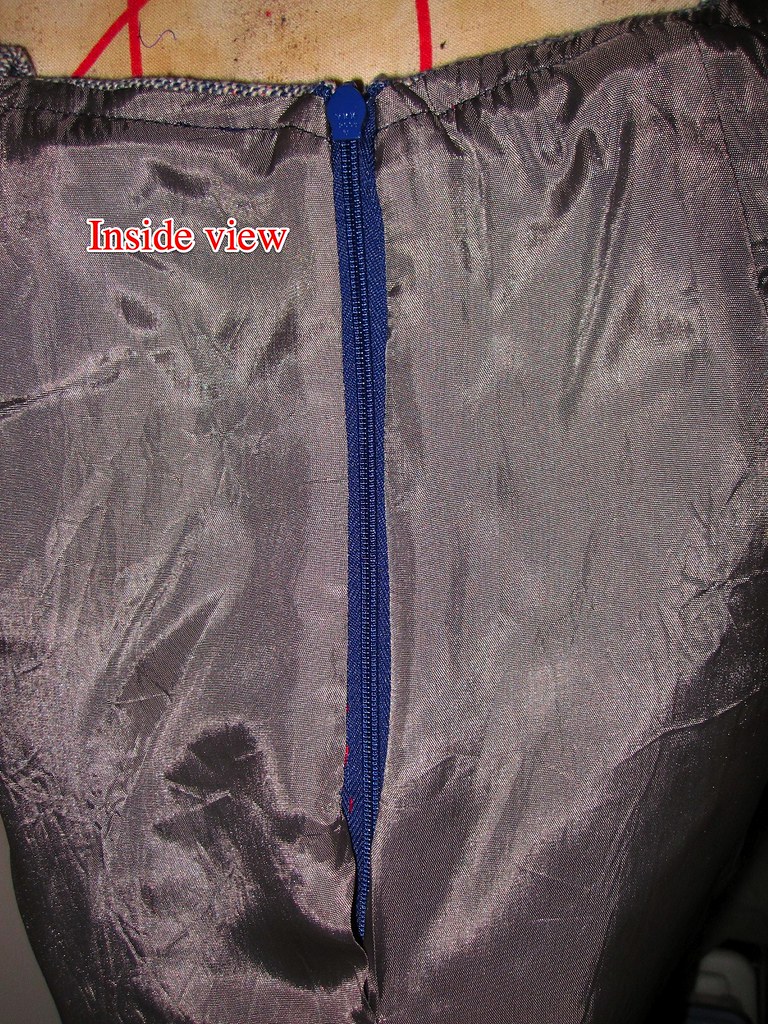
Inside View Outside Clean Finish

And voila! It looks great on the outside and the inside and didn't involve any hand sewing of the lining to the zipper tape.

All photos of this project are here and the pattern review is here.

===========

The plan for New York!!!! We will meet this Friday, March 26, at Crisp at 12:30 for lunch and then on to shopping. It is at 110 W. 40th between Broadway and 7th, very close to Bryant Park. The weather does not sound like it will be eat outside weather, but a girl can hope. Please let me know if you will join!

Monday, March 22, 2010

Meeting the Selfish Seamstress!

Elaine-Cidell-Trena

The Selfish Seamstress was in town for secret government business. This is why I love DC--everyone ends up here sooner or later for a conference or a meeting and then I get to see them without having to go anywhere! Cidell drove up from Baltimore and the three of us met up for an evening of Real Life.

We went had dinner at one of my favorite pizza places, Ella's Pizza, and then new-school frozen yogurt at TangySweet. I think it's so funny that frozen yogurt is having a sweeping-the-nation resurgence similar to its first sweeping-the-nation phenom in the mid 80s. But I must say, the new kind is SO GOOD. While the old kind is trying to imitate ice cream and is generally way too sweet and chemical flavored, the new kind actually tastes like yogurt, a little bit tangy and a little bit sour. Yum. And now it is finally warm enough to eat it again!

Trena and Elaine Fabric from the PhillippinesI have to say, the Selfish Seamstress, despite her protestations to the contrary, does *not* do a good job living up to her moniker, as she came bearing gifts. She brought fabric she had purchased in the Phillippines, taking care to match her selections up to our taste. I think she nailed it! Love this midnight blue with the gold border print; as we know I have been a little obsessed with border prints lately. I see this as a simple shift or sheath to show off the fabric.

It is so fun to meet up with sewing friends! This definitely whets my appetite for PR Weekend Philly and PR Weekend Montreal. I am so excited about going to both!!!!!

================

I am also excited about my trip to NYC this weekend (though I was hoping for beautiful sandals weather, *sigh*). I still haven't booked my bus ticket (better get on that), but my plan is to arrive around lunchtime on Friday and plan a lunch somewhere in the vicinity of the garment district, inviting any who can join. If you have any veggie-friendly restaurant suggestions please let me know!

Friday, March 19, 2010

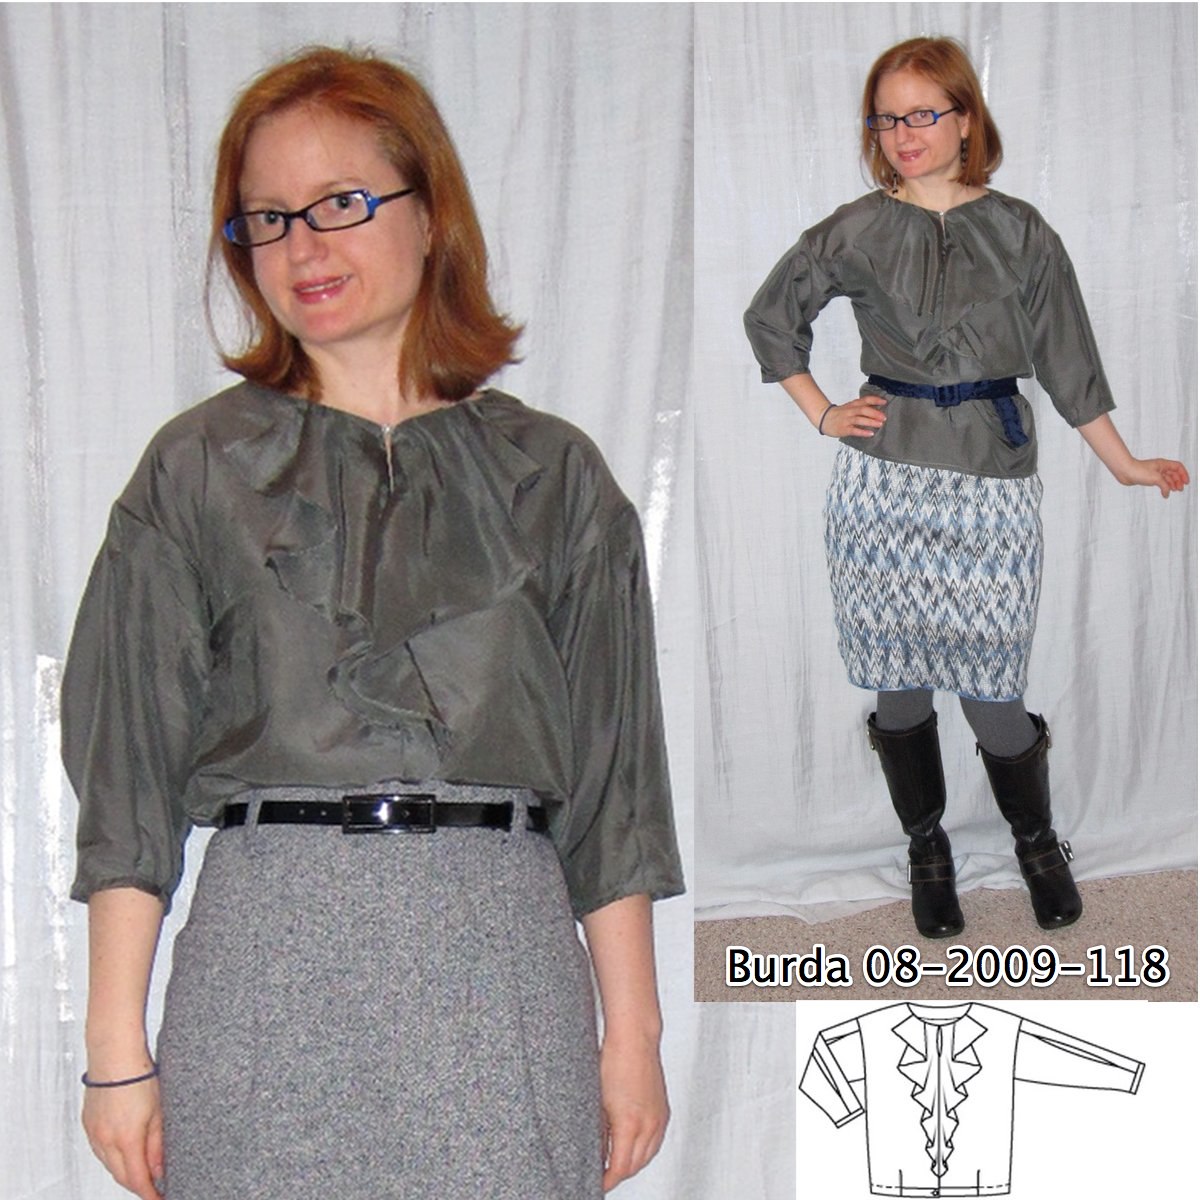
Burda 08-2009-118, Flounce Front Blouse

Burda 08-2009-118 Thumbnail

When I went to Philly in October, with a trip to Jomar heavily featured, I picked up two silks from the $6/yd silks section for Fall/Winter blouses and I was determined to actually make them up! I made the navy into the Burda 02-2009-123 self collar wrap blouse, and decided to make the gray into Burda 08-2009-118. Although the sleeveless version of this blouse has been quite popular, I haven't seen anyone make the version with sleeves.

Narrowed Sleeves I purchased 1.5 yards of this fabric. For cheaper fabrics Jomar gives quite generous cuts, but understandably in the relatively higher dollar (let's not forget it was still only $6/yd!) fabrics the cuts are closer to accurate. So I had to narrow the sleeve pattern a bit to accommodate my fabric. It is still very puffy. I also did not make it tight-tight at the bottom of the sleeve because I thought it would be too uncomfortable to have tight fabric bunching in the crook of my arm. I am definitely not wild about the sleeves. I don't like a dropped shoulder in general and combined with the overall puffiness of the blouse I think it's more shapeless than chic. I felt a little better when I wore the blouse this week and a co-worker complimented me on it.

French Seams Because it is a silk, I used French seams. I wasn't quite sure how to handle the armscye. In fact, in general I don't know how to handle the armscye when doing french seams. With a gathered sleeve cap French seams can get very bulky. This doesn't have a gathered sleeve cap but it has a drop shoulder line so the side of the blouse is cut in a straight line with just a marking for placement of the lower edge of the sleeve, rather than with a traditional armscye. I decided to French seam the sleeve onto the bodice first, and then to sew the sleeve and side seam at one go. I had a hard time getting all layers of the fabric to catch in at the underam. But for the most part the seams look nice and fancy.

Button Closure I had several issues with the neckline of the blouse. The first was that I did not have enough fabric to make a bias binding for the neckline and so I was forced to use the facing. Seriously, facings are SO AWFUL. I finally got it to look decent, but it involved a lot of clipping at the curves, which always makes me nervous, especially in a delicate, lightweight fabric like this (not sure exactly what the weave is, but it's not much more substantial than a habitoi/china silk). And it's so ugly on the inside!

The second issue, which Birgitte had flagged (I swear it was her, but I can't find the actual post, only this one showing the a-mazing complete Chanel outfit for her daughter--btw, Birgitte, if your daughter is sick of it I will pay for the express postage to send it to me, heh), is the flounce placement along the neckline. The markings are really too wide, with the flounce going almost all the way to the shoulder. Not only does this widen the shoulder line in an unflattering way, it stretches the flounce too thin so that it doesn't fall as well as it could. Out was ripped the facing understitching, the facing/neckline serging, and the facing/neckline seam and the flounce was brought a couple inches closer to the center on each side and it looks much better.

The third and fourth issues are not really issues. Burda tells you to finish the flounce with a close zig zag, I used my rolled hem foot. Burda tells you to sew a button on the inside with an invisible loop to keep the neckline closed. I used a fancy button on the outside (leftover from my Cruella de Vil costume), but followed their suggestion for using a thread loop as the closure, which looks nice.

Side Burda 08-2009-118 The flounce/ruffle/other embellishment trend has been strong for quite a while now and I wanted to get on the bandwagon. However, I'm not sure that this was the right choice. I just don't love how puffy it is, and I think I have the length wrong but am afraid to shorten the hem for fear it will pull out when tucked into a skirt (the length isn't an issue when it's tucked in, only when worn over the skirt with a belt). I really like how the sleeveless version has worked and may try that over the summer. In fact, maybe I should just take the sleeves off this one since I dislike them so much and am unlikely to give the blouse that much wear next Fall/Winter (I am officially declaring it Spring; it hasn't been below freezing in several weeks). I will ponder that.

It has few pieces and is quite easy to put together and has a trendy look, so if you like the pattern you should definitely give it a try. All photos are here and the pattern review is here.

Tuesday, March 16, 2010

Giveaway Winner, Coming to NYC, and Patterns are the Window to the Soul

The random drawing winner of the sundress patterns is Mary is Sew Fast! Very exciting, and I am hoping that Spring will get here soon. It was beautiful at the beginning of last week but now we're raining raining and the Potomac has overflowed its banks. I suppose rain is part of Spring, so maybe it is Spring? I will mail your patterns on Wednesday.

======================

Thank you so much for all of the amazing compliments on my 40s Faux Shirtdress! Wow. I knew I liked the dress but I didn't realize it was that flattering. Thank you for making me feel pretty.

======================

I am heading to NYC! I plan to arrive sometime on Friday, March 26. I'll be free that afternoon and Saturday morning, March 27. I will definitely be spending some time in the garment district!!!! Let me know if you want to meet up!

======================

G Street 3-13-10

It was Fashion Sewing Club at G Street's Falls Church location on Saturday, so of course I had to do a little fabric shopping. I was uncertain about the gold sweater knit (it's gold in color and has some metallic threads running through it), but I thought about it all during the meeting and finally decided I dug it. I have two wraparound sweaters that I bought from H&M many years ago and I LOVE them. I will copy them in the gold sweater knit. I was also thinking of maybe just a simple t-shirt and/or a shrug for dressy clothes. I have a silver shrug (RTW), but not a gold one.

G Street Cotton and FFC Tie SilkI intended the cotton print to be a blouse, but then I paired it up with the orange tie silk I got from FFC and I am so in love with how they look together. So now it needs to be a dress that can be worn with a belt, maybe some kind of shirtdress arrangement. My candidates right now are Simplicity 2694 (the view with sleeves minus the gun flaps, although I've been wanting to make the view with gunflaps forever), Butterick 5315 (probably with a narrowed skirt as I have only two yards), Simplicity 2579 (although the whole reason I like the pattern is that shaped midriff, which might be too obscured by a belt), Burda 05-2009-122 (although I don't think the fabric has enough drape), and maybe Burda 01-2008-121. The Butterick is my top choice at the moment, but the reviews on PatternReview have not been favorable. It sounds like it has the tight/restrictive armhole issue I've run into before, so I'd have to deal with that.

In a recent post, TE said she had gone to G Street Fabrics' Centerville location and been disappointed and asked whether she should try another location. I have never been to the Centerville store, only the Falls Church store and a half dozen times to the Rockville store. So I can't say if it has less selection there. As you know, I mostly shop at the $2.97/yd table but the thing is that the merchandise is constantly changing. There may be nothing interesting, or there may be only one interesting piece. It's rare that I find more than one thing that I like on it. The regular stock at the Falls Church location is good, but very expensive (polyester knits for $19.99/yd) so I don't buy much at full price. I think Rockville's regular stock is slightly not as good as Falls Church (though I haven't been to the new location). So G Street isn't necessarily a great destination from out of town for a bargain shopper because you have to visit many times over months (and, ahem, years) to accumulate a stash of fabrics you like.

======================

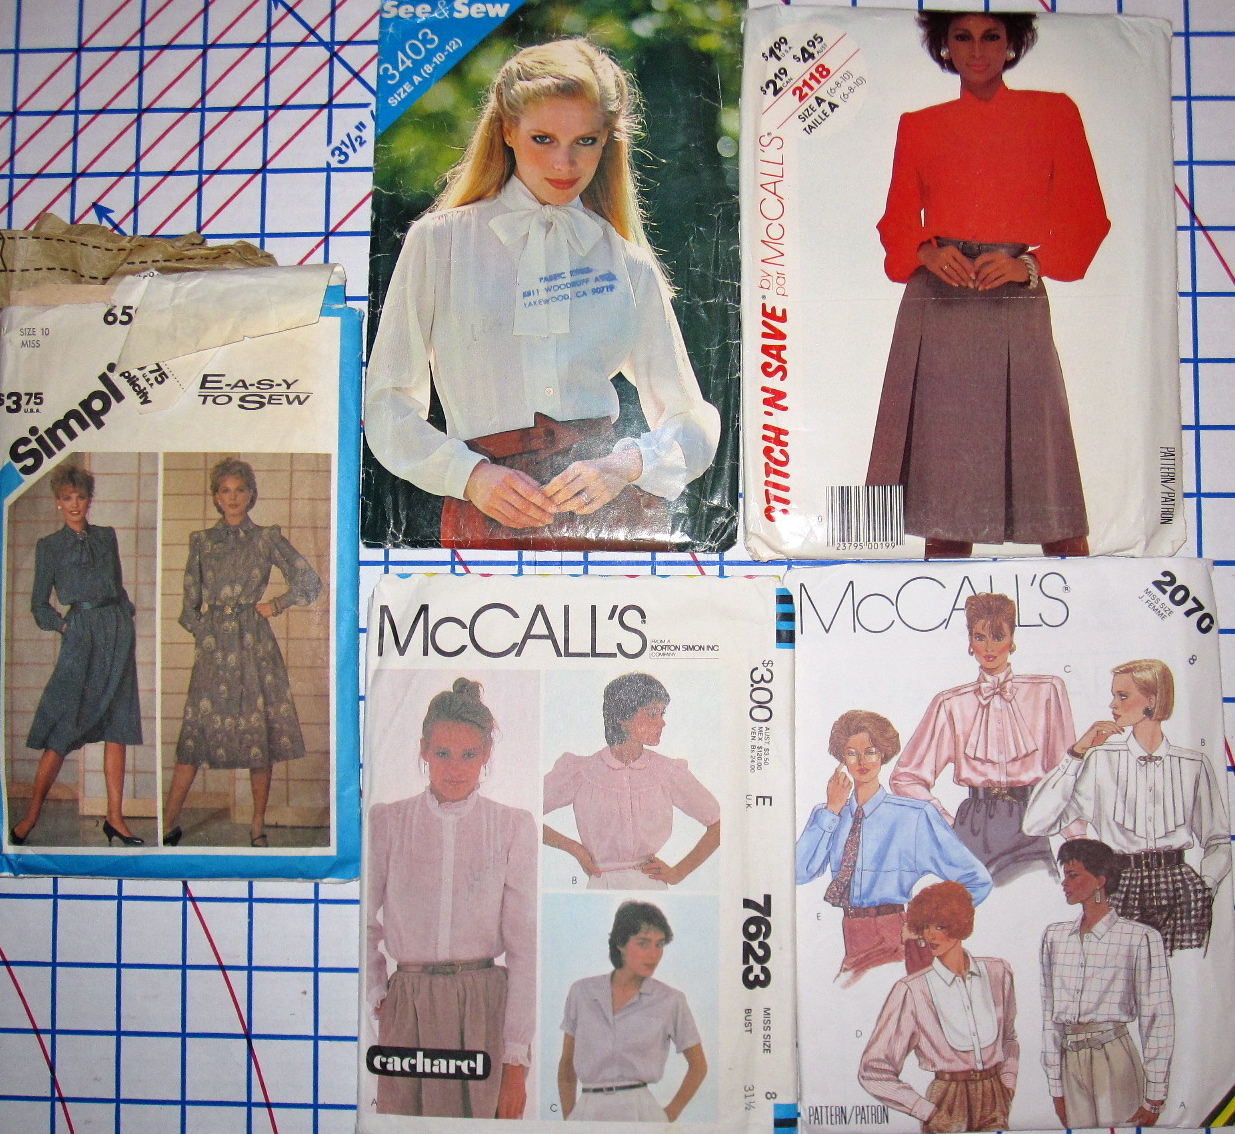
My mom went through her sewing supplies and got rid of a bunch of patterns (it must be something in the air). She asked if I wanted them, I said sure. The box was huge! I thought it would just be a few little patterns.

I have to say, I felt a little weird going through her patterns, like I was prying into her fantasy life. My mom stayed home with us when I was a kid, and had her first job when I was in junior high as an occasional substitute teacher. Starting when my younger sibs were in high school she worked various jobs at the mall, an animal vaccine manufacturing plant, and in lost luggage for an airline. Although she encouraged me and my sister to pursue our professional dreams, she did not want to work outside the home and did so only out of financial necessity (although I suppose financial necessity is the reason most of us go to work, regardless of how much we like the job!).

So it was surprising to me to pull out pattern after pattern for 80s Power Suits from the box. She didn't need them as a teacher, nor for any job she worked subsequently. It was so curious to see them and imagine her imagining herself in them, an important person in the corporate world. It was a facet of her I'd never seen before and it seemed like these daydreams were private ones I shouldn't know about.

80s Power Suits

There is also a plethora of 80s tie front and romantic-style blouses. That See & Sew 3403 is totally current.

80s Tie Neck & Romantic Blouses

Simplicity 5835
I am digging the dress in Simplicity 5835. It's another thing that I think is totally current (with the waist raised a couple of inches). I like the exaggerated cut-on sleeve and the little neck frill.

I wonder what sort of aspirational life my pattern stash reveals, beyond the apparent aspiration to own every pattern that is put into print. I have lots and LOTS of dress patterns, both knit and woven, so I think that reflects my taste. I have more purse patterns than I've ever made purses to justify, but they are a blip compared to the size of the rest of the collection. I do have quite a few suit patterns, but that technically fits into my lifestyle (technically), although I never sew any.

What secrets does your pattern collection reveal about you?

Friday, March 12, 2010

Hot Patterns Classix Nouveau Three Graces Rick Owen Knockoff

HP Three Graces Thumbnail

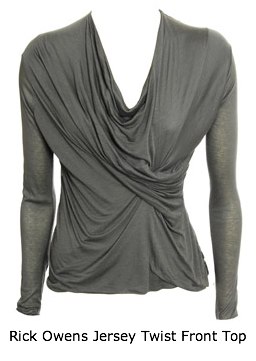
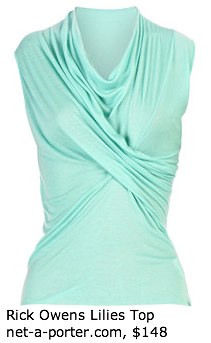
When the Hot Patterns Three Graces top came out I immediately loved it for the crossover view. I didn't realize until later that it was a knockoff the Rick Owens twist top we were talking about on the blogs last year and that's why I liked it so much.

Rick Owens Twist Front Top Rick Owens Lilies Twisted front top - Polyvore


Before I finally bit the bullet on this one, I hadn't purchased a Hot Patterns before but when Fabric.com had a 20% off sale on everything I went ahead and got the pattern. I was excited that it had not only the Rick Owens top but two other fun drapey views, but having never sewn a Hot Patterns pattern before, I had no idea how to do the sizing.

This pattern has been spectactularly popular but not so many people have made this view. Argh! However, it does appear to run large based on the small sample on PatternReview. Froggiegirl is most similar to my shape and her top fit quite well. She said that she went down two sizes from the envelope measurements (so, for her from a 10 to a 6) and the fit looks good on her. My bust is a 6 and my underbust is between a 6 and an 8, so I figured I had better at least grade this to a 4 at the top, and cut an 8 at the front hip rather than 10. However, I cut the back hip at a 10, based on suggestions from my pleat front knit dress that I might need more room in the back to accommodate my rear view.

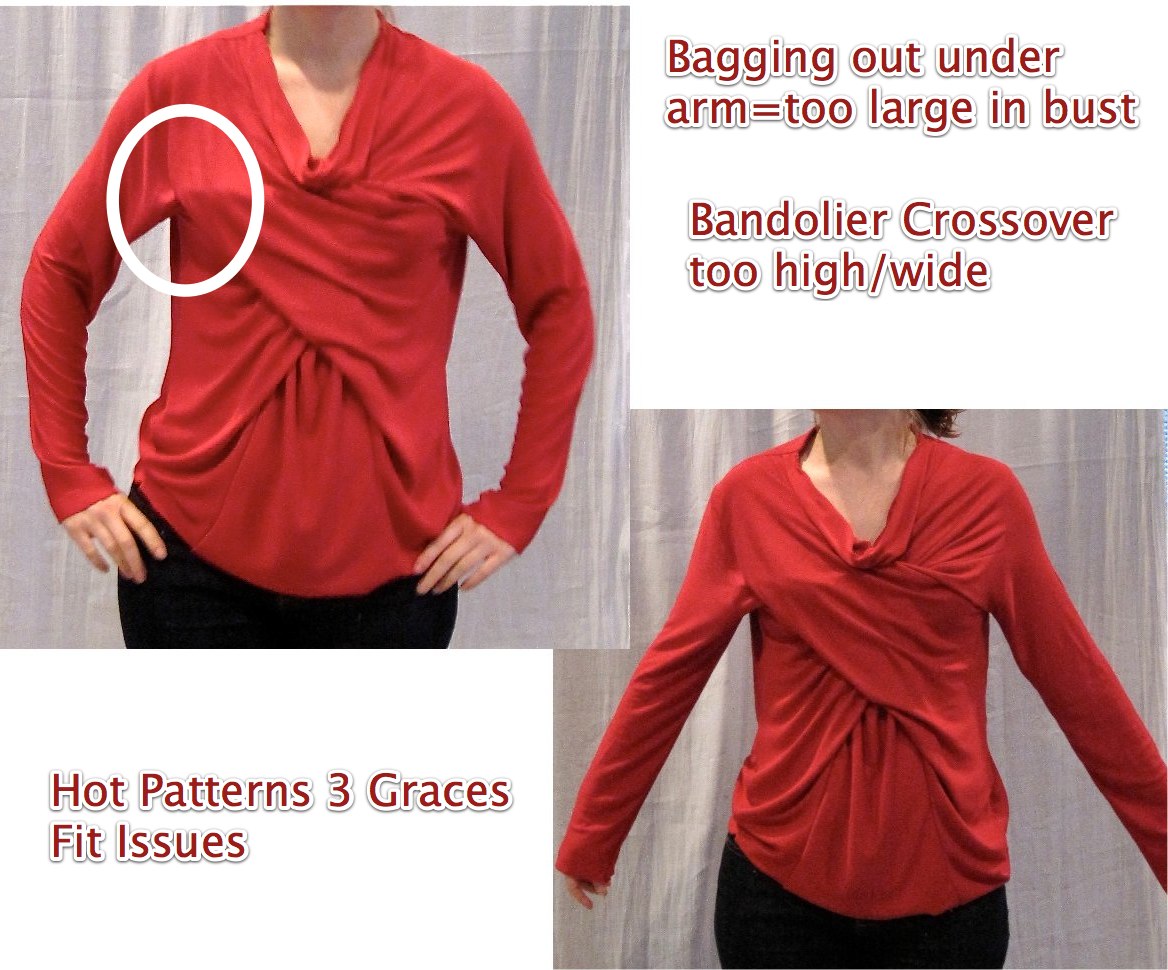
HP Three Graces Fit Issues Unfortunately, I think this pattern just is not designed to fit my body. I know that HP has drafted its own sloper, and I am guessing that it is designed with a very large cup size, perhaps a large C or even a D. Which I totally understand because Trudy is a large cup size, but I think those of us who are small of chest are kind of out of luck with this pattern line. You can see in the photo at left that once I finally (finally!) got this together there was SO MUCH fabric flapping around under the arm. In general it seems that when that happens it is because I am expected to have a bust large enough to push all that fabric toward the front. I took about four inches out from under each arm by re-stitching the sleeve and side seams as a quick and dirty fix, but the fit on this top just isn't great and I have NO idea how one would alter the crazy origami pattern to take out the extra fabric.

Speaking of the crazy origami pattern...OMG. Wow. This was SO HARD for me to put together. I spent two hours--literally, no exaggeration--with my dress form watching the YouTube video (instructions for this view start at 4:50) over and over. I watched it around a dozen times. I appreciate the video assist, but I found it very frustrating that Trudy used different numbering terminology for the seams in the video than those used in the instructions so I couldn't really match up what she was saying with the fabric in front of me. I do not have a 3D brain, as I've mentioned before, and this brought me to tears. I finally got it done, or so I thought, and sewed it all together, and then realized that somehow I had done it wrong and there was a twist that wouldn't come out. Luckily, the second round only took me half an hour.

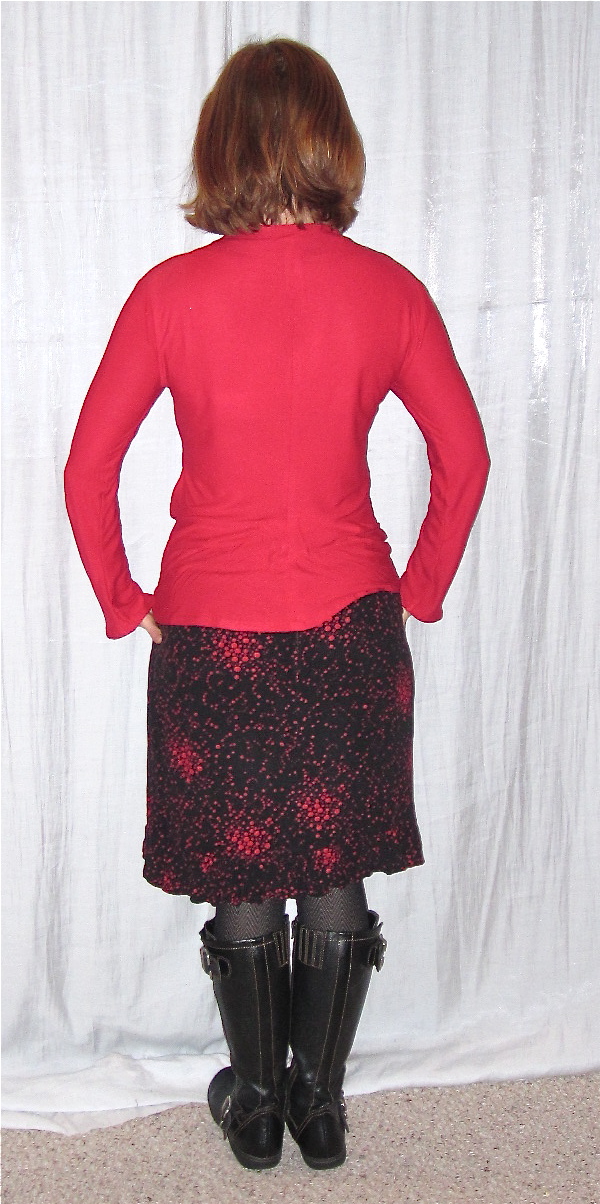
Back Hot Patterns 3 Graces My favorite feature of this pattern is the back collar. It's nicely drafted and gives a nice finish to the back neck. But I am otherwise not wowed. Well, I'm wowed that they figured out how the Rick Owens top works (mostly, although I think the crossover is too high and wide) but these patterns just do not work for my body. I thought I might try the other views but I think at this point I will cut my losses and move on from this pattern. I am just too different from their sloper. It's too bad because the line has some cute styles, but at least now I know I'm not missing out!

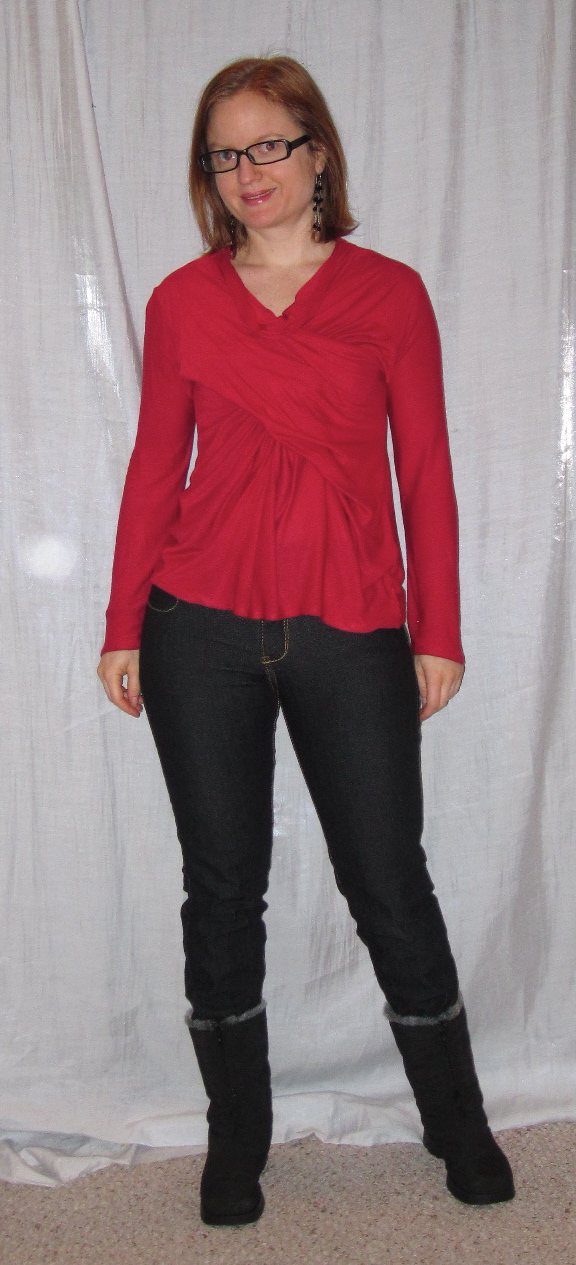
I made this in January but have procrastinated in posting because I can't get my camera to focus properly on this red top. I don't know what it is, but all the pictures came out a little fuzzy (I desaturated the thumbnail photo to try to show more details). So I can report that I've only worn the top a few times. The baggy fit just isn't me. Too bad!

All photos are here and the pattern review is here.

Tuesday, March 9, 2010

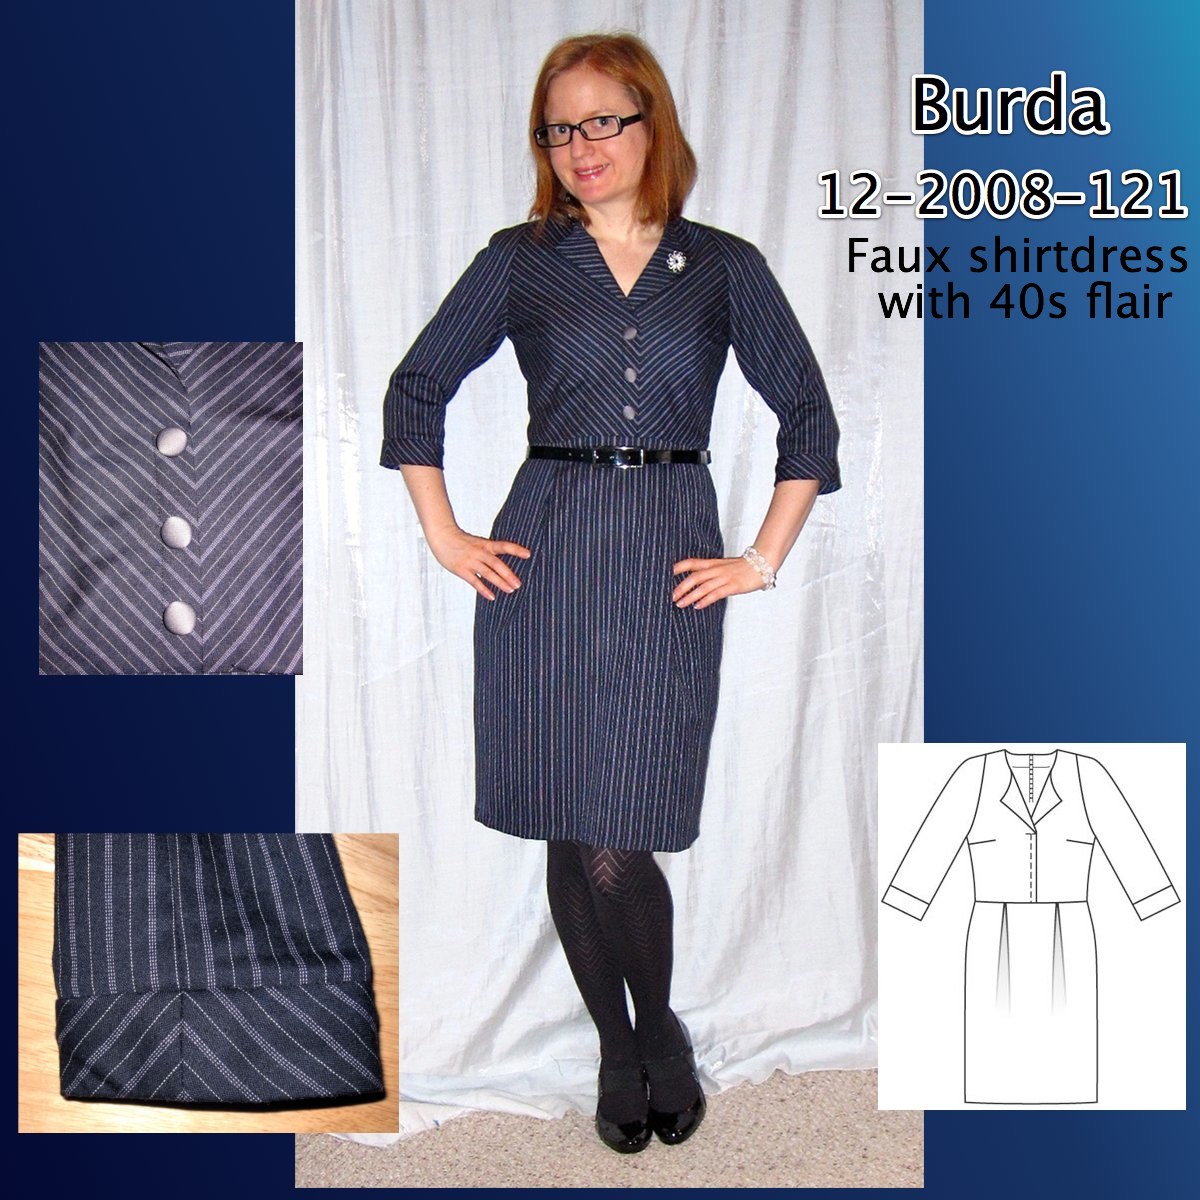
Burda 12-2008-121, Faux Shirtdress with 40s Flair

Burda 12-2008-121 Thumbnail

During the week of the Snowmageddon I decided that I should use the bonus sewing time to sew up some stash; with the stash contest going on I decided it was a good time to get some of that fabric that's been staring at me for so long off the shelves.

PR Weekend 2006 PurchasesI bought this stripe rayon/poly/lycra (I think that's what it is) at PR Weekend in NYC in 2006!!!! Seriously, that was a long time ago. Before I sewed the dress I had only used 3 of the 8 fabrics I bought that weekend. At least now I've sewn up half of it. I bought the fabric to make a wearable pants muslin. Three and a half years later I still haven't made any pants so I decided to release it from its theoretical servitude and make it into something I actually wear, a dress.

I looked through back issues of Burda to find a pattern that would make the most of the stripes and ran across 12-2008-121. It's designed for a plaid but I figured it would work just as well in a stripe. I only later realized this came from the same issue as the Tuxedo Jacket of Doom, so it's good to have a success from that issue.

Bias Binding on Facing


The pattern calls for a lining but I didn't think it was necessary as the fabric has enough weight to be worn alone. To give it a nicer finished look inside I used leftover fabric from the lining of my inauguration coat to make bias binding for the edges of the facing. I should do this treatment more often; I think it looks nice.


Perfectly Aligned Bias Stripes Imperfectly Aligned Bias Stripes
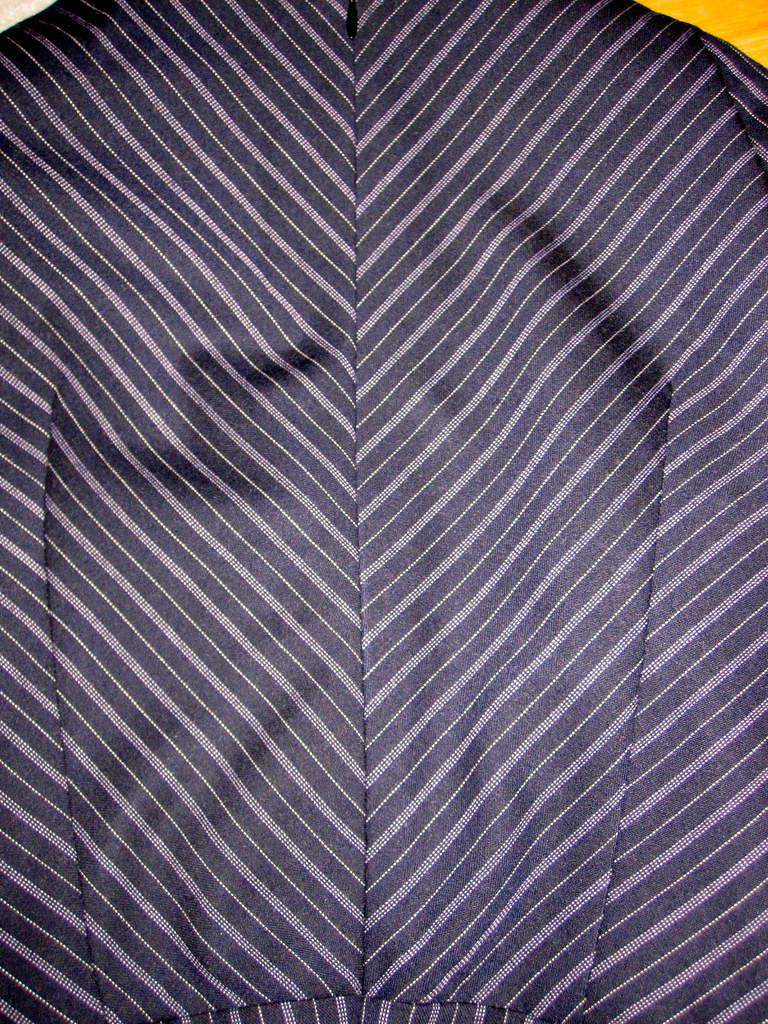
Seriously, how does this happen? I cut them both out with the same care and hand-basted *both* sides of the invisible zipper. The front is flawless and the back looks like I did it blindfolded. After fretting about it for a minute I decided that I really don't care that much and can live with it that way. The chevron effect is still there so whatevs. I am pretty proud of the front, though. However, it looked a little weird because with the faux placket the stripes meet perfectly...but off center. I think the (nonfunctional) buttons took care of that weirdness. In fact, I'm surprised nobody on PR had put on buttons before! To keep the little front flaps folded back I hand-tacked them down from the inside. The pin is merely decorative.

The cuffs are to be cut on the bias as well. I considered skipping them but in the end I'm glad I didn't. I cut them in two pieces so the stripes would chevron at both the inner seam and the outer edge.
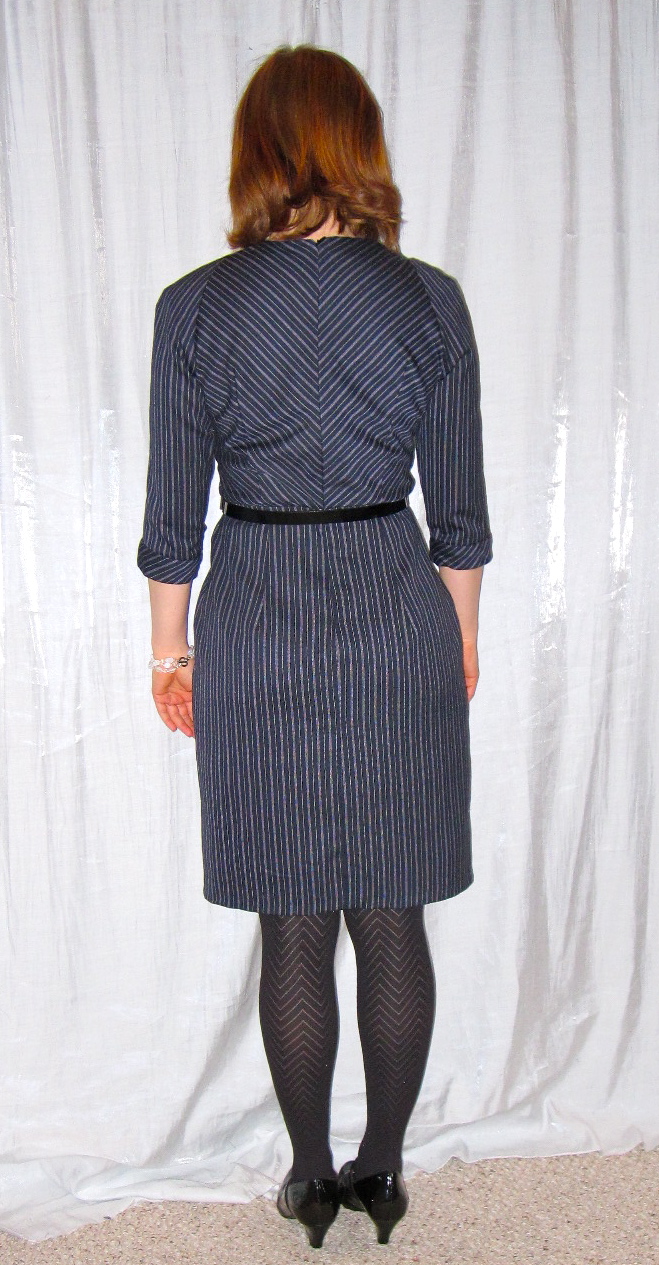
Front Back The back has those dewlaps again. *sigh* I don't know why my back is so hard to fit! The swayback I understand and mostly have it covered now. But the narrow shoulders/wide back thing is a mysterious pain in my @ss and now this is the second time I've had this dewlap droopy back situation. I think I need to start cutting a size larger at the front hip, as you can see some pulling on the side, but the front otherwise looks good.

I don't wear a lot of dark colors but as I wrote several months ago I don't really have a funeral dress. I think that this is both kicky enough to feel like me but sober enough to wear to a funeral in a pinch. I was really pleased with the 40s vibe it has going on. I added some small shoulder pads because all the 40s patterns I've worked with call for them and it made the dress fit a little nicer.

All photos are here and the pattern review is here.