Thursday, December 20, 2012

Vogue 8827, Drape Collar Wrap Dress


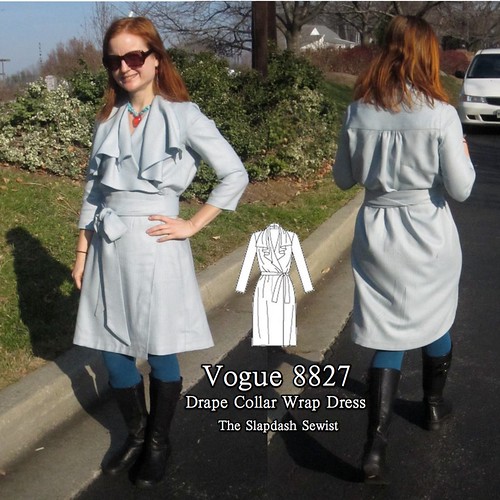
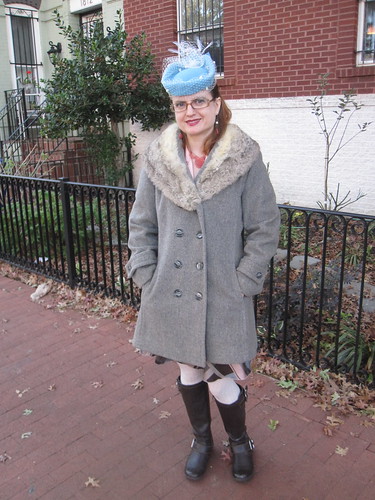
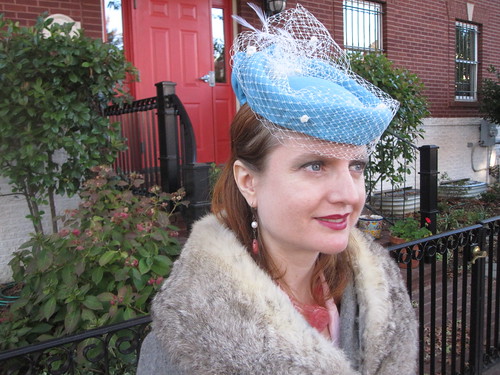
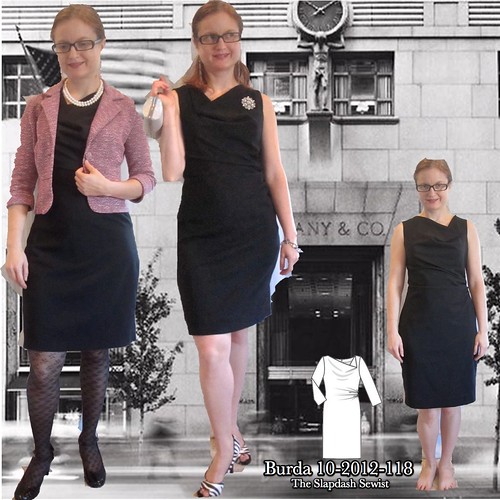
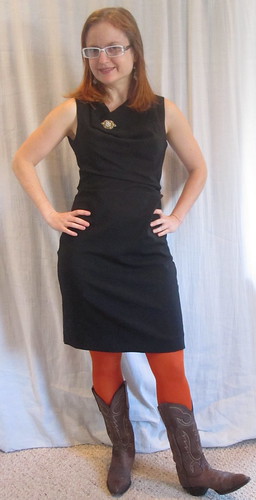
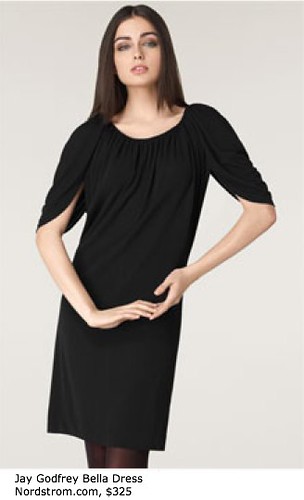
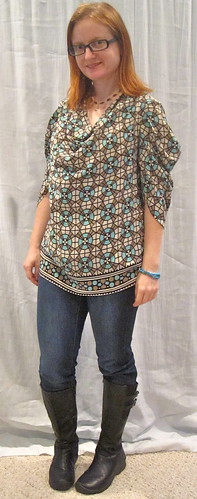
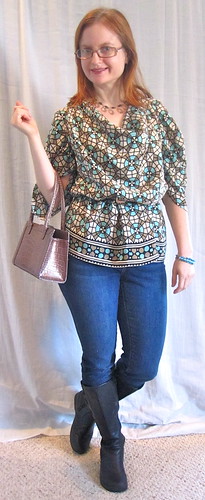
When I was shopping for inspiration last Fall, this Elie Tahari Lauren Long Sleeve Dress caught my eye.  I love the volume in the collar and the wrap shape is ever-appealing.  When Vogue 8827 was issued earlier this year, I was excited to see a pattern for this inspiration piece and bought it right away.

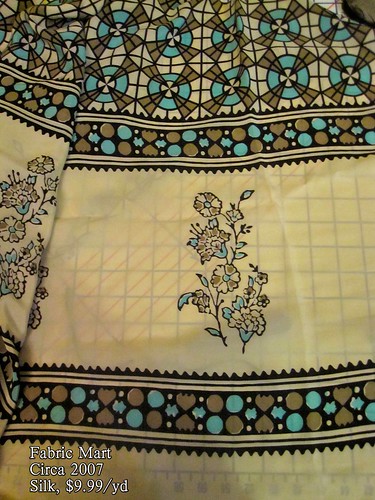
It's quite a fabric hog and I didn't have too many pieces large enough.  I decided to go for this lightweight wool purchased at Guss Woolens in Baltimore ($20 for the piece, about 2 2/3 yard) at a sewing meetup in February of this year. I knew I was taking a risk with the color and the volume.  This could very easily have come out looking like a nightgown.  However, I think my gamble paid off--this is a great dress!

Shorten Crossover for SBA


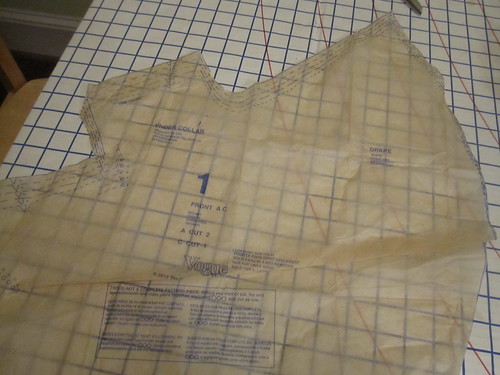
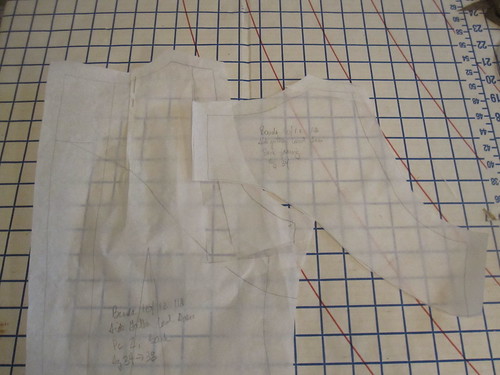
The only alteration I did to the pattern was a slight Small Bust Adjustment, shortening the front crossover/collar drape a bit by folding some length out.

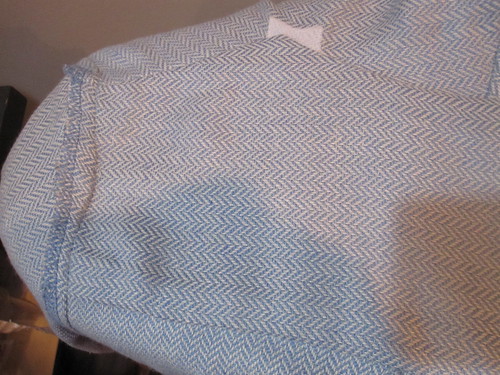
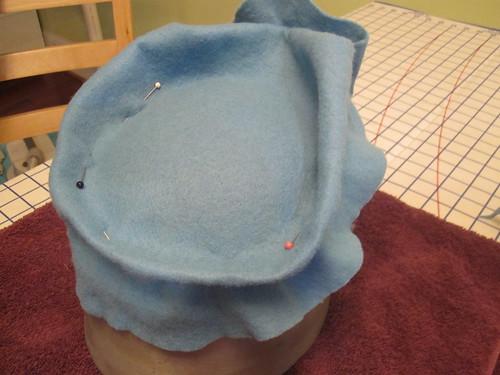
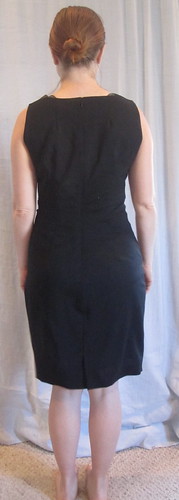
The back is drafted with a yoke, and then the lower back is voluminous and gathered into the yoke.  I figured that would take care of my broad back needs as it is broad near the base of the shoulderblades.  It does, though I feel a tiny bit of restriction in my arm movements.  Not enough to actually affect my range of motion; I think it's just that I'm so used to unlimited room to move that it feels restricted.

Side

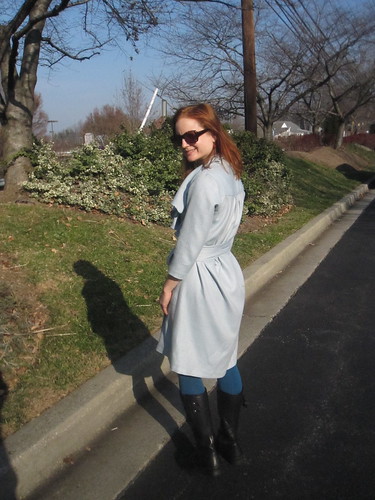
I also did not do a swayback adjustment.  The voluminous back is not really compatible with any center back contour (and adding a CB seam would have made the gathering more difficult).  The tie means that any extra fabric in the back over the swayback can be bloused above where the belt wraps around.  I was most concerned about this gamble, and whether the voluminous back would be sloppy/overwhelming.  I considered changing to a plain back, but decided to give the pattern a shot as drafted, but I think the design is nice in the end.

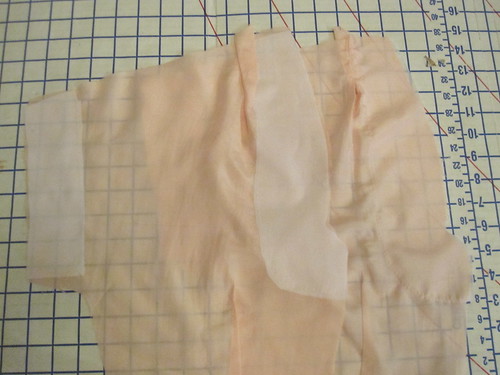
Part of the reason the pattern requires a huge volume of fabric is that the collar/flounce is meant to be faced  My fabric looks the same from both sides, and I wanted to take advantage of that, as well as maintain the maximum possible drape on the flounce.

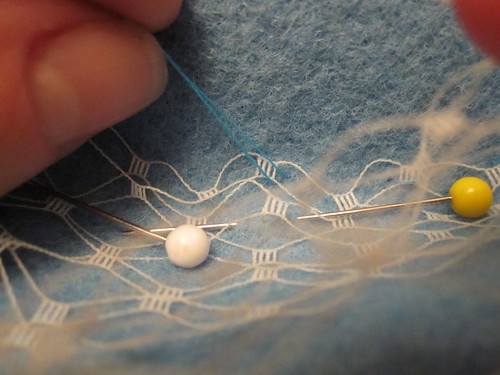
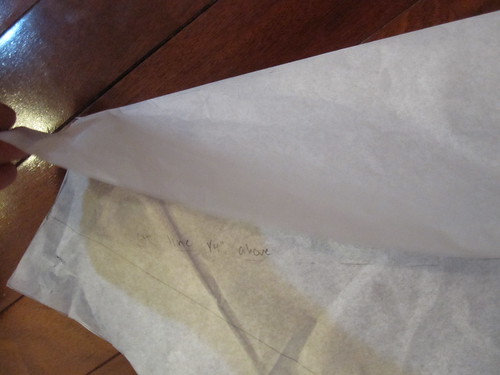
Figuring out how to do everything required a bit of thinking about right side/wrong side.  The wrong side will be the right side on the flounce (which extends to become the back collar), so the serger rolled hem needed to be done wrong-side-up, and the back collar seam needs to be sewn wrong sides together.  To make sure I had the proper side, I marked the wrong side of the fabric with a bit of tissue paper.

Trim Off SA and Roll Hem to Waist


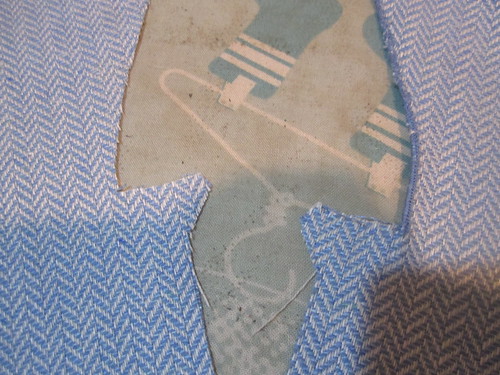
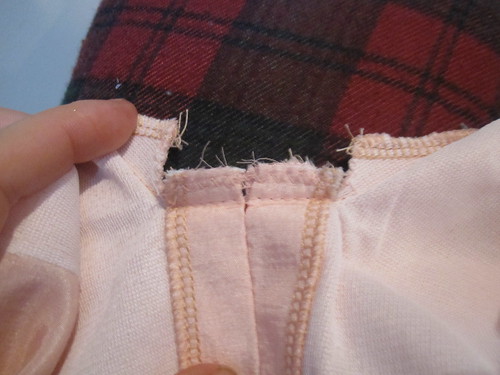
First, I trimmed away the seam allowance on the front opening edge above the waist, where the ties would be attached, then did a serger rolled hem above the waist (with the wrong side of the fabric up, as mentioned).

Hand Tack at Rolled Hem for Exact Match


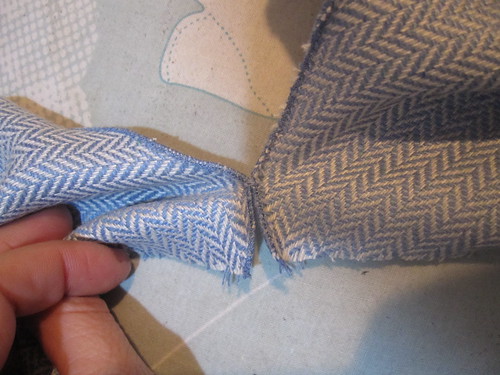
To ensure that the back collar edges would meet perfectly, I hand-tacked the rolled hem edges together, and then stitched the center back collar seam, which is cut in one with the front piece, wrong sides together.

Trim one Seam Allowance


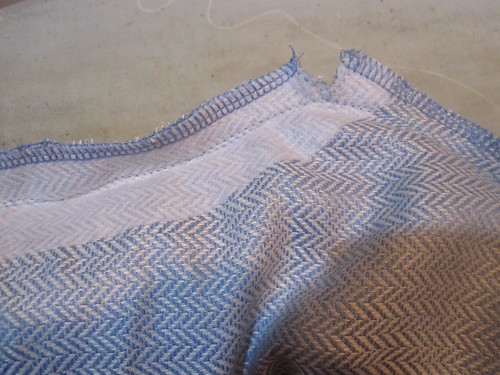
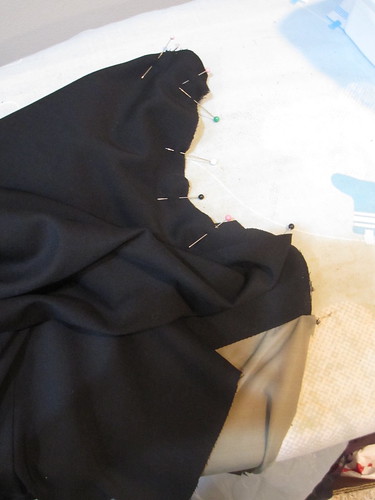
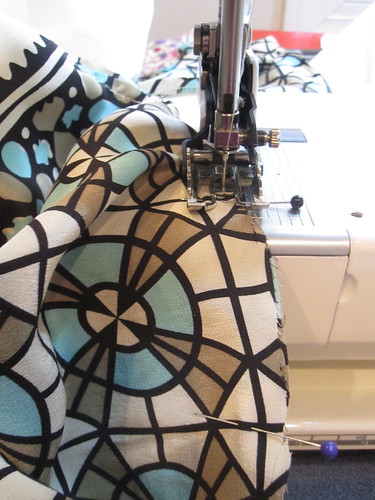
To form the flat fell seam, I trimmed one side of the seam allowance, then folded the full-length side over the short side.  The photo illustrates how the longer seam allowance folds over the shorter.  Everything is actually pressed to the side.


Topstitch Flat Fell


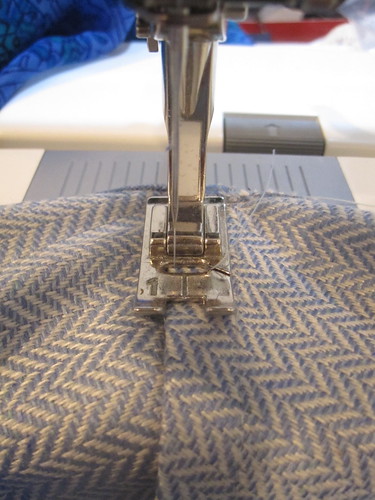
Once it was folded, pressed, and pinned into place, I topstitched close to the folded edge.  For topstitching close to an edge, I find it easier to click the needle over rather than try to run the foot close to the edge.  Here I have it one click over to the left.

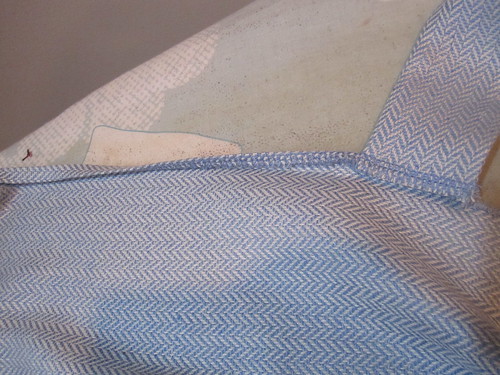
The end result looks good from both sides, perfect for a pattern where the wrong side is sometimes the right side.


Press Under Front Opening Edge Below Waist

As drafted, this pattern is sort of a faux wrap dress, or something like that.  At any rate, it's not meant to have ties that go through an opening and wrap around.  There are supposed to be weird small string ties on the inside, and then you wrap an unattached sash around the waist.  The reviewers generally complained that it was difficult to keep the dress closed.  After getting it assembled, I determined there was no discernible reason this could not be a regular wrap dress, so I decided to go the traditional route.

Tie Attachment/Finish


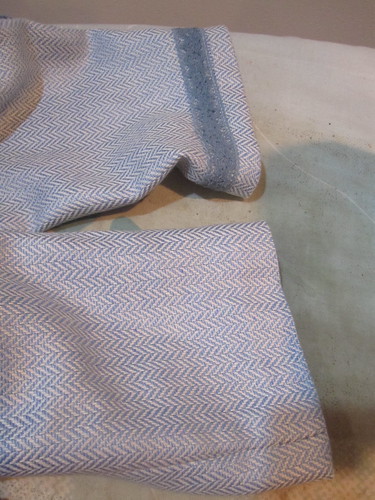
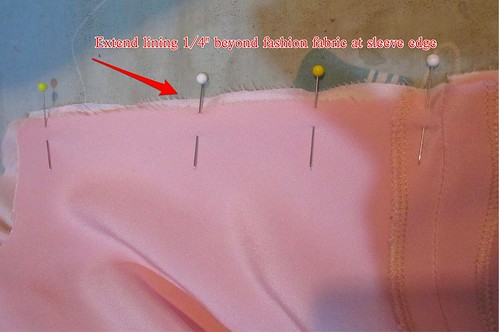
To attach the tie, I stitched it right sides together with the front opening edge, placing it at the notch where the seam allowance still remained (see the photo above showing the rolled-hem finish above the waist).  Then I serger finished the edge, including the tie.  Next, I double-folded and pressed the front opening edge from the tie down, and topstitched the folded under edge in place.

I am pretty proud of how seamlessly (for lack of a better, less literal word!) the front opening edge transitions from the serger rolled edge to the tie and finished lower edge.

Inside Yoke Finish
Clean Finish

Clip to stitch line for corner
Clip to stitching


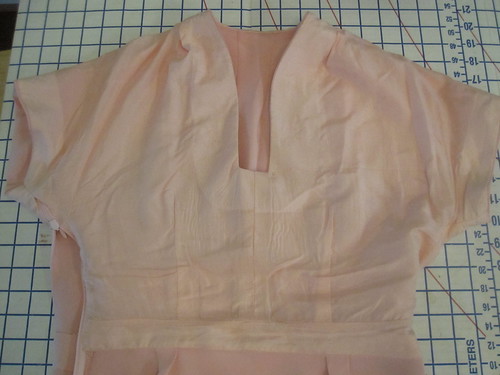
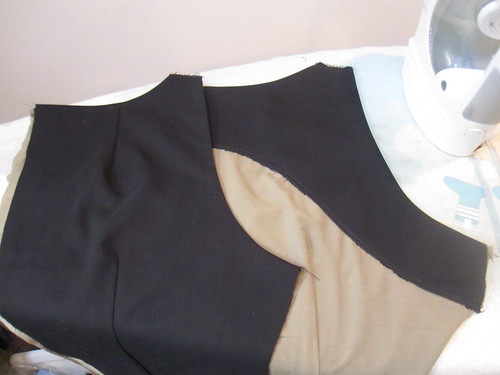
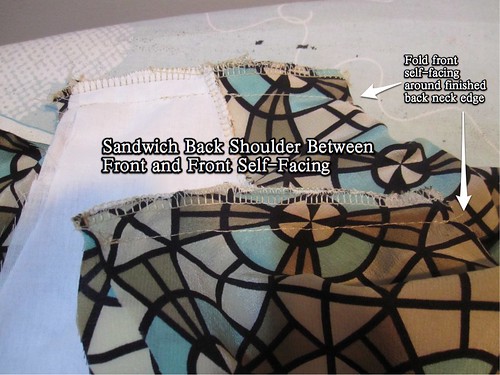
The back yoke is also meant to be lined.  It was a tight squeeze, but I was able to burrito it for a clean finish.  If you are facing the flounce, I wouldn't risk trying the burrito method.  To keep the back neck stable while supporting the weight of the collar, I interfaced it.

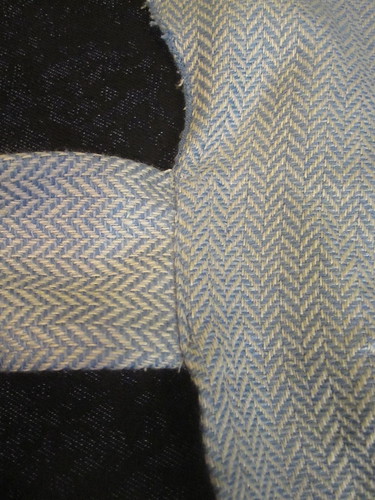
I also put a square of interfacing on the shoulder/neckline corner of the front piece with integrated collar to reinforce.  You have to clip all the way to the stitching to get a nice corner.

Sleeve Hem Lace


The hem is just turned under and machine blind-stitched, but I used hem lace at the sleeves because I didn't have quite enough fabric for a good hem allowance.  It ends up being a nice touch.

Flying Nun

Front


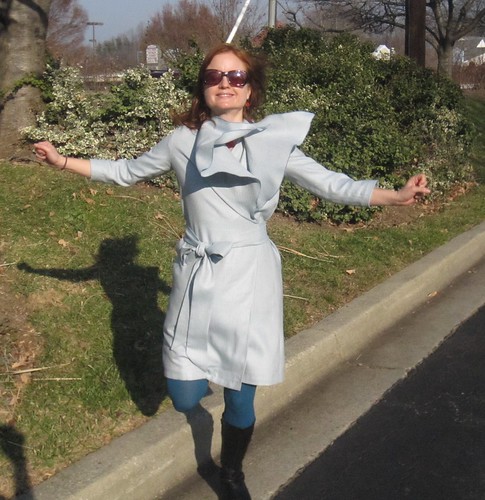
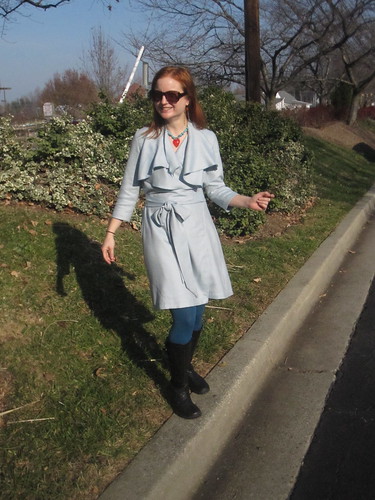
I was really pleasantly surprised by how cute this came out.  I don't think it has a nightgown vibe, nor is it overwhelming for my frame.  The non-faced collar has a lot of movement and drapes well.  All in all, a very successful project.  I can see it for Spring in a luxurious silk...

All photos are here and the pattern review is here.

Tuesday, December 11, 2012

Simplicity 4047, 1950s Blouse plus Another Tweed Ride Hat

Simplicity 4047 Thumbnail


I first made this pattern in 2007 and always planned to return to it.  It's a gorgeous style, and unusual.

The neckline with little cut-on collar is remarkably similar to this insanely beautiful L'Wren Scott (a more brightly-lit runway shot shows two rows of decorative buttons down the front--for which I do not care--and princess seams).  One thing I really like about the Simplicity neckline is that the centers have an inward curve.  Very graceful.


When I pulled out the pattern pieces, I was first struck cut this out along the smallest size line.  When my mom taught me to sew, she made me cut out the pattern along the largest size line, pin it to the tissue at the desired size, and then cut underneath the tissue at the desired size.  I truly HATED this.  Cutting is hard enough, but cutting underneath the tissue at the precisely the right spot was just horrible.  So when I started buying my own patterns, I just cut them out at the right size.

Well, then came the day when I realized I likely wouldn't be the same size forever, and that perhaps it might make sense to preserve the larger sizes.  Don't you hate it when your mom is right?  Anyway, I just added random increments of width at the waist and hip.

The other thing was that about 1 1/2 inches of length had been folded out of the upper bodice front and back.  It seemed odd, as I usually don't have to shorten above the waist due to my long torso (yes, my legs really are that short; you should see me running), but I figured I must have had a reason.  1 1/2 inches seemed way too much so I reduced it to 1 inch and went on my merry way.

Why, self of 2007?  Why did you screw me like that?  If anything, this could stand to have 1/2 inch of *additional* length.  So I got this put together and the upper bodice was ridiculously short.  The waist line is supposed to hit approximately at natural waist, and this was practically an Empire line.  Why, I ask again, why?

Ugh.  I found a piece of scrap large enough to cut out a waist insert 2 1/2 inches wide (including seam allowances).  In the end, the waist insert is a nice design feature, but it was way more trouble than it ought to have been.


Trim at Front Neckline


The key to the neckline is clipping all the way to the stitching at the corner, and trimming the seam allowance at the center.  I am pretty happy with the sharpness.  The corners are good and fairly sharp.  The only issue is there is still a tiny bit of wrinkling underneath the corners.


Back


One thing I did remember from making this the first time is that I desperately needed a broad back adjustment.  The first version of this was from a shreddy dupioni, and the fabric disintegrated at the darts the first time I wore it because I didn't have enough movement across the back.  I did not know what I needed then, but luckily through the magic of the internet I now know how to fix the problem.  I now have plenty of movement at the expense of a fairly unsightly back view where the excess ease sits when I lower my arms; I consider this a worthwhile trade.

Lined Upper Bodice


Another thing I remembered was that the facings were horrible.  This really must be lined.  I lined only the upper bodice, and stitched the lining to the seam allowance at the waistline by hand.

Interface Edges of LIning


To make sure that the neckline would be crisp, I used the facing pieces to interface the edges of lining.  I should not have interfaced the sleeve edge, as it is a little too stiff and the various seam allowances show through a bit.  However, it worked well for the neckline.  I stitched the edges of the interfacing down, so that if the glue unadheres the interfacing won't flap around inside.

Extend Lining at Sleeve Edge

Turn of Cloth at Sleeve Edge


To get a nice turn of cloth at the armscye, I pinned the lining 1/8" beyond the fashion fabric when I was sewing them.  When the lining was turned to the inside, that pulled the fashion fabric in so there is no chance of the lining showing.

This blouse falls toward the back at the shoulders, which is not a common problem for me.  I have to shrug it up toward the front to get the shoulder seam to run along the shoulder ridge before I can move my arms.  Is this a function of the dolman sleeve?  If I were to consider fixing this in the pattern, would I just move some fabric to the front from the back, or would I affirmatively add more to the front?  Wisdom and suggestions appreciated.  I think I would like to draft this into a regular armscye so I could make a sleeved top or dress from the pattern.

Front

The skirt I'm wearing it with had a really dated handkerchief hem.  This was during the PR Refashion contest and the fabric is a really lovely silk (purchased at H&M if you can believe, about 7 or 8 years ago).  I was thinking of making it into a tank.  It was going to be tricky because the skirt is bias cut.  But then I realized it would be much easier (and likely more successful) to just change the ugly hemline.  Ta da!  New skirt.

I bought this blush silk crepe many years ago, I don't remember exactly from where (FFC?) and how much I paid.  I let it lie fallow for many years because I thought I couldn't wear this color--too close to my skin tone.  However, I suddenly decided that it was the perfect color for me and I had to make the blouse immediately.  I don't know why.  I do like the color; it works a lot better for me than I thought it would.

All photos are here and the pattern review is here.


=========================

Teal Front


This was my costume change for the Tweed Ride.  I also wore my Nana's fur collar coat, which I'd never worn.  Even though I had nothing to do with the fur, I just can't bring myself to wear it.  It is a beautiful coat, though, and it fits me so well!


Teal Back

Teal Side


The main point of the costume change was to wear the other hat I made!  This one I blocked from a length of wool felt.  As sewists, we know how awesome it is to go from a flat piece of fabric to a 3D garment.  It was very cool to do this in a new way.


I gleaned most of my information from this video, and then just sort of made up the rest.  I cut off three of the square edges and used the fourth one to fold into a kind of origami back piece, accented with a faux bow.


Teal Mid-Blocking


Here it is after I spent a lot of time stretching the felt around the head form to give it a conical shape, and then the initial blocking.  I was just making up the shape as I went along.Wire Edge


I hand stitched the wire in place to help it keep its shape (felt stiffener is really what ensures it stays in shape).

Because I don't have a hat form suitable for blocking, I just had to use my head form.  The edge is pretty ugly--not at all smooth--because I couldn't stretch the wool underneath a block.  I didn't have any matching ribbon to wrap around the edge and cover the ugliness.

But I really don't care--I am over the moon about this hat!

Russian Netting

I've wanted a hat with netting my whole life , for some reason, and this one was well-suited to it.  I don't know how you're actually supposed to attach netting, but I did it with tiny hand stitches anchoring it in place, as demonstrated in the photo.  You can see completed stitches here.

Millinery photos are here, along with some closeups of the houndstooth hat.

Thursday, November 29, 2012

How to Verify Your Blogger Blog on Pinterest with a Meta Tag

Apparently Pinterest is dealing with as much spam as the rest of the internet and has instituted a website verification process for websites listed in your profile.  You have to prove that you own a website by mucking about in its code.  I deduce that the idea is if you are a spammer who is paid to promote a website as many (poorly written) places as possible, you will not have access to the server/code of the website you're promoting.  Pinterest will then delete the website reference from the account, thus defeating the purpose of paying spammers to promote websites there.  So eventually, companies wil realize they're not getting anything for their money, stop paying the spammers, and then Pinterest will be spam free.  Ta da!  We'll see how that works.  To paraphrase Jurassic Park, "Spam finds a way."

At any rate, that leaves a lot of bloggers who have blogs rather than personal websites so that we don't *have* to muck about in code scratching our heads.  I found instructions for verifying using the downloaded html file, but it didn't work for me.   After a little trial and error I figured out how to verify using meta tags for a Blogger blog (I'm afraid I have no idea how other blog platforms work).

When I logged into Pinterest, this window was waiting for me:

Choose _Verify with a meta tag_

Click on the option at the bottom, "Verify with a meta tag."

Which brings you to this screen:

Pinterest Meta Tag

Which has your custom meta tag.  I have whited out most of the content from mine out so that nobody can hijack my profile and redirect to, what else, spam.  (Hidden underneath the white bar is a long string of  letters and numbers.  You'll have your own unique string.)  Copy the entire line, from "< meta name" to "/ >." (I had to add spaces so Blogger wouldn't interpret this as code; don't change it or add spaces.)

Now go to your Blogger edit page.

Go to your Template

Click on "Template" on the lower left.  When you are on the template page, click "edit html."  You will receive a dire warning that you are going to ruin your blog for all time and plus the zombies will come if you edit your own html.  Accept this risk.  We will be very careful.

Insert Meta Tag in Template HTML

Once the html window is open, look for < head > (with no spaces).  It is only a few lines down, you don't have to dig.  Put your cursor at the end of < head > and press enter to go to a new line.  This is just to keep things neat, not for a special coding reason.  Then paste the entire line of code you copied from Pinterest, your meta tag.  Once that's done, hit "Save template."  You don't need to refresh your blog or do anything further in Blogger.

Background:  A meta tag is a little piece of code that talks only to other machines.  It has no effect on what a real person sees and will have no effect on your blog.  Meta tags have been (ab)used, for instance, to list a popular search term over and over again.  When a machine crawls the web looking for results relevant to a search term, why lo and behold this here webpage talks about this search term endlessly!  So it became the most popular page for that search term.  The webcrawlers and indexers quickly caught onto this spammer scam (spammers again!) so don't get any ideas.  This is just to explain what metatags do.  They tell machines what's on your blog, among other things.

Click to Verify

Once that's taken care of, go back to Pinterest and hit "Click here to complete the process."  It will look around your blog for a second and if all went according to plan...

Success!

You win!

You can keep the metatag in your template, or delete it once you've been verified.  I don't know Pinterest's plans for repeated verification; I'm just going to leave the tag so I don't have to do this again in the future.

PS If you'd like to be my friend or whatever we call ourselves over there on Pinterest you can find me here.

PPS Also please tell me if you can't pin from my blog.  I did something at Flickr a while back that should have fixed it, but I have no way of knowing because I'm always me, at least as far as Google/Flickr/Pinterest are concerned.


Wednesday, November 28, 2012

Burda 10-2012-118, Side Gather Cowl LBD

Burda 10-2012-118 Thumbnail

Burda 10-2012-118 (available for purchase from BurdaStyle at the link in sizes 34-42) is destined to become a Burda magazine classic.  It has already been made many times, including by AllisonC, Kristy of Lower Your Presser Foot, and Sigrid, to name a few.

Luckily, because so many people had tested it before me, I knew I could safely ignore the marked grain--which has the cowl on straight grain and the skirt on the bias--and place the skirt on straight grain.  This gives the cowl a little more drape and the skirt a firmer hand.  I really don't know why Burda designed it the other way.  BWOF, you are still a mystery to me!

Also, note an error in the instructions:  the pattern pieces are on sheet B, not sheet A.  The corresponding black-lined piece numbers on A are a pair of pants, which really confused me.
 
I traced my usual sizes:  34 at the shoulders and bust (and halle-freakin'-luja for a pattern that is already a 34 and doesn't have to be graded--they are getting rarer and rarer), a 36 at the waist, and between a 38 and a 40 at the hip.  I cut a 38 at the hip for years but lately have sometimes needed a 40.  However, for this size 39ish cut I had to shave off about 1/4" on the hips, ending at the saddlebag.  This is the only area in which I find Burda's sizing inconsistent, though it is only slightly inconsistent.

The fitting adjustments I made were a swayback adjustment and a broad back. I also added a back neckline dart for my narrow neck.  I did not change the bust fit--a cowl is a nice way to accommodate a variety of bust sizes.  The broad back adjustment adds a bit of puffiness over the shoulder blades, and I probably could have lived without it in this sleeveless stretch garment, but eh.  The sinking feeling of not being able to move my arms in a just-completed garment is much worse than some puffiness.

Drafting Front Lining

This stretch wool, from the Vera Wang $1.99 blowout on Fabric.com a couple years ago, is rather sheer.  I debated whether to plan to wear it with a slip or to line it.  For a dress this fitted, I feared that a slip would bunch underneath it and ruin the line so I decided to line.  Well, then my dilemma was that I needed a lining fabric with adequate stretch.  I have some stretch lining in a very light gray, which I used to the line the godet pencil skirt I previously made of this fabric, but I am really not happy with the quality.  I decided to go with a fairly opaque tricot from G Street's $2.97/yd table.

My first step in creating the lining was pleating out the gathered width.  I didn't want a bulky lining.

Next, as described in my review of Burda 7519, I folded over the front self-facing (very generous in this pattern, a really nice touch) and marked the bottom of it on the pattern.  In this case, it was below the armscye.  In cutting, I added seam allowance to the top of the front self-facing, and cut the front lining 1/4 inch above the marked line (for seam allowance).

Back Facing
Faced/Lined Back


To ensure that the flesh-tone tricot would not show, I cut a back facing of the wool, fused with lightweight interfacing, and stitched it on top of the back lining.  I should have been thinking about the width of the front self-facing so that the facing would look more seamless, but I like a generous facing and cut the back facing lower down the side seam than the front facing.

I interfaced the armscye of the front-self facing so I would get nice sharp lines.

Lining Lace

Taking a nod from Carolyn, I sewed stretch lace on the bottom of my lining.  Of course, I realized it would have been better to sew the black lace on the outside of the lining--the side the actually faces the public--rather than the side the faces me, just in case of show through.  But I like the way it looks when it's facing me!

I realized too late that the neckline was a touch too wide for my taste.  I solved this by taking 1/4" seam allowances at the inner shoulder rather than 1/2", though this made sewing the front to the back tricky there.

Front Sandwiching the Back

I used the same construction method as for Burda 7519, modified for the sleeveless style:
1.  Finish back neckline and armscyes with the facing/lining
2.  Sandwich back shoulder between front and front self-facing, stitch shoulder.
3.  For a sleeveless cowl, pivot at the seamline on the shoulder and continue all the way down the bottom of the armscye.
4.  Sew the lining and fashion fabric side seams, matching underarm seams.

Turn everything right side out and like magic, your dress is almost completely done!  All that's left is the zipper/CB seam and the hem.

Back
Evening Look with Gold


The darts are very low in the back, going almost to the fullest part of the booty.  I tried shortening one of them, so I could compare them.  Wrinkles appeared on the high hip in the back on the shortened side.  I was neutral as to whether high-hip wrinkles were worse than slightly pointy darts.  I decided to go with the pattern as drafted and the incredibly long darts.  When I look at the curve I am working with here, I can forgive myself for a not-totally-perfect fit.  It's just a lot of curve.

I added a walking slit so I'd have plenty of movement in the dress.


Burnt Orange and Boots


I was making this under the gun for an event and amazingly everything went pretty smoothly.

I came back from NYC and had literally 1 hour at home in which to do the hem (machine blind stitch) and little finishing bits.  Luckily, it got done in time.  The event's theme was "Texas" (as in the state and the University).  I didn't want to be too informal, as it was to celebrate a federal judge, but I didn't want to be out of the spirit of things.  A little black dress with burnt orange tights and cowboy boots seemed to strike just the right tone.


Evening Look with Silver
Day Look
The LBD contest on Pattern Review happened to coincide with my need for an LBD, so it was nice to have double motivation to make this for my event.   The rules require you to show the dress plain, with a day look, and with an evening look.  My looks aren't crazy different--but in my mind, the idea of a LBD is that it can go from day to evening with just a change of earrings and shoes.

I was hoping to get outdoor photos taken but the stars (or sun?) never aligned.  But there are a million photos.

I am very pleased with this dress.  The fit is excellent (at least under my not-too-stringent standards) and it definitely feels sophisticated and elegant.

It took me a while to get to like the cowl.  It's a shallow/narrow cowl and like the line drawing I can only get it to flop to one side, not to drape down the center as is standard for cowls.  Once I accepted that, I see it more as neckline origami than as a cowl.  However, it does limit necklace options.  It's better with a pin than a necklace.  In that sense, it may not fit the label for a classic Little Black Dress, where I think jewelry is supposed to be a big part of changing it from day to evening.  But the silhouette is definitely in the spirit and I will be glad to have this little number to pull out of the closet when needed.

All photos are here and the pattern review is here.

Tuesday, November 20, 2012

Burda 7519, Woven Cowl Pullover Top with Carapace Sleeves

Burda 7519 Thumbnail

Jay Godfrey _Bella_ Cowl Neck Dress - Sleeves - Nordstrom

I feel that sleeve variations are one of the more underused ways to make a garment special.  I get really sick of making plain, boring sleeves on everything.  When I found this top a couple years ago, I was really intrigued by the sleeves.  They probably have a boring name like "draped sleeves," but to me they look like beetle wings that appear solid until the insect goes to fly when it appears that its whole body splits open.  These sleeves appear solid on the upper side, but when you lift your arms you see they are split to the armscye.  So I call them carapace sleeves.


Anyway, I had no idea how they might be done, so when I saw Burda 7519 with that style of sleeve I was thrilled and picked it up.  I plan to make a copper-colored silk dress with this pattern, but I wanted to test it out before sewing the dress.  The silk fabric for this top was purchased from Fabric Mart many years ago, at least 4 years ago and possibly even 5.  The $9.99/yd sticker was still on it; I'm sure it was the most expensive fabric I'd ever bought at the time!

Fabric Mart 2007

Although I loved it, something kept me from finding the right project for this fabric.  Finally I realized the problem was that I loved the main motif, and I loved the border, but the fabric is sort of a "double" border print with the narrow geometric border, then a wide band of beige silk with flowers, and then another narrow geometric border.  I just didn't like the flowers at all or their expanse of beige, but somehow I felt that I should reconcile myself to them. After so many years, I acknowledged that I would never like the flowers and it would not be sacrilege to wantonly waste that part of the fabric.  Yes, I do have issues.

Anyway, I think this is one of those rare projects where the fabric for the wearable muslin is more expensive than the fabric meant for the final version!
Use Walking Foot for Motif Matching


I was testing out several things with this iteration:  fit, of course, though I didn't expect it to be an issue as it's an unfitted style; the sleeves; the depth of the cowl; and most crucially, whether the front really has to be cut on the bias.  This directional border print really couldn't be cut on the bias, but since it's a flowing silk and the bias isn't needed for fit, as it might be in a narrower-cut garment, I decided to just go ahead and cut on straight grain (the cotton batiste front lining was cut on the bias).


I took a lot of care with pattern matching for this project, and the matches are pretty much spot on (I'm not going to pretend it's perfect, of course!).  I pinned at each black line and used the walking foot to ensure even feed of the top and bottom fabric.


Mark Lining Cut Line

The other thing I changed for this version was to line it.

To cut the front lining, I folded down the self-facing on the pattern and traced where it ended.  In cutting the fashion fabric, I added a 1/4 inch seam allowance at the top of the self-facing, and in cutting the lining I added a 1/4 seam allowance above the marked line.  I stitched the two pieces together using the serger and pressed well.  This creates a neat finish on the inside, and by keeping the front self-facing intact there is no chance of the lining showing at the cowl.  When I make the intended dress, which doesn't need to be lined, I will extend the front self facing the entire width of the shoulder and down into the armscye a bit.

I wasn't overly impressed with the construction order and method for this project, so I used my own preferred method for cowl necks.

Finish Back Neckline with LIning

First, I finished the back neckline by sewing the fashion fabric and back lining right sides together at the neckline, using the serger to trim off the seam allowance, and flipping and pressing.  (Well, before that I sewed the CB seam, which I had added to allow for swayback shaping.

Sandwich Back Shoulder


Next, sandwich the back shoulder with the front and its self-facing/lining.  The fold line goes at the neckline/inner edge of the back shoulder.  Stitch, finish the seam allowances, and turn.  The seam allowances will automatically turn toward the front.  Press.

Next I sewed the side seams, starting on the fashion fabric and continuing onto the lining.

Treat Lining and Fashion Fabric as One at Armscye

I treated the fashion fabric and lining as one at the armscye.  This method does create a visible seam inside the garment; it is not neatly finished as a fully-lined garment would be.  This can be remedied by setting the sleeve only into the fashion fabric, folding down and pressing the lining seam allowance, and then hand stitching the lining to the armscye's seam allowance.  I don't go to the trouble unless it's a special garment.


Sleeve Abutment Under Arm


The one review of this pattern that discusses the sleeves mentioned that they are really restrictive.  Cutting out the voluminous sleeve pattern, I didn't see how this was possible.  The instructions weren't clear on how to install the sleeve.  The sleevecap is longer than the armscye so at first I overlapped the finished lower edges of the sleeves.  Whoa.  I couldn't even pull the sleeve over my arm enough to get the shoulder to my shoulder.  How that much fabric can be too tight, I don't understand, but I stopped doubting the reviewer.

I ripped out the sleeves.  This time I eased the sleeve cap and abutted the finished edges of the sleeve so they met exactly at the side seam.  Huge improvement.  The sleeves are no longer tight and uncomfortable.  However, I am a little disappointed in them.  The distinct tiers of drapes pictured on the envelope don't really show up in my project, though the print could be obscuring their appearance a little.  For the intended dress, I might try to figure out how to use the sleeves from Burda 12-2010-102, which are a similar style but a regular "tube" sleeve.  It might be tricky because the armscye is cut semi-raglan on that pattern.

Border Print Hem

After carefully pressing the hem exactly at the border motif, I machine blind hemmed the fashion fabric.  The blind hem stitches disappear pretty well into the border print.  The lining, which hangs free below the armscye, was hemmed with a regular straight stitch.


Unbelted Front
Front


 This can *almost* be worn as a true tunic, but the side view is pretty atrocious so I will likely wear it belted at all times.  We can wear jeans to work on Fridays.  I always feel like I should wear a nicer top to go with them and this really fits the bill.

This is one of those things that I think doesn't look as good in the photos as in real life.  It looks more bulky than it really is--the silk is very lightweight and the batiste lining is also light. 

I am happy both with the pattern and that I have finally sewn up this special fabric!  I normally hem tops at the high hip for the most flattering spot on me, but I wanted a couple longer tops to wear with my jeggings.  I cut in between the shirt and tunic length on the pattern.

All photos are here and the pattern review is here.