Thursday, January 29, 2009

Inauguration Coat: Pockets

Although I was doing this coat on a very tight schedule, I wanted to make sure I was putting in all the features I wanted and that I was doing them well. "On time, no defects: pick one" was not in my vocabulary for this project, unlike my general attitude!

Patrones has drafted the pattern with a single welt pocket on the center front piece of this princess seam coat, with the pocket placed about one inch from the seamline of center front and side front. Although I finally learned a double welt pocket last year for my green coat I have not yet tried the single welt. Admittedly, this had a bit to do with my reluctance, but honestly I really didn't see the point in creating a weak spot in your fabric by putting in a welt pocket a mere inch from a seam. It seemed much more logical (as well as easier) to put it in at the seam. However, since I wanted this to be nice I decided to put it in as a faux single welt pocket.

Original Pattern Pieces for Pocket and WeltFirst step was to deal with the pattern. Patrones is generally well drafted, but I don't know what was up with the drafting for the pocket and welt. I'm sorry the image at left is so dark (click to enlarge) but on the far left is the finished welt. It is about 2 1/2 inches longer than the drafted welt (center). The length of the drafted welt was problem #1. I have small hands, but even I would have had a hard time getting my hand into a pocket that narrow, much less while wearing gloves. Then there was the issue of the pocket opening length versus the welt length. I just don't get how they were supposed to match up! I also found the pocket a bit too small for my taste. I want to be able to put my hands all the way into the pockets to keep warm, and keep gloves and kleenex and emergency chocolate in them too.

Altered Pocket Pattern


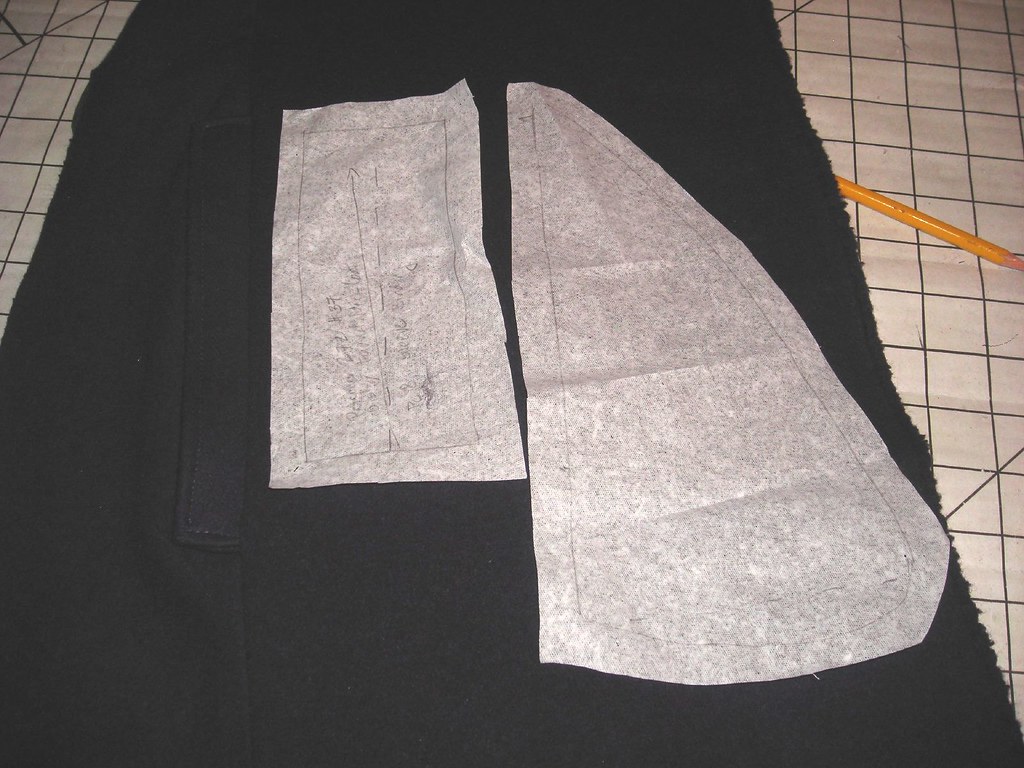
So I re-drafted the pocket to be wider and longer, with an opening that actually matched my longer re-drafted welt. After recutting the welt and the pocket back and the pocket front yet again I was finally ready to start putting this thing together!


I had to meditate upon the construction a little bit to think about how to layer the welt and the pocket pieces and which direction all the seams would be pressed to minimize bulk. The biggest bulk issue was the (faux) welt itself, but I realized if I sewed it to the center front piece, when it was folded over the side front piece and topstitched in place the seam allowance would automatically face toward center front where it was supposed to. I wouldn't have to try to iron it into a different direction than the business end of the welt.

Faux Single Welt Pockets
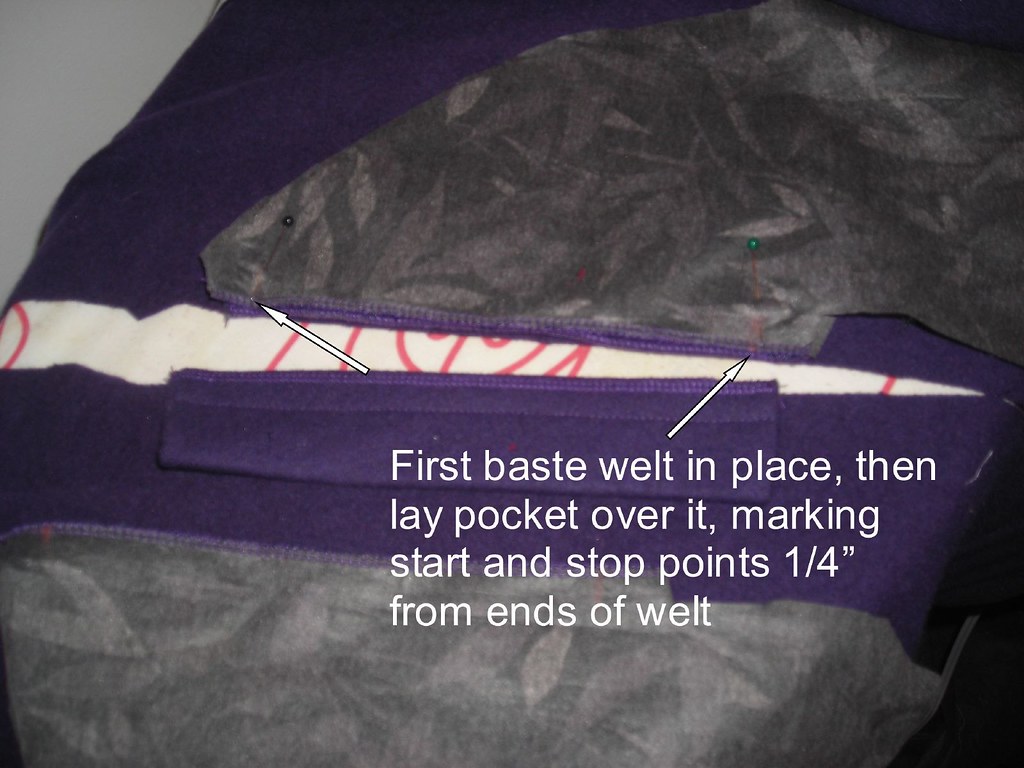
OK, here goes nothing! The first thing I did was carefully, carefully mark the position of the welts on the center front pieces so the pockets would end up parallel to one another. Then I basted the welts in place. Next step was to pin the lining half of the pocket over this, marking the start/stop points of the seamline 1/4 inch from the ends of the welts. As you can see, I had interfaced the lining bits of my pocket. My lining fabric was a slippery, unstable rayon and since the pockets are going to get a lot of wear I wanted to reinforce them.

Reinforce Pocket Opening Next step was to sew the fashion fabric halves of the pockets to the side fronts, after, again, very carefully marking their placement. Because of my limited fabric I used my contrast navy wool instead of the purple wool. When I made my Butterick 4665 corduroy jacket I reinforced the seam along the pocket line with selvage strips to keep it from bagging out. That coat is still going strong and the pockets look great, though I almost always walk with my hands in them. While I figured that the welt would protect the front piece, to keep the side front from stretching along the pocket seam I stitched twill tape along the pocket.

After all this, all that was left was to sew the front seam, stopping at that marking 1/4 inch in on the welts, and then sewing the pocket bags together. I topstitched the welts upper and lower edges of the welts onto the side fronts to keep them in place.

Well, almost all that was left. I did not participate in the Great Coat Sew Along (blog now open to the public!) because it's just not in my personality to spread a project over months. Four days for a coat is extreme even for me, but a few weeks is more apt. Although I have tremendous admirations for sewists who do perfect, exquisite, ornate tailoring work, it just ain't me. However, I was able to piggyback a bit on all the knowledge shared in the blog (before it was public) through Melissa Fehr's blogging about her warm winter coat.

Fleece Pocket Lining 
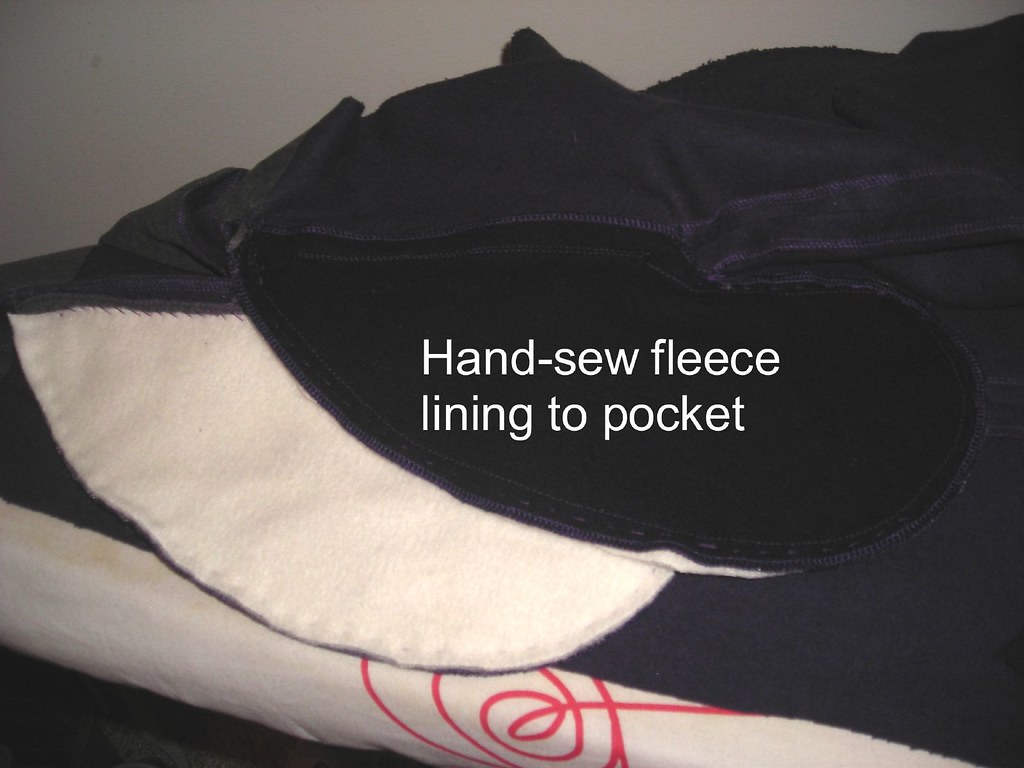
One of the things she mentioned was pulling the pocket bags to the inside of her interlining. Making sure pockets are interlined sounded brilliant to me. I definitely planned to interline my coat (more on that later) but to be absolutely sure my pockets would be as warm as possible, the last step was to hand sew a fleece interlining to the lining side of the pocket (this is the side that faces outward).

Finished Pocket 
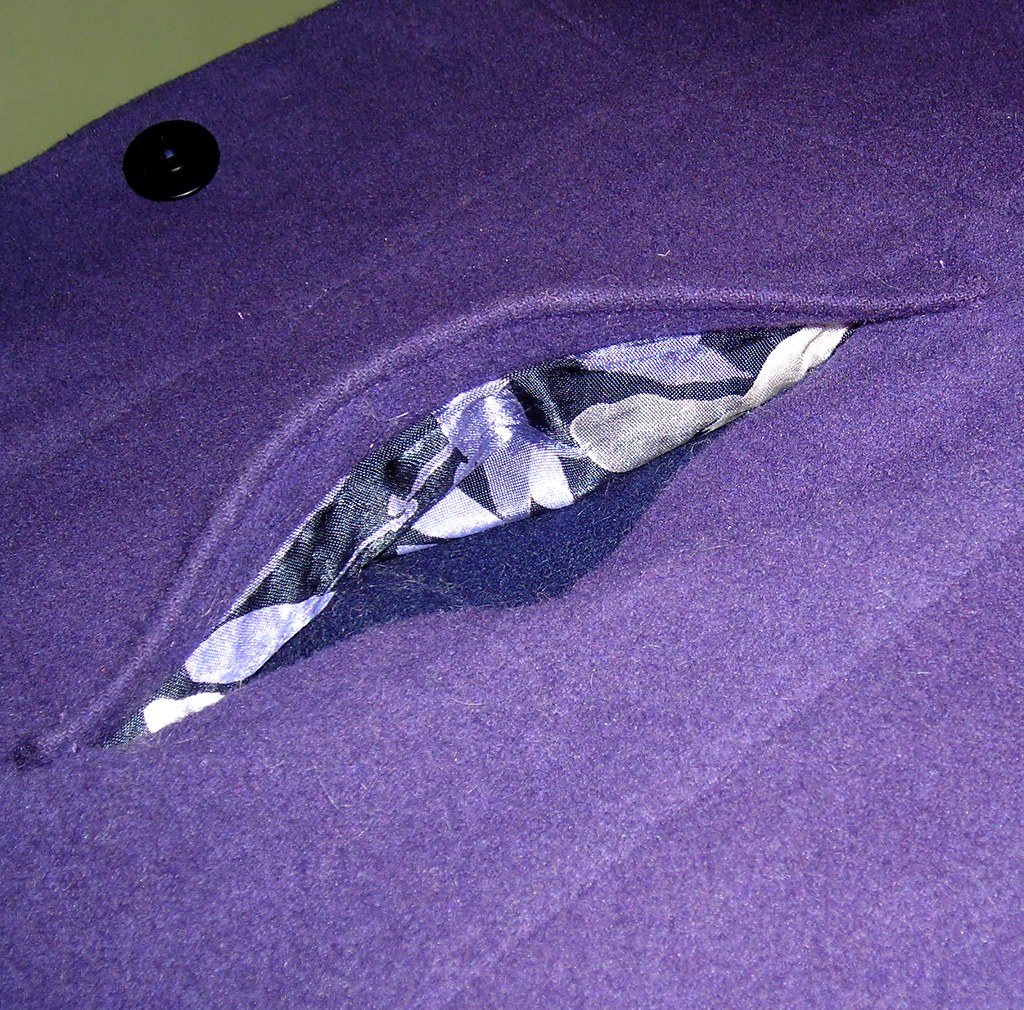
Having worn the coat now for a week I am thrilled with these pockets. They look cute, they are capacious (I was carrying a mini-pack of kleenex in one earlier in the week when I had a cold) but not cavernous (I can reach the bottom), they are sturdy, and they are warm. You really can't ask for more! Once I decided to add the contrast bits to the coat so the facing would make sense I had a little moment of wondering whether I should have made the welts in navy, but I think purple was definitely the better choice. Navy welts would have been too cutesy.

Lining Pockets
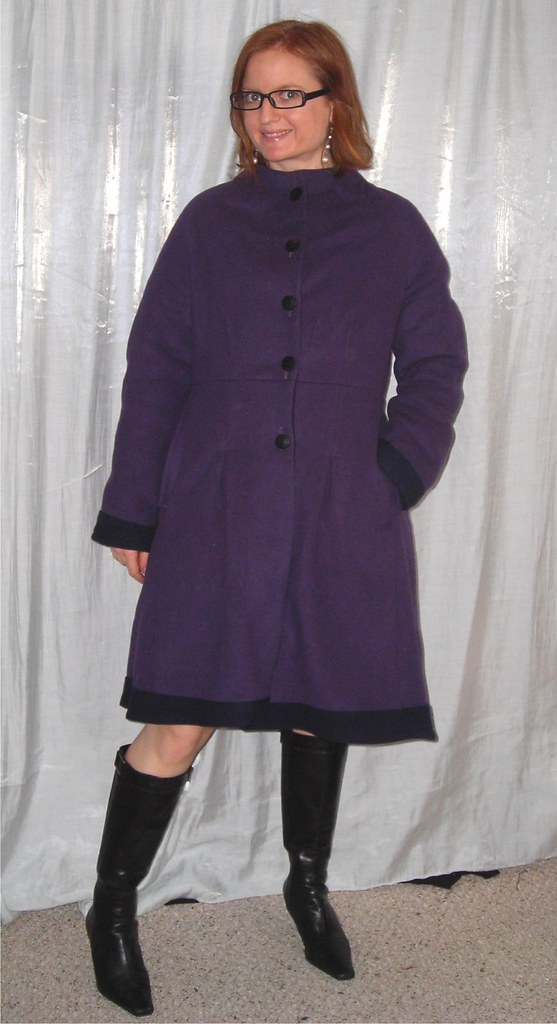
But of course pockets for your hands are not enough in a coat! I wanted to put pockets in the lining. My standard for the size and capacity was that if I wear this coat on a trip somewhere I want to be able to keep my passport, extra credit card, camera, and miscellaneous other small items in them. I did two pockets. On the left side is a zippered welt pocket, and on the right a patch pocket (made of two interfaced layers of lining). Now that I know how to make a welt pocket, a zippered welt is a cinch, and I think it looks great. Melissa and I were again in sync on this because I put my bright green zipper in before she showed off the colored zippers in her faux fur jacket.

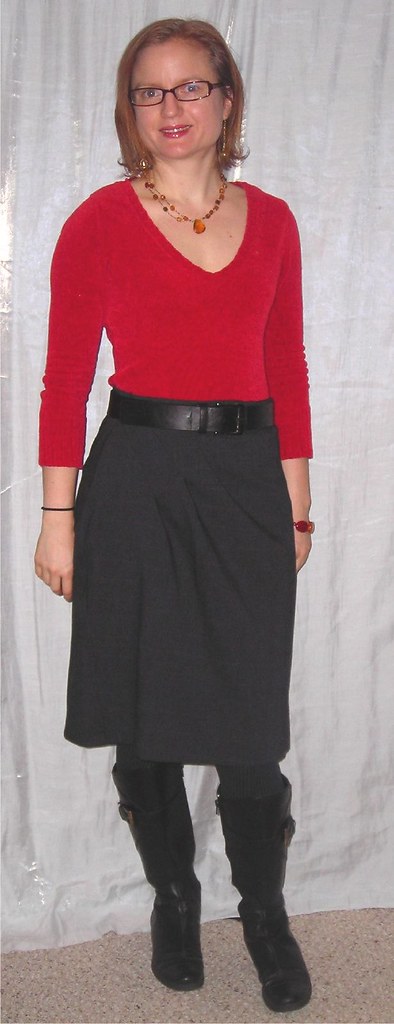
Here I am, demonstrating the in-seam pockets:

Front

Still to come
-Keeping Warm
-Aesthetics
-Overall Review

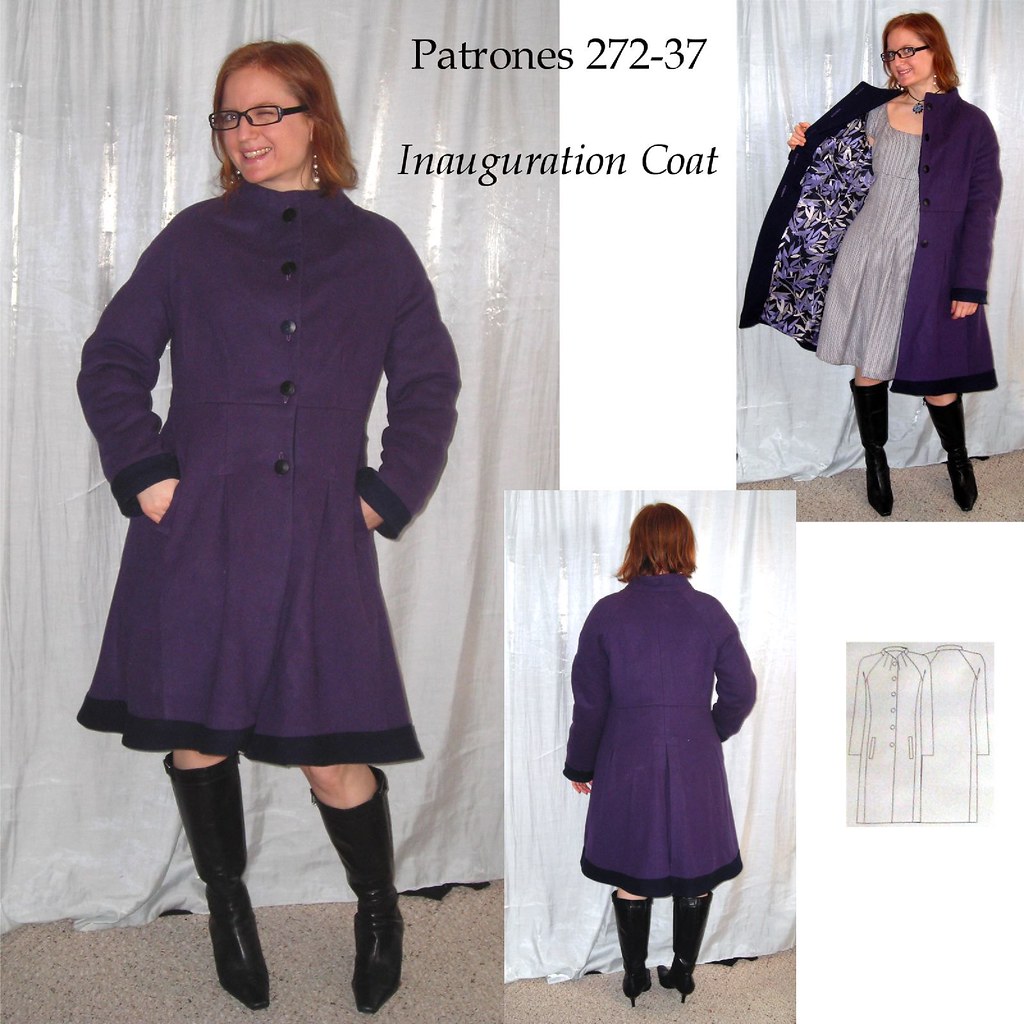
You can check out all the photos of this project, Patrones 272-37, here.

Wednesday, January 28, 2009

Worn Out Sweater to Hat

Sweater Hat

Pink Sweater


So this sweater came not from a thrift store but from my closet. I got it three or four years ago from H&M, an angora and nylon blend. I loved the color and the fuzziness and wore it absolutely to death. Finally this year I had to acknowledge that it was pilled beyond wear, but I still wasn't ready to give it up. I decided it was perfect for a hat. I washed it in hot and dried it in the dryer to tighten up the weave. The "before" pic on the right was taken *after* that step--I wasn't wearing it around with my belly showing.

Book Review

Book CoverCidell gave me the book Saturday Night Hat on extended loan when I first become obsessed with hats on the condition that I review it, so here goes.

The first thing you have to do is not hate the author. If her introduction is to be believed, she was one year out of college and unemployed and stopped into a fancy boutique wearing one of her hats. By the end of the month, Barney's had placed an order for her line. She talks a fair amount in the book about how she could neeeeevvvver have a real job like a regular person. While I don't (necessarily) begrudge her success at the age of 22 or whatever, I find the whole "I'm so special and artistic! I can't live like the rest of you peons!" thing pretty irritating.

But the point of the book is not Eugenia Kim (luckily), the point of the book is hat projects. The focus of the book is mostly sewn hats, with some projects that are just embellishing a purchased hat; there is no information on blocking. There are patterns for a nice variety of projects--cocktail hat, baseball cap, engineer cap, sun hat, cloche, and newsboy plus instructions for drafting your own beret and pillbox. In addition, there are embellishment projects for pre-made cloches and fedoras.

A weakness in the instructions is her information on how to size for your head. Rather than, say, shrink or enlarge the pattern on a copy machine in proportion to the difference between the pattern (drafted for a women's medium 23" head) and your own size or use other pattern-scaling methods, she tells you to make the project as is and then use an iron to steam shrink or stretch the finished product. Huh? I find it much easier to do some simple math--my 21.5 inch head is 93% of a medium 23 inch head (21.5 divided by 23), so I copied the pattern on a copy machine at 93%.

Many of her decoration ideas are very clever and the instructions are well-detailed with accompanying illustrations. There is also some basic information on things like the type of feathers used in millinery and other supplies. In enjoyed reading the book and I'm sure the ideas will be percolating in my brain for a while.

This Project

So, I had this sweater. It wanted to be a hat. What kind of hat? Although I am way, way late to the party (3 or 4 years) I really liked the newsboy hat project. After I made the hat I started paying more attention on the street and while the newsboy may or may not be out of high fashion, it is still going strong in street fashion so I don't feel out of place wearing my hat.

The instructions in the book are pretty good, though they result in a pretty unfinished interior, which is not generally my style. You make the crown and the lining and then sew them to the band as one. The raw edge of the bill is added to the mix. The whole mess is covered with grosgrain ribbon. I wasn't in the mood to figure out a neater way to finish all this (which would be to hand sew the lining down over the seam) so I just followed the instructions.

Brim ReinforcementShe recommends buckram or cardboard to reinforce the brim, but I used my standby shaper, plastic needlepoint canvas. I placed the pattern underneath the canvas; luckily the pattern has both a cutting line and a seam line marked. I traced along the seam line using a highlighter, cut out the brim, and covered the edges with duct tape to soften them as seen at left. I should have blunted the corners, and will probably need to open out the seam the cut them off at some point. Next time, though, I'll probably use a couple layers of buckram so the bill can be curved more. Cardboard is just asking for trouble because the hat will be ruined the first time it gets wet.

LiningThis hat is very fun on the inside. When thinking about linings I decided one of my tie silks from Fabric Mart that I split with Cidell (they still have some tie silk bundles) would be perfect. Silk is quite warm, and I wanted this to be a functional hat. It is also pretty and easy on the hair. I used the leftovers of some colorful ribbon to line the hat band. Indeed, this turned out to be much warmer than I expected and I've worn it on very cold days with no trouble.

Although I'm not sure this hat is *quite* the fashionable shape, I really like it. As shown on the on the model in the book it is perfect, but if you really look at the picture you see the hat is only barely sitting on the top of her head, and that's the only reason the crown poofs out as it does. When pulled over the ears (necessary for warmth!), it's not as full and almost has a rasta hat vibe. Of course, the difference in texture between my sweater and a traditional tweedy wool has something to do with it as well. Next time, though, I will try to build in a little more fullness. I have seen a few berets that are basically a newsboy without a brim and would like to try that--I don't usually wear hats with brims unless I need sun protection because I am so short that I can't see anything out from under them!

All photos are here and the pattern review is here. This will be my entry in the Reconstruction/Recycling/Refashion Contest on PR--I was eager to do the project but I made myself wait until January 1 so I'd be eligible to enter! I will write more about the coat, but I had to do this review before the end of the month to enter the contest.

Monday, January 26, 2009

Inauguration Coat

I didn't really have a coat warm enough to wear to the Inauguration. Because of my flex day, the weekend, MLK Day, and Inauguration I had a five day weekend. Plenty of time to make a new warm coat!(<--sarcasm) I made this mostly over the course of four days and wore it on the fifth day (though it was not, strictly speaking, finished). Kids, don't try this at home.

Week before. Trace out pattern (including sizing down). Cut out. Modify back to allow for inverted pleat walking ease.

Day 1. Cut out and construct fleece interlining. Cut out fashion fabric and lining. Fuse front and front facing. Put darts into neckline of fashion fabric and facing. Make skirt for party.*

Day 2. Put inverted walking ease pleat into center back of fashion fabric and lining. Construct in-seam pockets with faux single welt (includes sewing front/side front seam). Fuse upper front (front and side front pieces), upper back (back and side back pieces), and upper sleeves (front and back sleeve pieces).

Day 3. Construct outer shell. Realize shape is bad and pockets are too low; conceive strategy to modify as can't fall asleep with an ugly coat looming. Groaningly acknowledge it will add two hours to construction. Rip waistband out of party skirt when realize should have put plaid going other direction.* Cut out new waistband.*

Day 4. Cut apart along waist seam. Cut 2.5 inches of length from skirt at waist. Take in side front and side back seams on now-bodice and add darts in front. Pin skirt to bodice and mark inverted pleats in skirt along side back seams and even with front darts. Put in inverted pleats; sew skirt and bodice together. Construct lining and facing. Put one zippered and one patch pocket into lining. Realize you want a hanging loop at CB neck between lining and facing. Unstitch. Put in hanging loop. Hand tack fleece interlining to constructed outer shell. Sew lining to fashion fabric along center front and collar. Turn and press. Pound with mallet. Hand-stitch a few inches in ditch between collar and collar facing. Make mental note to hand-sew entire ditch at later date. Mark buttonholes, put in, and sew on buttons. Add contrast sleeve extension. Bag sleeves. Topstitch sleeve edges to hold cuff fleece interlining in place. Add contrast hem extension. Lose steam. Baste hem. Badly.

Day 5. Wear coat with shameful basted hem. Be warm (except for toes) at Obama Inauguration. Come home happy and exhausted.

Days 6-8. Wear coat with shameful basted hem. Twice. Feel relieved when weather warms up on 3rd day and can wear other jacket. Unpick sleeve hem topstitching after realizing sleeves aren't hanging right. Interface folded sleeve line. Reposition fleece cuff interlining and topstitch four rows. Really hope I got it right this time. Change serger thread to navy in preparation for remedying shameful basted hem. Move all buttons down 1/4 inch so sides line up exactly. Realize basted hem was actually spot on. Press. Remove basting. Serge raw edges. Put in machine blind hem. Replace waistband in party skirt.* Done!

*This step optional.

There are a whoooooole lotta details coming in the next several days--you can sneak peek here (though I realize there's still a few more things I want to show). But for now, the finished product. It is delightfully warm.

Thumbnail

Thursday, January 22, 2009

Tippi Hedren Dress, BWOF 02-2008-103

Thumbnail

I liked this dress in the magazine and when people started making it I liked it even more so it went onto the never-ending project list. I bought the fabric in August from the G Street $2.97/yd table and made it sometime in September, as I recall (I know I wore it to the chili cook-off our work's child care center does as a fundraiser every year, and I *think* that's in September, or maybe October).

This fabric was not fun to cut out. I mean, I don't enjoy cutting in general but this was more unfun than usual. From about 5 feet away the stripes in the print are perfectly clear and obvious, but when you get closer than that they completely disappear. So I had a reallllly hard time laying out the pattern to make sure that the stripes went straight across instead of off grain (finding absolute perfect true grain in a knit is generally beyond my capabilities). Once I got the bodice front cut out I could see I was a smidge off and the pattern veers a little bit diagonal, but it was too late to fix it. I really do not recommend this pattern for stripes because of, among other things, the circle they make around your belly button.

In addition to the grain/stripes issue, this project was plagued by several issues.

-I totally missed the part in the directions where you pull the skirt overlay through the knot. I followed the part where you clip the seam allowance of the lower right front between the asterisks and stitch it down and then don't catch it while you're sewing the skirts to the bodice until after you've applied the overlay and then when I was done sewing I was like, "Huh. Why did I have to go to all the trouble of that business with the clipping and the turning down on the right front and the not catching?" Only when I looked at photos of other people's versions did I realize I was supposed to have pulled it through the overlay twist opening! Oh well. I cut this pretty short because I am liking the shorter skirts for this season, so I consoled myself by saying, (1) it would make the skirt too short, and (2) the horizontal stripes would be disturbed and even more distracting if I had done it right.

-This was not the right fabric. It's more of a t-shirt weight (where oh where does one find beefy knits?????) and so the collar is too floppy (should have interfaced) and it emphasizes the bad fit at the bust/underarms (below).

Baggy Underarms-For some reason it doesn't look as bad in the photo as it looks/feels in real life, but there is way too much fabric under the arms. My conclusion is that it's a bust issue, with there being too much bust in the pattern and not enough bust on the body. I think on a "normal" person the bust would displace that fabric that's bagging under the arms but since it's not being pushed to the front it's just sagging. It's not as gross as a baggy crotch, but it feels pretty gross and sloppy on.

Armscyes have been really frustrating me lately as I keep running across armscyes that are way too small, which makes no sense to me as I have a small frame. I work out and lift weights so my shoulders are muscular, but they are still small. And then here is this one that is way too big. Maybe it's the difference between raglan and set in sleeves?

Anyway, to make this again I will shorten the front armscye and the front by probably 1.5 inches and see what happens.

-Despite the back darts is has a MAJOR swayback problem. I need to either cut it with a CB seam or cut the back as a separate bodice and skirt along the same lines as the front.

Drape Finish-The above problems are (mostly) with me and not the pattern/directions, but my gripe with BWOF here is I didn't like the way they had you construct the front overlay, which was to sew the edges together and *then* finish the twist opening. The seemed needlessly bothersome (why attempt to sew down a round opening when you could do it in the flat?), especially as you have to do the exact same thing for the right skirt, so it's not like they disapprove of the method! So I marked the opening, interfaced it to reinforce, clipped into the seam allowance, and turned it down. It created a nice opening.

They also don't have you sew down the long edges of the drape overlays in place at all, which seems odd as this is a knit pattern and most knits won't hold a crease so there's a huge chance of raw edges showing. I used fusible web to get an invisible hem on the outer edges.

-In addition to the collar being too floppy, I think it's a bit misrepresented in the line drawing. Mine ended up being much wider than shown. Actually, scratch that. Now that I look closely at the line drawing I see it's intended to be turned down to get that width. I don't really like that. Next time I will cut it to half the drafted width and stiffen it up with interfacing so it's more of a true funnel neck and less of a funnel/cowl hybrid.


All these problems make it seem like I don't like this dress, but I actually do. It's a good reliable dress for work, looks great with boots, and I'm glad I went a little shorter on the hem. I can't see my own back so I don't think about that hideous swayback while I'm wearing it. In my younger days I *loved* short skirts, but I've been wearing them at the knee now for years and years and it's fun to mix it up a bit. I would like to make another one someday, if I can find a suitably heavy knit.

All photos are here and the pattern review is here.

Wednesday, January 21, 2009

Inauguration

Arriving

I spent most of the long weekend frantically working on a new coat to wear to the Inauguration (even while Cidell was visiting me! it's good to have sewing friends who understand). I got it *almost* done under the wire. At midnight the night before, knowing I was meeting friends at 7:30 am to walk over to the Mall, I decided I was too tired and just basted in the hem without even finishing the edges; I didn't press because I wasn't sure that would be the final hemline. So the hem was a disaster and it still needs some hand finishing but everything else is exquisitely done and it kept me warm during a very cold morning on the Mall to celebrate the swearing in of our 44th President, Barack Hussein Obama!

It was amazing to be there. Everyone was so happy and friendly and courteous and optimistic. My feet were sooooo cold and one of the women standing near us passed me some hand warmers when she heard me complaining. Everyone was like that. There were 1.8 millionish people there and ZERO arrests. ZERO. Can you even comprehend that? That is a people full of optimism and, I hope, a new civility inspired by the grace and graciousness (not to mention intelligence, commitment, and sheer handsomeness) of our new President.

I only took a few photos because I've learned my lesson about taking too many--I never get around to editing them--and they're here. Unfortunately, dumb me forgot to ask one of my friends to take a picture of me with my camera so I have nothing to show you on the coat! Ay! I've emailed around a request but it will probably take a couple of days.

**edit** Yay! One of my friends came through. Here's a group shot with a teaser view of the coat. All his photos are here. You can see some of the back of the coat in this picture by another friend; her photos are here.

Friday, January 16, 2009

Stashoholism Confessional: 2009 Edition, and General Stash Musings

So, I'm not big on resolutions but I do generally have some kind of resolution to buy less fabric and shop more from stash. I was trying to figure out a workable solution for this year and I think I'm ready to commit. But first, the already broken fast:

1-10-09GSt

ThumbnailI got the hot pink knit because my mom loved my Knip Mode 4-08-13 gather front top when I wore it in Texas over the holidays and asked me to copy the pattern out for her. I figured I'd copy the pattern but also make one for her, because she never seems to get around to sewing for herself and her wardrobe is SAD. She has that mom syndrome where her needs always come last, even now that the kids are long out of the house!

However, I was wracking my brain trying to figure out what colors are in her wardrobe, mentally looking through her closet of worn out, faded, out-of-date clothes that were of horrible quality to begin with (all you moms out there: for real, don't let this happen to you!), and while I couldn't come up with any colors I know she likes, I don't think the hot pink is right for her. She has a lot of red tones in her face, which I inherited somewhat, and I think the pink might bring them out too much. I found a fabric in stash that will be great for her (I hope), but that means I really had no justification for buying the hot pink! Especially considering I have 3 or 4 other colors of pink knit in stash.

PatternEnvelopeThe print I just loved, loved and is also connected to my visit home. My sister is not much of a sewist--she's an avid and talented paper crafter and scrapbooker--but she does have a sewing machine and makes pjs for her boys occasionally. She showed me a pattern she had gotten for herself, McCall 5752, and I really liked it.

BlueGreenSide


I get so many compliments on my Simplicity 3775--the Spring version and a Fall version I also made and have yet to photograph--that I wanted to find more patterns with ruching on them. The print seems perfect for the pattern and I am having to hold myself off until at least mid-February to start Spring sewing! There's still a lot of winter left.

====================================

Anyway, it is just not realistic for me not to buy *any* fabric, inspired as I am by Little Hunting Creek's example--she hasn't bought fabric since March 2008!!!!! So I think I've decided I will buy** 6 yards per month. I was considering 4 but I think that might be unrealistic for me and unrealistic resolutions come with big ol' tags that read "Break Me." Six yards is two 3 yard pieces or three 2 yard pieces. That should really be enough to satisfy me. It adds up to 72 yards over the course of a year. I only started keeping track in 2007, but for 2007 and 2008 I averaged approximately 130-140 yards purchased and 100 yards sewn.

Buying 72 yards this year will take up the excess for one of those years, assuming I sew at the same pace, which is anyone's guess. I was actually a little shocked when doing my end of 2008 blog post at the volume of my sewing output. I don't *feel* like my life is out of balance, but I wonder if I should experiment with devoting less time to sewing (sacrilege!) and seeing how I feel, whether my life feels richer.

**I almost wrote "limit myself to" but I liked how Carolyn phrased it in her blog. She wants to purchase 100 yards of fabric. I'm not going to pine about yards unpurchased, but enjoy my generous allowance of yards purchased.

====================================

All that aside, srsly I have plenty of fabric to keep me busy! Here is a short list of projects I'd love to do in the immediate future. I keep a paper list at my desk so when inspiration strikes I can write it down and get back to work.

Purple Patrones coat 272-37
Red tropical floral tie neck tee from BWOF 08-2007-105
Knip Mode famous gather front top for mom, 04-2008-13
Plaid skirt for mom, BWOF 10-2008-103
Hot pink BWOF orchid neck knit "big shirt," 09-2008-110
Black stripe pleated sleeve BWOF blouse, 12-2007-117
Moleskin BurdaStyle Kasia skirt (which appears to still be a free pattern)
Taupe wool Knip Mode wrap/pleat skirt, 04-2008-11
Olive wool plaid tulip skirt, BWOF 09-2007-116
Gray stripe Knip Mode batwing blouse, 04-2008-14
Green/white/gray McCall 5752 (SPRING)
Giambattista Valli knockoff tee in aqua lace from The Princess Seam's blog (SPRING)

This is only a sample of what's on my project list, and only the projects I am currently most excited about. The list goes on, believe me. Unquestionably, this is enough to keep me busy until the end of the month, when my 6 yard clock restarts! In fact, these projects are enough to keep me busy for three months at my one-garment-per-week pace (the coat will take longer, but other projects will be shorter so it would all even out, I think).

Looking back at my list of projects helps me realize that buying more fabric keeps me from doing projects I love. Wait a minute, I think I just had an epiphany. Let's try that again:

BUYING MORE FABRIC KEEPS ME FROM DOING PROJECTS I LOVE

Once the new fabric comes into the sewing room, long-planned projects lose their luster and I am drawn into the novelty of New!Stuff! This really gives me something to think about. I don't want to miss out on these projects:

Projects1-16-09

====================================

I guess I also have a resolution to keep up with pattern reviews in a more timely fashion. Starting this year 17 reviews behind is not a good place to be! Clearly this was a resolution last year. Looking back at my list of pattern reviews I see I did 10 in January 2008--over 1/4 of my reviews for the whole year! I'm starting out strong this January as well, keeping my goal of posting two per week. I'll try to keep up the two per week pace until I've cleared out my backlog. Only 13 left (plus the 3 projects I've done so far in 2009)!

Thursday, January 15, 2009

Simplicity 2923, Notched Collar Blouse with Directional Stripes

Thumbnail

When I ran across Simplicity 2923 in the book, I was drawn by the brown version, looked at the line drawing, was repulsed by the blousy waist, looked more closely at the line drawing, and was drawn back in by the notched collar and interesting raglan sleeve and back yoke design. It's part of the Project Runway series. Is Simplicity putting out any patterns nowadays that aren't? It kind of loses its luster when it's overused. Anyway, there was no way I was making this into a shirtdress as drafted with the blousy waist, but I thought it would make a nice blouse with a bit of a 40s vibe.

SBAThis navy striped rayon is part of The Carol Collection, and I was tickled by the idea of playing with directional stripes. To that end, I modified the pattern a fair amount. In addition to my usual princess seam SBA at side front (see photo), I cut the back yoke in two pieces so I could get a chevron pattern with bias stripes, eliminated the back darts and replaced them with a single released dart/inverted pleat at center back, left off the front darts, and cut the side fronts on the bias. I cut the sleeves as drafted, but I had to sew a strip of fabric to the shoulder and the cuff to keep the sleeves from sliding down my arm and losing the big poof.

I did a pretty good job of matching the stripes (not like my usual self!), though if you look closely at the front you can see I did a better job matching the side front stripes to the raglan sleeve better on one side than the other. It's still better than most RTW and that's good enough for me, LOL.

The shirt ended up a nice addition to my closet. It's fun to wear but good for days when I don't want to stick out too much! I'm going to look for more notched collars. I like the way they open up and lay flat.

All photos are here and the pattern review is here.

Tuesday, January 13, 2009

BWOF 10-2008 #118, Dolman Sleeve Blouse

Thumbnail

This pattern didn't look like much in the magazine, partly because they didn't show much of it, but when I looked at the line drawing I really liked the simplicity of it. It has enough interest with the gathered neck and dolman sleeves, but with the plain lines They had the right idea to use the pattern to showcase a beautiful print.


And I had just the print in my stash, the leftovers from Vogue 2858. I got this gorgeous silk print from Fabric Mart at least a year and half ago (reviewed the Vogue dress in May 2007). I didn't have a lot left after the dress--which I took with me to Vietnam and wore the night my hosts took me to dinner--but I had enough for a parsimonious project. Since I am perpetually in a quest for winter work tops the pattern and the fabric zinged together in my mind as the perfect match.

As I said, I had very limited fabric left. I mocked out the layout, but obviously I should have taken more care over it because after I had actually cut out the front I realized that there was no way, no how to fit the back onto the fabric. Dangit! I was pretty annoyed with myself for wasting the fabric and had to take a break from the project. The next morning I woke up and had my solution. I was always intending to wear the blouse with some sort of cinching belt; I just can't get the hang of wearing a sack. So I turned my miscalculation into a design feature. I cut the back as long as I could, which was to above the waist. Then I cut a strip of coordinating silk from the Carol Collection to make a tie casing, then I cut the lower back out of scraps. I also cut the inner band collar, sleeve bindings, and tie out of the same silk. To wear, I thread the tie through the casing and knot in front. Here's the back in action.

I have a bit of buyer's remorse about the contrast color I chose. I meant for this to be part of a 4 piece mini wardrobe with the Exquisite Fabrics wool skirt of Simplicity 5914, my BWOF velvet skirt disaster, and my Butterick 4985 off-white pinstripe silk blouse. However, (1) I didn't get around to photographing and reviewing all the pieces in time for the contest although I did finish them all with time to spare, (2) the velvet skirt was a disaster, and (3) the two different colors of teal/turquoise of the blouse accents and the wool skirt clash. The best laid plans.... I was also considering hot pink for the accents and I kind of wish I had gone with it; I was totally not thinking about the clash with the skirt. I suppose I could theoretically go in and re-do it with pink, but let's face it--that's highly unlikely.

Mini-wardrobe deficiencies notwithstanding, I really like this blouse and think I found the right use for that last bit of Fabric Mart Anna Sui silk. I ended up liking this pattern quite a bit, and as far as blouses go it's a quickie, what with the dolman sleeves, band collar, and self-front placket. If you have a precious silk print in your stash take a look at this pattern.

All photos are here and the pattern review is here. The booties I'm wearing are a new purchase; I've been wanting booties like that forever and I found these Clarks, which are *highly* comfortable, at Macy's on clearance and my friend had an additional 15% coupon. They were still too much (though a good chunk less than at Zappo's, I'm pleased to see), but I neeeeeded them. Cute, no? I felt validated when I was at the register and the woman in front of me said that she would never have considered this style but she saw me try them on and had to get some!

Friday, January 9, 2009

Vogue 7898, Asymmetric Hem Mock Wrap Dress

Thumbnail

When I was deciding on my wardrobe for Germany, I planned to take my black suit to wear on the most formal day, and then dresses to wear under the jacket for the rest of the days. A black jacket is very versatile and gave me a lot of flexibility in the dresses.

When I was going to pick up my serger I knew one of the first things I wanted to do was my first sweater alteration, but I also wanted to try out the legendary serger sewing of knits!

For some reason, I felt the urge to go into deep stash. The mesh knit overlay fabric and the Vogue 7898 pattern had been earmarked for each other and sitting in stash for at least a year, and probably quite a bit longer, so that qualified. I was seduced when I saw the mesh knit on the $2.97 table at G Street; love the print and the colors are totally me. I bought it even though I *knew* that mesh knit would be an absolute bear to cut and sew. (I was right.) On my way back from picking up my serger I stopped by Exquisite Fabrics' moving sale for the wool to match my Goodwill Bennetton suit (they are still closed; the website says their tentative opening date in Georgetown is January 17). Because they were closing out all the inventory there wasn't much left but I managed to get the last four same-color cones of serger thread they had, in navy. Good enough!

Original (Modified) HemWhen I was preparing the pattern I could see that the angle of the asymmetric hem was way too steep. There was clearly too much difference in length. I think this pattern is showing its age because it had to have come from a short moment in which ridiculously dramatic asymmetric hems were de rigeur. I shortened the long side of the pattern by three inches before cutting out, and even still it was too much. Had I cut it as drafted I think the long end would have dragged on the ground, while the short end is above my knee! Ridiculous! I shortened it another three inches, and now I think the hemline is interesting without looking clownish. In preparing the pattern I also, of course, did an SBA on the front neck edges.

Laying the pattern out for cutting was dreadful, as it was impossible not to be stretching the mesh knit. I thought I got it right in the end, but when it was all sewn together the underlay/lining was hanging several inches longer than the mesh overlay. I had sewn the lining and overlay separately, joining them only at the armscye, in case of any weird pulling. At first I was going to trim away the lining, but then I decided (1) that would make the short parts of the dress too short, and (2) I actually kind of liked it with the two layer effect.

Other than the hemline and my usual SBA, I didn't change anything other than the tie method. This is actually a mock wrap dress, though it looks like a real wrap. The directions want you to sew the fake tie into the left side seam and the D ring onto the right front, so they basically just meet. I thought that wasted a perfectly good opportunity to have the tie go across the back and deal with my swayback issue, so I sewed the now slightly-less-fake tie to the right side seam and bring it around the back to catch into the D ring. The right side is gathered around the D ring; I found it necessary to sew it in by hand.

Clear ElasticI used my new best friend for knit wrap styles, clear elastic, to snug up the neckline. Pin each section of clear elastic slightly shorter than the neckline section so that in the end your elastic is about 3 inches shorter than your neckline and twin needle in place. The neckline on this is very low and no amount of futzing with how I placed the right side over the left raised it. Since I am flat-chested I don't think it's too va va voom for work on me, but someone who has any boobs at all will have to save this for evening, I think.

I wore this dress the day of the official state dinner for the conference, and felt very pretty in it. All photos are here and the review is here.

Wednesday, January 7, 2009

Knip Mode Pencil Skirt with Pleats

Front

I didn't make many skirts last year because, well, I already have a.lot.of.skirts. I was on the phone with a friend a couple years ago complaining that I didn't have the right skirt for an outfit. She made me go in my closet and count how many skirts I had. I think it was somewhere around 50. So I have slowed down my skirt making since then! That said, I am ready to speed it back up because most of my skirts from years past are A line, and the pencil line is all fashionable now. And maybe I'm just being influenced by fashion, but I think it may be more flattering on me, and unquestionably it looks better with voluminous tops, of which I've made a fair amount recently. When I saw this one, Knip Mode 11/2007 #12, it had to go into my closet.

Magazine PhotoSo I don't speak any Dutch, but I'm pretty sure "Met slimme details" means you'll look skinnier so I was sold on this skirt. Actually, I just loved that assymetric pleat detail. It gives a little interest to a straight skirt without making it too crazy. I am really digging the Knip Modes I borrowed from Cidell. In a way I almost wish I didn't know it existed because now I wants and have no way to gets.

The fabric for this came from Kashi, purchased during PR Weekend 2007. I thought that I could brag that I had used all the fabric I bought that weekend within 2008, but dang it! Now that I look again I see that the blue/gray stretch woven on the lower right is still in my stash. (The maroon jersey became a hideous wadder.) This skirt is a lovely gray stretch wool (on the blue-ish end of gray, but not actually blue) with orange windowpanes. Kashi alleged it was Italian, but as Karen points out, doesn't he always?

CloseupI hesitate to point an accusing finger at Knip Mode, because the patterns seem exquisitely well-drafted, but you can see that the skirt does not hang quite right at the side seam with the pleats. I actually corrected the line a bit during construction when I first noticed the problem, but it's still not right. Normally I am happy to take the blame, but I actually made a serious effort to get grain-perfect in cutting this out. It was cut out in single layer, so it's not an issue of folding it incorrectly. I even cut off the selvages of the fabric because they were distorting the lay a little bit! So I don't know where the problem arose.

The pattern directions have you cut a straight piece of fabric for a waistband, but I really prefer a contoured waistband so I drafted one. It pulls away from the body a little bit above the pleats, another thing that bothers me. I thought this was because I was an IDIOT and cut out my single layer lining the same orientation (right side of fabric up) as my single layer fashion fabric when, in fact, they should be cut out opposite. I didn't want to re-cut so I just put the lining in backwards or sideways or mirror image or however you would describe it. That's slapdash for ya. But it bothered me so much that I actually went in, opened out the lining, and added a gusset there. No effect. So perhaps a straight waistband would be best for this after all.

As you can see, I reversed the pattern in cutting to change the pleats from the left to the right side. I prefer to have details on my right side, probably because I am right-handed. I just put the pattern piece on the fabric upside down.

Although in theory I love the higher waisted skirts that are coming in style, I think it will take a while to get used to them. They seem perfect for my body type--emphasizing a small, high waist; shortening my relatively long torso and lengthening my relatively short legs--but I felt kind of thick around the middle in this. Cidell's comment on seeing the photos (without me telling her how I felt) was that the waistline is very flattering, so maybe it's just a comfort thing. Low-rise was the thing for so long and it has been a decade and a half since I tucked anything in; maybe I just need an adjustment period.

All photos are here and the review is here.

Monday, January 5, 2009

Oversized Sweater to Sweaterdress

Before and After

So I have been wanting a sweaterdress for ages, but after my bathrobe attack disaster I feared the sweaterknit. This season the sweaterdress is *everywhere* and I really wanted in on the trend. When I went on my thrift store sweater-buying melee this sweater did not fit my 100% wool criterion (it is nylon, angora, and metallic) but I am drawn to all things shiny and soft and I had to have it.

When I got it home and tried it on I thought maybe, just maybe, I had found my sweaterdress. I decided it would be perfect for New Year's Eve, casual yet cute, sparkly yet tasteful, so I took scissors to it when I got back in town from visiting family for the holiday.

You need a sweater that is many sizes too big for you for this project. I really don't know what my RTW size is, but I'm guesstimating that this sweater was about 6 sizes too large (I'm probably around a RTW 4 and this was an 18/20). For a sweater that is only a little too big, you can take it in by sewing into the sleeves and side seam as one, but for something that is much too big you have to take off the sleeves. I also cut out the shoulderpads--given the price of shoulderpads that alone paid for the sweater!

After you've cut off the sleeves, try it on mark with pins 1) the new bottom of the armscye, and 2) how much to take in the side seams. I considered making this just a body hugging t-shirt dress style, but I am just too self-conscious of my belly so I didn't tighten it all the way at the side seams, leaving room for the center pleats I would add later.

Cut Off Sleeves

Once you have sewn the new side seams, put it back on and mark the shoulder edge. Trim away the excess. This sweater had been constructed with twill tape to stabilize the shoulders. If yours isn't, you might want to add some shoulder stabilization here. I should also note that as soon as I made any cuts I immediately took it to the serger and finished the edges to prevent unravelling and too much stretching.

Shorten Shoulders

Mark Inverted Pleats at CFAt the same time you're trying on to mark the shoulders (and if you want a short sleeved dress, the oversized shoulders turn into a cute cap sleeve), pin out your center pleats. I did three inverted pleats at center front right under the bust for an empire look. I sewed them down about two inches long on the inside.

Now it's time to get back to the sleeves. You're going to turn them upside down so that the larger armscye becomes the lower hem of the bell sleeve. I sewed the elastic casing by hand because the ease situation would have been a pain on the sewing machine. When I first tried on the sweater I was sure I'd have to shorten the sleeves, but in fact once I had fitted the sweater and shortened the shoulder they were only just barely long enough.

Cut the wrist edge into the rough shape of an armscye. I didn't worry about being too precise here because the sweaterknit stretches and I knew I could ease the sleeve into the armhole. I did pull the sleeve onto my arm up to the shoulder to make sure that it was about the right size. My sleeve was tapered at the wrist; if yours is not you might need to take it in a little to fit in the armscye. Set in your sleeves and thread elastic through the lower casings; you'll need a longer piece of elastic than you think because the sweaterknit adds a lot of bulk to the casing.

Sleeve Treatment

I could have stopped there, but I am just not a fan of the crew neck. This is not for the faint of heart because you're going to have a wiiiiiide neckline once you cut off the original finished neck edge, there is no way around it. First I cut off the collar as narrowly as possible and immediately rushed to the serger to finish the edge. Then I stabilized the edge by twin-needling over clear elastic, stretching the elastic slightly to take up as much of the neckline as I could. Then I squared off the neckline by hand-gathering at a diagonal from the neckline toward the shoulder.

Secure the Neckline

And voila! This isn't a super-quick project; it probably took me about four hours all told. So allow enough time for yourself. I put a decorative pin over the center pleats to emphasize the empire shape; it's not functional. I am so happy finally to have a sweaterdress! Especially for under $5!!!

All photos are here.