Friday, December 7, 2007

A Wine Gift Bag with Pocket

The Sew Mama Sew blog did 30 days of handmade gifts in November, links to all kinds of tutorials and gift ideas for the sewist (here's the compiled list). It was a really fun read and there were lots of ideas that sparked my interest. I especially appreciated all the generous people who have posted tutorials. So when I found myself needing to create a wine bag, I thought I should spread the wealth.

After law school I clerked for a judge (two judges, actually) and he recently celebrated his 20th year on the bench. I didn't want to get him any tchotchkes or dust collectors, so I figured a nice bottle of wine is always appreciated. This occasion called for heartfelt words, not a scrawled signature on one of those little cards with a punchy hole threaded through a drawstring, so I puzzled a bit about how to attach a real card to a wine bag. I thought of punching a hole in it, but that's just not classy. Then I thought of a pocket. Of course!

This method works only with fabric that is attractive on both the right and the wrong side. Jacquard was an easy choice here.

Start by measuring your wine bottle against the fabric. I ended up with a rectangle 24" long and 13" wide. This should work for any standard bottle of wine. If you have champagne or a magnum, you'll need to do custom sizing. My pocket ended up a little tall, so I could have shaved an inch or two off that, but it was totally fine.


Next, fold up what will be the pocket based on your bottle size. Mine was 9 1/2 inches from the raw edge of what would eventually be the pocket.


Mark the pocket foldline.


Turn the pocket and top edges under. I did about 3/4 of an inch, and double folded them to hide the raw edges. They need to be hemmed on the opposite sides from one another--the pocket toward the wrong side and the top toward the right side (or vice versa--it doesn't really matter).


Now stitch along the pocket foldline you previously marked, with the finished pocket edge wrong side out.


Once you've stitched the foldline, you need to sew the side seam. I did a French seam so it would look all nice. To do so, fold the pocket up along the seamline, wrong sides together (so the bag looks as it will when finished). Make a narrow seam along the side, and finish with a zigzag. Next time I make this bag, I will sew a ribbon into the side seam at this point for tying around the neck of the wine bottle. I had a hard time keeping the ribbon in place on the finished gift.


To complete the French seam, turn the bag wrong side out and stitch the side seam again, encasing the raw edges of the first seam.


Turn the bag right side out and voila! Slip in your wine bottle, tie with a ribbon, and tuck your card or gift into the pocket. I was worried that having the pocket seam along the bottom might make the whole thing unsteady, but even with my thick jacquard the wine bottle stood up just fine.


If you want to make a little gift to go with the wine, it's easy to make little wine charms with ring-sized memory wire and beads. Memory wire is really hard on cutters, so use old ones if you have them.

Sunday, November 4, 2007

How to Dye Your Eyebrows

There was a thread on Pattern Review about redheads and what colors are flattering. I'm not a real redhead, but I play one in my life so I read it. It turns out, not surprisingly, that not all redheads can wear the same colors. There was also a fair amount of discussion of eyebrows and what to do about them for those of us who get a little help to justify our fiery tempers. I never would have thought of dyeing my eyebrows until I went to get my hair cut several years ago and my hairdresser told me to hang on a minute so she could get the dye off her eyebrows. I figured if a trained professional said it was OK I'd give it a shot. It's great! It makes a huge difference in my face when I remember to dye them, as otherwise my eyebrows are clear (I'm a natural blonde).

**REQUIRED LEGAL DISCLAIMER** I am not a doctor or a cosmetologist. There is a danger from dyeing your eyebrows. Be careful, and dye at your own risk. I am providing this information for free and have no liability for anything you may do. Also, this will only work for dyeing your eyebrows darker; I don't know how to lighten eyebrows.

So here's how you do it.

You can either go to Sally and buy professional products (my choice) or just buy a box from the grocery store. At any rate you need developer, dye, an eyedropper, something to mix on (I use a yogurt lid), some q tips, and some cotton pads or balls.


Developer comes in different numbers and I know they somehow correspond to whether you're dyeing lighter or darker. I just don't know how they correspond. I chose 20 Vol because it's in the middle. It works fine. Make a small puddle on your lid; you really don't need much. It's thick and it helps to use a q tip to get it out.


I have an eyedropper whose sole use is hair dye. I recommend you get one too because it's really hard to pour the right amount. Drop dye into the developer so that they are in equal amounts.

As you can see, I'm a fan of the L'Oreal Mega Reds line. For my eyebrows, I use either light intense copper (shown) or a mix of light intense copper and medium intense golden copper. If you have darker skin you might be able to use a darker color.


Mix up the dye and developer using a qtip until it thickens. It only takes a second. You actually don't need to make as much as I did, I don't know why I mixed up such a big batch. This would have done 3 or 4 pairs of eyebrows. Once the dye and developer have been mixed they lose their potency really quickly, within a couple of hours. So you have to mix up a new batch fresh each time you color.


Here's where technique comes in. Using a q tip, apply the dye to your eyebrows opposite the direction of hair growth, and apply only to hair. Do not get it on your skin. Clean up any that gets on your skin with a q tip. If you are nervous about getting it on your skin, you can put a thin layer of petroleum jelly such as Vaseline on the skin around your eyebrow to create a protective barrier. I don't bother with this, though.


You can see here that while I have loaded the hair generously with dye, it doesn't go all the way down to the roots and touch my skin. Hair dye will color your skin. It fades after a couple of days, but you'll look really funny in the meantime if you don't take precautions.


My fine blonde hairshaft takes 13 minutes to dye. This is about half the time it takes for my whole head to dye (well, took, I've switched to henna for my hair which is 2 1/2 excruciating hours in a plastic shower cap--but the color is so much better and so much less damaging that it's worth it). Don't leave on your eyebrows as long as on your hair--try half at first and see if it's enough. I made the mistake of dying for 25 minutes the first time I tried it. I had cheeto caterpillars on my face.


When your time is up, wipe off the dye first with a dry cotton pad. When you've wiped off as much as you can use a damp cotton pad to clean it up the rest of the way. No need to use soap, but unlike with dyeing your whole head it's ok to wash that day--you don't have to wait three days to wash your face!


Immediately after you remove the dye, they're pretty bright. It will tone down quickly (usually after several hours).


And voila! Matching hair and eyebrows. Nobody will ever know your secret.

Sunday, August 5, 2007

Cooling My Jets

After my frenetic sewing of the past few weekends, I needed a break this weekend. Even though it was a three day weekend for me, I still wasn't quite ready to face up to a big project.

Not that I did nothing, of course.

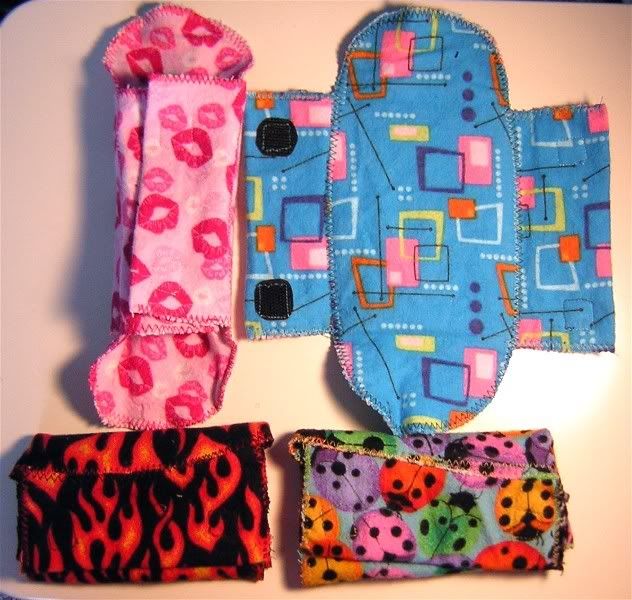
I made the cloth pads in the previous post.

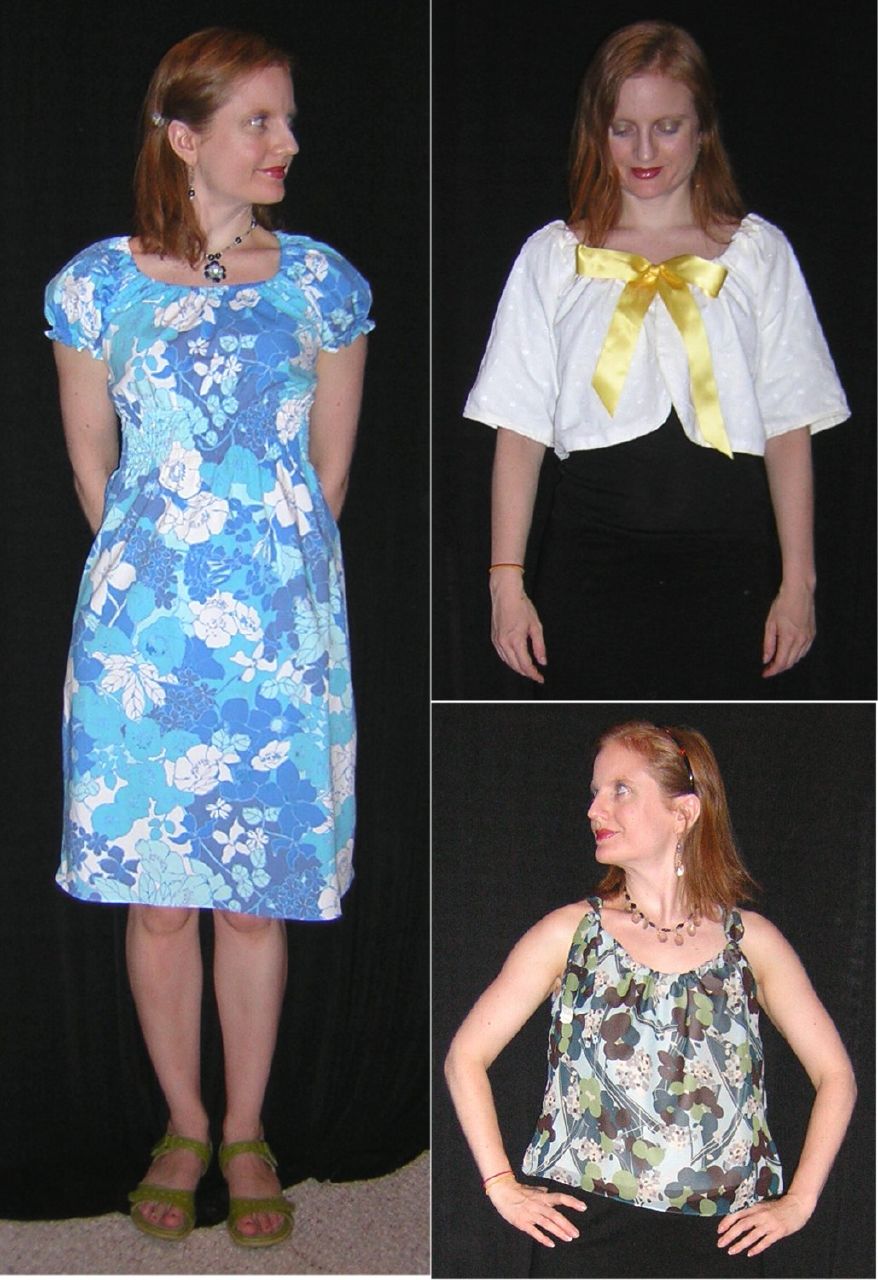
I finally turned a dress that didn't fit into a skirt. I couldn't bear to take a before pic of the dress because it looked *so* bad on me. I got it from a discount store that was going out of business somewhere between 7 and 9 years ago. It was in Austin where I went to law school, and my sister still lived in Austin because she was with me when she bought it. I'm pretty sure it was before she had kids so that makes it 9 years ago, but she moved away from Austin 7 years ago so that's the most recent it could have been.

It was a beautiful dress; the top was very simple sleeveless (but not spaghetti straps). For that reason it took me many years to decide to make it a skirt. It was such a pretty dress that I didn't want to "ruin" and knew I should give it away so somebody could enjoy it. But finally I realized that in order to fit into that dress, "somebody" would (1) need to be at least 4 inches taller than me for the torso scale to be right; this one isn't hard as I am only 5'1", but (2) have a 25 inch waist at the outside, preferably 24 inch, *and* (3) have a 34-36 inch bust, with a B cup minimum. There are very few somebodies like that out there, and the odds that one of those somebodies would be shopping at the thrift store rather than, say, being plied with drinks at the nearest bar seem very slim and so I decided I could keep the dress and make it into a skirt. When I bought it, there were lines of embroidery floss across the bottom but in the front only and they were gaudy and hideous (I expect the reason why the dress did not sell at the original price of $78). I took those out when I first bought it. The gray is actually silk organza, though the underskirt is acetate.

I also turned a bunch of Fashion Fabrics Club swatches into a trivet.

I am not a quilter, but it seemed a waste to throw away all those precut little pieces. I didn't have any batting or old towels or thick fabric to pad it with, so it's a trivet rather than a potholder. After visiting the Gee's Bend quilt exhibit with Cidell, I was a little inspired. I don't like the rigidity of the patterns (no big surprise), but there were some beautiful free form quilts with just a bunch of pieces sewn together that I really loved. So I've been toying with turning some of my natural fiber scraps into free form quilt-ish items. I think I may part with a towel to make potholders.

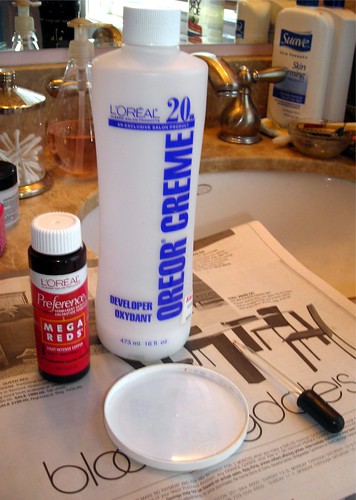
I was supposed to be cleaning, so naturally my eye was attracted to unfinished projects. Finishing projects is cleaning, right? It's a slow way to clean, but slow and steady wins the race. I enjoyed Sarah's article on sweater reconstruction on PR a while back (December? I think--I would link to it, but only PR members can read back articles. I am a member so I can look it up if you are too and are curious.) One of the suggestions was to turn a sweater into a cardigan by cutting up the center and crocheting the cut edges to finish them. I have some nice sweaters I'd like to alter, but I wanted to start with a cheap one.

This sweater is from the girl's department of WalMart. Girls' tops fit me well across the chest (le sigh), but the sleeves are a little too short and the tops can be a tad too short. This one was just too short to wear as a sweater. I carefully cut up the center and crocheted the sides with embroidery floss (all six strands). I did three rows of crochet. It was unfinished because I ran out of floss on the third row of the last side. I had bought more, but hadn't picked it up again until yesterday. It will be held together with a button (from my FM 4 lb bag, natch) glued to a bar pin. So it will look buttoned, but it's actually pinned. Quel clever, no? This project took me only about 6 months to complete. I'm sure the rest of those sweaters will be altered in plenty of time for winter. ::rollseyes::


All this crocheting put me in mind of a type of bracelet I make, so while I was on the phone with a friend I worked this one up.

The stones are from a friend, whose aunt sent them to her. I *believe* they are very low grade Peruvian opal. The pic is a bit dark, but in person they are whitish green, with some darker and some lighter. It's a very organic bracelet and because I did so many stones on it I think it might be too much for my somewhat freakishly small wrist. But since I made it to fit me I don't know if it will fit anyone else. My source for 28 ga sterling silver wire is artbeads.com. From these two projects you might believe that I can crochet. I cannot. To call my crochet skills "elementary" would be an untenable social promotion like putting the football player who can't read into the 11th grade so he can stay on the team. I can do chain stitch and then single crochet or whatever it means to do chain stitch while catching the previous chain stitch. That is all. My mom is an amazing crocheter. Maybe someday I will have her teach me. She has tried in the past, though, and it never took. I learned my crochet "skills" from the internet.

Today I met up with a friend at the Renwick Gallery, part of the Smithsonian (and therefore free admission!). It's part of the Museum of American Art, though located near the White House, and specializes in craft. I can't believe I had never been there before! I think a lot of the exhibits are closed, but I liked what I saw. There is a large gallery called George Catlin's Indian Gallery. The artist traveled through the American West just before the Trail of Tears to try to document Native dress and culture. The paintings were much more sensitive than I would have expected--the artist did not seem to be after novelty value or caricature. There was not much by way of craft, unfortch, but there are some a-mazing glass pieces and some trompe l'oeil furniture that was really incredible.


Anyway, I took watercolor classes for a couple of years with some girlfriends, and near the end of our classes our teacher suggested I incorporate fabric into my art. I did a piece in class that I really loved and then started saving fabric scraps. Which grew and grew into a monstrous collection and it had been two years since I was supposed to make them into a collage so I decided it was time for them to go in the trash. But first, I figured I would give myself one last chance to do a collage, hoping to be inspired by my visit to the Renwick. I convinced my friend to do it with me and so I finally made a fabric collage. My theme was textures. You can see why I am a crafter, and *not* an artist. Those years of classes were a bit torturous to me (I did them with girlfriends because we wanted to make sure we'd all get together at least once a week). I can't do art, never could, never will be. By this I don't mean that I am not artistic or cannot appreciate or create beauty. But not on paper, canvas, wood, or any other flat surface. The tomato soup I made from farmer's market tomatoes came out much better than the collage, so at least the afternoon was not wasted! I also made some white bean, quinoa, shiitake, and spinach soup to bring for my lunch this week.

I feel pretty relaxed, but I won't be able to sew next weekend. Saturday will be an all-day bachelorette winery canoe trip (don't ask), and Sunday will be recovering from the all-day bachelorette winery canoe trip. I am saddened by the upcoming loss of my weekend.

Saturday, August 4, 2007

Menstrual Madness!


So, there's a thread over on PR on the Miscellaneous board right now about "alternative, reusable menstrual products." This is a topic near and dear to my heart, so I'm going to go ahead and get all TMI on your ass.

I <3 cloth pads. That's right, I said it. I am not a hippie dippie (well, i am a vegetarian who uses cloth pads) armpit-non-shaving pagan moon goddess. I'm a bougie yuppie (except for the vegetarianism, cloth pads, walking everywhere, etc. etc.) with a cute wardrobe and conventional grooming habits. What I'm saying is, there's room for cloth pads in every woman's life. It doesn't have to be a political or a feminist statement (though for me it is both), it can just be because they are so much freaking more comfortable than plastic disposable pads. They are more absorbent, too, believe it or not. Three layers of cotton flannel lasts three times as long as a disposable pad before it needs to be changed. And, hello! So much cuter! Check out the adorable ones above, made for a friend who is curious to try them.

I didn't start using them until I had a washer/dryer in my own home. I will exempt anyone who doesn't have that luxury from my request that you just consider it for even a split second. I will also exempt you if you have a really heavy flow; mine is light enough that I don't have to change during the workday so I don't have to carry a used pad around with me. Everyone else: just think about it.

I rinse them out and let them dry after use, and then wash them whenever I'm doing laundry. They don't smell bad or do anything scary while they're waiting for the wash.

They're really easy to make and so much more comfortable than disposables. No chafing! No inadvertent bikini wax when the adhesive catches you! No crackly embarrassing sound when you walk! No landfill-filling! (Ok, that last reason is kind of hippie dippie, but that's ok by me.)

If your first reaction is: Ick, I get that. When pads are being demonstrated on television they use blue liquid because OMG MY PERIOD IS SO GROSS!!!!!!! I WANT TO DIEEEEE!!!!!! But try to have a second reaction. Why is your menstrual blood soooooo disgusting that it has to be mummified and hidden at the bottom of the trash can and thrown to the unspeakable depths of the landfill? Do you take that much care with the tissue you use to sop up the blood when you stick yourself with a pin when sewing? Probably not. Blood is blood. Menstruation is normal, not shameful or embarrassing or gross or a terrible, horrible thing that happens to you every month (easy for me to say, I don't get cramps when I'm on the pill--if you get cramps I'll give you the terrible horrible bit).

To make, just trace around your favorite brand of pads, cut out three layers of flannel, make wings, zigzag, flip over and zigzag from the other side, add velcro, and voila! In wearing and making them for a couple of years I have learned that (1) the wings need to be long compared to the length of the pad to keep them from riding to the back of your underwear when you walk, and they need to fasten at the front and the back of the wing, not just in the middle. Someone on PR suggested using corduroy for the bottom layer to stick them more in place, and for people with a heavier flow you can use PUL for the bottom layer. (2) When fastened, the wings need to be slightly narrower than the pad to keep it from crumpling up inside your underwear. (3) You can use velcro if you round the edges of it and overlap the two velcro pieces *exactly* when you put it on.

Monday, July 30, 2007

The Wardrobe

It is done. Well, at least the wardrobe contest entry is done. There will still be a lot of tweaking before the suitcase is sat upon and zipped. I need more skirts that will travel. Really only the blue knit skirt will travel well. I wore the green bias skirt to work today (with the Burda blouse) and it wrinkled even faster than my face is trying to do (I am, shall we say, a little aware of my age spots and wrinkles).

I did everything but the four dresses and the swimsuit in an 11 day period, of which 8 were sewing days. I did the scarf and started the blue knit skirt during the week; everything else was done on a weekend day (counting the night before the official weekend starts and remembering that the first one was three day weekend). I don't usually sew during the week because I get too obsessed and can't fall asleep. I generally have to finish a project in one day, or at most cut it out one day sew it another day because of this problem. It's kind of annoying and it sometimes keeps me from starting complicated projects. On the other hand, I have very few UFOs. Not to say none, of course. But few.

Looking over it, I can see why people are fascinated/horrified at what a prolific sewist I can be. I am kind of fascinated/horrified myself. But I promise I am not a sewing hermit! The first weekend I had movie/dinner plans with a friend Friday, movie/wine & cheese plans with a friend Saturday, and farmer's market plans with a friend Sunday. The second weekend I admit I didn't do anything social Friday because I stayed up all night reading Harry Potter, thereby turning down an invite to a wine tasting party. Saturday I went out dancing. Sunday I had farmer's market plans with a different friend. But I will concede that other than these events I was sewing or asleep (with occasional stuffing of nutrients into my face).

I am clawing my way to yards purchased/yards sewn parity, one hard-won yard at a time. I am now up to 88 yards sewn, 93 yards purchased. So very, very close...

Way too many details about the wardrobe in the review. I am as prolific a writer as I am a sewist.

Friday, July 27, 2007

Using Up Scraps

So, sewing the whole wardrobe from stash was quite a challenge. I have been aggressively buying fabric this year--I totally can't deny that--but I have also been aggressively sewing. I'm at 83 yards sewn in my rough tally on my PR profile; there are about 4 or 5 yards not counted in it yet; purchases are recorded at 93 yards. I had plenty of stash built up before the year started, of course, but I have outgrown a lot of it/become more of a fiber snob. I was really scraping to get enough fabric in coordinating colors to fill out the wardrobe, which helped me look creatively at some smaller pieces of fabric I had.

The floral print here is a beautiful print in colors I love on a hideous fabric. It is almost impenetrable by a needle and is a misery to sew (though a stretch needle, knock on wood, seems to work almost well). It has a great drape, though, and the print is really nice. I bought it to accent an infinity dress I made last year. I lined the straps with it and made a reversible tube top of the dress fabric and the print fabric. It was kind of a disaster. Lining the straps made them way too thick and ugly where they were knotted together, so I ripped out the looooong long seams of the straps. The fashion fabric is really cheap and thin and rolls together really terribly so I started ironing interfacing along the edges to give it enough body to be hemmed but got bored of it and gave up about 1/4 of the way through. I guess I can pull it out for the UFO contest.

Anyway, this is why I had only a little bit of this print. I had just enough to cut out the upper bodice. The scraps from it were quite small. It was pretty serendipitous. The blue heavy knit is from my Mermaid Parade costume and there was more than a scrap left of it, but less than a full yard (I still have plenty to make a skirt). I was pretty pleased with my resourcefulness in combining them, using up stash, and making something to fit in with my wardrobe colors.

What's slapdash about this project are the sleeve bands. I didn't measure how wide the sleeve openings were, just cut binding pieces that "seemed" long enough. They weren't. Rather than measure and re-cut I stretched the bindings to fit the sleeves. This looked horrible so I ripped it out. Again, rather than actually measure I cut some extension pieces. The bindings still weren't quite long enough so I stretched them to fit on the under part of the sleeve. They don't look horrible like before, but are not quite right if you know to look for it (which nobody but you will). This is an instance where being slapdash is pointless and stupid. It would have been *easier* and *saved time* to measure in the first place. I even knew that at the time. I just like my slapdash ways.

You can read the review if you'd like.

Thursday, July 26, 2007

Here's a story...


I finished up my entry for the One Pattern, Multiple Looks contest. I wanted to play around with collages because I'm going to have to make a big one for the Wardrobe contest. I conceived of the Brady Bunch idea and decided I HAD to do it. I'm disturbed by how shrewish my tank incarnation looks on the lower right. I was smiling in real life, but somehow it looks like a grimace on the camera.

This made me start thinking about how they did the credits in the Brady Bunch. At first I was all, well you just drag everything into a window on the editing software.... Um, no. That's not how they did it then. But how did they do it? Before I went to law school I worked in public radio in Shreveport, Louisiana (where I had gone to college). We were a dinky station, and still edited sound on reel-to-reel tape. I did arts reporting and cut my tape with a razor blade and then spliced it together with special blue tape to create my pieces. I felt very cool having such an esoteric and archaic skill. But simply cutting frames out and putting them together wouldn't have worked to create a multi-frame image. However they did it, I'm impressed they did it without computers.

I have to confess, there isn't much slapdash about these projects. They were too easy even to take shortcuts. You can read the review if you'd like.

Monday, July 23, 2007

Final Tally

I accomplished everything on the list over the weekend.

-three skirts
-four tops
-one convertible skirt/top
-one (reversible) hat to go with everything
-1:15 marathon photo session. I think I still have flash spots in my eyes.

I want to add one more skirt (easy peasy knit tube), a belt with hidden zipper compartment for credit card security, and a scarf that can be used as a shoulder cover for entering churches. I may not finish all these before the contest deadline.

Then there's the little matter of doing all the reviews.

I am tired.

And now I am ready for Harry Potter. My copy, according to USPS tracking, was delivered to work at 7:00 this morning. I have not seen it yet. The mailroom is about to get acquainted with me if it doesn't arrive soon.

Sunday, July 22, 2007

Wardrobe in a Weekend?

The productivity is insane. So far, three skirts, one blouse, one knit top, and one convertible item that can be a skirt or a top. Two more tops cut out and ready to sew. My shoulder hurts and I think my sewing machine is getting tired. Taking pictures of all of this is going to be an ordeal. I live alone and have no boyfriend so it's just me and the timer function of my camera. Over and over and over.


This post brought to you by the fact that I'm a night person and have stayed up this late just because I can.

Friday, July 20, 2007

Tragedy! (of minuscule proportions)

So, I decided to go ahead and see what I could get done this weekend for the wardrobe contest. I spent Thursday night inaugurating my three day weekend of sewing by cutting, perhaps my least favorite task. I managed to get two skirts and most of a blouse cut out while watching NBC reruns of The Office (I keep hoping for Phyllis's wedding because I missed that one during the season--no, I don't have TiVo, or even cable, much to Cidell's chagrin) and 30 Rock. Luckily Cidell called and spared me Scrubs. I used to love that show but now it gets on my nerves. Cidell went to bed and then I spent Victoria "Posh Spice" Beckham's show trying to fit a skirt pattern onto a piece of fabric that was really not large enough. I refuse to call it a reality show, because even if it accurately reflected Posh's life (doubtful), her life is not reality. I'm curious if the American "personal assistant" is actually a producer for the show. She certainly seemed to do more assisting to create camera-friendly situations than assisting in the sense of being helpful. I will now think of Posh every time I wear that skirt and the blouse.

Anyway, woke up this morning around 10 feeling really good. I'm not a morning person and in general waking up any day at any time is sheer agony for me. This morning I was awakened by the generator that has awakened me for the past several mornings. Apparently a neighbor across the alley is having an electric gate put in, and apparently such work can only be done between 6 and 8 in the morning. Gah. This on top of the roadwork on my street every night starting at about 10 pm. Somehow despite all this I was chipper and ready to sew!

The first skirt, a Patrones project, was going well (in the sense of coming together--I'm not hyper-enthused about the way it looks) until the very last step, putting a buttonhole in the waistband. My sewing machine did *not* want to sew through all the layers and kept tossing off the thread. I finally got the entire buttonhole in and went to open it up with the seam ripper. My old seam ripper finally died a couple of weeks ago; the metal part came loose of the plastic handle. I switched to a new one and was amazed at the difference! It was like butter! Seam ripping became almost (I did say almost) a pleasure. Well, RIP New Seam Ripper.


The metal just broke inside the buttonhole. It looks all sad, like a hand that has lost a thumb. I was quite upset. First, because New Seam Ripper and I were just getting acquainted, and so far we were getting along quite well. And second, even more tragically, I had to halt my sewing to go get a new one. I went right then and there because I know myself too well. Had I not gone to the fabric store right then I would have started a new project, and then reached a point where I needed a seam ripper and would try to use scissors absolutely *knowing* that it was a dumb idea and then I would snip the fabric and ruin the project and be mad at myself.

I live in the District, which I love. I can walk downtown, to DuPont Circle, to the U Street Corridor, to Adams Morgan, to Union Station, even to Georgetown in good shoes and nice weather. However, I cannot walk to a fabric store. They are all* out in the suburbs and require driving. I hate driving.

*This is not technically true. There is a place called Exquisite Fabrics on K Street, but I have never found anything in there I'd like to buy.

I have also made a vow of NO FABRIC IN JULY AND AUGUST. I must shout this at myself, so pardon my tone of voice. The easiest way for this to happen is not to go to a fabric store. Not so easy is not to go on the internet but since I will be imposing a Harry Potter Media Blackout as of now that will be easier too.

I went out to Seven Corners in Virginia (20 minute drive there). I went to JoAnn instead of G Street because I knew I was not going to be tempted by any of the polyester crap there. I bought four spools of thread and two seam rippers (I will not be caught unawares by this type of tragedy again) and felt quite virtuous about my restraint. Not even any interfacing or quick glance in the remnants bin! Since I was already out in the boonies I went to Trader Joe's and got a few items I needed. There was traffic on the way home (for some reason 395 going *into* Washington is terrible in the afternoon rush, which starts around 1:00 on Fridays), so the total round trip cost me 1 hour and 30 minutes. *le sigh* I was meeting a friend for the 4:20 showing of Harry Potter followed by drinks and dinner so I was racing against the clock when I got back.

I still managed to finish three skirts, and have cut out two tops for tomorrow (in addition to the blouse cut out during Posh). I have decided on the fourth top and will cut it out tomorrow.

I might actually finish this wardrobe thing. That would be kind of fun. I am not going to get too excited though--counting chickens and all that. I haven't even started to attempt to tackle the hat.

Thursday, July 19, 2007

Wardrobe Contest/Greece Trip

So, when the Wardrobe Contest (then called Sewing with a Plan, which raised somebody's copyright hackles) was announced I was all gung ho about it. I don't have a plan, that's part of being slapdash, so at first I objected strongly to the idea of *planning* sewing. It seems to defeat the fun. But I do go through color themes/manias (take your pick as to whether you prefer the cheerful or the psychologically loaded term) and I was hoping to make this an orange and yellow summer and call my wardrobe "Orange Juice and Lemonade." I bought a lot of fabric, natch, but couldn't find enough yellow to slake my thirst and of course wandered off to do a bunch of other projects. I completed only my orange plaid dupioni self-drafted skirt and then gave up on the idea (well, technically the jacket in the previous entry was also part of my plan, so I didn't give up on it wholly. And I'm not buying any fabric in July and August so eventually I'll probably get around to some of the orange and yellow fabric previously purchased).

Now I am trying to decide whether to revive the dream. I leave for Greece in about six weeks and it's time to start planning what to wear. On my trips is the only time I do create interchangeable wardrobes. At home I have a giant closet full of goodies to choose from and abhor looking the same from day to day. Traveling, I choose a color theme, buy or make a bunch of tops and bottoms that go together, and make an accessory to tie it all together. To honor the blue and white architecture of Greece that I love so much (in pictures anyway), my colors are blue, green, and white. For Italy my colors were black and pink and I made a purse (using my ultra-spy burglar detector of choice in the remote chance of a pickpocket--velcro) out of a pink sparkly fabric, the remainder of which I just gave to Cidell, on which I embroidered a big flower when I was going in for surgery.


For Scandinavia, my colors were green and brown with a little bit of purple, and I made a sash belt with a hidden zipper in the lining I used to store my extra credit card in, again in case of pickpockets. I do not believe in money belts, that seems way too extreme, but I do like the idea of having two credit cards and separating them (I travel alone). For Italy, I sewed tiny velcro pockets into the waistbands of my skirts that held the extra credit card.


I have now found out that the rules for the Wardrobe Contest have been changed to coincide almost exactly with my philosophy. 10 items total, one of which must be an accessory that goes with everything. 3 bottoms, more tops than bottoms (meaning at least 4), 1 accessory, and the rest can be filled out with dresses or jackets.

I am stuck on tops. I really only have one blouse I know I want to make in my queue, an eyelet (using up the rest of those "curtains") one based on a Marc Jacobs dress. I have some great vintage fabric in a sheer that I have been looking for the perfect pattern for, but I still haven't found the perfect pattern. I also have some green/blue knit leftover from my 80s top that I could use for a top, as it matches my blue/green/white theme. I just don't know what pattern to use that's worthy of the cool fabric. I've been thinking of making another twist top but I don't know if that's special enough. And I don't even have any other ideas. Well, thinking about it, I think the top I'm making for the one pattern, multiple looks contest will match the plain skirts, but I don't think it's *quite* in the right colorway to really go with the rest of the group (it will be teals and browns with some green).

Skirts I can make a plain green bias skirt (should be easy--it's an elastic waist pattern), a skirt out of some Ikea upholstery fabric I got, and a skirt from Patrones out of some linen-ish fabric that's been in my stash since who knows when and needs to be used or tossed.

I've already got three dresses (made since May!) that will fit in, which is one too many (as there are only 2 free slots after 3 bottoms + 4 tops + 1 accessory).

The accessory will be a big sunhat, for which I purchased buckram when I was visiting Cidell in Baltimore.

The catch, of course, is the deadline is July 31! It started May 1. I have a three day weekend of sewing planned, but I'm pretty sure there's no way I can finish everything this weekend, and I'll be spending every night next week (not that I sew during the week anyway) reading Harry Potter. I will also have next weekend but it's only a two day weekend that I think will be filled with sociability and catching up on sleep lost to staying up late to reading Harry Potter.

Well, I never officially click "enter contest" until I have something to enter so I can ponder this for a while longer.

Wednesday, July 18, 2007

Raglan Sleeve Jacket

Jacket Front

I am finally getting around to doing my entries for One Pattern, Multiple Looks! A two month contest and I do all the sewing the last two weeks. Typical. You can read the official pattern review here.

A note on the pic--I made the dress I'm wearing for my 22nd birthday! Eleven years ago! I hadn't worn it in *years* but held onto it this long because I made it the summer after I graduated college, when I was a live-in nanny for one of my professors. His daughter's birthday was also in August and I made us matching dresses. Although I was very close with the family when I lived with them, for some unknown reason (I mean really unknown) they stopped communicating with me when I moved away for law school. It was quite painful to lose what felt like "family," especially because I didn't know why, and this dress was one of the few links I had to them and that time. Well, everything really does come back in style because with the current maxi-dress trend I wore this work Monday and felt completely stylish. I'm glad I never got rid of it.


Pattern EnvelopeThis is the first variation on this vintage 1978 Stretch & Sew pattern (#1582) purloined from my mom's sewing room.

I have been using this pattern for over a decade now, which is a little scary! I think my first version was for a costume based on the 1990s Kenneth Branaugh/Emma Thompson movie version of Much Ado About Nothing, a really lovely movie if you haven't seen it. Try not to think about what happened between them afterward. Then there was the orange floral calico one I still miss. It is bad for me to be able to remember--much less miss--specific garments I have gotten rid of. Cleaning out my closet is emotional and difficult enough without knowing that I won't necessarily forget about something the moment it's gone and realize I was silly for getting all sentimental in the first place. I just need to remind myself of the hundreds (hundreds! I tell you) I have gotten rid of that I don't remember. Like the gray v-neck sleeveless t-shirt dress that was a little too short. Wait, I remember that one, don't I?

So, what's slapdash here? Mostly the matchup between the lining and the fashion fabric. I'm pretty sure I put the fashion fabric sleeves in the wrong sides (meaning backwards--left sleeve in right side, back of sleeve to front of garment and vice versa), because I had to trim down the sleeve at the neck a *lot* to get it to line up with the front neck edge. There appeared to be some major iron shrinkage going on, even though I pre-washed and dried, so that made the matchup wonky too. I had to pin the two pieces together at the neck and then trim off the bottom, then sew the sides and back together, turn, and then do another trimming & trueing before sewing the neck casing. And then I had to get the sleeves the same length! I don't know if this counts as slapdash because I actually did try to get it right, and I think I did ok because I don't notice any distortion anywhere.

Here's the "official" picture of the front curve topstitching.

Top Stitching


Here's the other side:


I think that little point counts as slapdash.

Monday, July 9, 2007

Making Your Own Dress Form...

...or trying to, at any rate.

Over the weekend I went to Baltimore to hang out with Cidell. As we are sewists, we were not content just to eat and drink and shop (though we did a fair amount of each). We had a mission: Mission Paper Tape Dress Form. We figured we'd alter a few t-shirts, slap on a little tape, slide together some PVC, and voila! Perfect us-es!

Not quite so easy. Apparently this is an iterative process with quite a learning curve. Right now that curve is bulging out at my double's waist. We're learning so you don't have to.

One thing we did conceptualize and realize to (almost) fruition is the stand. We conceived of a three-way convertible stand/dress form, spent half an hour in the PVC aisle at Home Depot flirting with and mystifying the (very obliging) Home Depot guy. We drew, we measured, we sawed, we glued with foul foul PVC cement, we malleted and in the end our crazy dreams (almost) came true (we are missing a few supplies).

The drawing below shows how the completed stand/dress form works. It can be used either on a tabletop, on a traditional stand, or hanging to fit pants at the hips and waist. I listed the materials needed on this page. (NOTE: Click on the pictures to enlarge.)


This drawing shows the nitty gritty of how to put everything together.


Cidell has put up some details of how to do the taping of the dress form itself, and I'll write more later (I'm worn out from our weekend!), but this will get you started.

Blogger only accepts JPEG and GIF format for pictures, and unfortunately the scanner cut off the edges of the drawings. However, I have also scanned them into PDF form, which looks great, and I will happily email you the PDFs. If I don't already have your email address, leave it in the comments in the form:

janedoe[underscore]sewist at hotmail

If you write it out like this web spiders can't harvest it. If it's a common domain name that I'm going to know ends in dot com, don't include that, just to keep your address safer from harvesters. You can also leave a comment for Cidell, who has set up some sort of fancy commenting system that asks for your email but doesn't publish it and she will send me your info or just send you the PDF (um, I hope you don't mind that I'm committing you to this, Cidell).

Thursday, July 5, 2007

Patrones 253, #40 Philosophy Shirtdress


Another pattern from Patrones. I am addicted to this magazine's patterns! Thanks a lot, Cidell. The official pattern review is here and the web album is here.

I said it in the review and I'll say it again here: I was verrrrry doubtful about this dress as it was on the sewing machine. Usually I love the process of trying on a garment as it slowly goes from flat fabric, to cut out pieces, and on through the process of assembly. It's so fun to see it take shape and become real clothes. With this one, at every step I was afraid I should just cut my losses and abandon it. It did not look good until the only things left to do were buttonholes and hems. Then I started really liking it, and now I love it.

I never wear anything with a fully buttoned neck, partly because I think my collarbones are one of my good features and partly because I love to make and wear jewelry so I always wear a necklace (this dress gave me an excuse to fire up the torch and make the earrings to go with it). I think with the buttoned up placket, rounded collar, and wide belt the style is a little Gothic Lolita (here are some photos from flickr for examples), which is not normally my style and plus my age makes it kind of laughable, but I am drawn to all things costume-ish so I guess it's not that surprising that eventually I'd end up with something Gothic Lolita in my wardrobe. I will not be carrying a teddy bear while wearing it, but I cannot guarantee I won't carry a parasol. I got one last summer that I carried a few times, and was told I was fabulous while walking around in Logan Circle (a gay area of town). That's my stamp of approval. Actually, I think I get catcalled more by gay men than by straight men. Perhaps this is another piece to the puzzle of my singleness. Straight men do not appreciate my style.

So I'm sure you're sitting there going blah blah blah yadda yadda, let's get to the good stuff! So here's what's slapdash about this project: the tucks. I carefully chalk marked the tucks on the inside of the underlining. I considered thread tracing, as Cidell did for her eyelet dress. That lasted about 8 seconds and then I laughed and went back to chalking. I pinned the tucks as drafted, and it seemed it make the front too small, so I made them half as wide as drafted. The dress didn't have enough shape when the tucks were the same width all the way down, so I took them in a little around the bust (why not around the waist? It just didn't feel right. I think taking them in at the bust somehow makes it look bigger because they curve around it.) The slapdashedness comes in where I didn't take out the old stitching. So there are two rows of stitching where I took the tucks in. You can't see from even two feet away, so I figured eh, I'd save myself the work. Also this fabric is quite delicate and I didn't think it would take well to the seam ripper.

In fact, the delicateness of the fabric is my only grip. I don't know if it came like that or happened in the wash, but there are two large holes in the fabric near the hem in the front. They are each about the size of a quarter and the fabric has just disintegrated there. I didn't notice them in cutting and didn't have enough to recut the entire front. I patched them from the back with fusible interfacing, but after a few washes I think they will be out of control and ruin the dress. I am pretty upset about that. I guess I'll have to hand wash this one, not getting the hem area wet (and certainly not agitating it) if I can help it.

Tuesday, June 26, 2007

Fabric Shopping in NYC

So I was in New York over the weekend for the Coney Island Mermaid Parade (of which more later, but you can get a sneak peek at the pics if you're dying to see). This of course meant fabric shopping!

I took the Chinatown bus for the first time, about which I was oddly nervous. I don't know why. But I bought my ticket in advance beforehand and showed up on time and gained admittance and rode the wheels on the bus going round and round for a long long time and then arrived near Penn Station. Two hours later than scheduled, leaving me only a short time in the garment district.

I started with Kashi at Metro Textiles. First, a word on that. You may want to cover your ears and say la la la. But I have to say, it's not my favorite fabric shopping experience. Yes, he has an uncanny ability if you describe a fabric to magically produce it in the manner of pulling a rabbit out of a hat. That's a skill not to be undervalued. But then he goes on to the hard sell. I do not like and do not respond to the hard sell as a matter of principal, because I don't want to encourage that behavior. If you show me something and insist that I buy it, even if I want it very much I won't buy it. He kept pulling out fabrics I didn't like and insisted they were perfect for me. I don't wear navy blue, or brown (except for my recent shirtdress, which I like very much), or purple made of too-wide stripes of various laces and fabrics. I am very particular about what I wear and that's how it is. When I rejected the third or so fabric he brought to me, he asked in exasperation, "But what do you wear?" I said a lot of pink and blue. He scoffed and said I was wearing the wrong colors for me. As much as I don't respond to the hard sell, I definitely do not respond to insults of my personal style. Insult my hairstyle, my (highly insultable) housekeeping, my legal profession...but don't *even* talk about my clothes. I also think his prices, while good, are not all that. He has some GREAT bargains, like the $4 shirting, but I know I could have gotten a better price on the silk charmeuse ($8).

OK, rant over, you can uncover your ears. And now that the rant is over I can rave about the wonderful fabrics I did get. I hereby Flash My Metro Pass.

Clockwise from left: a sand/taupe silk charmeuse (which is exactly what I said to him and he pulled it out before I was even done speaking) to make a skirt out of some silk scarves inherited from my beloved grandmother, a red swiss dot for a shirtdress with wide pleats/tucks, a blue and white striped shirting with a little silver line running through for a Patrones blouse with giant sleeves (the aforementioned $4/yd bargain), a cotton batiste (so soft!) to line the swiss dot (it's white, the lighting is just bad), and a beautiful wide white crochet trim because it was only $1/yd. Now that was a bargain. Total damage: $60. And not only did I get some great fabric, I got to meet some PR folks who also happened to be there! It was Mardel, who has a fun picture on her blog of us in the store, Carolyn, Diane E., and their friend Joanna. It was so fun to have other people to fabric shop with!


Next I was off to Paron. Their annex is a treasure trove of excellent fabric at excellent prices. I was trying to be selective so I ended up only with this gorgeous wool suiting (only 1 1/2 yards left, unfortunately) and some rayon/acetate lining for it. Even at half price, the suiting was $11/yd, but a really excellent quality. Total was only $20.


I stopped into Daytona to get some a trim for Cidell, of which I did not take a picture before sending it off but you will see it on one of her projects eventually.

My last stop was at a store going out of business. It appeared to actually be going out of business, rather than having a big sale called a going out of business sale. It was already picked over, but there was plenty of good stuff left. I restrained myself to 3 yards of the seersucker (which he said was $3/yd), 4 yards of the stretch cotton print (sign said $2.50/yd), and 3 yards of this wacky satin/matte ice blue thin fabric that is probably something for curtains for $1/yd. However, when I got to the register my total was...$10. The cutting guy seemed to like me, but no wonder they're going out of business! 10 yards of fabric for $10. I wish I had gotten more. And of course I can't tell you where it is or what it was called because I paid in cash (so no checking my credit card statement) and lost the receipt. I'm very sorry about that. It's somewhere in the garment district. It's the one with the fabric. There's a sign outside that says Going Out of Business and Silk for $1/yd (which for the record was a hideous upholstery looking fabric).

Very satisfying, though I am getting nervous about fabric actually taking over my house. It could happen. I live on the third floor, too. I wonder how much fabric my place can hold before the floor falls in on my neighbors. At least there will be plenty of cushion when I fall.

Vogue 5766


This fantastic bathing suit comes to you courtesy of the lovely Sherril Miller of Pattern Review. I posted on the message board looking for an Ethel Merman style swimsuit, like those on mybabyjo.com. I google image searched Ethel Merman before posting my question, and came up with a number of drag queens and many pictures of a stately, handsome older woman. I was curious that there were no pictures of her in a swimsuit, her signature look, but figured that she must have grown out of her bathing beauty phase. It did not, of course, occur to me that I had the wrong person. Several people gently pointed out to me that I meant Esther Williams. It's the historical pop culture questions that always stump me on the crossword, too.

Anyway, Sherril said that she believed she had in her possession such a pattern, inherited from her husband's grandmother. And offered to send it to me! That is a generosity of spirit! She was laid out flat with back spasms, and even still managed to send her husband to the PO to send it off to me with a quickness. I was so touched and amazed, and knew I had to make the pattern immediately.


I used the fabric I got from NYC during pattern review weekend that I had leftover from my Alberta Ferretti knockoff. Having finished it, I don't think the pattern is shown to its best advantage in a print. The print is all distorted by the ruching and I think that distracts from the lines of the suit. Oh well.

So, what's slapdash about this project? Rather than do any pesky measuring, or perform algebraic geometric surgery on the pattern to get it to, you know, fit, I just cut out the lining as drafted and then kept taking the darts and seams in and in until it fit. That's why they invented lycra. Then I kinda sorta figured out where I had taken it in the most and cut out the fashion fabric layer a little smaller in the those places, and then sort of ruched the whole thing together. It worked out great.

You can maybe see a little bit of how much I took it in in these pictures of the lining after all the sewing but before I trimmed away the seam allowances.


I don't think this swimsuit can actually be worn in the water. With all that fabric it's pretty constricting, and I think the weight of three yards of wet lycra would pull me under like a riptide. But I will look freaking adorable sitting on a chaise longue at the beach with an umbrella drink in my hand, no? Anybody want to offer their beach house on the French Riviera (with cabana boy) in which to practice my styling and profiling?

You can see the web album, with way more poses and angles than is necessary, here.

The pattern review is here.

Tuesday, June 12, 2007

Patrones 252, #4 Celine Blouse


Another project from Patrones, a Celine blouse. And a really terrible picture of me. I look stoned/greasy and my eyeliner is a little smudged. I promise this was taken after a sewing binge, not a substance binge.

What's slapdash about this project? Mostly the yoke area. I really did try to decipher the Patrones directions, but ultimately could not make heads or tails of them. We'll blame it on the fact that I haven't taken a Spanish class in 15 years. And the fact that that means I am old and not as sharp with the mentalness now.

What I ended up doing, which you can read about on Pattern Review, was to finish the inside edges of the yoke and the placket, and then just sew them together. Four layers of fabric and their seam allowances? Not a really great looking seam. Also, the seam allowance of the four layers of fabric and their seam allowance peek outside a little, as you can see here.


Luckily my sad little wilty bow mostly covers that up.

Also, the hem is uneven (two different lengths at the placket) and I am too lazy to fix it. Yes, I am that lazy.

I am enjoying nit-picking myself. I guess confession is good for the soul.

Saturday, June 9, 2007

Patrones 252, #53 Calvin Klein Dress

Let's play: What's slapdash about this project?

You can read what's not slapdash about this project on Pattern Review. This is where I lift up the hems and reveal the dirty secrets.

Speaking of hems, that's what's slapdash about this project. I knew I didn't want a stitched hem because it would be too obtrusive. I was hoping for a raw edge hem--this is a knit, after all. But I can't cut straight, especially on bias cut fabric with dull scissors. I really need to get them sharpened. But that would be so un-slapdash of me. The problem is I don't know where to go to get it done, except occasionally Joann has someone come in and do it. But I'd have to leave my scissors there (the person, naturally, is not there on the weekend when people who, say, have a job can come) and I don't think I can live without them for a week.

Annnnyway, after a lot of patient chopping I realized the raw edge was never going to work. In the chopping there was a little, um, unevenness created. I decided I actually liked the top being shorter than the lining. Much of being slapdash involves labeling a mistake a "design feature" and calling it a day.

To finally make the hem I resorted to the ultimate in slapdash: fusible web. Even I hate resorting to fusible web because it says "I give up" in the biggest possible way. But hey, the hem doesn't look half bad!

This is also slapdash in that the back lining is cut on the grain, while the front, front lining, and back are bias. I didn't have enough! And this is a knit, fer crying out loud. Bias knit? Those crazy Spaniards and their incredibly awesome pattern magazines.

My Philosophy

I am proudly a slapdash sewist. I think it stems back to my childhood. My dad was yellling at me and my sister about having our clothes strewn all over the floor. He told us about a girl he went to high school with who didn't have much money or many clothes, but the few clothes she did have were quality and she cared for them very well and she always looked classy yadda yadda. I told him I'd rather have a bunch of cheap clothes than a few nice ones.

I sew more in quantity than in quality. Sometimes I think I should care more about getting the exquisite details right. But I kind of don't. I'd rather take the 10% chance that it won't come out right than cut my volume in half by muslining every project.

In Tim Gunn's new book, A Guide to Quality, Taste, and Style, he explains the origin of his catch-phrase "Make it work." He was disturbed, he said, by seeing so many of the fashion students scrapping a project when it didn't go as they wanted or they got bored of it. His point was, who's to say the next project is going to be any more successful if you don't know how to see a garment to its conclusion? So I am relying on an authority no less than Tim Gunn to support my slapdashedness and make-it-work-ness. (I suspect that he would not actually approve of my work habits, but unless he weighs in I'm still counting him my mentor.)

So, some things never change. The floor? It's still covered in shoes.