Thursday, November 29, 2012

How to Verify Your Blogger Blog on Pinterest with a Meta Tag

Apparently Pinterest is dealing with as much spam as the rest of the internet and has instituted a website verification process for websites listed in your profile.  You have to prove that you own a website by mucking about in its code.  I deduce that the idea is if you are a spammer who is paid to promote a website as many (poorly written) places as possible, you will not have access to the server/code of the website you're promoting.  Pinterest will then delete the website reference from the account, thus defeating the purpose of paying spammers to promote websites there.  So eventually, companies wil realize they're not getting anything for their money, stop paying the spammers, and then Pinterest will be spam free.  Ta da!  We'll see how that works.  To paraphrase Jurassic Park, "Spam finds a way."

At any rate, that leaves a lot of bloggers who have blogs rather than personal websites so that we don't *have* to muck about in code scratching our heads.  I found instructions for verifying using the downloaded html file, but it didn't work for me.   After a little trial and error I figured out how to verify using meta tags for a Blogger blog (I'm afraid I have no idea how other blog platforms work).

When I logged into Pinterest, this window was waiting for me:

Choose _Verify with a meta tag_

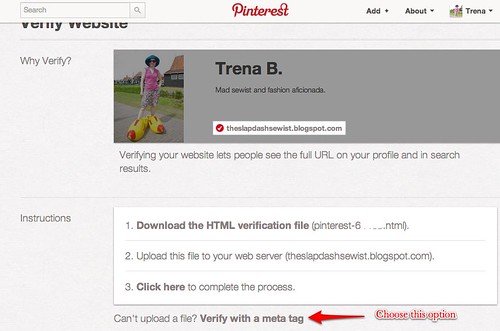
Click on the option at the bottom, "Verify with a meta tag."

Which brings you to this screen:

Pinterest Meta Tag

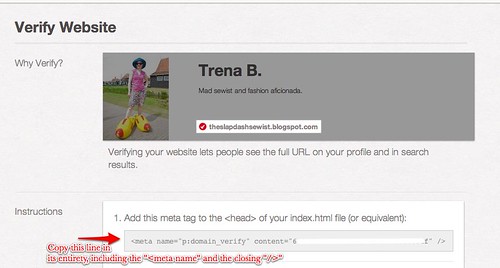
Which has your custom meta tag.  I have whited out most of the content from mine out so that nobody can hijack my profile and redirect to, what else, spam.  (Hidden underneath the white bar is a long string of  letters and numbers.  You'll have your own unique string.)  Copy the entire line, from "< meta name" to "/ >." (I had to add spaces so Blogger wouldn't interpret this as code; don't change it or add spaces.)

Now go to your Blogger edit page.

Go to your Template

Click on "Template" on the lower left.  When you are on the template page, click "edit html."  You will receive a dire warning that you are going to ruin your blog for all time and plus the zombies will come if you edit your own html.  Accept this risk.  We will be very careful.

Insert Meta Tag in Template HTML

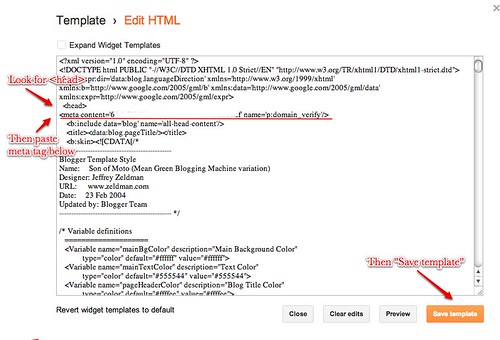
Once the html window is open, look for < head > (with no spaces).  It is only a few lines down, you don't have to dig.  Put your cursor at the end of < head > and press enter to go to a new line.  This is just to keep things neat, not for a special coding reason.  Then paste the entire line of code you copied from Pinterest, your meta tag.  Once that's done, hit "Save template."  You don't need to refresh your blog or do anything further in Blogger.

Background:  A meta tag is a little piece of code that talks only to other machines.  It has no effect on what a real person sees and will have no effect on your blog.  Meta tags have been (ab)used, for instance, to list a popular search term over and over again.  When a machine crawls the web looking for results relevant to a search term, why lo and behold this here webpage talks about this search term endlessly!  So it became the most popular page for that search term.  The webcrawlers and indexers quickly caught onto this spammer scam (spammers again!) so don't get any ideas.  This is just to explain what metatags do.  They tell machines what's on your blog, among other things.

Click to Verify

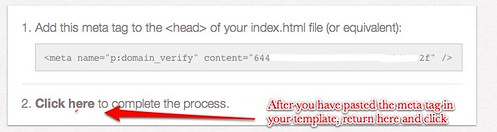
Once that's taken care of, go back to Pinterest and hit "Click here to complete the process."  It will look around your blog for a second and if all went according to plan...

Success!

You win!

You can keep the metatag in your template, or delete it once you've been verified.  I don't know Pinterest's plans for repeated verification; I'm just going to leave the tag so I don't have to do this again in the future.

PS If you'd like to be my friend or whatever we call ourselves over there on Pinterest you can find me here.

PPS Also please tell me if you can't pin from my blog.  I did something at Flickr a while back that should have fixed it, but I have no way of knowing because I'm always me, at least as far as Google/Flickr/Pinterest are concerned.


Wednesday, November 28, 2012

Burda 10-2012-118, Side Gather Cowl LBD

Burda 10-2012-118 Thumbnail

Burda 10-2012-118 (available for purchase from BurdaStyle at the link in sizes 34-42) is destined to become a Burda magazine classic.  It has already been made many times, including by AllisonC, Kristy of Lower Your Presser Foot, and Sigrid, to name a few.

Luckily, because so many people had tested it before me, I knew I could safely ignore the marked grain--which has the cowl on straight grain and the skirt on the bias--and place the skirt on straight grain.  This gives the cowl a little more drape and the skirt a firmer hand.  I really don't know why Burda designed it the other way.  BWOF, you are still a mystery to me!

Also, note an error in the instructions:  the pattern pieces are on sheet B, not sheet A.  The corresponding black-lined piece numbers on A are a pair of pants, which really confused me.
 
I traced my usual sizes:  34 at the shoulders and bust (and halle-freakin'-luja for a pattern that is already a 34 and doesn't have to be graded--they are getting rarer and rarer), a 36 at the waist, and between a 38 and a 40 at the hip.  I cut a 38 at the hip for years but lately have sometimes needed a 40.  However, for this size 39ish cut I had to shave off about 1/4" on the hips, ending at the saddlebag.  This is the only area in which I find Burda's sizing inconsistent, though it is only slightly inconsistent.

The fitting adjustments I made were a swayback adjustment and a broad back. I also added a back neckline dart for my narrow neck.  I did not change the bust fit--a cowl is a nice way to accommodate a variety of bust sizes.  The broad back adjustment adds a bit of puffiness over the shoulder blades, and I probably could have lived without it in this sleeveless stretch garment, but eh.  The sinking feeling of not being able to move my arms in a just-completed garment is much worse than some puffiness.

Drafting Front Lining

This stretch wool, from the Vera Wang $1.99 blowout on Fabric.com a couple years ago, is rather sheer.  I debated whether to plan to wear it with a slip or to line it.  For a dress this fitted, I feared that a slip would bunch underneath it and ruin the line so I decided to line.  Well, then my dilemma was that I needed a lining fabric with adequate stretch.  I have some stretch lining in a very light gray, which I used to the line the godet pencil skirt I previously made of this fabric, but I am really not happy with the quality.  I decided to go with a fairly opaque tricot from G Street's $2.97/yd table.

My first step in creating the lining was pleating out the gathered width.  I didn't want a bulky lining.

Next, as described in my review of Burda 7519, I folded over the front self-facing (very generous in this pattern, a really nice touch) and marked the bottom of it on the pattern.  In this case, it was below the armscye.  In cutting, I added seam allowance to the top of the front self-facing, and cut the front lining 1/4 inch above the marked line (for seam allowance).

Back Facing
Faced/Lined Back


To ensure that the flesh-tone tricot would not show, I cut a back facing of the wool, fused with lightweight interfacing, and stitched it on top of the back lining.  I should have been thinking about the width of the front self-facing so that the facing would look more seamless, but I like a generous facing and cut the back facing lower down the side seam than the front facing.

I interfaced the armscye of the front-self facing so I would get nice sharp lines.

Lining Lace

Taking a nod from Carolyn, I sewed stretch lace on the bottom of my lining.  Of course, I realized it would have been better to sew the black lace on the outside of the lining--the side the actually faces the public--rather than the side the faces me, just in case of show through.  But I like the way it looks when it's facing me!

I realized too late that the neckline was a touch too wide for my taste.  I solved this by taking 1/4" seam allowances at the inner shoulder rather than 1/2", though this made sewing the front to the back tricky there.

Front Sandwiching the Back

I used the same construction method as for Burda 7519, modified for the sleeveless style:
1.  Finish back neckline and armscyes with the facing/lining
2.  Sandwich back shoulder between front and front self-facing, stitch shoulder.
3.  For a sleeveless cowl, pivot at the seamline on the shoulder and continue all the way down the bottom of the armscye.
4.  Sew the lining and fashion fabric side seams, matching underarm seams.

Turn everything right side out and like magic, your dress is almost completely done!  All that's left is the zipper/CB seam and the hem.

Back
Evening Look with Gold


The darts are very low in the back, going almost to the fullest part of the booty.  I tried shortening one of them, so I could compare them.  Wrinkles appeared on the high hip in the back on the shortened side.  I was neutral as to whether high-hip wrinkles were worse than slightly pointy darts.  I decided to go with the pattern as drafted and the incredibly long darts.  When I look at the curve I am working with here, I can forgive myself for a not-totally-perfect fit.  It's just a lot of curve.

I added a walking slit so I'd have plenty of movement in the dress.


Burnt Orange and Boots


I was making this under the gun for an event and amazingly everything went pretty smoothly.

I came back from NYC and had literally 1 hour at home in which to do the hem (machine blind stitch) and little finishing bits.  Luckily, it got done in time.  The event's theme was "Texas" (as in the state and the University).  I didn't want to be too informal, as it was to celebrate a federal judge, but I didn't want to be out of the spirit of things.  A little black dress with burnt orange tights and cowboy boots seemed to strike just the right tone.


Evening Look with Silver
Day Look
The LBD contest on Pattern Review happened to coincide with my need for an LBD, so it was nice to have double motivation to make this for my event.   The rules require you to show the dress plain, with a day look, and with an evening look.  My looks aren't crazy different--but in my mind, the idea of a LBD is that it can go from day to evening with just a change of earrings and shoes.

I was hoping to get outdoor photos taken but the stars (or sun?) never aligned.  But there are a million photos.

I am very pleased with this dress.  The fit is excellent (at least under my not-too-stringent standards) and it definitely feels sophisticated and elegant.

It took me a while to get to like the cowl.  It's a shallow/narrow cowl and like the line drawing I can only get it to flop to one side, not to drape down the center as is standard for cowls.  Once I accepted that, I see it more as neckline origami than as a cowl.  However, it does limit necklace options.  It's better with a pin than a necklace.  In that sense, it may not fit the label for a classic Little Black Dress, where I think jewelry is supposed to be a big part of changing it from day to evening.  But the silhouette is definitely in the spirit and I will be glad to have this little number to pull out of the closet when needed.

All photos are here and the pattern review is here.

Tuesday, November 20, 2012

Burda 7519, Woven Cowl Pullover Top with Carapace Sleeves

Burda 7519 Thumbnail

Jay Godfrey _Bella_ Cowl Neck Dress - Sleeves - Nordstrom

I feel that sleeve variations are one of the more underused ways to make a garment special.  I get really sick of making plain, boring sleeves on everything.  When I found this top a couple years ago, I was really intrigued by the sleeves.  They probably have a boring name like "draped sleeves," but to me they look like beetle wings that appear solid until the insect goes to fly when it appears that its whole body splits open.  These sleeves appear solid on the upper side, but when you lift your arms you see they are split to the armscye.  So I call them carapace sleeves.


Anyway, I had no idea how they might be done, so when I saw Burda 7519 with that style of sleeve I was thrilled and picked it up.  I plan to make a copper-colored silk dress with this pattern, but I wanted to test it out before sewing the dress.  The silk fabric for this top was purchased from Fabric Mart many years ago, at least 4 years ago and possibly even 5.  The $9.99/yd sticker was still on it; I'm sure it was the most expensive fabric I'd ever bought at the time!

Fabric Mart 2007

Although I loved it, something kept me from finding the right project for this fabric.  Finally I realized the problem was that I loved the main motif, and I loved the border, but the fabric is sort of a "double" border print with the narrow geometric border, then a wide band of beige silk with flowers, and then another narrow geometric border.  I just didn't like the flowers at all or their expanse of beige, but somehow I felt that I should reconcile myself to them. After so many years, I acknowledged that I would never like the flowers and it would not be sacrilege to wantonly waste that part of the fabric.  Yes, I do have issues.

Anyway, I think this is one of those rare projects where the fabric for the wearable muslin is more expensive than the fabric meant for the final version!
Use Walking Foot for Motif Matching


I was testing out several things with this iteration:  fit, of course, though I didn't expect it to be an issue as it's an unfitted style; the sleeves; the depth of the cowl; and most crucially, whether the front really has to be cut on the bias.  This directional border print really couldn't be cut on the bias, but since it's a flowing silk and the bias isn't needed for fit, as it might be in a narrower-cut garment, I decided to just go ahead and cut on straight grain (the cotton batiste front lining was cut on the bias).


I took a lot of care with pattern matching for this project, and the matches are pretty much spot on (I'm not going to pretend it's perfect, of course!).  I pinned at each black line and used the walking foot to ensure even feed of the top and bottom fabric.


Mark Lining Cut Line

The other thing I changed for this version was to line it.

To cut the front lining, I folded down the self-facing on the pattern and traced where it ended.  In cutting the fashion fabric, I added a 1/4 inch seam allowance at the top of the self-facing, and in cutting the lining I added a 1/4 seam allowance above the marked line.  I stitched the two pieces together using the serger and pressed well.  This creates a neat finish on the inside, and by keeping the front self-facing intact there is no chance of the lining showing at the cowl.  When I make the intended dress, which doesn't need to be lined, I will extend the front self facing the entire width of the shoulder and down into the armscye a bit.

I wasn't overly impressed with the construction order and method for this project, so I used my own preferred method for cowl necks.

Finish Back Neckline with LIning

First, I finished the back neckline by sewing the fashion fabric and back lining right sides together at the neckline, using the serger to trim off the seam allowance, and flipping and pressing.  (Well, before that I sewed the CB seam, which I had added to allow for swayback shaping.

Sandwich Back Shoulder


Next, sandwich the back shoulder with the front and its self-facing/lining.  The fold line goes at the neckline/inner edge of the back shoulder.  Stitch, finish the seam allowances, and turn.  The seam allowances will automatically turn toward the front.  Press.

Next I sewed the side seams, starting on the fashion fabric and continuing onto the lining.

Treat Lining and Fashion Fabric as One at Armscye

I treated the fashion fabric and lining as one at the armscye.  This method does create a visible seam inside the garment; it is not neatly finished as a fully-lined garment would be.  This can be remedied by setting the sleeve only into the fashion fabric, folding down and pressing the lining seam allowance, and then hand stitching the lining to the armscye's seam allowance.  I don't go to the trouble unless it's a special garment.


Sleeve Abutment Under Arm


The one review of this pattern that discusses the sleeves mentioned that they are really restrictive.  Cutting out the voluminous sleeve pattern, I didn't see how this was possible.  The instructions weren't clear on how to install the sleeve.  The sleevecap is longer than the armscye so at first I overlapped the finished lower edges of the sleeves.  Whoa.  I couldn't even pull the sleeve over my arm enough to get the shoulder to my shoulder.  How that much fabric can be too tight, I don't understand, but I stopped doubting the reviewer.

I ripped out the sleeves.  This time I eased the sleeve cap and abutted the finished edges of the sleeve so they met exactly at the side seam.  Huge improvement.  The sleeves are no longer tight and uncomfortable.  However, I am a little disappointed in them.  The distinct tiers of drapes pictured on the envelope don't really show up in my project, though the print could be obscuring their appearance a little.  For the intended dress, I might try to figure out how to use the sleeves from Burda 12-2010-102, which are a similar style but a regular "tube" sleeve.  It might be tricky because the armscye is cut semi-raglan on that pattern.

Border Print Hem

After carefully pressing the hem exactly at the border motif, I machine blind hemmed the fashion fabric.  The blind hem stitches disappear pretty well into the border print.  The lining, which hangs free below the armscye, was hemmed with a regular straight stitch.


Unbelted Front
Front


 This can *almost* be worn as a true tunic, but the side view is pretty atrocious so I will likely wear it belted at all times.  We can wear jeans to work on Fridays.  I always feel like I should wear a nicer top to go with them and this really fits the bill.

This is one of those things that I think doesn't look as good in the photos as in real life.  It looks more bulky than it really is--the silk is very lightweight and the batiste lining is also light. 

I am happy both with the pattern and that I have finally sewn up this special fabric!  I normally hem tops at the high hip for the most flattering spot on me, but I wanted a couple longer tops to wear with my jeggings.  I cut in between the shirt and tunic length on the pattern.

All photos are here and the pattern review is here.


Tuesday, November 13, 2012

Pilgrimage to Fabric Mart

Group Photo

Well, our visit to Fabric Mart was a roaring success!  In addition to me and Cidell, 5 people were able to join our spur-of-the-moment trip.  The group photo shows Layla, Mary, Claudine, Cidell, Lisette, me, and Diane thoroughly dazed and sated after our 3(!!!) hour visit to the store.  We really felt like we'd been in there for only an hour.

Fabric Mart, Exterior

The drive from Baltimore took about two hours and Fabric Mart was easy to spot once we got into town.  The parking lot isn't large, but they don't get too much in-person business and we had no trouble finding a place.

About to Cross the Threshold


You can enter through the front of the store (didn't get a picture, sorry) or the back, from the parking lot.  We came in through the back.  Here I am about to enter the store for the first time.  Can you feel the anticipation?


Fabric Mart Sharon Our Lovely Hostess


We were greeted by Sharon, with whom many of us have had email correspondence.  She was incredibly nice and patient with us and gave us a tour of the palace grounds.

The area you enter is the store.  Down the center of the store are the clearance items--generally there is not enough yardage to sell online.  Once it gets into the store's clearance area, prices are 50% off marked.  Most of my purchases came from this area.  Where the items are available online I provided a link below.


Cheerful Cutters


Then you keep going.  There's a cutting area, a back room, an upstairs, and a downstairs.  The areas are marked with letter codes (B=Back, D=Downstairs, and so on--so now I know where their product codes come from!).  You can wander the shelves at will, writing down codes.  There is a computer in the front where you look up fabric content and price based on your code.  If you decide you want something, you just grab it off the shelf and bring it to be cut.

The whole time we were there, the cutters were steadily working on online orders.  It seemed like a happy workplace.  The cutters were joking with one another and everyone was incredibly nice.  This makes me doubly glad to shop there in the future.  Happy employees and a non-chain business--what more could you ask for?


Fabric Mart Happy Shot

After much contemplation, it was finally time to get our fabric cut.  Sharon had so much patience with us--we ended up getting 97 yards as a group!  I was responsible for more than my fair share, I'll confess:  27 1/8 yard.  Cidell beat me at 28 yards.

I think the look on my face in this photos shows it all.


Fabric Mart Fancy Wovens 11-2012


 The fuchsia wool/cotton/lycra blend on the right was my splurge fabric, a Julie's Pick at $12.99/yd.  For this quality fabric, I consider the price a bargain.  It's lighter weight, but totally opaque.  It will make a gorgeous work dress.

The nylon jacquard is, I think, my only mistake.  I was really drawn to the color and the weave, but I didn't really feel it until I got it home.  It has a scratchy, uncomfortable hand.  It would be ok for a purse, but the color wouldn't work for a purse.  I think one mistake is allowed.

Fabric Mart Ponte 11-2012
My second mistake was being too influenced--I LOVE the mustard ponte and I only bought one yard of it.  I wish I'd bought 3.  This was from the clearance section so it's not available online.  Alas.

These pontes are great quality and you can't beat the $4/yd price!  The turquoise is totally my color and I was influenced by the sweatshirt dress Cidell was wearing that day in getting the heathered charcoal gray.

Fabric Mart Knits 11-2012


The bright print with the black background hasn't made it onto the website yet, but it is meant to eventually in the ITY section.  The border print was in the clearance section and Cidell and I had a bit of a tug of war over it.  Let's just say, I'm small but I'm fierce.  LOL.  It will be a wrap dress.

Fabric Mart Wovens 11-2012


Love these two prints!  The cotton was from the clearance area.  I can never have enough bright colors.

The peacock-style print on the right is a rayon challis.  It's another fabric that hasn't yet made it onto the website but is supposed to join the other rayon challises.  It will be be another Burda 09-2007-120 tie front blouse, and hopefully soon.


I also got some underpinnings:  8 yards of a nice light gray lining ($1.99/yd) and 1 yard of black tricot ($1/yd)

Lunchtime!

After all this, you can imagine that we were ravenous!  We tried to go to the pizza place just down the street, but it was closed.  We all piled into Lisette's minivan (imagine 7 grown women emerging from a minivan, it was kind of hilarious) and headed to Frank's Pizza to tally our purchases and plan our next stop.

You didn't think there would be more?


PA Fabric Outlet

The PA Fabric Outlet, which has a store in Philly and a few other locations, is based (I believe) in Lancaster, PA, which just happened to be on our way back home.  Unfortunately, I forgot to take any photos inside but it is a big store famous for its notions and trims.  They also have plenty of fabric.

PA Fabric Outlet 11-2012


I couldn't resist two more knits, an orange red medium-weight knit that will make a nice top in a fiery color to keep me warm through the winter, and a purple wool-blend (based on my burn test) knit for $7.97/yd.  You really can't beat that price.  It will make a great t-shirt dress, though I am contemplating other uses for it.


Notions, PA Fabric OUtlet
I also stocked up on notions.  The best find was this elastic reflective piping for athletic-wear at 25 cents/yard.  That is a crazy price for this notion.  They also had pinchy toggle cord stops in a bag of about 24 for $3!!!!  It costs $3 for two of these at Joann.  Lisette and I split a bag.  I also picked up some zippers from the 8 for $2 barrel (plus two more "by the each").

Then it really was time to get home.  I managed to heave my suitcase onto the train, two metros, and finally made it to home sweet home, exhausted but entirely pleased.

All photos are here.

Friday, November 9, 2012

Stashoholism Confessional: 7 Month Itch Edition

Fabric Acquisitions April-October 2012

So, you may recall that I decided to go on a Fabric Fast for Lent this year, which I promptly broke the first week due to the seductive powers of Fabric Mart.

I stayed faithful through the remainder of Lent, and threw in another week to atone for my sins.  Then I kept going.  I didn't buy any fabric until July, at which point I bought fabric for my white A line skirt.  I feel that I have somewhat learned my lesson in fabric buying, because I first bought online from Michael's Fabrics, which had a cotton/linen blend for an incredible $4.99/yd.  I know this was in July because I lost my wallet on 4th of July and I still didn't have a replacement credit card, so I had to get the boyfriend to order it for me.  When it arrived, dangit!, it was winter white, not white.  It also didn't come through the pre-wash very well and it's quite thick/heavy, like a denim weight.

I mostly stuck with in-person buying after that.  I kept my buying sparse, trying to purchase only for wardrobe holes.  For instance, the red silk is to replace this one, whose sleeves I just never loved.  The taupe silk is for a silk half-slip.  The black and white geometric is for (another) A line skirt--I got rid of my black and white plaid skirt several years ago and occasionally miss having a b&w skirt.

The gorgeous wool denim from Michael's fabrics on the lower left will be a sheath dress.  I realized I would really like more non-print sheath dresses for work.  So easy to wear and accessorize and yet instantly professional.

G Street 11-2012

The two knits on the right are for long-sleeve tees.  I have pasted the larger picture above to ask if the turquoise on the left is French terry?  People talk about French terry but I honestly have no idea what it is.  This is a very stretchy knit, fairly heavy weight.  One side is smooth like a jersey knit, the other side almost looks like a sweater knit.  Unfortunately, it didn't wash too well--it has parched desert "crack" marks all over it, the way you sometimes see on rayon knits (though it doesn't feel or burn like rayon).  They are worse on the sweaterknit looking side, so I will be using the smooth side as the outside.

I will admit there is a folly in there. I fell in love with that peacock feather sequined mesh at sewings.com and had to have it.  I have no real idea for it other than a simple skirt.  But I loved it so much online, and I love it just as much in person.

I think for the first time ever I am below parity in my fabric buying, counting the number of pieces of fabric purchased for 2012 against the number of garments sewn (which is not a 1:1 yardage correlation, but is an easy rough calculation).

How better to celebrate than to blow that streak in a fantastical fabric buying spree?  Nikki organized a trip to FabricMart earlier this year, but it was on a Wednesday and I just couldn't take the day off.  Cidell and I are taking our own field trip on Monday since we have the Veteran's Day holiday.  I am so excited.  I just can't even tell you.  Comment here or on her post if you want to meet up with us!

And then next week I will be in NYC for work.  I haven't quite figured out when I'll go fabric shopping, but there will be Garment District visiting.  I will be free for dinner on Thursday night (November 15) if anyone would like to keep me company.

And then I will go back to being parsimonious and puritanical in my buying, and sew like hell to make more room!

Wednesday, November 7, 2012

Tweed Ride 2012: Triple Houndstooth

The Girls


Riding on R St


Sunday was the Tweed Ride, and of course we were on it!  Nothing is more fun than dressing up retro and riding around town.  Here is the crowd riding about a block from my house.  I admit that we peeled off here--we had to get ready for the party.

Crowd


 We started off in Franklin Square in downtown DC.  Everyone was in their finest and there was a lot of inspiration to be had.

 I have never been into the tiny top hat for women, until I saw this woman's hat.  Love it!  I think the scale is just perfect--not so small as to be entirely twee, but not so full-sized so that it loses its sauciness.


Cidell and Liz License Plates


Cidell and Liz got custom Maryland license plates for their bikes. I was pretty jealous and think I might need a DC one. I just can't decide what to put on it! Any ideas?


The Look


I had a lot of fun putting together my look.  I spent the 10 days before the ride working on two different hats, and couldn't decide which way to go.  In the end, I figured that the chance for triple houndstooth (hat, dress, and tights) does not arise very often and must be seized upon.


The dress is Butterick 5520, out of a nice thick wool that kept me warm despite the chilly day..


Front Closeup


I am quite proud of my hat.  Judging by the prices for hand-blocked felt hats on Etsy (though they don't seem to have many sales) I feel that I have now *almost* justified the hundreds of dollars I have spent on millinery supplies and a class over the years.


Molding on Headform


I bought a vintage wooden head form on Etsy last year and spent many hours sanding it down to my freakishly small head size.

After looking at tutorials on blogs and YouTube (tutorials and inspiration photos are on my Hats Pinterest board), I wet and steamed the felt hood.  I started out with the idea of doing a pillbox hot, and used my metal form for that (the linked photo gives you more of an idea of what the hood started out looking like, I didn't think to take a flat photo).  But it just didn't look right.

So I wetted and steamed it again and started over.  The hood was very thick and a little difficult to shape, so I kept it fairly simple.

The Look


All my Tweed Ride photos are here and the sewing/hatmaking relevant photos are here.

As I mentioned, I was working on another hat simultaneously.  I decided it was too great not to get *some* exposure, so I did a costume change before the party.  It also involved a new blouse and revitalized skirt, so stay tuned...