Tuesday, September 28, 2010

Simplicity 2580, Empire Waist Cowl

Simplicity 2580 Thumbnail

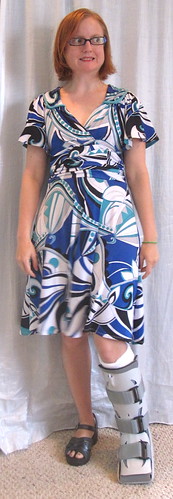
I buy just about every knit dress pattern that comes down the pike and am always looking at knit top patterns to see if they can be made into a dress. But it rarely occurs to me to turn a dress into a top. Melissa of Fehr Trade showed a cute cowl top made of the Simplicity 2580 and I tucked it into the back of my mind for the next time I had some odd-shaped scraps I couldn't do much else with.

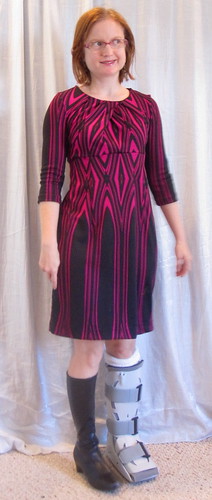
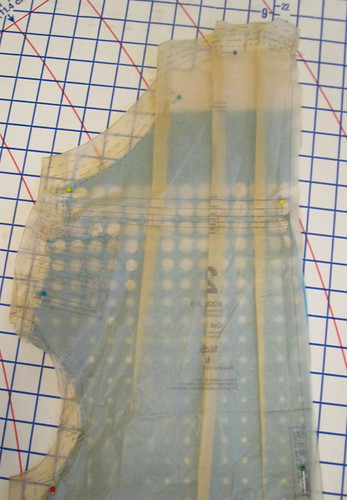
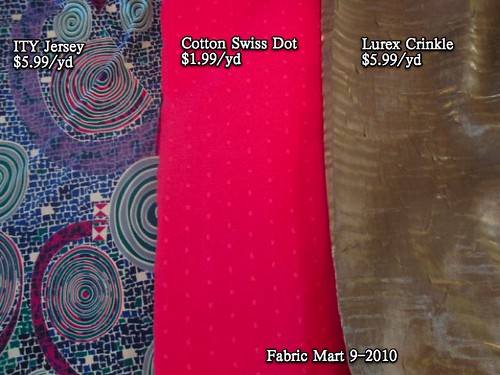
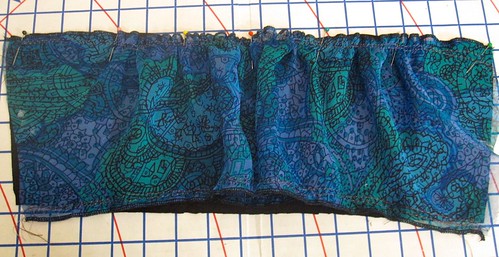
I just got this fabric from Fabric Mart ($5.99/yd, pricey for me!) for my Turkey wardrobe and immediately sewed it into a long sleeve knit dress. The scraps were too big to throw away, but had to made into something pieced.

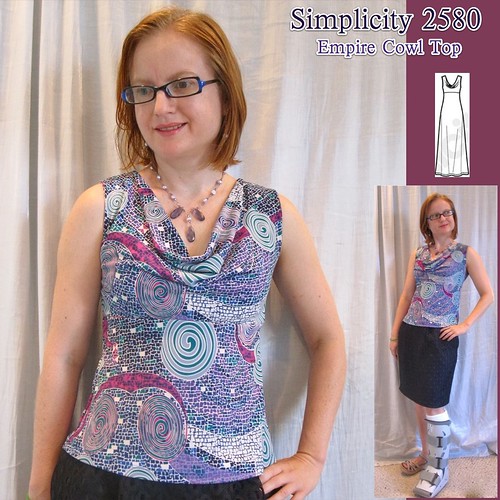
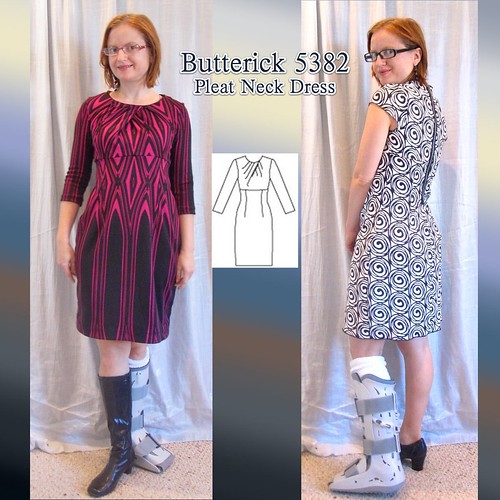
I am not crazy about empire waist tops lately, because they can be neither belted nor tucked and I have apparently turned into someone who wears a belt nearly every day. The tucking is more theoretical, but theoretically I am open to it. But I decided to throw caution to the wind and make it up in this pattern. I actually already made a top from this a while back; the fabric didn't have enough drape and it doesn't look great, but I knew it was a solid pattern and the fully self-faced cowl that will always sit perfectly and requires no rearranging sold me.

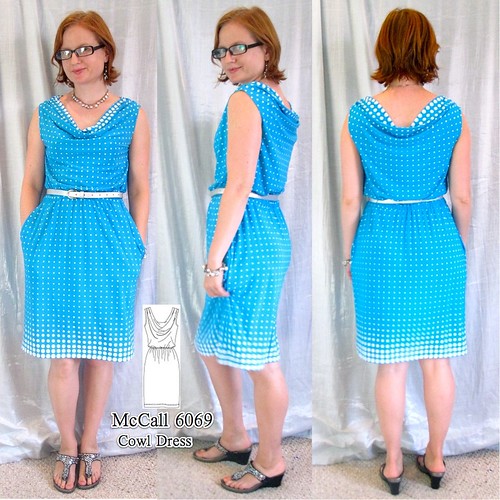
My one gripe is the instructions, which involve a lot of fussiness and inefficiency. Most cowl patterns these days seem to use the modern, all-machine-finish way; I was really impressed with the instructions for the McCall 6069 double cowl dress. So if you pull out one of your patterns it will probably do a much better job of explaining things than I am about to. What I love about this method is that you can do the whole thing with a twin needle in your sewing machine if you use a serger for construction. No switching back and forth between twin and regular.

Finish Back Neckline & Armscye 
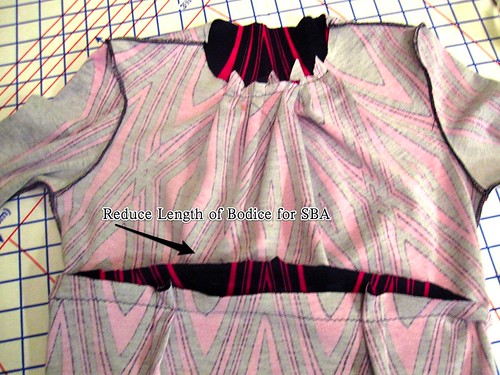
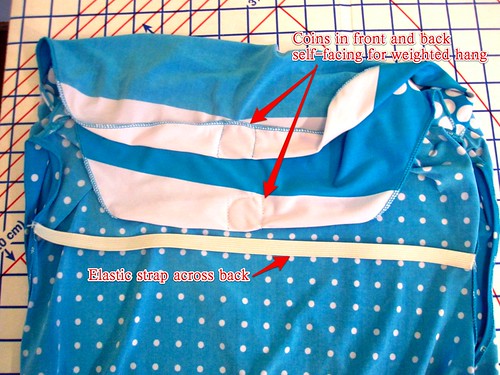
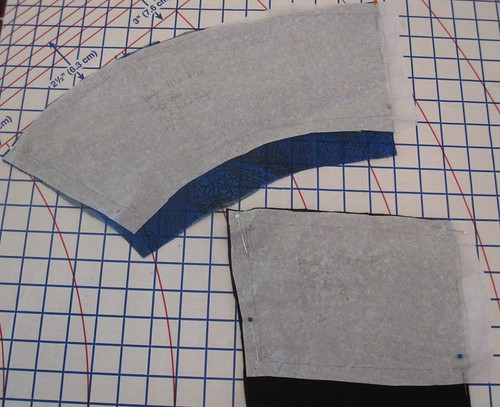
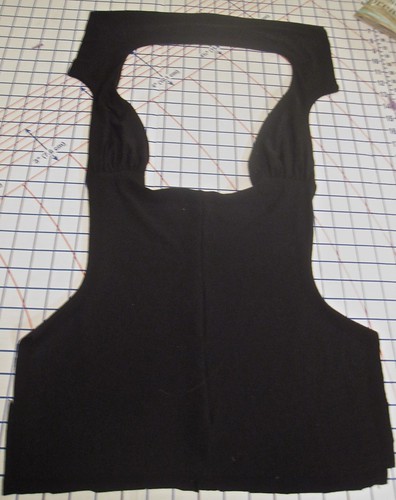
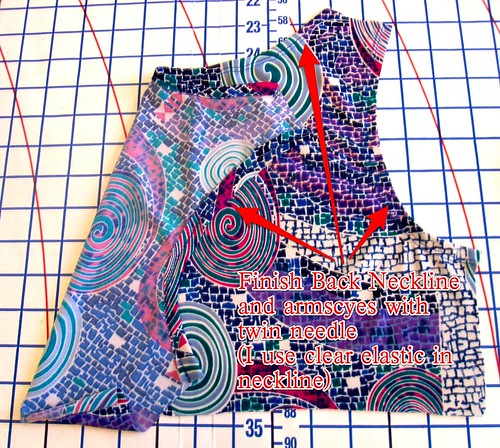
Start by finishing the neckline and armscyes of the back piece. For both, I just fold the seam allowance to the inside and twin needle in place. I fold the neckline over a piece of clear elastic slightly smaller than the length of the neckline to keep it in shape; the front cowl is heavy compared to the back so the back benefits from a little support. (If you're using a sleeve, obviously you don't need to finish the back armscye.)

Shoulder Seam All In One 
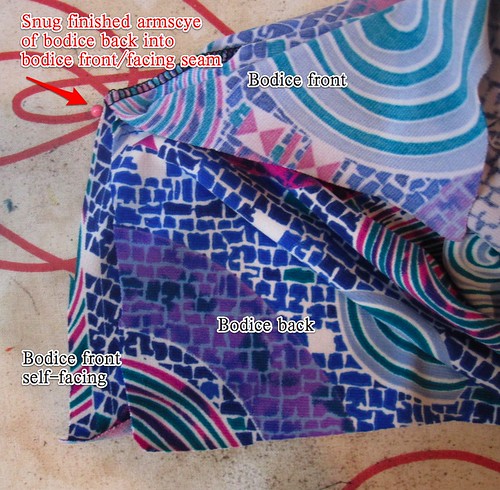
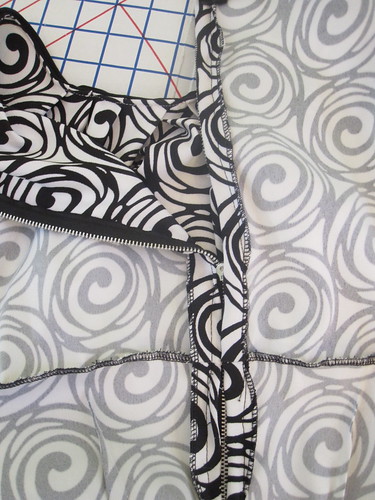
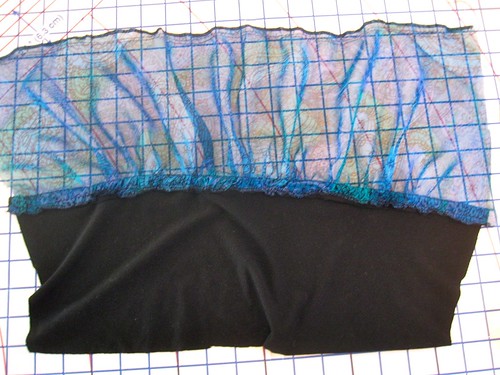
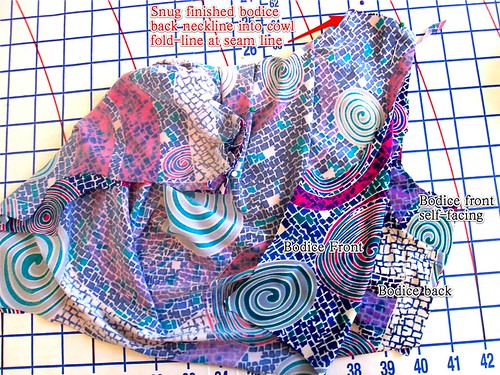
Next, fold the upper bodice and self facing along the fold line. Slip the back shoulder edge in between them. Snug the finished back neck to the fold line at the seamline. This is crucial. I am generally guilty of matching and pinning the edges rather than the seamlines, but here the you will have an unsightly bump if the back is not matched up to the fold at the seamline. Note that the unfinished edges of the front armscye will overhang the finished edge of the back armscye. Pin and serge.

Finish Front Armscye 
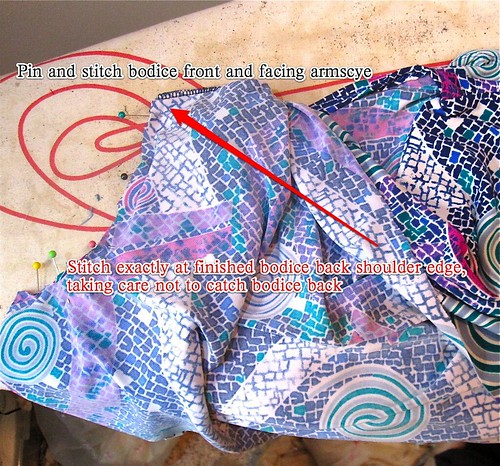
Now match up the edges of the front armscye outer fabric and self facing. Here it is important to mark exactly where the finished back armscye is hidden in between the two layers of the front (OK, fine, I admit it; I don't mark). Serge the front/self-facing armscyes, right sides together. At the shoulder edge, make sure your stitching line is exactly at the finished back armscye edge. Be careful not to catch the back into your seam (especially with a serger!).

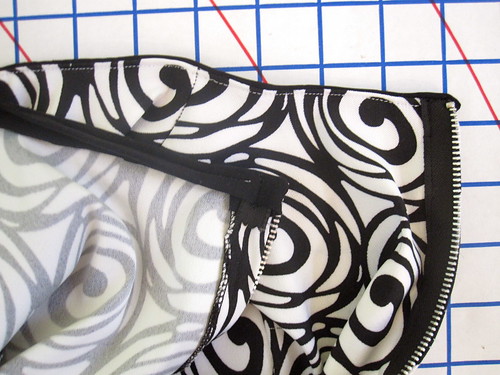
When you turn it all right side out, you have your finished neckline and armscyes all done. If you've correctly matched everything up, the front and back will be seamless (well, not literally seamless but you know what I mean).

Snug Bodice Back Between Fronts at Armscye 
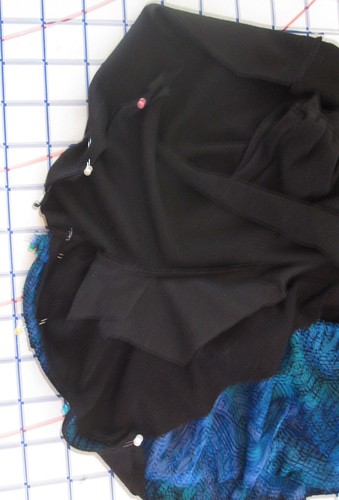
Next comes the side seam. As with the shoulder, you are going to sandwich the back between the front and front self-facing. This is a little easier because you just have to match up the raw edges. Again, it is important to snug the back finished armscye up into the front/self-facing serged together armscye at the seamline. Serge.

Finished Self-Faced Cowl 
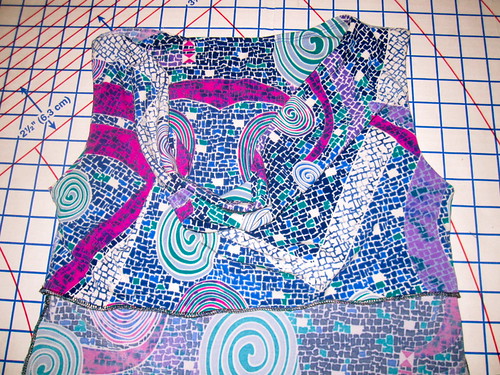
If you want to complete the clean finish, you can leave out the self facing when sewing the upper bodice and lower bodice and then hand-stitch the facing in place. However, a serged finish is good enough for me here.

Serge the side seams of the lower front and back and center seam of lower back. I used the center back seam in the lower bodice for some swayback shaping.

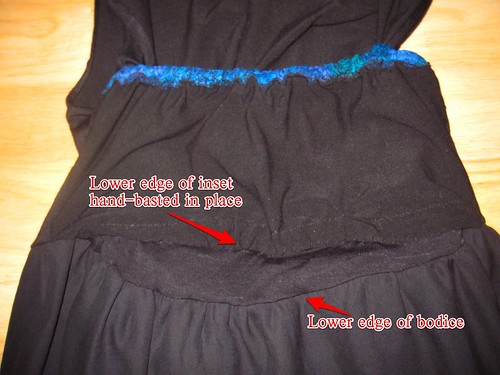
Treat the front and front self-facing as one and pin the upper bodice to the lower bodice. Serge.

Simplicity 2580 Your machine is still set up in a twin needle so you can easily hem the top and voila! A nicely finished cowl top with a minimum of effort.

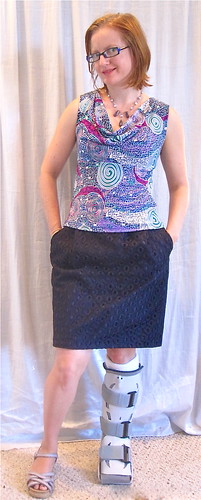
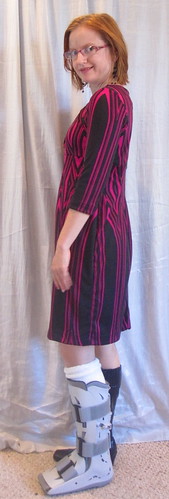
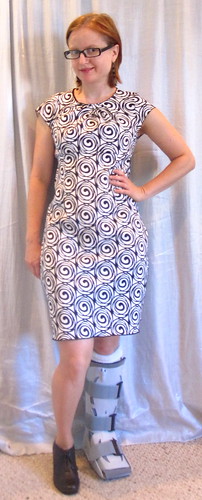
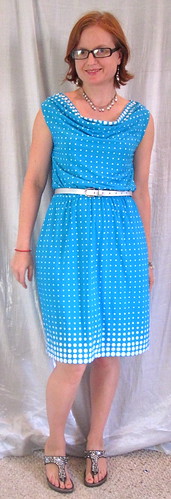
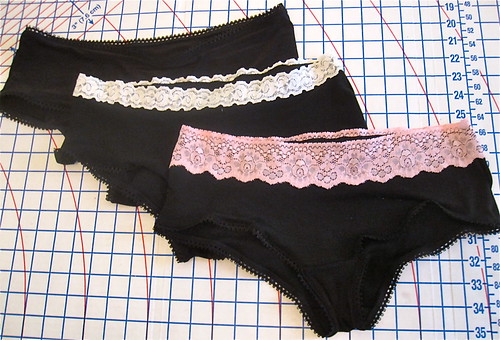
I am really happy with the top, despite the empire waist. It's a fantastic way to wear my lace Burda 09-2008-108 skirt for summer and in a casual way. If I'd had enough fabric I would have liked to avoid that big circle that's almost at center front on the lower bodice but it was a top with a big circle at center front or no top at all.

All photos are here and the pattern review is here.

=======================

I am sewing like crazy for my Turkey trip! It's still a little too early to know exactly what the weather will be, so I have been making both long sleeve and short sleeve items. It seems to be tipping toward cool, though, low 60s (16-18 C for my metric readers). I can handle cool weather, I suppose, but it is also looking rainy. Much less fun for sightseeing. I will have to ponder whether it will be worth it to bring a pair of boots. They take up so much room, but shoes are really no good to be out in rain for 8-10 hours. I suppose much depends on my therapeutic boot situation. I go to the doctor this afternoon so keep your fingers crossed for me!

Thursday, September 23, 2010

Stash Busting for World Peace: IBOL

IBOL II

So, somehow I had never heard of Iraqi Bundles of Love, the project of a soldier stationed in Iraq to get raw sewing materials into the hands of individual Iraqi women. I do not normally give in-kind goods for charity. They make the giver feel really good--and they actually cost the charity money to store, ship, and distribute; money that could be directly spent to buy more of whatever you sent for cheaper at wholesale and do more good for the beneficiaries. Money is always more valuable than goods.

However, this is the perfect type of project for sending goods. IBOL is not a 501(c)(3) charitable organization (a US tax status thing). It's not even an organization at all. It doesn't have a bank account or a budget and there is no place to send money. It is just one guy asking people to send bundles of fabric.

Because of the long years of sanctions against Iraq during the Saddam Hussein years, all goods are scarce. And because it has not been safe for aid workers during the war years, there are few charities to distribute goods now the sanctions have been lifted. The soldier who invented IBOL wanted to do something about this. I think he mainly reached out to the quilting community last year simply because his mom is a quilter, and since garment sewing and quilting don't have a ton of overlap I don't know that word has gotten out in our community.

Here is the word and please spread it! If you are in the US, you can send a flat-rate box to an APO address. The address is emailed to you when you leave a comment on the IBOL blog (the organizer does not want the address publicized for obvious reasons so I cannot provide it). A large flat-rate box costs $12.50 to mail to an APO address. You have to fill out customs form 2976a. It is the size of a half-sheet of paper--not the green one or the other one that's the size of the green one (this confused my post office very much).

You build a bundle of fabric (large pieces and solids or tame prints preferred) and whatever notions you may have. I threw in a large spool of thread (the Gutermann 1000 meter ones), a lot of buttons, and machine and hand-sewing needles. I made the simple needle book by stapling a square of fleece (flannel would be better but I didn't have any) into a folded piece of paper. Tie it all up with a ribbon so the bundle can be removed from the box and stay in one piece and send it off. For ideas, check out the What to Send page and the flickr photos people have uploaded (be sure to use the tag "iraqibundlesoflove" on your flickr photos).

I picked up two boxes from the Post Office (thank goodness there is one right next to the metro!) and it took me about an hour to select my fabrics, round up the notions, and build the bundle. I would have preferred to send more thread and maybe a seam ripper or thread snips in each, but with my limited mobility I haven't been able to make it to a fabric store.

I am so thrilled to be able to share some of my bounty with Iraqi women who have nothing, women who have probably not felt like America has done a lot for them. There are very few ways in which the average American can say to the average Iraqi, "We are all sisters under the skin." This is one remarkable way. Last year they received and distributed 3445 bundles. So far this year they've received 26.

You have until next Friday, October 1 to get your bundle in the mail.

Start packing.

Friday, September 17, 2010

Butterick 5382, Pleat Neck Empire Waist Dress

B5382 Thumbnail

Based on what I see on the street, the pleated neckline trend is still going strong so I decided to make my fabulous hot pink and black G Street Fabrics $2.97/yd knit print for possible inclusion in my Turkey wardrobe out of Butterick 5382.

I had previously purchased nearly identical Vogue 8593. However, the Vogue does not have a waist seam and I have pretty much given up on dress patterns that don't have a waist seam. For a serious pear like me, it is the rare pattern in which I can cut a 6 or 8 shoulder/bust and a 12 or 14 hip in one length of fabric and have everything work out in the way it hangs and fits. I really need a waist seam that will allow me to dart extra fabric into the lower half. A waist seam also allows for much better swayback correction. So I was overjoyed to see the Butterick pattern come out with the waist seam and skirt darts. V8593 can be made into a great tee as demonstrated by KBenco, so the pattern won't go to waste.

This dress was so successful and so easy once you put in the pleats (only four pieces, plus sleeves and a way to finish the neck) that I decided to go ahead and make it again with short sleeves.

Small Bust Adjustment As with Burda 11-2008-111, I found that where the shaping for the bodice and bust is in neck pleats, the small bust adjustment is done by shortening the lower edge of the bodice piece at center front, tapering to nothing at the side seams. Here, the shape of the bodice pattern is actually concave at the center front and it would be more trouble than it's worth to adjust the pattern piece. Once the pleats are made in the fabric, it's easy to cut off that lower curve.

Hand tack facing The most challenging part of this pattern is finishing the neck, simply because there is a huge amount of bulk with pleats upon pleats. For the pink version, I actually used the facing (*gasp*). The black/pink fabric is a thick, spongy, cottony (yet polyester) knit and there was no way a binding would work. I lengthened the back facing to give it more weight and help it stay in place better. Once sewn in, I hand tacked it at the shoulders, the front pleats (hidden by the other pleats upon pleats) and the center back. The plus side of this thick fabric is that although there is no seam at CB, my hand stitches taking up a few threads of fabric don't show.

Knit Binding and Topstitching The black and white fabric was purchased from Fabric.com with all the Vera Wang pieces back in January for $1.95/yd. However, based on the product code, it is not actually from the VW Lavendar Collection (it doesn't match the style/colorway, either). It's one of those really stretchy wovens that are so stretchy they're almost a knit. Not lightweight, but not as thick as the black and pink fabric.

I decided to finish the sleeve and hem with a serger rolled hem in black, so to continue the black finish motif I used a black knit binding at the neckline, intending to act somewhat as piping. I cut it about two inches wide (should have done 3, given how much bulk it has to fold over), folded in half, sewed it to the right side of the neck with the cut edges aligned with the neck edge, rolled it to the inside leaving just a hint of it showing at the neckline, and topstitched in place. I probably should hand stitch the seam allowances onto the pleats at CF, but so far they have stayed in place.

I had been planning to get myself a Brother 1034D serger for my birthday because the tension on my secondhand White is not great. However, it had been behaving so well and I have been spending so much on travel lately that I decided to defer it. But for this project I couldn't get a good rolled hem on this fabric so now I'm considering whether I should just go ahead and get it. For the hem edge, I folded the fabric along the hemline and then serged juuuuuust next to the fold. I miraculously did not cut into the fold anywhere! This gave it more body for the serger to grab onto, but the tension wasn't enough to actually roll the hem to the inside.

Pink Side The Price of Swayback Definition This knit dress pattern is drafted with a zipper at center back. I thought that this was one place where a knit dress might actually need a zipper because the neckline appeared narrow, but several of the pattern reviews said it could be left off. Sweet!

For the pink version, I cut the bodice back on the fold but the skirt with a CB seam for swayback purposes. I had to tweak the length of the back dart, ultimately adding about 1.5 inches. I also had to shorten the front dart about an inch to give myself more belly room. I didn't fit the swayback closely because I wanted to keep that room in the belly.

However, for the black and white version, I decided to do an exposed zip using a metal zip I believe I bought at Jomar a couple years ago. This trend has been around for so long that I'm sure I just gave it the kiss of dress by finally making a dress with one but that's ok. Because of the zipper feature, I wanted a close fit at the swayback because a baggy exposed zip was not the sexy look I was going for here. However, you can see the price I pay for swayback definition: belly definition. Before you protest: (1) I know I'm slim (and I work hard for it), it's a proportion thing. (2) Especially looking at this picture, I can see that with the architecture of my body there's just no room for organs if I had a flat belly. This was taken first thing in the morning when my belly is at its flattest *and* I was sucking in. It normally sticks out about 2 inches more than in the photo. For real. I generally look about 5 months pregnant. I think I will only be wearing this dress when it's cool enough for tights. Tummy-sucking-in tights. Not to mention that this fabric is the plasticky kind of polyester; definitely can't be worn when it's hot anyway (warm, maybe, but not hot).

Exposed ZipI install an exposed zip just like a regular, non-invisible zip: baste the center back seam, right sides together; press seam. Place zipper over the seam, in this case on the outside of the fabric. Stitch. Unpick basting. At the lower edge of the zipper I turned in the little extra flaps of zipper tape and at the top I caught them in the neck binding.


My only quibble with this pattern is that the sleevecap of the long sleeve is too high and pointy. I thought that would be the case when cutting it, so I basted it in and it created a little peak at the shoulder. I rounded out the curve and it installed much more smoothly. The sleeves are a little slim cut as well, but of course I serged off my seam allowances (did both dresses almost entirely with serger construction) so oh well.


Pink Front Circles Front LOVE this pattern, tummy psychosis notwithstanding. Of course, my taste in crazy prints means that the neckline pleating detail is pretty much lost, but I know it's there.

I am calling the black and pink version my "architectural dress" because both the pleating detail and the print are architectural. I spent a lot of time laying out my fabric to get the best looking print layout, resulting in an uncharacteristic amount of wasted fabric, and I succeeded beyond my expectations. I love the way the bodice front and skirt match up and I *think* the print matchup there is low enough and close enough together that it does not look like peek-a-boobs, just like a cool design feature. I like the pattern placement on the sleeves, and the long lines on the skirt lengthen my short legs.

I'm not quite as crazy about the black and white version. However, I hope the boyfriend will like the exposed zip (though he doesn't notice clothes 98% of the time--my fashion is wasted on him unless it's short and tight, but this is sort of both so fingers crossed) and it looks good under a black jacket for a work thing that doesn't require a full suit, like a speaking engagement.

All photos are here and the pattern review is here.

Tuesday, September 14, 2010

McCall 6069, Double Cowl Dress

McCall 6069 Thumbnail

There have been a ton of great versions of McCall 6069 and y'all know how much I love a knit dress so I had to hop on the bandwagon.

Modified Back Cowl I love the sexy low cowl back, but wanted something I could wear to the office. A sexy low back and a strap across the back of the neck to hold it in place would be taking it a little too far for me. I considered following Kyle's lead and using the front of C for the back, but instead decided to raise up the back cowl by reducing the width as shown.

This did bring the back up to office-wearability, but did pretty much nothing to make it easier to wear without that back strap. The first time I wore it I had to bring the shoulders back into place literally every 15 seconds. I looked ridiculous walking down the street constantly twitching it onto my shoulders.

Improve Wearability I came home and sewed coins into the front and back cowl facings to keep them from flipping out and add some weight to keep it on my shoulders and an elastic strap running between the armscyes in the back.

I tested these solutions out before wearing this again yesterday and I could tell it wasn't going to be enough (though the cowls were hanging better) so I resorted to the nuclear option: pinning it to my bra straps (luckily, with my raised cowl back I can wear a racerback bra, so the bra straps weren't going to fall off my shoulders). This is why I need those bra strap keepers! Safety pins are ok for now but when I am back in the gym and changing in and out of my clothes twice a day (at lunch and after work) I'll be wanting some snaps. Although I guess by the time I get back to the gym the season for sleeveless dresses will be over, sob!

M6069 There's not much more to say about this easy dress. It's great for a border print because the skirt hem is straight. I used the large dot border at the top and bottom in the hope of creating an hourglass illusion.

I used the pockets because I thought I'd want someplace to clip/store my work ID, but after it was finished I realized that it needed a belt over that elastic casing so I can just clip my ID to the belt. I might cut out the pockets, as the outline shows through my thin poly knit.

I appreciated McCall's sewing instructions for this as it included thoughtful, professional details like sewing the pockets to the side seams at a 3/8" seam so the pockets roll to the inside when the side seams above and below the pockets are sewn in 5/8". I also appreciated the way the shoulder seams were sewn, which encloses to the facings and creates a clean finish.

If I make this again for work, I will definitely use plain front C as the back so it is not so fussy to wear. Also, the shorter cowl just looks kind of like a hood that get caught up. For a beach vacation or going out on summer evenings, the dress with the full length cowl back and neck strap would be gorgeous.

I took these photos before The Injury. I was going to re-do them because I forgot that I can't wear my glasses when taking afternoon pictures in my bedroom (it faces west) because of the awful glare. Now that I have more perspective, I decided that glasses glare is better than The Boot!

All photos are here and the pattern review is here.

Friday, September 10, 2010

My Latest Fashion

My Latest Fashion Ooooooh yeah. This is going to be all over the runway for Spring. You heard it here first.

So, I ran too hard at the gym. Really. I was in boxing class and we were doing a partner drill where your partner rolls up a towel the long way and loops it around your waist. Then they stand behind you and hold onto the ends, squatting down to give the most resistance. Then you cartoon run and try to pull them across the floor. This is much harder than it sounds. My partner is someone I've worked with before and she is about the same size as me. So I'm running, running and she isn't moving. Well, come on! I know I can do better than that. So I redoubled my efforts and then I felt something pop in my left calf. Bad.

I tried to put weight on it, couldn't. Felt like I was going to faint, then like I was going to puke, then like I was going to faint again. Luckily, none of that happened. The gym employees literally carried me out of the gym in a fireman's carry (I made them put me down before we got outside because no cab would pick me up if they were carrying me).

I went to the emergency room where I sat in the waiting room in howling pain for four hours (I was doing yoga breaths and tapping the other foot to try to deal with it and the other people waiting kept looking at me askance). I went back. They did an X-ray. Then they said, "By the way, an X-ray will only tell us if the bone is broken. It's not." Well, duh. They said that maybe my calf muscle had torn, maybe detached from the bone, but my Achilles tendon was fine (huge relief).

They put me in a cast. I spent a day on crutches and wow, do they suck. I had to ask a co-worker to carry my lunch from the microwave to my office because you can't hold anything! I have to flash my badge to get back to the hallway where my office is after using the bathroom, and I couldn't figure out the timing of flashing the badge and then hopping over sideways to open the door and then push through it with the crutches before the time expired and the door locked again.

I came home and traced a pattern while standing on one leg. Don't recommend. Also not recommended: making meusli while standing on one leg.

Went to the orthopedist this morning. The "good" news is that the muscle is still attached to the bone and mostly intact, just a really bad pull. I am in the boot for four weeks and we'll re-evaluate a few days before I leave for my long anticipated vacation. He warned I may still be in the boot in Turkey. Oh yeah. But I am back on two feet walking approximately five inches per minute and I can't tell you how good it is. I live in a third floor walkup. Hopping up to the third floor is really quite excruciating.

My first thought, after "I think I'm going to vomit" was "Thank goodness it's not my sewing leg!!!!" Since I won't be going to the gym for a while, I'm going to have to make sure I use that time to sew rather than sit around snacking. Don't know how much I'll be modeling though!

Can I just say, thank goodness I made all those dresses I can just pull over my head!

Unmentionables 9-2010 Current output is three pairs of much needed panties. These are made from the same knockoff H&M pattern as the last set. I determined that lace isn't great for the leg openings (not strong enough or good enough recovery), so I ordered some black picot elastic from Sew Sassy, the source of the stretch laces. Love the picot elastic look and will be using it to trim a neckline soon, I think. The legs on the panties look wavy when sitting flat, but fit perfectly when worn. I already purged three old pairs from the drawer, which felt good.

Sooooo, does anybody know any cardio exercises that can be done sitting or standing stationary? I can do most strength exercises, including even shallow squats and dead lifts, but figuring out how to burn calories is going to be my biggest challenge.

Wednesday, September 8, 2010

Stashoholism Confessional and Notion Hunt

Fabric Mart 9-2010

I feel like it's been *forever* since I bought fabric, but really it's only been about two months. Maybe we can just agree to call two months a long time. I have been trying to sew from stash because I have done a lot of travel this year and plan more for next year and am trying to divert funds away from stash building (my stash is mostly built) and into savings.

However, in planning my trip wardrobe for Turkey I determined that I need a long broomstick-type skirt that I can keep in my travel purse for going into mosques. I briefly considered trying to make a whole wardrobe of long skirts and dresses, but I don't find long skirts flattering on me because of my height and plus they pick up dirt as you walk and travel means a lot of walking! I scoured the stash, but actually don't have anything lightweight but opaque that can be twisted and squished but still worn so I permitted myself a gander at the fabric websites.

Fabric Mart had just what I was looking for in that crinkle lurex: lightweight but doesn't need to be lined, meant to be wrinkled, and will go with my planned colors of rich purple, dark pink, and olive green. But of course since Fabric Mart has flat-rate shipping, it would have been economically unsound for me to order only one piece, right? Also, they were having a 15% discount if you spent $25. It would have been like leaving money on the table (except, not really--had I ordered only the lurex I would have spent $19.98 and saved myself $13.50).

The description of the poly jersey print was rather hilarious. It was clear that whoever had written it did not care for the fabric at all, thinking it gaudy and garish. It warned of the largeness of the motif and the print repeat and the difficulty of laying out your pattern. I expected that the print repeat would be a noticeable line where the print starts over (I've found fabric like that on the G Street $2.97/yd table) that you really can't put into your garment but in fact it is just a subtle repeat. At any rate, the colors are *perfect* for my wardrobe! Perfect! I am thinking McCall 6032, though I can't decide between the bell sleeves and the straight sleeves. There were only four yards left. I ordered 2 and was very relieved that I got them. I guess other people were put off by the description. The other two yards are gone now, though.

I'd been eyeing the bright pink swiss dot for ages and at $1.99/yd I decided I could just go ahead and get it without any particular plan. I love swiss dot, I love pink, it will get made eventually.

I have to give props to Fabric Mart. I live in a locked condo building with no doorman and packages left outside will be stolen before the delivery van drives away. The Post Office has a key to our building, but private carriers do not. So I have to have most of my packages sent to work. I don't really want work to know my shopping habits, nor do I like making the mailroom and our administrative assistants do personal work for me but if you miss the UPS or FedEx delivery at home you have to go to their depots to pick up your packages. The depots are not metro accessible (I don't have a car) and do not have weekend hours. Pretty much the worst customer service ever.

Anyway, in the little "notes" section I asked FabricMart to please use USPS as the carrier and send it to my home, but provided my work as the delivery address just in case. Showing that personal touch, they read the note and went to the trouble of using USPS and sending the fabric to my house. I was so pleased!
===================

Does anyone know where to find pre-made bra strap keepers? One of our European blogging friends (or possibly an Australian or New Zealander--not on the same continent as me at any rate!) posted some a few weeks ago that I have been lusting over ever since and of course I can't remember who! **edit** A ha! Thank you Miss Shigatsu! It was Yoshimi, who is in neither Europe, Australia, nor New Zealand. And in fact the ones Yoshimi showed are pretty much the same as the Dritz. In my mind they were sort of dog-bone shaped with the snaps at the very ends. My fantasy world is always better. I am jealous that Yoshimi can purchase them by the bag, rather than each pair being heavily overpackaged.

I could, of course, make these myself but honestly I would rather overpay for them than sew tiny snaps to fraying ribbon. I've only made one set of bra keepers and hated every second of it and decided I am going to treat myself to pre-made if I can find them. Because of my sloping shoulders I wear a racerback whenever possible, but when I have to wear a regular bra the straps instantly slip off my shoulders for that classy falling down bra strap look.

The closest I can come in my googling is this Dritz product called Shoulder Strap Guards, but the snaps seem too far away from one another and I'd have to cut off the ends of the tape which would then fray and defeat the purpose of buying pre-made ones. There are also these little bandaid things, but single use products are a waste and I'm looking for something that can be sewn in.

Thursday, September 2, 2010

Birthday Dress, Silk Chiffon Burda 07-2010-120

Burda 07-2010-120 Thumbnail

I really loved the look of Burda 07-2010-120 dress, thinking it would be a great way to showcase this silk chiffon print from The Carol Collection without too much horror in handling silk chiffon--the skirt is just rectangles and the bodice inset is small enough to control. However, the instructions are all kind of nonsense, starting with the fabric (linen jersey sounds amazing but I had literally never heard of it before and have certainly never seen it anywhere). Burda instructions are famous for being inscrutable, but once you figure these out they involves so much ridiculous hand sewing and missing of obvious opportunities to do a clean machine finish that it seems like they gave the pattern pieces to someone and said "Make this as complicated and fussy as you possibly can."

Here is how I put it together.

Lengthen Inset to Match Bodice First, I compared the length of the inset to the length of the bodice. The inset is about an inch and a half shorter. Part of the crazy insane instructions is that the lining skirt is an inch longer and you sew the lining skirt to the inset (I think). This seemed needlessly complicated, and later when I realized how LOW LOW LOW the bodice front is drafted I was glad I didn't plan to hang the lining skirt off of it because the dress would have effectively become a skirt with suspenders. Instead, I lengthened the inset to match the bodice length, thinking to baste it to the lower edge of the bodice front lining. I didn't end up doing that because I needed a full extra inch of length on the inset just to adequately cover my bust. So next time I'd lengthen it even more.


Assemble Bodice/Lining; Leave Side Seams Open I cut the bodice back with a center back seam so that I could do an all-machine clean-finish for the neckline and armscyes. Because my fabric was thin, I interfaced the front neckline of the bodice lining. I started by assembling the bodice and lining as per my earlier tutorial and then sewing the center back seam, but leaving the side seams open so that I could insert the inset.

I did not use a zipper. With the wide neckline it's easy to pull over the head, and I preserved the stretch of the bodice by using zigzag seams for assembly.

I serger-finished the upper and lower edges of the chiffon bodice inset (I find it hard to catch all the edges when trying to finish something after it has already been gathered) and put in the gathering threads. The pattern calls for cutting two lining pieces for the front inset. I actually tried it that way first but it was way too bulky, so I cut another set with just one lining piece.

Gather Upper Edge of Inset Gather the upper edge of the chiffon inset and pin to the inset lining, right sides together. I found it helpful to lay the inset into the bodice "window" to determine how best to distribute the gathers (you want it flat where it will be covered by the bodice, concentrating the gathers in the window).

Elastic Casing of Seam Allowance NOTE: Where I machine stitched any horizontal seams (rather than serging) I used a zigzag to retain the stretch quality of the fabric.

Stitch (zigzag) the gathered chiffon inset to the inset lining, right sides together, at the upper edge. Turn down the combined seam allowances of the chiffon inset and lining inset onto the lining and stitch down (zigzag) to form an elastic casing. Although this leaves a serged edge in theoretical danger of being exposed if your casing flips down, it also ensures that the chiffon goes over the upper edge of the inset and the lining will not peek out.

I cut the elastic to the length prescribed by Burda, but after assembling the dress found that the inset feels very wardrobe malfunction-y and took about three inches out of the length of the elastic to tighten it.

After inserting the elastic into the casing, gather the lower edge of the chiffon and stitch (zigzag) it to the lower edge of the inset lining, wrong side of the chiffon against right side of the lining.

Finish the side edges of the inset.

Stitch Inset to Lining Side Seams Unfortunately, my photo of the next step is blurry and I only took one. Sorry about that.

As discussed in the clean finish tutorial, take a hand tack at the underarm match point for the bodice and lining on each side. Before sewing the side seams, place the inset into the lining half of the side seam (NOT the fashion fabric half), with the chiffon side against the right side of the bodice front lining and the upper edge snugged up against your hand tack at the underarm match point. Then sew the side seams as one.

Inset Stitched to Lining Side SeamsWhen everything is turned right side out, the inset rests inside the bodice front from side seam to side seam.

To make the skirt, I cut (tore, actually) two rectangles the full width of my 45 inch wide chiffon the length that Burda prescribes in the instructions. This Carol Collection silk chiffon is very high quality and the print goes all the way to the edge of the selvage. That made it very easy to do nice french seams.

Burda provides an A-line skirt lining pattern to be cut of jersey. However, I thought a knit skirt would be too heavy and an A line would take away the floaty quality of the skirt. So I used a woven lining rather than a knit and cut the full 60 inch width of my fabric, to be gathered in place.

I did a serger rolled hem on the lower edge of the chiffon, and did a regular serger finish on the upper edge, as well as the upper and lower edges of the lining.

Next, I put in gathering threads and sewed the chiffon skirt to the fashion fabric bodice and the skirt lining to the bodice lining, pressing the seams up toward the bodice.

Additional Length Needed for InsetI had intended to baste the lower edge of the inset to the lower edge of the bodice front lining but--surprise!--it was not remotely long enough. I left it free when sewing the skirt to the bodice. To finish, I hand-stitched the inset in place onto the bodice lining as well as tacking it to the straps. If I make this again, I will shorten the front strap, something I often need to do but didn't think about for this project.

The neckline is so low. Have I mentioned that? I don't usually have a problem with the low Burda neckline because I am flat-chested, but this one is rather ridiculous. It definitely looks better in the magazine with a shorter inset, but I honestly don't know how they got the inset to cover the model's nipples. It is that low.

Burda 07-2010-120I dig the dress. It is my first transitional piece of the year--it works with sandals, but also will be great into fall with tights and a jacket or sweater. I wore it on Tuesday to celebrate my birthday (8/31) and felt festive.

The biggest weakness of the design is the bodice back, which is boring and somewhat incongruous, but I don't have any ideas for making it more interesting or harmonious so I can't really complain. You can't really lower the back neckline because it could cause the front to pull too much forward and lower the neckline even more. Maybe cutting out the armholes a little in the back for a more racerback style?

I am trying to sew from stash so I just used what I had and the knit fabric for the bodice is really not strong enough. I think this would do best with a double knit; strong enough to hold its shape but still stretchy enough to leave off the zip. Although it will be no fun to unpick all that zigzag stitching, I can remove the chiffon bits to reuse if I want to remake this with a sturdier knit for the bodice at some point in the future (and then I could incorporate that shortened front strap).

This is also the first candidate for my travel wardrobe to TURKEY!!!! After several setbacks, we booked our tickets a couple of weeks ago and are going for sure. I'll be gone the first two weeks of October, and I think the weather in Turkey in October is as fractious as the weather here in October and it could be blazing hot or freezing cold. I'm going to have to make game time packing decisions so of course that means I need a huge array to choose from! I have many sewing projects planned, probably more than I can complete in the time remaining but a girl can dream!

All photos are here and the pattern review is here.