I guess everyone else has figured out that this style is not flattering, because there were virtually none of them at the Goodwill! I actually don't like the Goodwills in the DC area much because they're too nice. This sounds ridiculous, but the point of Goodwill is the thrill of the hunt. The ones here don't have much on the racks, and everything they have out is pretty current and good quality. Whither the funky vintage? Why no crazy bedclothes that can be made into fun skirts? I find the prices still reasonable and I'm happy to pay them, but others feel that $5 is too much for a sweater. I don't know of any crappier thrift stores in the area, though there must be some.
Anyway, I found a really nice grey lambswool Gap sweater that, upon getting home, I realized was great as is and just too nice to cut up. And this.

I hate turtlenecks. My collarbones are one of my nicer features and I like to show them off; plus, I feel all choke-y in turtlenecks. It has the requisite balloon-y shape and ribbing at the cuffs and hip. But it was great raw material--I love the colors, and it's 100% wool and had been well cared for.
It's best to start with a sweater at least two sizes too large for you. Even bigger is even better, because then you can felt it before starting the project and you won't have to worry about raveling. This was only about a half size too large and was almost too short as is, so I knew I'd need to adapt MrsBowles' tutorial by adding in a midriff band to give me more length. I went through my stash and the best match was some grey wool jersey. It's just luck that this was wool; any jersey will work, though it needs to be a medium or heavy weight to stand up to the sweater.
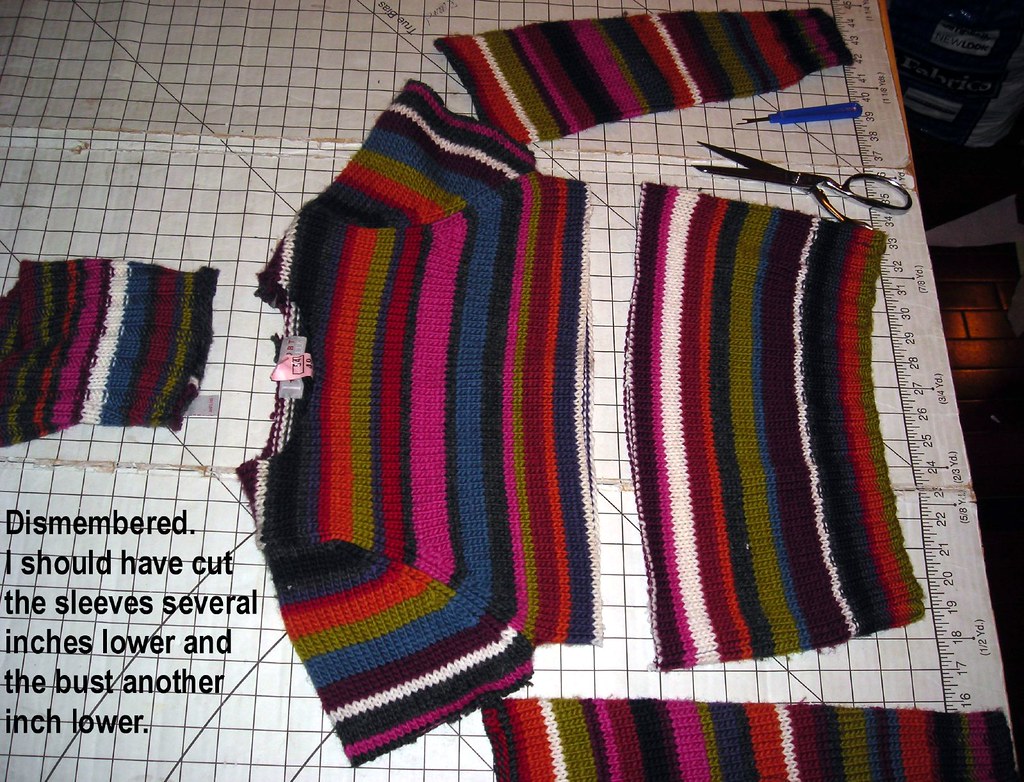 The basic premise of this refashion is to make an empire line, bell sleeved sweater by turning the lower halves of the sweater and sleeves upside down. Simple yet brilliant. Doing this on a striped sweater made it super easy to cut apart, I just had to choose a stripe and follow it. You'll want to cut about three inches under your bustline (I cut about an inch too high), and two to three inches above the elbow (I cut about 3 inches to high). I immediately finished all the edges with the serger so there would still be some sweater left to sew back together! I'm still working on optimizing the differential feed to allow stretch but not actually *be* stretched.
Once your edges are secured, it's time to make the V front. First, find and cut up the center, then cut your V opening.
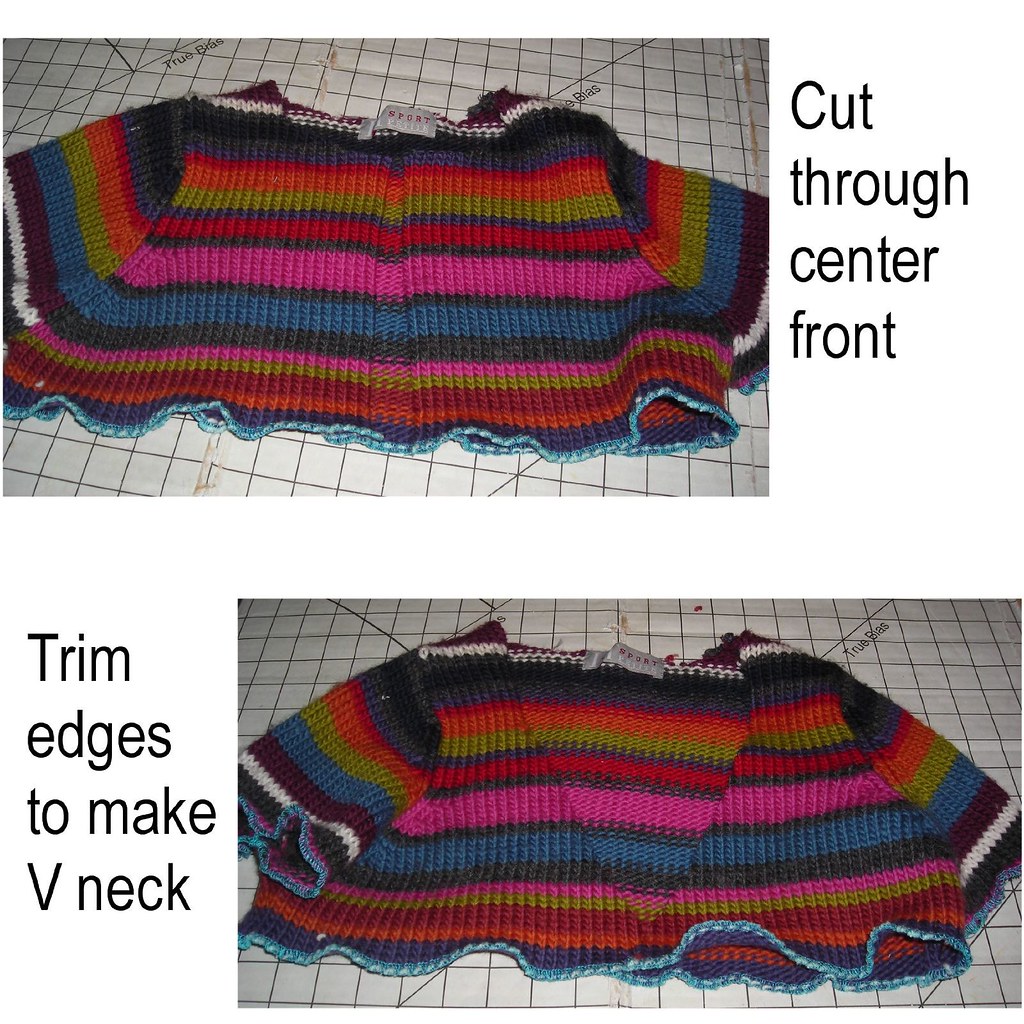
Again, secure your edges with the serger (or a zigzag stitch). If your sweater is a loose gauge as mine was, it might be smart to stabilize your neckline with twill tape or grosgrain ribbon or something. I didn't, so after it was done I took some yarn and wove it into the neckline just outside the ruffle, tightened the neckline a little, and tied off the yarn.
Now it's time to make the ruffle. My ruffle was three inches wide and about twice as long as my V neck opening. This might have been a little too much ruffle. I finished the edges with a contrasting thread color just for fun (and also because I didn't have a matching thread color), and cheated on the gathering by using only a single basting stich.
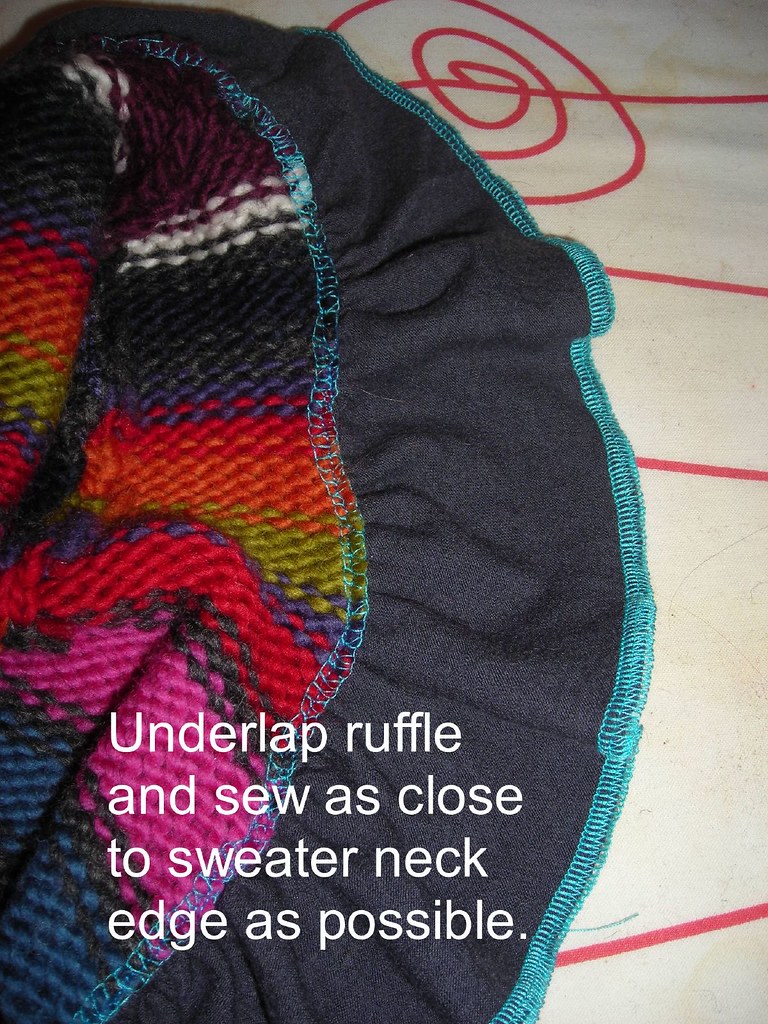 To sew the ruffle to the neckline, underlap the ruffle. You're sewing right side to right side, but you're not lining up the edges and sewing as with a normal seam. You're just overlapping the edges kind of like you were shuffling cards. Sew with the sweater side up, as close as possible to the edge of the sweater. Here's what the underside looks like.
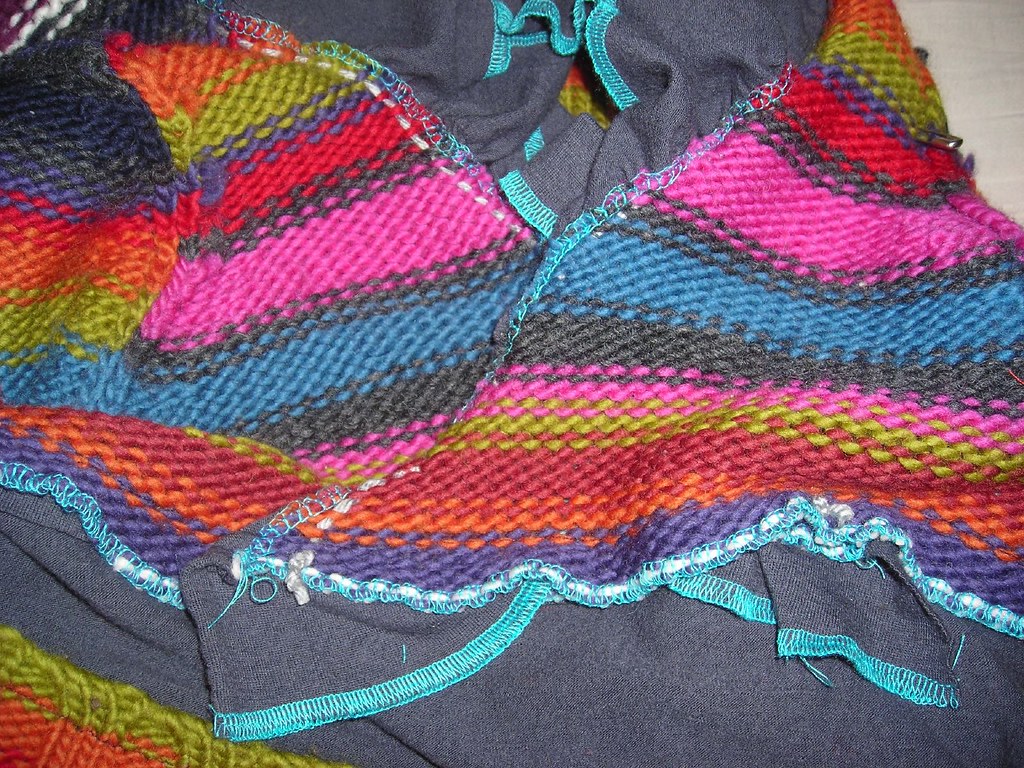
Now cut out your midriff band. Mine was five inches wide (including the half inch seam allowances) because I have a ridiculously long torso for being so short and I wanted the sweater to comfortably reach the top of my hips so there'd be no danger of showing my belly when I lift my arms. Sew the side seam so that it fits comfortably but not too tight (2 inches of ease or so). Put on the top part of your sweater and overlap the V neck edges so that the fit is good, pin and baste. Not that I ever baste. Then pin your midriff band and sew. Here's the overlapping V:
I found it best to sew with the sweater on the bottom so the feed dogs would help me ease it in. A loose weave sweater like this requires a lot of easing.
Now try on your upside down lower half of the sweater and take in the sides if needed. I had to take in the ribbed edge about an inch and a half on each side, tapering to nothing at the bottom to give plenty of room for my hips. I did this seam with the serger, but probably should have used the sewing machine as the seam stretched like crazy and I have little points at the side. Once it fits, sew the lower half to the midriff band.
For the sleeves, it's basically the same thing. Gather the edge of the upper sleeve (hard to do! It ended up more like easing), sew to sleeve band (add plenty of ease in sleeve band--the bulky seams will make it much tighter than you think), turn lower cuff upside down and sew to other edge of sleeve band. This is where, again, it would have been better to have a bigger sweater, so the puff was more obvious.
And voila! It took me about 2 1/2 hours because I had to mess around with things a bit.
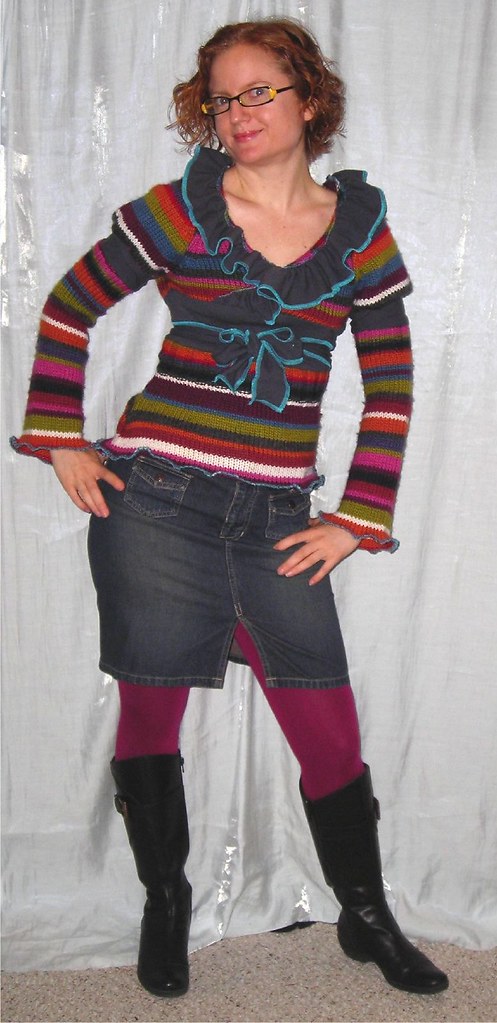
I felt like I needed to bring the turquoise overlocking into the rest of the sweater, so I made a little belt for the midriff, but actually I think it looks fine without the belt, which is how I wore it yesterday. All photos from this project are here.
I am now obsessed with sweater recon/sweater reconstruction/sweater refashion/whatever you'd like to call it. When I went to the Crafty Bastards craft fair in the summer there was one girl, The Devil Made Me Do It, who had done *amazing* clothes out of felted thrifted sweaters, but that kind of thing just doesn't come naturally to me so I have to use tutorials. Sad. I'm going to try to get Second Time Cool from the library, and I also searched online. My google searching didn't come up with a whole lot of ideas, but there were a few.
Sarah in NYC did an article for PR on refashioning sweaters last year; as a result I cut up the center of a sweater that was too small and crocheted the edges with embroidery floss to make a cute cardigan. Please note that single crochet is the extent of my crochet knowledge; other than this all I can do is sad and uneven scarves that curl up and even sadder and more uneven dischloths. You don't have to be an expert to do this.
There's a whole lot of turning sweaters into cardigans, such as this one from One Pearl Button and I love the little collar Erica Makes Stuff added. But I'm really not into cardigans.
I like this tunic from judethelost--check out the clever pocket she made of the ribbing cut off the sleeves! I can't quite master the wearing of the tunic, though. I don't know what kind of bottoms to wear with them. I feel like an oversized upper piece needs a fitted lower piece, but then I'll look like I'm in the 80s (and not the good kind of 80s).
Red Panty Crafts had a few cute ideas; I like the two piece cardigans at the bottom of the post.
There are several clever "Frankenknits" projects on Knitty by Kristi Porter; my favorite is the shibori felting technique, though I think it's best suited to scarves as demo-ed; I'd find it too cutesy for clothes. I also like her idea of turning a ribbed waist into a collar.
And of course Summerset has done a few refashions as well.
Anemone of FreePlayCraft cut up a very large sweater into an asymmetric cardigan and crocheted the edges, which suits me much better than a regular cardigan. Lee Meredith was also inspired by Anemone.
I'm looking more for clothes than accessories, but the photos on this Threadbanger tutorial are too adorable not to share.
There's a whole board on Craftster dedicated to reconstructing clothing; if you search "sweater" on that board you come up with some really creative projects people have shared.
================================
Can anyone think of a pink motorcycle jacket BWOF did recently? And can tell me how much yardage it calls for? Cidell is considering pricing leather in Egypt but I forgot to look last night and tonight will be insane packing for Germany (leave tomorrow!) and won't get a chance and by the time I'm back she'll be back.

.jpg)


.jpg)


12 comments:
Cass and I both LOVE your sweater refashion. You are welcome to come and stay with us in Paris ANYtime -- for the price of a live tutorial. ;-)
Oh, wow. That is one serious transformation! It looks fabulous!!! You make me want to go out and sweater-hunt now. Thank you for this bit of creative juiciness. :)
That sweater looks wonderful!
There is a secondhand/thrift shop on King Street in Old Town Alexandria operated by a charity for the blind that had a boatload of clothes last time I was there. You could walk there from the King Street metro. Peek into the other antique and secondhand shops on the way there too. Don't forget to cruise into the Crate and Barrel Outlet 2 blocks from the metro off Diagonal road, near Peyton and Prince Streets. We call it Diagon Alley in our family of course. Also the Salvation Army has all sorts of recyclable items, but they require a car, as they are on Duke Street in Annandale - way up Duke St. Happy Hunting!
What an improvement! Great tutorial - thanks :)
Wow, what a transformation! I love that the original sweater was hand knitted so it's doubly good. Handmade by two different sets of hands.
Wow.
You ARE a household deity.
Brilliant transformation!
If we're thinking of the same one, the pink BWOF biker jacket is in May 08-119 and needs 1.8m of 135cm wide fabric. no idea how you convert that to how many pieces of leather to buy!
Wowza, I'm inspired. Beautiful. Thanks.
really cute. And I agree with your thoughts on Good Will. Ours is the same here. I have better hunting luck at the Salvation Army
That's adorable on you. Thanks for all the awesome links.
That is awesomely better than the original. I think your transformation would have worked in any color/pattern, but the stripes are perfect!
Enjoy Germany, buy fabric, come home and tell us asll about it.
Excellent transformation.! I will try it on my Gap sweater.
Post a Comment