Thursday, April 28, 2011

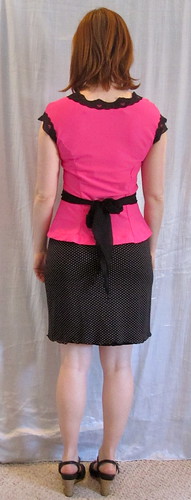
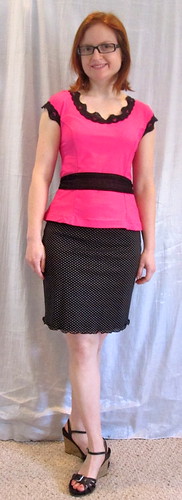
Simplicity 6930, Ruffle Shoulder Blouse

Simplicity 6930 Thumbnail

I was first seized by this project two years ago and it has been on the "right away, sew it up" list since then. To be fair, I actually sewed it last June--only a year behind--but it hung needing the hem to be fixed for nearly a year before I got to it. The hem on this gave me fits, and the back hem is *still* crooked. I never understood why people hated hemming, but now that I've made so many tops recently I feel the pain! Skirt and dress hems never give me much trouble, but hemming a top is a nightmare. I have slightly crooked hips and shoulders and while everything kind of evens out by the time you get to my knees, shirt hems are a whole other story.

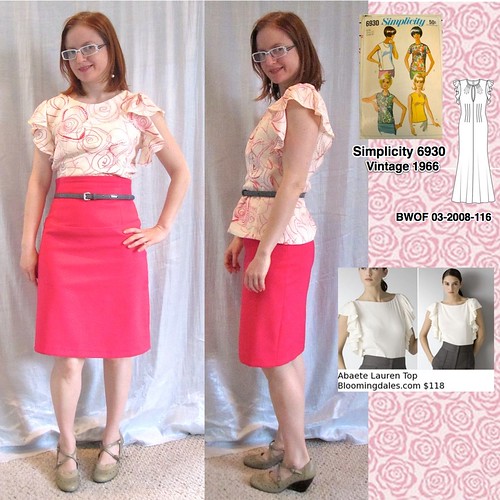
I saw this top first, the Abaete Lauren top, on Weekend Designer. He gave instructions for drafting the top, but I am more of a frankenpattern-er than a drafter, so I went through the archive to see what I could find.
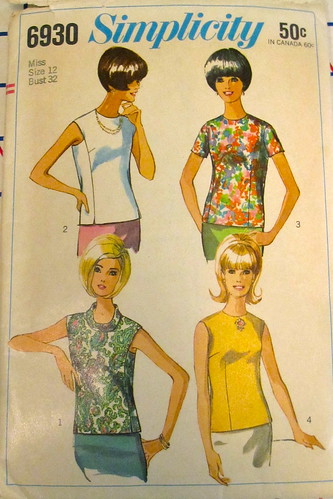
S6930 Envelope

My original plan was to make a princess seam top and catch the ruffles into the princess seam, as in Simplicity 2360. This vintage 1966 pattern has a side princess panel that seemed perfect. However, I realized I'd still have to draft a ruffle and felt unenthused. Then I hit on the idea of using the sleeve from the Duchess of Windsor dress, BWOF 03-2008-116. I had even made the dress before and had the sleeves already traced out. So much easier.
Bullseye
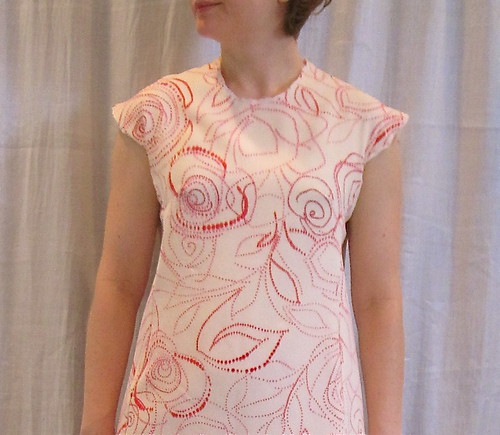
I adore the print on this fabric, though I'm not wild about the texture of silk crepe in general. It has a sort of "paint with water" look of smeary dots, and I love that it has both pink and red in the print so it matches either color skirt. Since it's a floral pattern I placed the pieces carefully to avoid the headlights situation. Or so I thought. Could I have done a *worse* job? Not only is there a GIANT flower centered absolutely perfectly on one side, the other sides looks small and saggy because of the slightly lower placed second flower. Thank goodness I had enough fabric to re-cut the front. I don't normally buy extra fabric so it was really lucky in this case!
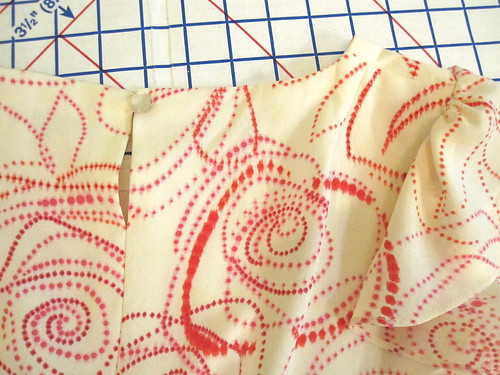
Back Slit with Button As the envelope back shows, this pattern is drafted with a button back. I have ranted before how the button back discriminates against the single woman. I changed it to a center back seam with button slit at the top, figuring I could put a zipper into a side seam if need be. It turns out, this is very easy to pull over the head even with the button closed, so I even tacked it closed at the top.

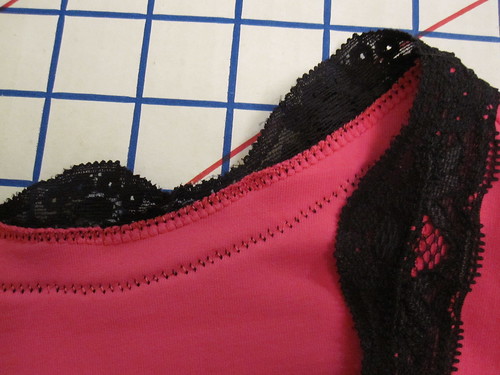
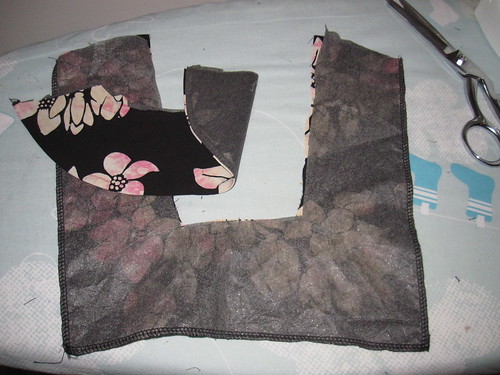
Lining/Underlining As the fabric is slightly sheer, not to mention a little rough (this is not high quality silk crepe) I lined/underlined the blouse with cotton batiste. The sleeves are unlined and French seamed. I did a faux Hong Kong finish at the center back seam, and treated the batiste as underlining at the side seams, which are French seamed. I finished the neckline with a bias strip, the outer edge of which I hand-stitched to the underlining to keep it in place. I put in the hem by hand.
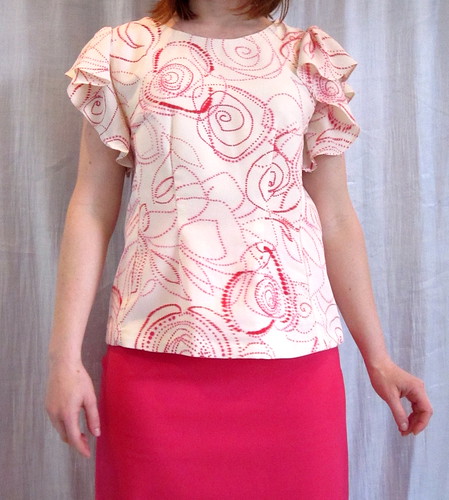
Front Closeup Consistent with most of my vintage pattern experience, there is a LOT of ease drafted into this top. My pattern is a size 12 for 32 bust. I have a 32 bust but my waist is a couple inches larger than it "should" be for a size 12. As far as I can remember, I didn't adjust the size of the pattern (though as I recall I lengthened it--my memory is hazy) and it came out HUGE. Although it's not portrayed that way on the envelope, the description of the garment is "overblouse." Maybe that explains the size? Anyway, I added front and back vertical darts to take up about 6 inches of ease (two 1.5" darts in front, two 2" darts in back). It is still quite loose and can be pulled over the head.
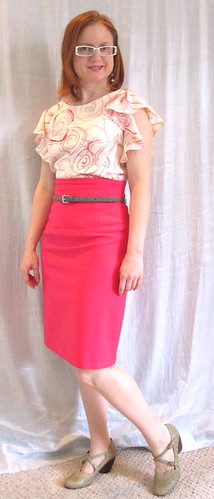
Front
I am pleased with how well this knockoff turned out. My sleeves are not as ruffly as the original--if you visit Weekend Designer's post you'll see he recommends a circular ruffle, and the Duchess of Windsor sleeves are full but not a full circle--but they are dramatic enough for me. It looks fab with my Burda 01-2009-112 corset waist pencil skirt, if I do say so myself, and after much experimentation I found a way to style it with a red skirt as well (the belt was the issue--I wish I had a beige-ish one but haven't been able to find such a thing).

I'm glad I finally got around to fixing the wonky hem so I can actually wear it! I have no idea what I was thinking when I first put in the hem. Not only was the front hem crooked by at least 1.5 inches, the front was about 2 1/2 inches shorter than the back. So bizarre. And of course it still isn't right. I finally decide to put a hand hem in something and now I'm cursed to have to re-do it 3 times!

All photos are here and the pattern review is here.
Thursday, April 21, 2011

Spring/Summer 2011 Designer Inspiration

Pattern Review's Knock Off contest will run in May, so it's time to get inspired!

I am not wowed by the selection of dresses online at Saks and Neiman Marcus this year. As usual, it is almost entirely neutral (aka drab and boring) colors with few prints. That's a hurdle I can overcome, but there is also a lot of unshaped clothing that is fitted with belts. As the old SNL sketch goes, "Just cinch it!" While I do enjoy loose, airy pieces in the heat of summer, a belt is actually way more sweaty than a dress that has shape at the waist with several inches of ease.

That said, there were some unshaped pieces that appealed to me. At least they have full skirts for biking. It is very inconvenient, this lifestyle change of bicycle commuting. Last year I put a lot of effort into sewing fitted and pencil skirts but I cannot bike to work in them! It's okay for skirts, I guess, because theoretically I could wear a biking skirt to commute and then change at work. But I just hate carrying extra clothes around for no reason and I don't want to walk into the building in the same raggedy skirt every day. Not that such a skirt is raggedy because it doesn't even exist yet (I'm thinking black A line knit). And for dresses, just no. I don't want to wear an entirely different outfit to commute in.

In the land of knock-offs this summer, Simplicity is the clear winner. Other than my vintage Stretch & Sew peasant blouse, *all* the matching patterns are Simplicity (including one New Look).

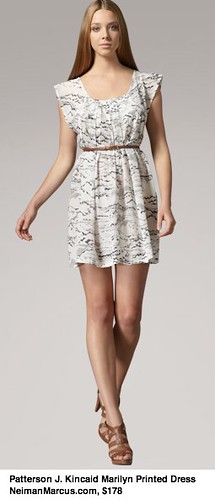
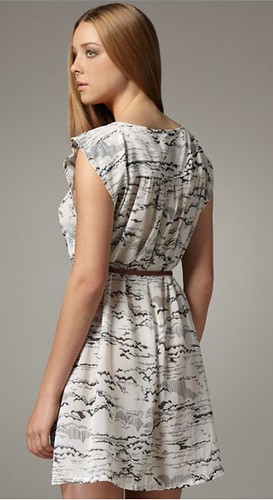
Patterson J. Kincaid Marilyn Printed Dress Marilyn Dress - Back

I like the features on this dress: the back yoke with gathered lower back; the pleated neckline, and the pseudo-raglan sleeves formed by the yoke.

When I saw it, I immediately thought of Simplicity 2594 (which is the same as lower priced It's So Easy 2418). It has the yoke and the gathered back below the yoke. The yoke would need to be extended in both directions and the front redrafted into pleats instead of a cowl, but I think these changes would actually be less complicated than they sound.

I have been trying to decide what fabric I have that would work for this!


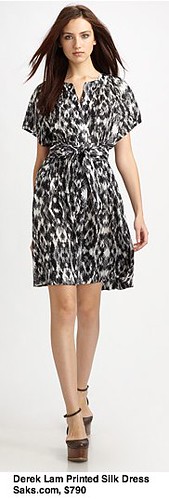
Saks.com - Derek Lam - Printed Silk Gathered Dress

Now, the gorgeous silk fabric in this Derek Lam would set you back a pretty penny. The description says only "silk" with no information on the weave. It doesn't look like charmeuse, but it also doesn't look sheer enough for voile. Possibly a lightweight twill weave?

I can really see this working with a silk cotton, one of my favorite blends. I am lusting after this one, only $22.74 per yard! Maybe when I have sewn up my entire stash I can justify that purchase. Give me about 15 years.... Or maybe I can get it for my birthday. That's a little closer in time, but I suspect the fabric will be gone in 4 months. Thinking about it, I have a lightweight gray rayon with a small print in stash that would work.

Although the fabric is unattainable, the pattern is a good match for Simplicity 2615. The only difference I can tell based on the level of detail available is that in the Simplicity the ties are threaded through a long casing/belt loop in the front and tied in the back and the Derek Lam has a separate sash tied in the front.

Exact same pattern.
Sash tied in back=Becky Homecky.
Sash tied in front=high end designer.

Very simple equation.

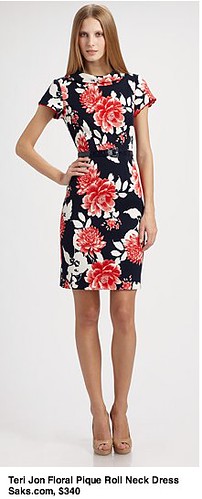
Saks.com - Teri Jon - Floral Piqué Roll-Neck Dress

A fitted dress! Here we have the classic sheath with a roll neck collar. Where have I seen that before? Oh yes, New Look 6968. Here the pattern is somewhat different, as the designer version appears to have princess seams and the New Look has bust and waist darts in the bodice. I can't tell whether the Teri Jon has a waist seam because of the belt, but I think it does as you can see princess lines breaking the print in the bodice but the print on the skirt appears continuous.

The standout feature here is the collar. The New Look roll collar has a little extra flip thingy, but I have the pattern and from my perusal of the directions a while back the flip thingy is not an integral part of the collar and can be left off. Too bad my floral print pique is already spoken for!

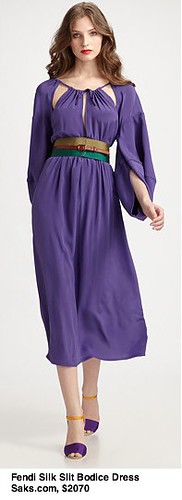
Saks.com - Fendi - Silk Slit Bodice Dress

For some reason this dress really grabbed me when I was browsing. It is entirely impractical for my life so I kept going. But I had to go back and snap it. I don't know what it is I love here. I am not really into the 70s Studio 54 vibe, which this has in spades, and it really REALLY does not fit into my lifestyle. There is no conceivable event, place, or occasion for me to wear a dress like this. The only place I can even picture it is for dinner at an expensive beach resort in Ibiza or on a yacht. Believe me, nobody has invited me onto their yacht lately.

It actually would not be hard to make, barring the difficult fabric. My trusty vintage Stretch & Sew 1582 Peasant blouse, pattern source for 3 knockoffs so far, could be adapted to it with the sole change being the deep V back, though I wouldn't go that low; lightweight flowy silk without a bra would be vulgar in real life, even on a IBTC founding member like me. I suppose that's why I picture it in a bathing suit situation; it wouldn't matter if your bikini band showed in the back and through the low front slit, so it would solve the bra problem.

If anyone wants to invite me to their mansion on the French Riviera to party with Brad and Angelina, I'll get right on this project. I will warn you that I would probably use the wrong fork at some point.

I had been planning to make the Michael Kors striped shift I discussed here for the knock-off contest, but it doesn't have much of a wow factor *and* looking at it more closely I see that it has studded ribbon trim on the shoulder and side seams. I am not a studded ribbon trim kind of gal, so my "knock off" would not be faithful to the original. The more I think about it, the more I'm thinking Derek Lam.

Of course, all this depends on how tired and sewn out I'll be after my bike trip! I get back on May 15 and the contest ends the 31st. I started this week with 7 things on my to-sew list. Only one of them was somewhat complicated and it is done! (Well, done-ish; an hour or so of hand-sewing remains.) I'm down to six things to sew: two skirts (one zip, one elastic waist), a top, a shrug, and two scarves.

T minus 15 days--I leave two weeks from tomorrow!

All my inspiration photos are here.

Are you joining the knock off contest? What are you sewing?

Tuesday, April 19, 2011

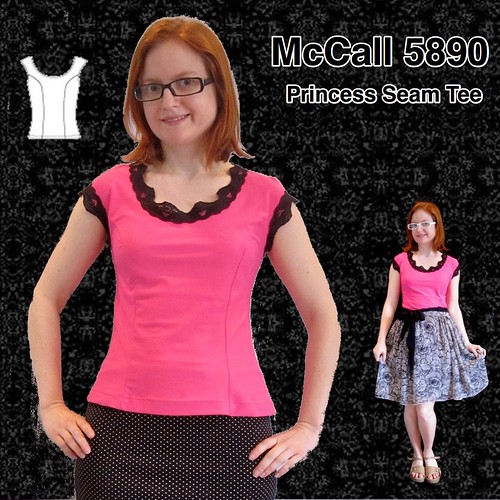
McCall 5890, Princess Seam Tee with Lace Trim

McCall 5890 Thumbnail

Since I planned for several t-shirts (right now the plan stands at 6, with 5 completed) for my bike trip, I have been obsessed with finding interesting t-shirt patterns! McCall 5890 attracted me with the princess seams (great for fitting) and the little cap sleeve for shoulder sun protection.

This is one of those patterns that shows somewhat dowdy examples in the photos, while the line drawings reveal good bones. I was a bit concerned about the width of the neckline in the line drawing, but it is not as wide as drawn--my neckline is out of the envelope.

The envelope actually provides the finished bust measurement!!! I feel like I haven't seen that in a good five years. This is a Nancy Zieman pattern, so I don't know if it is her doing or the fact that there was no room on the envelope for the line drawings. The instructions give you hints for sewing in short bursts of 10, 15, or 20 minutes. I am not good at that sort of sewing but it was interesting to have the various steps clocked out.

Back


I just love princess seams for getting a good fit. I shaved some bust curve off the side front piece as shown in this example (example is not the actual pattern here) and took in the back/side back seams for swayback fitting. I *think* the swayback is actually good, and the wrinkles here are just from the sash and the way I'm standing. It seemed good in the mirror holding another mirror, but it's impossible to see your own back without distorting the garment.

The top uses the same pieces as the the knee-length and calf-length dresses. This is fine for pattern-printing economy purposes but it meant that the top's hem was impossible! The pattern just has cut lines rather than extensions that provide for the hem to be the same width as the area you're sewing it to. This means that the lower edge of the top is much larger in circumference than the area you're trying to sew the lower edge to for a hem.

It really needs a hem facing but of course I was trying to hem this late at night because I just wanted to finish and I didn't feel up to messing with measuring and cutting a hem facing (which of course would have been easier!). So my hem is not great. Next time I will definitely use a hem facing, or shape the lower edge to be straighter.

Lace Application Closeup

I am not one to wear solid colors. I love a print. So sewing all these solid color tops was making me itchy. I decided to dress this one up with some black stretch lace, purchased a while back from Sew Sassy. First I serged off the seam allowances from the neckline and armscyes. Then I arranged the lace so that there was a "dip" at center front (though later when I put the top on with a pendant necklace I realized I did not quite get center front, lol--no pendant necklaces with this top!) and the armscyes were symmetrical. I stitched the lace on with two rows of twin-needle stitching, one right along the edge of the neckline/armscyes and one at the edge of the lace. I'm not totally convinced the scallops on the neckline aren't going to wilt and droop. I guess I could starch the lace, but that would be uncomfortable and quickly melt off as I sweat on the bike!

M5890


This is a nice t-shirt variation. I love hot pink, though the top may be *too* hot pink to wear as real clothes. It is almost as bright as 80s fluorescent pink, and definitely as bright as 90s neon pink. The shape is flattering and easy to adjust for different figure types, and I really like the shoulder coverage. I don't know that I would make the dress version of the pattern because I don't think it would be flattering to my figure, but if it suits you I think it would be a great travel dress.

The pattern also includes elastic waist pants and an unstructured jacket with a band-like/shawl collar. The pants hold no allure for me, but the jacket could be a nice layering piece.

All photos are here and the pattern review is here.
Friday, April 15, 2011

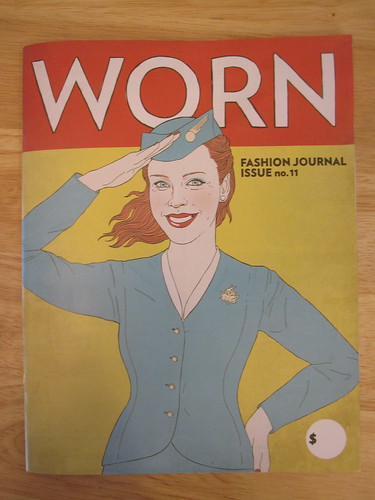
Worn Fashion Journal and Stashoholism Confessional

Worn Magazine I found Worn Fashion Journal through a mention in the blog Of Another Fashion. Of Another Fashion is a project to collect images of women of color throughout history to illustrate their participation in fashion. It is a great project and the images are always fantastic. I highly recommend checking it out, and submitting photos if you have any that fit into the project.

I was thinking of the magazine as "Worn Magazine," but it turns out that there is *another* fashion magazine called Worn Magazine and it is about Washington DC! I'm going to have to dig deeper into that one.

Worn Magazine

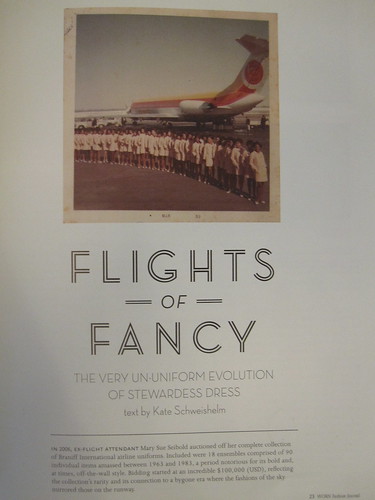
I was drawn to Worn because I saw it had an article on flight attendant uniforms. I enjoyed making and wearing my retro air hostess Halloween costume two years ago, though it was not any kind of historically accurate, and was interested in the topic. The article includes interviews with women who were flight attendants during the 60s and 70s as well an exploration of the larger cultural role and perception of flight attendants. And of course, information on the uniforms. I enjoyed the article.


Worn Magazine The magazine includes many other interesting articles, such as this one by a textile conservationist on the techniques used in her work for museums. Other articles include a discussion on choosing vintage eyeglasses, a history of the perfume "Jicky," several book reviews, and a discussion about the characteristics of tweed.

There is also an editorial fashion spread, though I have to say it didn't do much for me. It is rather geared toward the university crowd with layer upon crazy layer of texture, embellishment, and Inuit inspired fashion. It is not anything that can be remotely adapted to a working woman's wardrobe. But this is more of an academic journal than a lookbook, so the fashion spread is almost irrelevant.

Worn is a Canadian magazine but accepts subscribers in the US for $18 + $8 shipping ($20 shipping outside US and Canada). The magazine comes out twice a year, and a subscription is for two years (so four issues).

I am not a magazine subscriber because I am not good at getting rid of magazines--the only other magazine I get is BurdaStyle. But I found a friend who will let me pass the issues along to her so I'm safe!

=====================

G Street 4-2011

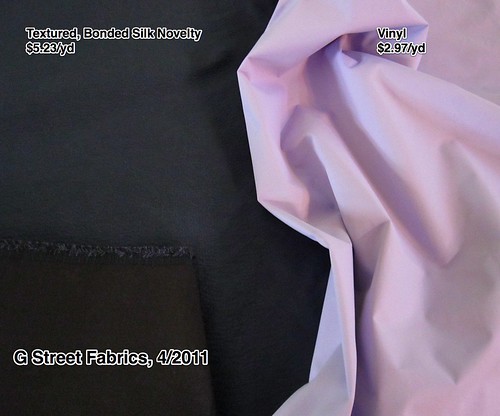
I was feeling so smug about my fabric buying! I went to G Street Fabrics last weekend for Fashion Sewing Club. The topic, fortuitously, was rainwear. The instructor had found some vinyl on the $2.97/yd table and pulled it out for us. I want to have two helmet covers as I have two helmets (one for work and one for home) and am just about out of Gore Tex so I bought the vinyl.

I also had to check out the silk novelty $6.97/yd table, especially as there was a 25% off sale going. I found this very interesting textured, bonded silk. The outside is a blue-gray with a bumpy texture and the back side is black cotton (I think, I can't separate the two layers to do separate burn tests). It's fairly substantial without a lot of drape and I think it may be home dec. I immediately envisioned a trench-style jacket. The silk would make it warm but still relatively lightweight. I am not *quite* sold on such a dark-colored coat--not my style!--but I can see it being great for Fall, and light colored coats do show dirt awfully quickly. As I have no immediate plans to sew this up and I have plenty of wools for jackets in my stash I'm not sure this purchase was justified. I am going to have to recommit to mindfulness.

Wednesday, April 13, 2011

McCall 6527, Vintage 1946 Cherry Blossom Dress

McCall 6527 Thumbnail

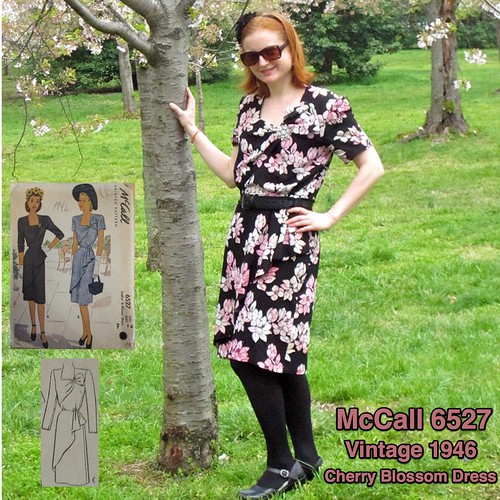
I made this dress in February to be ready for cherry blossom season. This project is a total hat trick: I made it during the stash contest, it was sewn during the vintage sew along (although I didn't join), *and* it's a PR Weekend Montreal souvenir as both the pattern and fabric came from the giveaway tables. The pattern was one that Reneeb4930 and I *think* the fabric was from lmg/Maria. The fabric is a batik rayon that may actually be real batik, as there is no discernible right or wrong side to the print.

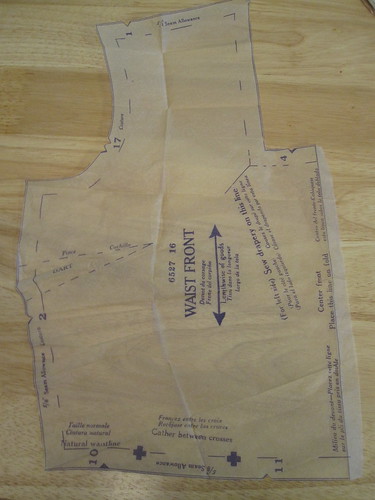
Pattern Piece This is a single size pattern. It appears to have been printed in sizes 12, 14, 16, 18, 20, 40, and 42. Though it sounds like there should be a huge difference between 20 and 40, the measurements increase in the same increments as it does in the sizes between 12 and 20, so it seems rather harsh to call it double the size!

This size 16 pattern is a 34 bust, 28 waist, and 37 hip with a finished length from back neck of 43, which is close enough to my measurements (32/27/37). I pinched some width out of the bust dart when cutting, but that was all. As with other vintage patterns I've made, though the pattern envelope depicts a nipped-in, impossibly tiny waist, the pattern is actually drafted with a lot of ease. I added some "pleats" along the waist seam in front and back to take in the extra width after it was done. I love how helpful the pattern tissue is! You don't really need directions because all the info is right there.

Interfacing Finish for Facing For a neat finish on facings, Beth of Sunny Gal Studios described a method of sewing the interfacing to the lower edge of the facing, right sides together, then flipping and fusing, for a neatly finished edge. Love! These are certainly good looking facings. I probably should have sewn the shoulder seams of the facings and interfacing and then done the stitching around the outer edge all at once, but I was concerned about not being able to press the shoulder seam of the interfacing portion. I will try it that way next time.

To keep the facings from flopping around, I hand-tacked them to the shoulder seams, the back neck darts, and underneath the overlay on the bodice.

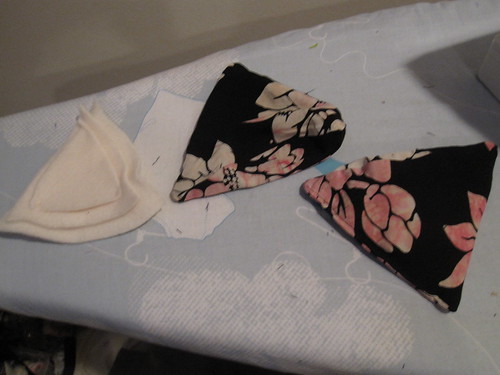
Shoulder Pad Pieces I am not someone who sews vintage patterns to go back in time. I use modern methods and drastically shortened the skirt (43 inches would drag on the floor at my height, and mid-calf looks horrible on me). Where possible I used French seams, but at the zipper (not snaps) opening, I serged the raw edges.

One vintage touch I decided to try, though, was the shoulder pad. In the past I have left the shoulder pad off projects like this. The shoulders generally end up a little loose as the patterns were designed with extra ease at the shoulder to allow for the pad height. The shoulder pad is made of 3 pattern pieces and then stuffed with several progressively smaller triangles of batting or felt. In my case, I used fleece. Although it is a little fussy to sew, the pattern create a pad that is already shaped, and just has to be stuffed. I feel very fancy with my matching shoulder pads.

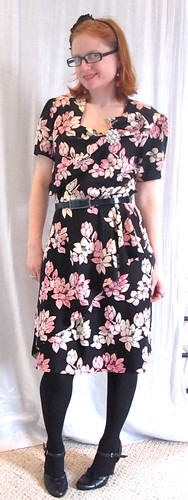
Front I had been planning to cut this with long sleeves, but didn't have enough fabric. So I had to wait months to wear it after finishing. I comforted myself with calling it my Cherry Blossom Dress and planning to wear it to this year's bloom. Well, the day I was planning to go it snowed!!!! Kite Day was rescheduled for April 10, so we went over the weekend. The blossoms were almost gone but I did manage to get a few of them in the background. Luckily, I didn't miss them entirely because I had gone after work a couple weeks ago to see the blossoms at peak bloom. You can see my blossom photos here.

As is often my problem, the details of this dress disappear into the print in two dimensional photographs (I think they're more obvious in person). I tried to get some detail shots, although even they didn't turn out great; they're in the photo album. The pattern review is here

Friday, April 8, 2011

Outfit of the Week, Q&A, and Stashoholism Confessional

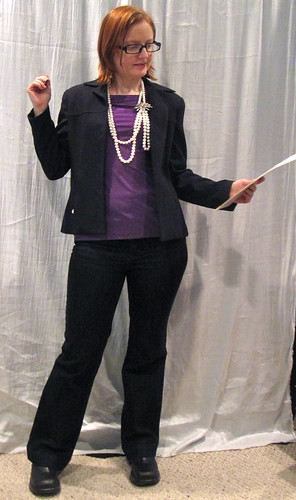
With Jacket A while back I mentioned that I was wearing my Burda 02-2008-108 ruffle shoulder top with jeans for a Friday. I had a meeting that day with some higher ups so I put a jacket over it for the meeting. A couple of people asked how the jacket looked with the shoulder ruffles, so here you go!

In the case of this top (non-jacket view on the right), the fabric is a drapey, flowy, lightweight poly knit and so the ruffles squish down just fine under a jacket. I looked reasonably professional for the meeting but I secretly knew that I was wearing something fabulous!

When I put on the jeans I confirmed what I learned with my hot pink corset-waist pencil skirt: I definitely have an athletic front thigh. The side seam swings noticeably forward at the quadricep. If I ever attempt to make pants (and the extremely cold winter convinced me I should probably own at least one pair of pants) I will have to remember to correct for that.

==============================

Kathy asked, after I mentioned how much I hate them on my ballerina wrap sweater post, why I dislike facings so much.

My issue is twofold. First, facings are notorious for flopping around. When I put on a garment with a neck facing the odds that the facing has flipped to the outside are good. It's not that big a deal to tuck a facing inside when you first put it on, but some facings refuse to stay on the inside. Ugh! I always tack them down by stitching in the ditch at the shoulder seams, but for a wide neckline this is often not enough. Also, the edge of a facing can sometimes create a noticeable ridge from the outside of the garment in lightweight fabrics.

The second issue is not functionality, but pure aesthetics. Facings are just uglier than lining. They have no hanger appeal and if the interfacing loses its glue after a garment has been in use for a couple years then you have floppy intefacing on a floppy facing; so ugly.

A lot of the time, lining is not much more trouble than facing and you end up with a garment that is finished beautifully inside and out. Although I know they are used in commercial garments, facings seem very "homemade-y" to me. I do use them occasionally (such as in a vintage pattern I hope to show soon), but I vastly prefer lining or other solutions (bias tape finish, turn under and twin-needle topstitch) whenever possible.

==============================

Fashion Fabrics Club 3-2011

And finally, a fabric purchase. Sadly, it is another boring one. My strategy of looking at my flickr album of my fabric every single day to stay excited about the projects in there and keeping a list of projects waiting for me in stash* has helped me to curb my fabric buying in line with my goal of "mindfulness." I am excited about seeing some space appear on my fabric shelves and want to continue to work toward that goal.

*I think I may have put too many items on the list and feel a little paralyzed in choosing a project...though I won't be doing any non-bike sewing until I get back in mid-May, so I'm trying to decide a month in advance what I want to sew, which doesn't work for me.

Anyway, I would like to have 6 tops for my trip so I don't have to re-wear a sweaty top, or wash in the sink and try to line dry in The Netherlands' drizzly weather. So I needed a few more wicking fabrics. Fashion Fabrics Club had them for $3.95/yd, a bargain I couldn't pass up although I had sworn never to use FFC again after the non-stretch "stretch" lining debacle. They were as slow as ever in shipping, but the fabrics were as described. They have a waffle texture, so they won't look like real clothes, but I can still make them into cute tops! If you're thinking of ordering, note that the fuschia (far left) and the coral (middle) are sheer. The other three colors are nice and solid.

QUESTION: If any of you have used this textured fabric before or have RTW of it, which side is the inside? I assumed the more waffley texture would go outside, but when I pre-washed and hung them to dry, the waffley side seemed to feel less damp than the smoother side. Does the waffle side go toward the body and the smooth side toward the outside?

I am determined to finish my rain pullover, helmet cover, and spats this weekend so I can go back to the fun sewing of tops and skirts. Wish me luck!

What is your strategy for mindful fabric buying?

Tuesday, April 5, 2011

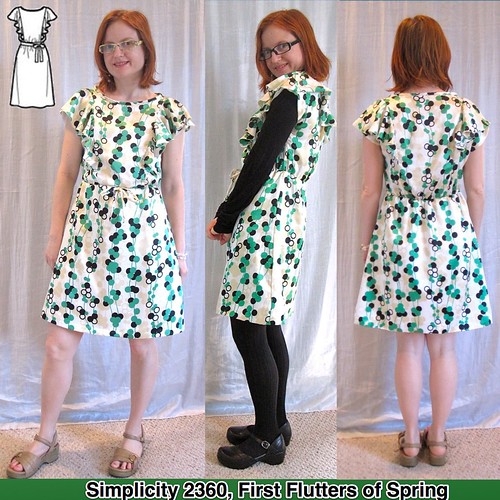
Simplicity 2360, The First Flutters of Spring

Simplicity 2360 Thumbnail

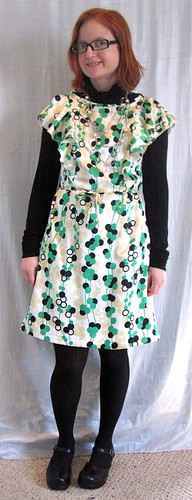
The girls in DC had the clever idea of wearing their filmy Spring dresses all winter with a cardigan over and tights underneath. I thought it was a brilliant idea. It worked because the colors of the dresses they were wearing were muted neutrals. I don't think my bright color palate would work as well. I wouldn't know a neutral if it bit me on the nose. Plus, it looks better with pumps than boots, so that lets me out--I never wear heels and I need boots to keep me warm. However, it did get me thinking about starting Spring a little early. The black in this print helps it work with opaque black tights and black mary janes. With a sweater over top I can bust out the filmy, fluttery dresses of Spring a few weeks early. Take that, Punxsutawney Phil!

I bought this fabric in Spain, while hanging out with the wonderful Paco Peralto Rovira in Barcelona. It is a polyester print, not so much a special fabric as a special memory.

Simplicity 2360 caught my eye at the end of last summer--it's sort of a woven version of the Simplicity 2554 flounce tee I made and loved last year--so I tucked it away for this Spring. Once I decided to use my Spain fabric for it I got so impatient! Especially as our Australian sewing sisters were merrily making it up in adorable prints (Exhibit A from powderpuff) over their summer while I bundled and froze. I really must find a way to live half the year in the US and half in Australia so that it is always summer. Or move to a tropical island, I guess that would be easier. That whole "making a living" thing really cramps my style in that respect.

This is a really easy pattern. It would be a great 3rd or 4th project for a beginner (assuming an easy way to finish the ruffle: serger, closely spaced zigzag, or lightweight fabric that can be doubled by cutting out two sets of ruffles and sewing right sides together at the outer edge). It is not fitted and has no closure, but it doesn't look dowdy/homemade-y and is right on trend with the ruffles.

I took a small SBA on the side piece as per usual for a princess seam, but this unfitted dress did not need that much tweaking in that area; actually, I find in general that shoulder princess seams do not need as much SBA adjusting.

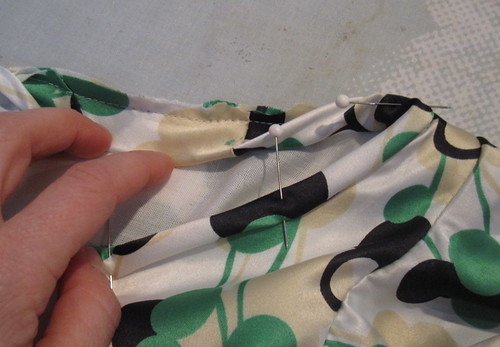
Turn Folded Edge of Bias Tape to Front As directed by the pattern, I used a bias strip to finish the neckline. I will observe that bias does not mean much to a polyester charmeuse. The fabric also doesn't ease and the neckline binding has some wrinkling around the curves. I folded my bias strip in half, lined up the raw edges of the strip with the raw neckline on the inside and stitched at a 1/4" seam. Then I turned the folded edge over to the outside and topstitched in place. This makes so much more sense than first sewing to the outside of the neck and then trying to stitch in the ditch from the front side and catch in the folded edge on the wrong side. So much easier. I don't know why patterns always have you do it the hard way. Here's the finished neckline, inside and out.

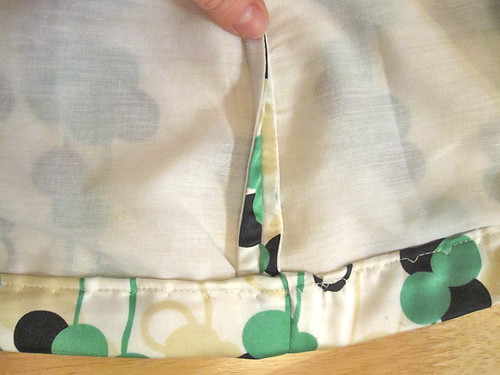
Seam Finish for Skirt The dress is lined/underlined with an Ikea Knoppa sheet, my go to $1.99 source for cotton/poly batiste. The bodice is lined. I constructed the lining separately and then sewed it right sides together with the dress at the shoulder edges for a clean finish. Since the shoulder edges are covered by a ruffle and this created some problems given the different ways in which the fashion fabric and lining fabric behave, next time I will just hem the two edges together. I then treated the lining and fashion fabric as one at the neckline.

For the skirt, I underlined with the sheet. My polyester charmeuse is sure to exercise unfathomable powers of static cling on hot days and I wanted to tame that as much as possible. It adds stiffness to the skirt and it sticks out a little too much in an A line, but I still think it is better than the staticky alternative. I hadn't thought far enough ahead to do a full faux Hong Kong finish, which requires that the underlining be cut 5/8" wider than the fashion fabric. So I did a faux faux Hong Kong finish, sewing the fashion fabric and underlining right sides together along the long vertical seams of the skirt and then turning right side out.

I lined the skirt with rayon satin as I knew I'd want to wear tights with the dress occasionally and tights would stick to the cotton/poly batiste.

I cut out the side seam pockets but forgot to actually put them in because I was so focused on the seam finish.

For fitting at the waist, you are meant to turn the waist seam into a casing for elastic. I left openings in the waist seam at CF and did a drawstring (two fashion fabric strings with a generous cut of elastic in the middle) closure. Next time I will just do the regular casing and put a fake, removable bow on the outside so I can also use a belt over the elastic waistband.

I used the serger to finish the outer edge of the ruffle.

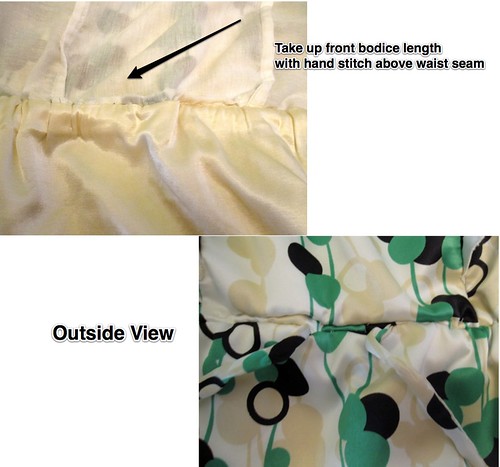
Slapdash Front Bodice Length AdjustmentThis dress is definitely not my best work. I was not consistent in choosing my right side for the French seams of the bodice lining, so the seam allowance is on the outside at the princess seams. The poly charmeuse grew at the neckline and so I sort of arbitrarily trimmed it to match the underlining, but I didn't do a great job of matching them up so the outer layer is a different shape than the inner, creating some wrinkling. And then there is the bodice length.

I have a long torso and never need to adjust bodice length, even though I am short. On this pattern, the waist is elasticized and I think the bodice is meant to blouse over the waist a little bit. I didn't like the length of the front bodice, finding it a touch too long. I didn't want to have to undo the thousands of layers of stitching and serging at the waistline (bodice, skirt, skirt lining, and casing) so I just folded out some bodice length above the seam and hand-stitched it in place. It totally shows on the outside as a fold above the waist seam.

Saks.com - Cynthia Steffe - Zola Ruffled Silk Dress


Lest you fear ruffles have gone out of fashion--they have been having quite a long run this time--check out this Cynthia Steffe dress. The ruffles run all the way to the hm and it uses colorblocking, but the styles are almost identical. Hers is silk, and costs $295. Discount for my use of polyester, and I'm still doing pretty well, I think!

Front


I wore this for St. Patrick's Day with my ubiquitous Burda turtleneck underneath. I was so thrilled to sneak in a warm weather dress!

I am so into this pattern, though more as a top than a dress--an elastic waist does not do a whole lot for me. I always sigh over beautiful silk charmeuse prints but never know what to do with them. Next time I find one I just have to have I will indulge and make a top using this pattern.

All photos are here and the pattern review is here.