We're already a third of the way through this year's BurdaStyle subscription, and this is my first garment from a 2011 magazine. Things aren't looking good for Burda. I made only 6 items out of the entire 2010 subscription. There are definitely more that I'd like to make and considering how many things I am still sewing from 2007-2009 my count will eventually increase, but that is not good odds. It is the only magazine I subscribe to so I don't feel like it's wasted money, but I really hope they step up to the plate soon.
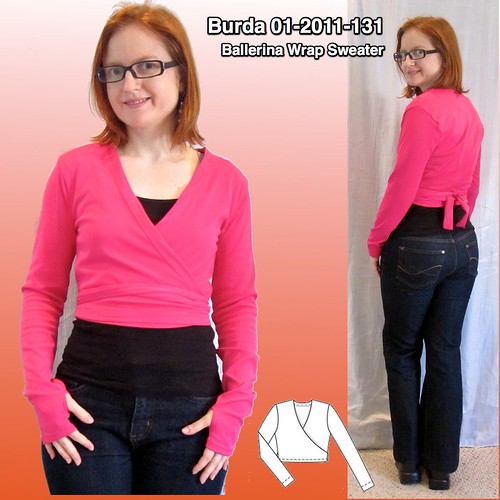
At any rate, here's Burda 01-2011-131. I have a hip-length wrap sweater pattern that I rubbed off a RTW sweater from H&M (as seen in my trip to Turkey), but I like the ballerina vibe to this cropped sweater so I added to the sewing list for my upcoming bike trip. It's made of the heavier Tactel nylon I bought from Fabric.com last January for $3.50/yd and from wearing it around the house during our latest cold snap (sob!) it is a nice layering fabric.
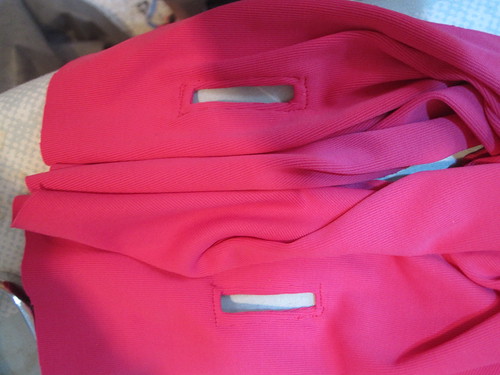
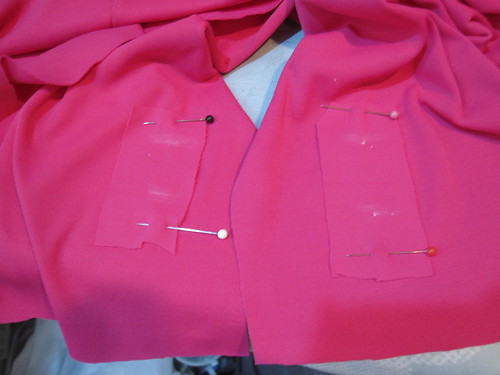 I lengthened the sleeves on the pattern so that I could do another thumbhole garment. As I learned from my 09-2010-121 turtleneck (which I am coincidentally wearing today, due to the FREAKISH COLD WEATHER), while it is convenient to put the thumbhole in the sleeve seam, it doesn't necessarily work anatomically. For the sweater, I constructed the body and sleeves and sewed the sleeves to about 3 inches above my wrist. Then I put it on and marked the thumbhole placement and made a welt opening at my marking.
The first step is to pin rectangle of fabric for your welt over the marked opening, and then mark the openings on the welts (since you'll be sewing on the welt side).
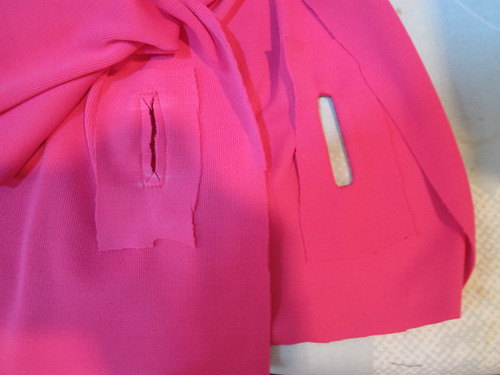 Once you have your patch in place, stitch a rectangle according to your marked opening. For a normal welt, you would only stitch the legs and not the tiny short ends, but I was going for a simplified, sturdy process here so I sewed the whole box.
Once the rectangles are sewn, clip as per usual with a straight clip down the center and Y clips into the corners, cutting as close to the stitching as possible at each corner. Turn the welt patches to the inside through your clips.
 Once you have turned and pressed your welt patches to the inside, topstitch the welt patches in a rectangle around your opening at about 1/4 inch. The goal here is to enclose the cut edges and Y clips so that they cannot ravel or deteriorate.
Once your topstitching is done, trim the welt as close as possible to the topstitching. Note that this method requires non-raveling fabric. If your fabric ravels, you'll need to finish the edges of the welt rather than trimming them to the topstitching.
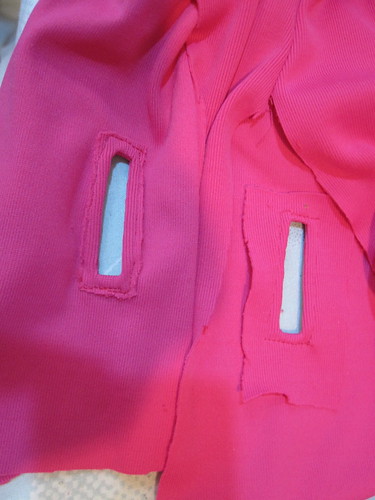
 And voila! These thumbholes are perfectly placed and do not require me to spin the sleeve out of alignment to get my thumbs through them. They are neatly finished and should hold up to lots of wear. If it is at all chilly your hands get really cold while biking because they are out in front of you directly in the wind and in a fixed, unmoving position so they don't get circulation. If it is in the low 50s or below you simply have to wear gloves but I think for higher 50s and low 60s the longer sleeve and thumbhole should be sufficient warmth.
I meant to look at the instructions for this but forgot, so I don't know how Burda wants you to finish it, exactly. However, I was quite proud of my clever hemming method.
First, let me recommend fusing a light tricot interfacing along the foldline of the neckline opening edge. My knit fabric did not want to press flat there because this is a long bias line. I hemmed one of the sides three times before finally resorting to fusing and now it looks good. I couldn't face unpicking the other side, so it is not as flat.
I found the sweater to be a touch long as drafted, so I took a slightly deeper hem than planned. This allowed me to layer the hem allowances to create a beautiful finish on the inside. The deep hem rendered the tie opening somewhat superfluous; next time I probably will skip the opening.
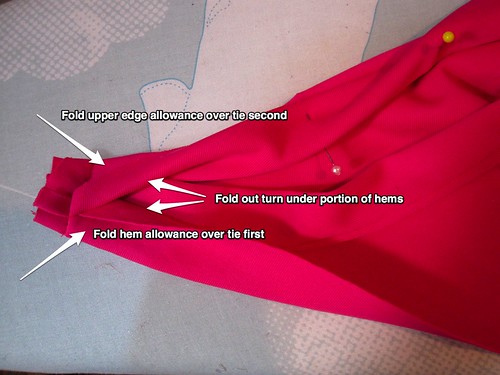
To create the finish, once you have attached the tie, fold the hem allowance over the tie, and then fold down the turn-under portion of the hem. Then, fold the upper edge allowance over those layers and fold up the turn-under portion of the hem. Stitch this whole sandwich and then grade the seam allowances.
When you turn it right side out by pulling out the tie, you will already see how neat your your hem and upper edge allowances will be.
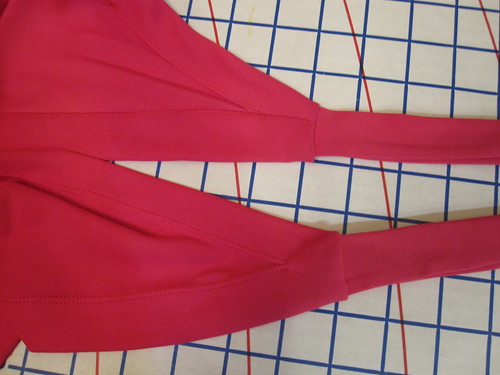
Pin the remainder of your hem and upper edge allowances and stitch, pivoting at the confluence point where the folded edges meet. I used a twin needle so I couldn't pivot the way you can with a single needle, I just kept the lines as close together as possible. You can see how great this looks both inside and outside.
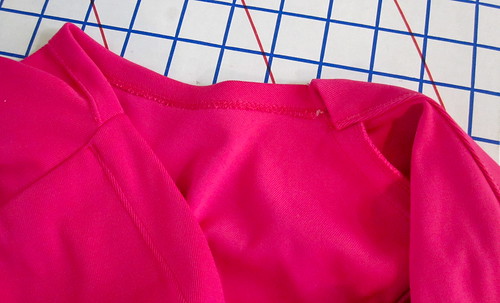 Due to my hatred of facings, I left off the back facing and instead twin needled over clear elastic. When I went to sew down the front edge allowances, I realized that a facing would actually have looked nicer for this project. You can see the offset between my twin-needle finishing for the back and front. Had I faced the back neckline I could have had one continuous row of stitching. I don't really care, probably not even enough to use the facing next time. But something to consider if you will care.
For fitting, I found I needed to narrow the shoulders (I did 1/2 inch, it probably could have used a full inch) and add back darts.
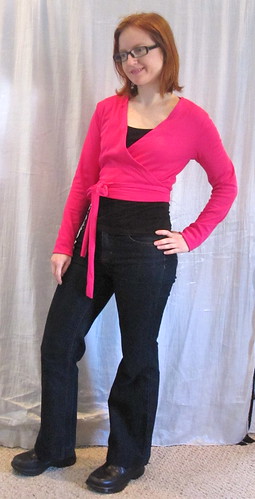
This sweater came out quite cute. When planning it, I was not sure about the cropped length. At my height (5'1.5") I have to be careful about having too many segments of clothing so I don't look squat and even shorter, particularly when taking my high waist into account. However, I think it works, particularly for athletic gear. I love the bright color and I think it will be fun to wear on my trip!
All photos are here and the pattern review is here


.jpg)


35 comments:
It came out REALLY cute and I would think perfect for biking. Your trip sounds so exciting... if for no other reason than how fab you're going to look doing it. Plus, you know: biking in Europe. Very fun!
This is very cute.
Ooooooh, that came out really, really well! I concur with everyone else who proclaims this as cute!
That is cute, and by the way you look great in those jeans. Thanks for the tips on the thubhole, I think I will be adding that to all my winter knit tops from here on out :)
Cute! This is so flattering on you. I love the dark pink.
I love this garment on you! It looks great with the jeans. I think you'll be getting a lot of use out of it.
Ditto everyone else, this is super cute! I want one!
Very pretty! I need to make one of these for my ballet wardrobe.
Absolutely gorgeous top! I want one, but I don't get Burda...
That is really super cute - I love the color
Yes, it is super cute.
Yep, this is definitely cute, a great style and color for you. I had seen the thumb holes in a Patagonia shirt my son got for xmas and thought it was pretty neat idea.
This is so perfect for you! It looks wonderful on, and the color is amazing. This is a style that I cannot carry off, so I am going to live through you.
Very cute! The color looks great on you, too!
Love it!! I saw it on flickr and immediately pulled that issue to make it. Alas, I can't completely copy you, as I already made up my fabric.com nylon tactel (I even had this same color!) into a jalie top. It pills like the devil, but sure is comfortable! It'll be perfect for biking.
That is super cute, I need one!!!!
Dare I add another Cute to the mix? But it is, so I have to. ;-)
That top looks really good on you! I'm not sure if I could pull off a cropped length, but you look terrific!
Thank you so much for the explanation on how to do the thumb openings - I've bookmarked it because I will definitely be trying this after seeing yours!
Really lovely colour and style on you :D
Pretty in pink! so nice!!
Greetings from germany, Bettina
That is adorable!! My daughter would love a cropped sweater with those details. I will definitely do the thumb thing with the next long sleeved sweater I make her.
Have you lost weight? You look great. You and Renee both are skinny minnies. Love the sweater.
Very Cute, and I love the thumb holes.
I like this a lot!
It's very nice, the color is great. I recently tried an Ottobre cropped wrap sweater against my better judgment and have been beyond pleased. I thought March was too late to make a sweater but I've worn it a ton. I also thought I was too short for the look but have been finding I really like it. Thanks for the thumb hole run down, I've added them to long underwear for the kids--helps immensely with snow pack between layers as the shirt stays tucked in the glove. Maybe next time I'll put them in the right place! Thanks
This really does look good on you and as usual I totally overlooked the pattern in the magazine. I'm not even going to count how many I have made in the last 2 years, I'm sure it is way less than you. If only there was a proper searchable photo gallery of real life Burda Style patterns I am sure I would make more of them!
You look really long and lean in the last pic! I like crop tops, shows off a small waist.
Oh, no, we're supposed to sew those magazine patterns!?:-) Love this color and great style on you. You will be so chic on your trip.
Really cute top, the colour suits you. I read of your hatred of facings again and again. As newish to sewing, please help me to understand why you hate them so much? Is it because you find them uncomfortable to wear or tricky to sew up?
Tx
Kathy
Cute! I love the thumb holes, what a great added feature.
Hello Hot Mamma!
Love the whole outfit and may have to make a wrap sweater of my own now.
This is definitely a fabulous top on you. It's a great color, and you were quite resourceful with constructing anatomically correct thumb-holes :)
Great choice for keeping your lower back cool whilst cycling. May I suggest though that you consider bringing biking gloves? The palm padding really helps for long rides. It will also reduce shock (stress) on your ligaments while riding, as well as being perfect to protect your hands in the very unlikely event you overbalance. Lastly they provide darn good sun protection.
Would you mind a constructive suggestion? Loosen the tension on your bobbin or use wooly nylon hand-wound on a bobbin for the twin needle hem. I can see the bobbin thread tension was a little tight in the photo. An expensive third option is to hem over a fusible tape but one loses the 'give' in the hem.
I love this color, and I'm totally stealing the updated thumbhole idea, though the first version worked pretty well for me too. ;)
I put this one in my queue for next fall after I've lost most of my baby weight--this is just the kind of garment I love wearing as an extra layer.
The thumbhole is brilliant! No more chilly wrists/pulse points. Fantastic idea. This is adorable and the fit is great.
Regarding cycling gloves: if your riding posture is very upright, as on a cruiser bike, you probably won't need them. But your bike looks like a hybrid, which probably means a more leaning-forward posture and some weight-bearing for the arms. If this is the case, and if you're going to be putting in long days in the saddle, the gloves would definitely be helpful.
Classic crochet-back cycling gloves might go well with your retro look:
http://www.amazon.com/Spenco-Classic-Glove-2009/dp/B003UWLZNG (just one example - there are lots of these out there).
I love that you ride in a skirt. Cycling shorts are practical but horridly unfeminine and not very flattering (at least on me). :)
Post a Comment