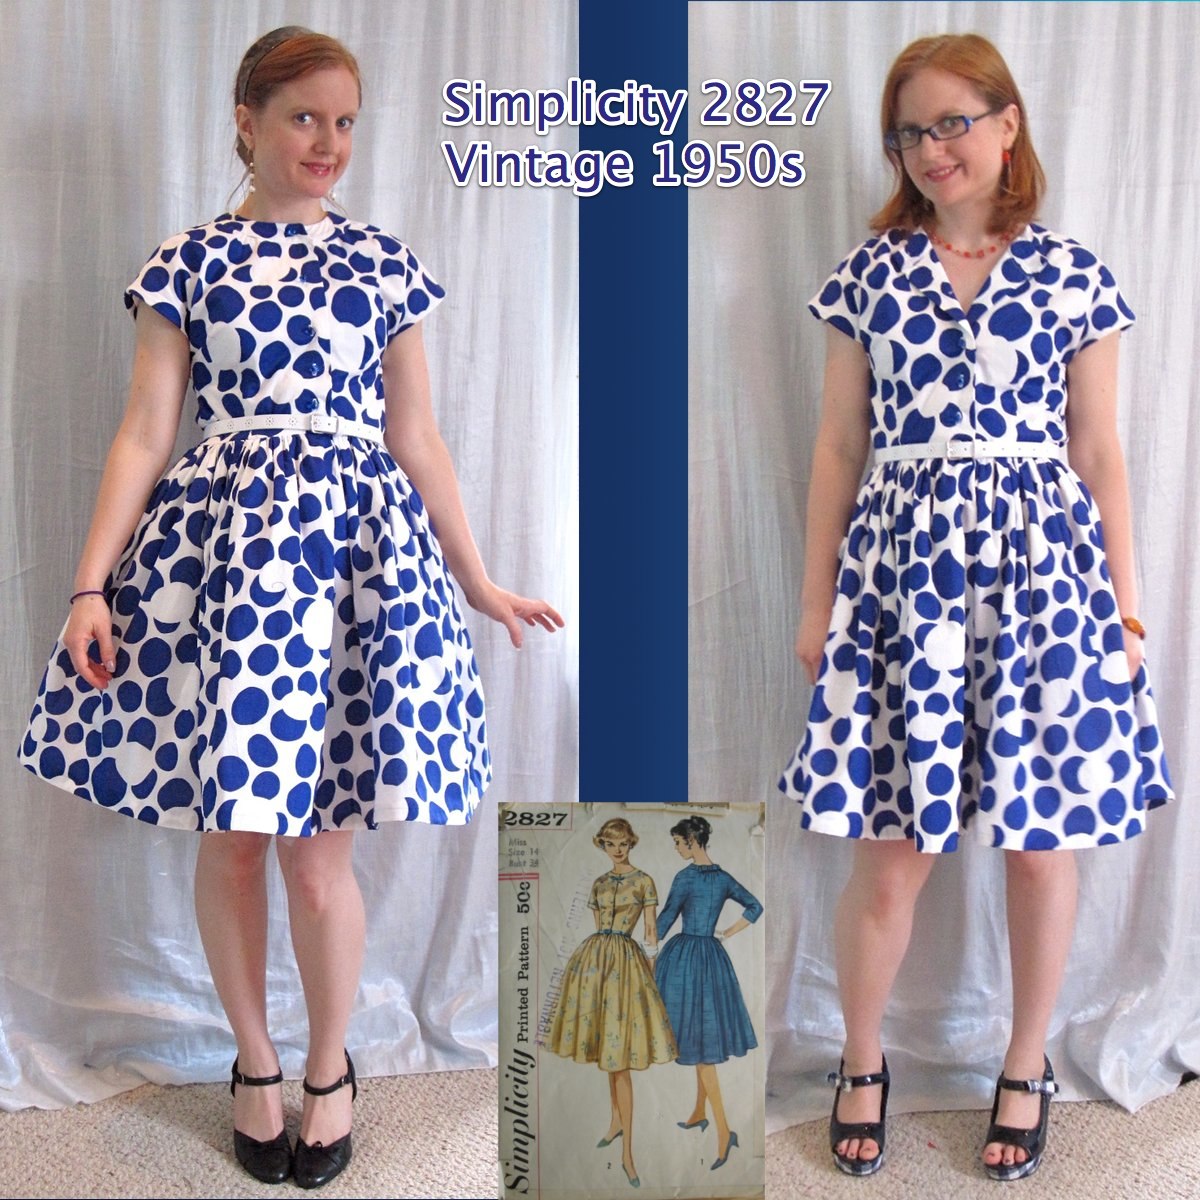
When Pattern Review announced that the challenge for April 15-May 1 would be Vintage Patterns, I decided I should interrupt my regularly scheduled sewing to actually stitch up one of the many vintage patterns that I own. However, nothing was really grabbing me in my vintage pattern stash. But then I remembered this pattern, Simplicity 2827, which for some reason I had put into my regular Dresses-Woven pattern stash instead of with the rest of the vintage patterns, probably because it totally works for modern day.
I have no idea where I got the pattern. For some reason I associate it with Karen. [**EDIT** Confirmed! Karen tells me she gave this to me at PR Weekend 2007. Thank you, Karen!!! Both for the pattern and for jogging my memory.] It does not have a copyright date, but the style and the price (I looked in the Vintage Pattern Wiki for comparison) put it in the late 1950s.
 It is a Miss Size 14, 34 Bust (corresponding to a 26 waist and a 36 hip). I am a 32 bust with a 27.5 inch waist, so I had to do some altering. When I pulled out the pattern tissue there was a tiny shorten adjustment pinned into the bodice, which I thought was so cute! I traced the bodice front and back. On the front, I scooped out a little width under the arm, narrowed the two darts, and added some width at the waist. For the back I just added to the waist. After I put the dress together, although the bodice had seemed the right length in the tissue and in the fabric, once I added the skirt it was too long, so I shortened it by 5/8 inch. The bust area was still too large, so I tightened the side seams, taking out a total of 1.5 additional inches. As with my vintage 1947 shirtdress, I think the illustration shows a much more fitted dress than it was actually drafted to be. I guess ridiculous ease is nothing new to the Big Three.
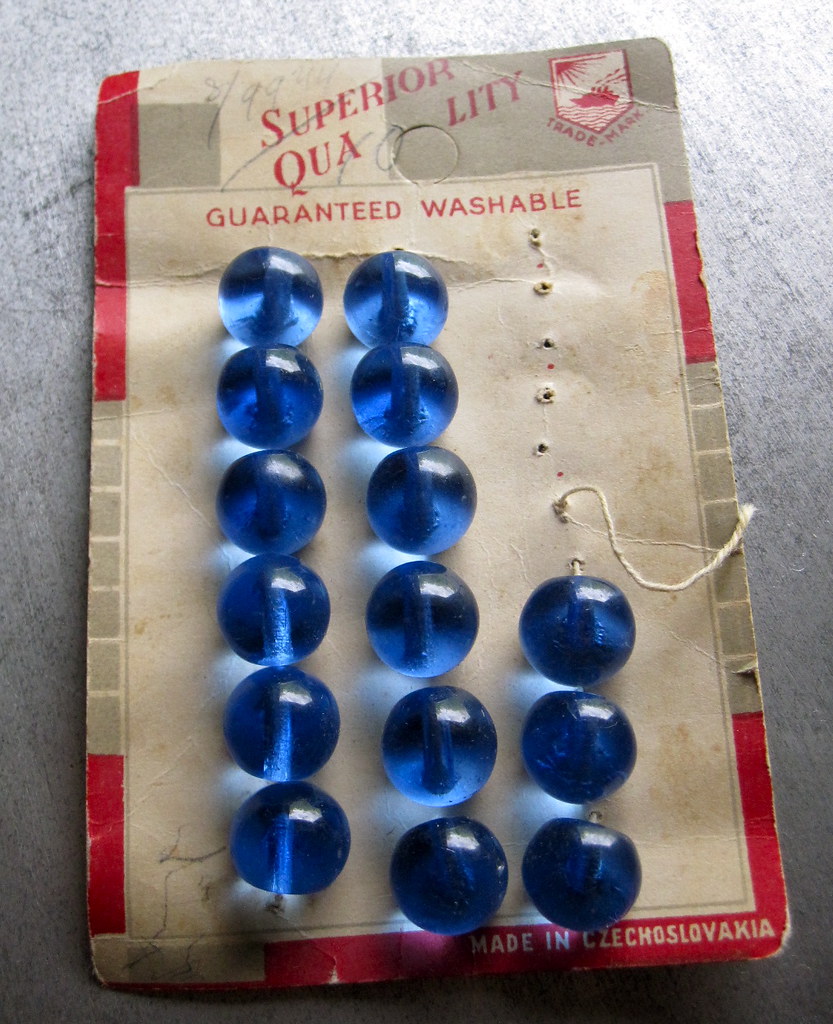 I bought the fabric, a large scale abstract floral print, from Fabric Mart in June. I have been feeling so guilty about that order because I hadn't sewn anything from it! I just couldn't find the perfect project for this print (and seriously, it was $3.74/yd) so I dithered and dallied and now I am so glad to have it done. Of course, there are three more fabrics in there waiting to be sewn... I got the buttons at last year's Goodwill Trunk Show; I don't know how old they are, especially as there is no price printed on the card, but I would hazard that they are older than I am. They don't match exactly, but I liked the idea of using vintage buttons on a vintage pattern.
 The cotton print was somewhat sheer and needed to be underlined. I underlined with cotton batiste and used Julieb's tip from pattern review on doing a combination underlining/faux Hong Kong finish This is my new favorite thing; I just used it on a skirt (haven't photographed it yet), so when I had to underline this project I used the same technique. You can only use it to finish the seams along one axis, either the horizontal or the vertical. In general, it will be best to use it for vertical seams, as your horizontal seams will be finished by hemming and a waistband or neckline finish.
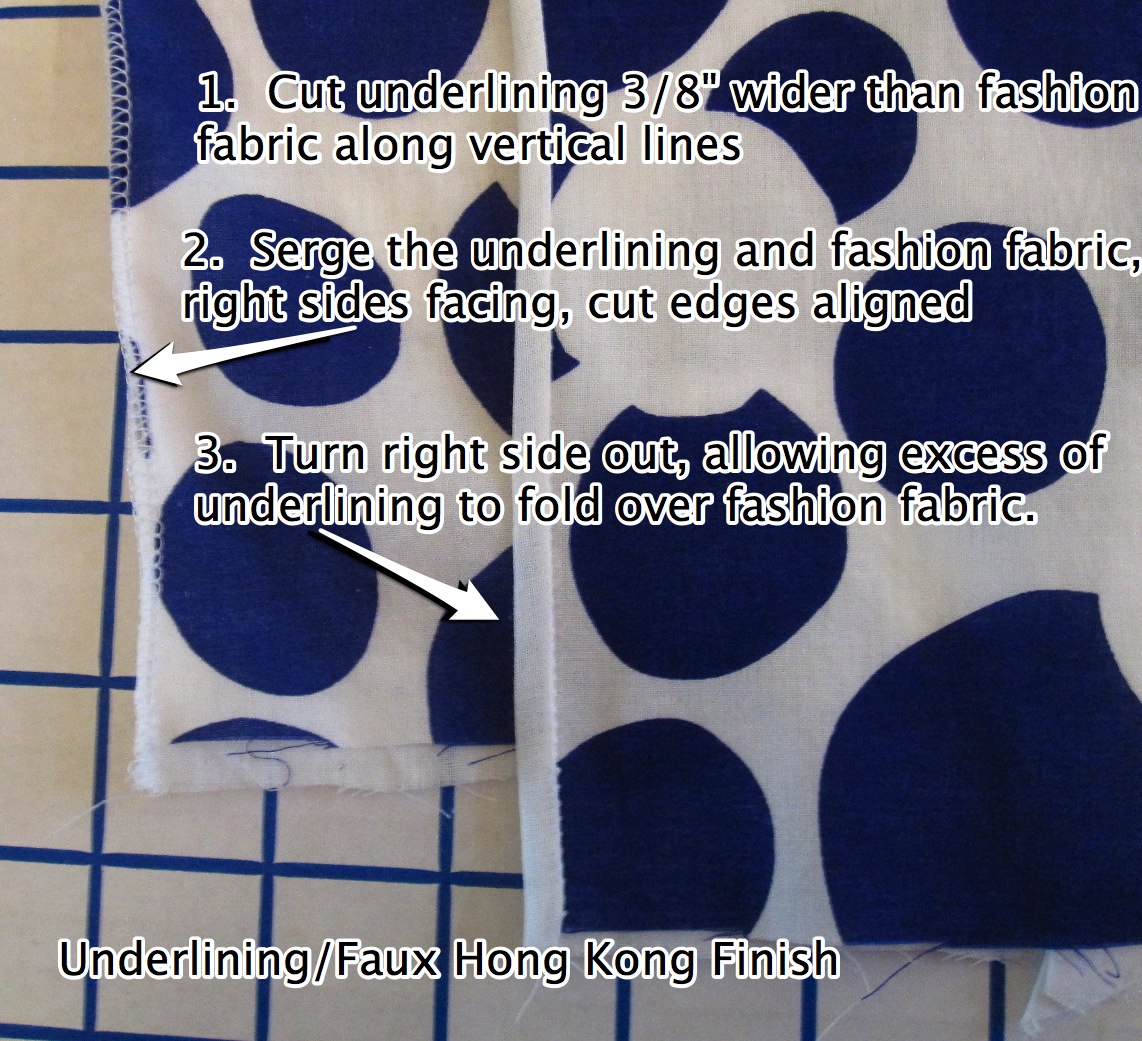 The tip has you cut the seam allowance on the underlining twice the width of the fashion fabric seam allowance, but that was too wide for my taste in the skirt project. So for this dress I cut the underlining an additional 3/8 inch wider than the fashion fabric. As with my cheater French seams, I use the serger to stitch together the layers, which gives a very precise seam allowance.
Each piece is finished individually before being sewn together. After cutting the underlining an additional 3/8 inch wide, line up the cut edges of the fashion fabric and underlining, right sides together. Serge together.
Then turn the piece right side out. Lay out the piece so the serger stitching lies flat with the underlining wrapped around it and press. That's it!
I love this method because it is only a hair more work than just constructing a pattern normally (I'd underline sheer fabrics and serge all those edges anyway) for a really lovely finish on the inside.
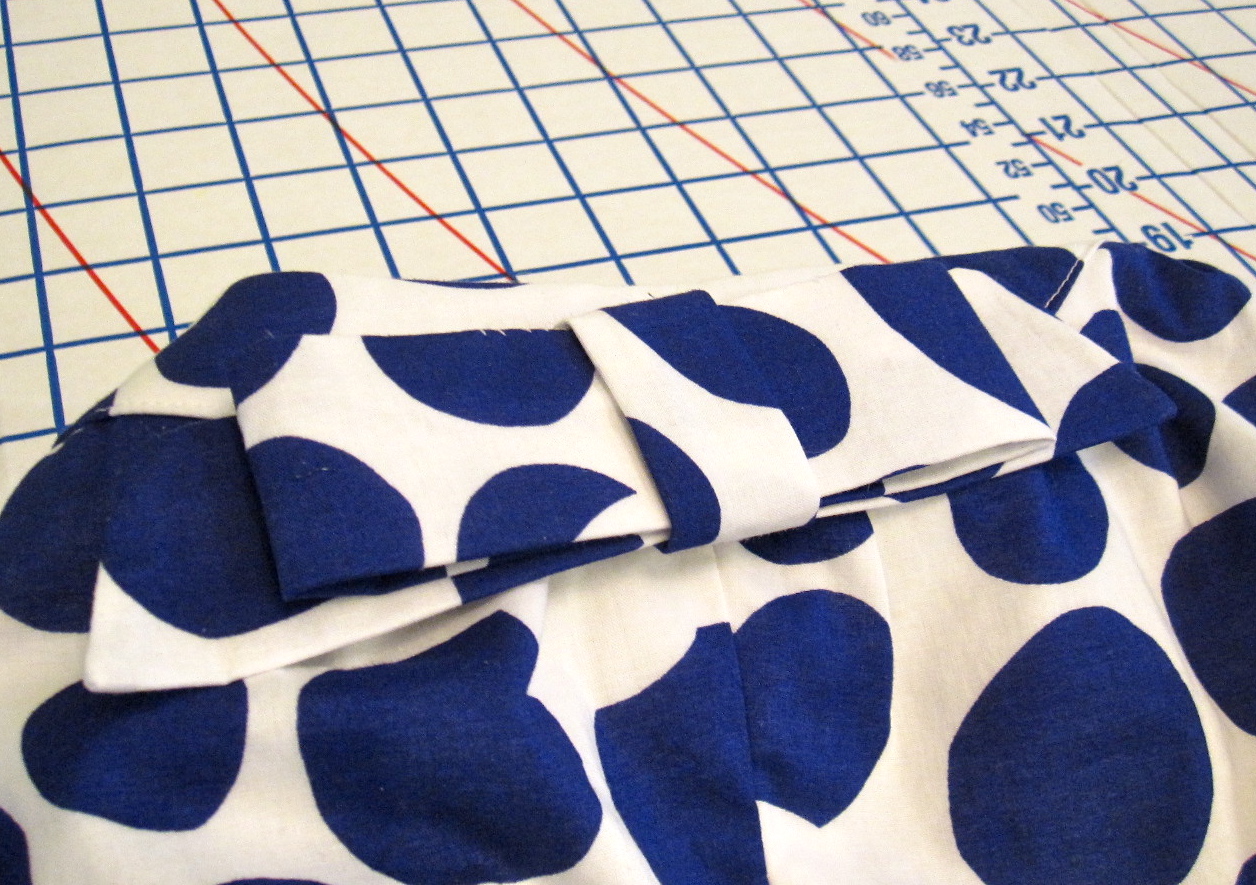
 You can see how pretty my seams are in the photo at right. To finish the upper edge of the skirt I first did the vertical seams as describe above. Then I turned the piece so the right sides were together again, rolled the underlining of the vertical edges outward, and serged along the top edge. Turned right side out and pressed, this time with the serged seam at the top, rather than the underlining rolled over. It's nicer than having the serged finish showing.
 The closure on this was interesting. If this were designed now, it would have the buttons and buttonholes along the front opening edge the same way, but the lower edge of the button bands would be stitched together and there would be a short invisible zip at the side seam. However, this has a sort of faux fly in the center front seam with snaps. This gives enough room to get in and out of the dress with the look of a continuous skirt. I only had x-large, large, and teeny snaps. I'll have to remember to get medium snaps the next time I go to a fabric store and then I'll replace those large snaps. They don't affect the look or hang of the dress and are perfectly functional, but I think aesthetically they're too large and heavy.
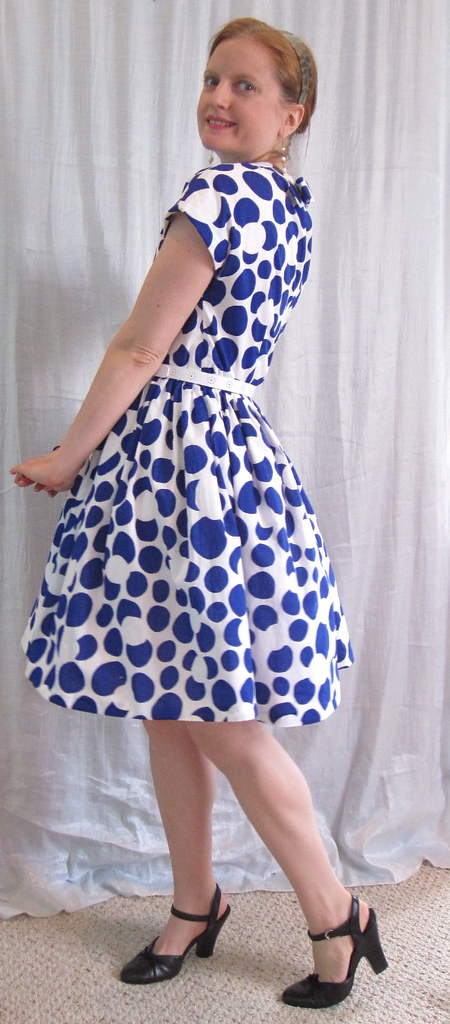 I love the little bow on the back neck, it's one of my favorite parts. I was a little disappointed with the back neck as the pattern illustration shows visible gathers but there's really not enough extra fabric there for visible gathers. But the bow is cute. Unfortunately, with my print it kind of disappears. I am going to have to look for a royal blue ribbon to replace it.
I had fun dressing this up for the 50s with a crinoline and pearls and a chignon (I tried gloves but I only have off white gloves which looked weird with the white of the dress), but it can also be worn in a modern, non-costumey way. All photos are here and the pattern review is here.
.jpg)
.jpg)


.jpg)


57 comments:
Oh you look so cute! I love the vintage feel but you are right- it totally works for today without a custumey look. I really like how you finished your seams. Love the shoes too!
That is completely cute!! I love how you have styled it as well!! You can wear this dress wonderfully - you have the best figure!
Very very cute! I like that you can have the neckline either way, too. That Alexander blouse from BurdaStyle I made recently has a very similar neckline to this.
Your dress is gorgeous and suits you very well, I love the fabric that you chose.
The two stylings for this dress are really fun! Thanks for going over the underlining/faux hong kong finish technique. I have seen it before, but this was a great refresher - I'm planning to use it for a skirt that I'm making out of tana lawn cotton.
Love the fabric and pattern and the underlining tip is great! What a fabulous dress, and the shoes are cute too...
I love it on you and the fabric is perfect. I will need to try your faux hong kong seams! Thanks for the tutorial.
What a great dress! I love the choice of buttons.
Oh, my God...you look absolutely amazing and the dress is killer! Kudos to you for a truly beautiful FO!
Love it one of the cutest things you've made. You look so adorable in the 50's version.
This is a cute dress on you! Love the print you chose to make it in.
I sure hope you wear this dress next month at the get-together in Philadelphia . . . would love to see it in person! Looks so terrific!
Funny how some vintage patterns, like this one, come out looking so modern! This dress looks great on you.
Super cute! Thanks for the tips on how you did the underlining/inside-finishing. Yet another reason why I want a serger!
This is really cute, and not at all costumey. I am getting more interested in vintage patterns, and it is always good to see them made up with modern fabric and style. I really like this one.
Cute dress! The fabric print is perfect for this pattern!
Your dress looks great on you! I love the fabric, buttons, everything about it. Thanks for the tutorial too!
Great, fun dress! I like how you showed both a 50s look and how you make it modern, too.
Adorable and a perfect marriage of pattern fabric and those buttons! Thanks so much for the faux Hong King finish info! I have 2 projects in queue that I need to underline and this will be perfect for them. You are awesome.
I think this is my favorite garment you have sewn. Keep up the good work. I love to see the old vintage patterns sewn up in modern fabrics using more modern methods.
Gorgeous! I love the 50s styling, though I think your glasses would be cute with it, too.
Very cute and fun.
I love this - it looks awesome in that print xx
I love it with a petticoat! It is nice to be able to use those gorgeous vintage buttons on it too!
SUPER cute! It looks vintage and modern at the same time. Love love the print and your fun belt. Great job!
What a pretty dress! It looks great on you. Even though it is a vintage pattern, you'd never know it
This may be the most adorable dress I've seen this season anywhere! Major designers included! It is absolutely adorable and very well crafted!
So adorable! You look fantastic. Really nicely done too, thanks for the tip on the interlining!
oh... super cute! I also really like your interlining tip. I'll have to try that out some time soon!
I *LOVE* your dress and love the shirtdress style right now. Thank you for posting your measurements. I measure 32" bust and 27.5" waist (well more like 28") at 5" 1.5" so it's really nice to see how patterns/style look on you before I try it. I made the Drape Drape dress that you made several months ago but yours turned out so much nicer!
This is a perfect dress for you! The style is perfect, the colours suit you and I just love it!
Super cute!
I have a "slapdash" question. I love interior finishes like this, but how did you take the side seams in 1.5 inches after you did the underlining? Did you tear the whole thing apart after sewing it, and then re-underline it? Or did you test fit by basting the fabric before you sewed the underlining in? Or do you just have almost 2 inch seam allowances at the sides? It's alterations like this that always make me afraid of doing a nice interior finish. Thanks!
A*dor*a*ble!!! I think we`re about the same size, so you better keep your closet door locked or I may spirit this dress away in the dead of night!
You associated correctly - I think I gave you this and another vintage at PR Weekend 2007 in NY. Glad to see it made up, you look adorable in it and I LOVE the fabric.
LOVE the dress! It is a great color on you. You look awesome!
Your dress is beautiful. You are just too darn cute.
Thanks so much for visiting my blog on the tote bag post.
You really made it work for you, it looks wonderful, good fit, great fabric. How special that you can wear the neckline in two ways.
Your dress is gorgeous and looks fabulous on you!!
The dress is adorable and suits you perfectly. Perfect choice of pattern, fabric and buttons!
Wow, you're really on a roll! Adorable hat, adorable dress...
Stunning dress! You look super adorable in it. Your construction is superb, I am in awe!
So pretty.The seam finish is so neat, I have to try it. Thanks for the tutorial
Great great dress! Will you allow me to link to your tips on lining? It's a great tip! Thanks!
Love it! So adorable!
OMG you have made the most adorable outfit ever!! Congrats!
I love this!!! Makes me wish I could sew.
You look fabulous in that pretty dress! And I love your finishing, really neat. Gorgeous, really!
You do look so cute
Really, really adorable! You should do more vintage patterns, this one really suits you. :) Want to join the We Sew Vintage blog and share your beautiful dress?? We'd love to have you!
http://wesewvintage.wordpress.com
OMG, this is insanely cute!!! It is the perfect fabric + pattern match. I love it!
OK, this goes right up to the top of the list of cutest garments I've ever seen on you! That fabric is fantastic and I love your tip about the underlinging/hong kong finish. Fabulous!
As I said over email, I love this dress. It looks so fresh and beautiful on you.
Very nice and I like the hong kong finish and the buttons!
Current and yet vintage-lovely!
Jana
Your choice of fabric made this dress bold and beautiful. The button and detailing is great. Way to go!!
I love the choice of fabric! Wonderful job on the dress! Yes, you are correct. The pattern is from the late 1950s. The font style of the company and other details on the cover can help you date them.
Bravo!
I remember having dresses that closed like that when I was a child in England in the 60's when children were dressed more conservatively than adults. I seem to recall also having a dress with a little horizontal pocket in the inside waistband concealed by the front mock fly to tuck a clean handkerchief into.
Post a Comment