Thursday, December 31, 2009

A Fond Farewell to 2009 and Looking Toward 2010

Last year's resolution was pretty much just to keep on keeping on, which I've done. I actually had a bit of a resolution to sew less, as discussed in my stash resolution post, as crazy as that seems! I devote a lot of time, energy, and head space to sewing and it seemed possible that I was using it as an excuse to hide from the world a bit.

Although I didn't really end up sewing that much less I felt like I did slow down a bit--no fewer garments (actually a couple more than last year, based on my imprecise counts for both years), but I think overall the average of my projects was much less complicated so there was less time involved. And it totally worked out for me, whether setting my intention really did have an effect or it was just random. I know it has been a bad year for many, so I hope my happiness doesn't seem inappropriate but 2009 has been *my* year in my personal and professional life. One of the best years ever for me. I still love sewing and have missed it when I haven't had time to do it, but the tradeoffs I have made have been worth it. I am happy, and this is not something I've always been able to say.


The Stats

50 Pattern Reviews for the year (some of those were for garments made in 2008, which is why the numbers don't seem to add up).

photoed and reviewed: 42 garments (I'm calling the hat a garment since it took a fair amount of sewing)
5 knit tops
3 woven tops
5 skirts
15 knit dresses
12 woven dresses
1 coat
1 hat

Awaiting photography and review: 18 garments
3 knit tops
1 woven top
4 skirts
2 knit dresses
4 woven dresses
1 pair PJ pants
1 bathing suit

Totals: 60 garments
8 knit tops
4 woven tops
9 skirts
17 knit dresses
16 woven dresses
1 coat
1 hat
1 PJ pants
1 bathing suit
Plus
Misc. projects: 2 belts (braided ribbon and obi), 4 aprons, 1 refashioned sweater, several pairs of underwear

UFOs:
Suit Jacket. Ugh. I need to recommit to this project and either tackle welted pockets with flaps or just leave the damn pockets off already.

On the bright side, I think that's my only UFO from this year. I cut out a skirt of the same fabric at the same time but haven't started sewing it. I don't know if that's a UFO or not.

I had a UFO of a crappy attempt to alter a so-so pattern out of horrible fabric that I hated but I threw it away. It was very liberating.

Failures:
Two projects turned out awful. One was my fault, the other was a gross pattern. I haven't reviewed them yet. The Butterick 5079 Twist Dress was so so. Another unreviewed project needs some fixing, I guess; it's not wearable as intended at the moment, but is still not horrible. Everything else ranges from fine to awesome.

Favorites are very hard to choose this year! I had a ton of projects I loved. It's a lot easier to choose the duds.

Grand Entrance


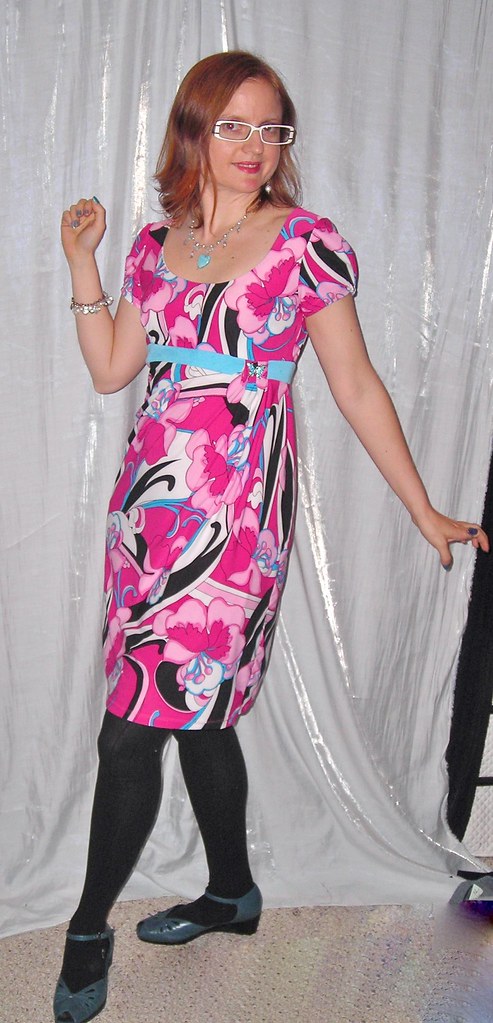
Favorite special occasion dress: Birthday dress of silk jersey from Drape Drape Japanese pattern book. I've only worn this once, but I love it.


Side


Favorite Knit Dress: BWOF 03-2009-102


Front


Best day-to-night piece: BWOF 02-2009-124 Lace Dress


==================================

So for 2010 I will continue to maintain my balance, in all senses of the phrase.

Stash balance, of course, is part of it. In the end I greatly exceeded my six yard monthly allotment--around 166 yards. *gulp* I had no idea it was so much. I thought I had bought way less than in years past and in fact began composing this blog post to that effect. But it turns out that when I actually tallied it all up it was almost half again as much (my average the past two years was about 110 yards). I guess not keeping track didn't work.

I found a place to give away my 2008 stash cull (DC Threads), and gave a few more pieces away this year. My shelves look emptier than at the end of last year, but maybe I just did better at distributing the fabric. However, with the huge exception of all the fabric I bought in NYC in June--I have sewn only four of the fourteen pieces I purchased--I have done better at buying fabrics that I am inspired to sew right now, and I love most everything that has been added to stash.

Knit and woven balance is also something to contemplate. I fall back on the easy knits quite often. I enjoy wearing them, but sometimes I'd like to be a little dressier. But sewing "too many" knits doesn't really bother me. They travel so well!

Dresses and separates are another imbalance in my sewing life. I love dresses. In Spring/Summer I wear them almost exclusively, which is what I want. In winter I am always wanting more separates. For some reason I am a little dressier in Fall/Winter, so those separates are more work than their summer counterparts, and then I get impatient and end up in knit dresses for Fall/Winter. So I'd like to add a few more separates to my closet.

But above all, I want to maintain my work/sewing/gym/life balance. I am prone to going overboard in one area of life so it is not an equilibrium that is reached and then easily maintained. Mindfulness is always useful to me!

Here's to a wonderful, healthy, happy 2010!

Wednesday, December 30, 2009

Sweater Refashion: A Hole New Look

I hope everyone had a lovely holiday! I was in Texas last week visiting my family. I missed DC's big snow (boo) but experienced the biggest snow"storm" that I've seen in Texas, which was fun. My nephews thought it was a blizzard. It was nice to see family, but I am very happy to be home!!!!

====================

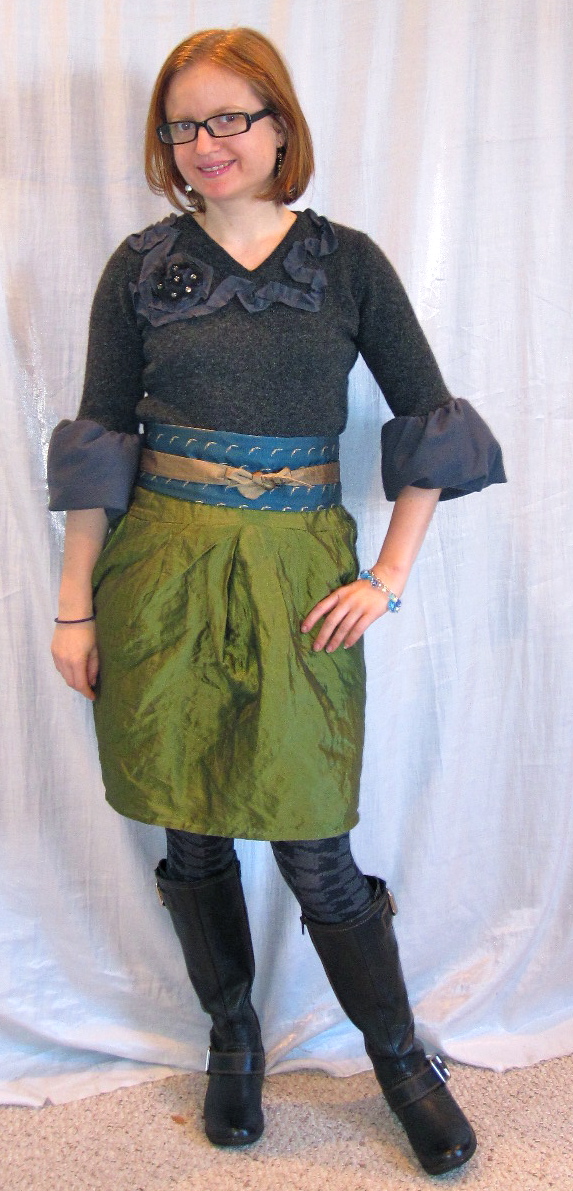
Worn Through Elbow I bought this sweater last year when I was gathering materials for sweater refashioning. I debated about it because it is an XS, so there was not enough fabric there to cut down into anything else. However, it was so nice I couldn't leave it there and just wore it as is. It is a really soft lambswool, and the sleeve and sides are straight rather than having a dated cuffed look at the bottom.

It wasn't until the second time I'd worn it that I got home from work and realized one of the elbows was worn through! I am guessing that's why the previous owner donated it to the thrift store, because it was a well cared for sweater. On the one hand, I thought it was kind of rude to donate a holey sweater to the thrift store. On the other hand, I was so I glad I happened to be the one who picked it up! Because there is no need to throw away a sweater that is otherwise in good shape just because of one little hole and now the sweater has a new life.


Gray Sweater Recon Tutorial

The first step was to cut off both sleeves at the hole. The other side wasn't worn all the way through, but it was definitely thinner at the elbow.

Next, I went in my stash and found some gray wool jersey (Nikki so kindly gave it to me ages ago and it has come in handy many times!). I cut out rectangles for the sleeve puffs, each at 22 inches by 12 inches. Then stitch the short edges together. If you don't have wool jersey, you can use cotton or rayon.

I put strips of tulle inside the sleeve puffs before folding them in half to keep them poofy. For additional poofiness I also followed the technique in BWOF's balloon skirt dress 10-2008-117 of twisting the balloon when folding it in half, so that the side seam is offset rather than matched up.

Next you put in your double row of gathering thread, pin the gathered puffs to the sleeve edge, and stitch in place.


Flower and Ruffle DetailThis was all well and good, but because my sleeve puffs were a lighter gray than the rest of the sweater I needed to bring the jersey in another way so it didn't look like a non-sequitor. Also, the fancy sleeves needed a little added fanciness. I have been enjoying the crazy feminine ruffles that Ruffles and Stuff and My Mama Made It are into lately, so I decided to go with that. I can't find the exact tutorial I used, but here is one for a rose made of strips of jersey fabric. My fabric strips are one inch wide, and rather than machine stitching I hand-stitched (I thought I could do it on a long car ride at Thanksgiving, but it made me carsick). I didn't gather the ruffles, but made them "ruffley" by twisting and looping them.

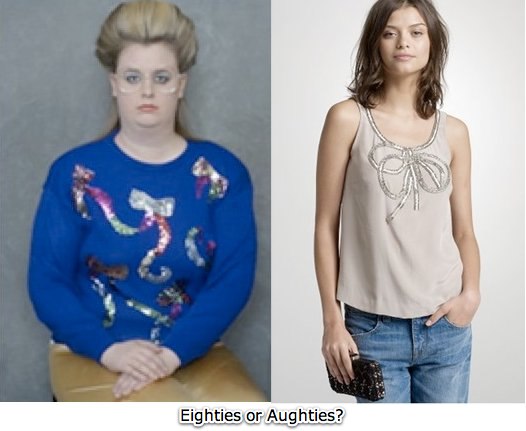
Eighties or Aughties?I finished it off with a layer of gathered tulle on top of the rose to emphasize it, and a few sew on jewels I had purchased in Hong Kong. Despite my best efforts that the jewels be random, they are in fact quite evenly distributed. *sigh* I am completely incapable of asymmetry.

After I'd sewn on the jewels, I wasn't sure if I loved them. I can't tell if they are Eighties or Aughties. The 80s sweater is from Leslie Hall's Gallery of Glamore gem sweaters project; it is awesome and if you've never seen it you must go check it out. The current embellished top is from J. Crew.

Refashioned Sweater Back

All photos of this project are here.

====================

I love sweater refashion, as you may be able to tell, so I check out the web for project ideas. Here are the most recent ones I've found.

This is such a clever way to get a drapey front cardigan. The result is almost like an overdress and would be great to winterize a sleeveless LBD.

I like this cardigan idea with the inset fabric at the waist.

There are tons of refashion ideas on the Craft blog (although not limited to clothing). There are *hours* of entertainment to be found at the Wardrobe Refashion blog, which is mostly clothes and a fair number of sweaters (although unfortunately the posters don't generally use tags so you have to wade through some introductory and other miscellaneous non-project posts).

PatternReview just announced a quick challenge for the first two weeks of January and it's...refashion! I have another sweater project in the hopper, so I just have to wait a few more days to start!

Wednesday, December 16, 2009

Patrones 284-24, Twenties Inspired Knit Dress

Patrones 284-24 Thumbnail

Patrones Haul from Spain While I was in Spain I managed to find three issues of Patrones. The first (the one this dress comes from, which was the most recent at the time) I picked up my first night at a regular ol' newsstand on Las Ramblas in Barcelona. This is the main tourist drag, not exactly a hotbed of sewing. Can you imagine being able to get Patrones at whatever newsstand you happen to pass? Crazy! The other two I found in the train station in Sevilla. Random back issues of Patrones, just sitting there. I bought two copies of each, one for me and one for Cidell. The woman working the newsstand was baffled, but I explained that I had una amiga who wanted them also.

Patrones 284-24One of the things that's great about Patrones is the photography is appealing and fashion-y (not catalog), but at the same time actually shows the clothes. What a novel idea. Alas, this dress came from a spread where the dresses were just laid out flat, so I couldn't tell what it would look like on a person. However, it looked cute, I loved the line drawing, and it seemed well suited to some fabric I'd gotten from G Street's $2.97/yd table back in October so I traced it out. Although I can translate Patrones instructions without too much trouble, there was nothing confusing about this so all I checked was the collar application (fold in half, right sides together, and stitch across short ends and to markings for tie ends; turn right side out, fold wrong sides together along unfinished edges and serge to the neckline).

Although I knew I was going to sew down the pleats in the Burda 06-2009-101 knit dress, I wasn't sure how I was going to handle the front bodice pleats here. Sewing them shut would defeat the purpose of the design, but I also didn't want any bagginess. I sewed them about 3/4 of an inch past the seam line at the top and bottom before putting the dress together. While I normally hate baggy, somehow I really like the look of these blousy pleats. They have a bit of a 1920s vibe. I always feel like the 20s are due for a revival, and there is usually something on the runway to evoke them. For Spring 2010 Proenza Schouler had an art deco vibe going in some of its pieces; here's another look from Balmain. Nobody really went full on 20s inspired (though I haven't looked at all the shows), but the ideas are there.

I was somewhat short on fabric based on what the pattern called for, so I did not use the skirt pattern. My fabric was 60 inches wide, so I just cut a rectangle and then eyeballed approximately even pleats all around. It was a little fussy and I probably could have just used the pattern and saved myself some trouble, but the skirt flows well and is fun to wear so whatever.

Sleeve CloseupThis pattern is called "Vestido Manga Larga," which means "Dress with Long Sleeves." I had to cut the sleeves on the cross grain due to my somewhat limited fabric, but I have not noticed any ill effects. Because I was cutting on the crossgrain I had plenty of room for length and cut them really long. I do the sleeve and lower hem last on a project, so I was fussing with the sleeves trying to get them to look right. I experimented with gathering them up or having them very long but it just wasn't looking great. Finally I pinned them up to 3/4 length and WOW what a difference it made. It reduced the target age for the style by at least 10 years. It had been kind of matronly looking, and suddenly it was young and fresh. It was startling how much a small alteration changed the entire look. To add a little interest to the sleeve I added an inverted pleat at the hem. This means it is snug below the elbow, and the blousing echoes that of the bodice.


Closeup of Neck Tie What I really loved about this pattern was the loose cowl-y collar and tie. Unfortunately, the tie really disappears in my dark fabric. I'm not sure a lighter fabric would be that much better because a knit bow is always going to be floppy. It took me several experiments to tie the tie right; the key, it turns out, is not making a knot first. I keep thinking I should tie it perfectly and then hand sew to keep it from ever coming untied, but I'm not sure it will work. The tie is rather heavy when tied in a bow, which distorts the shape of the neckline a little bit and pulls it open. If you look closely you can see that my clear bra strap is a little exposed.

Ta Da! I am happy with the way this dress turned out. The style is fun and a little different than I would usually wear. And I'm glad to have sewn from my Patrones!

All photos are here and the pattern review is here.

Monday, December 14, 2009

'Tis the Season...

...not to have to time to sew. Boo. But there are compensating factors

Cookie Baking 2009

Three friends and I have been making mounds of cookies for the holidays for about 6 years now. One of the girls is in Moldova, but her roommate joined us in her stead. We skyped her in and it was almost like she was actually there.

Let's take a closer look at those cookies, shall we?

Cookie Baking 2009

Clockwise from top left: Sugar Cookies, Mexican Wedding Cookies, Peanut Butter & Chocolate Whirls, Rolo Cookies (also at lower left), Snickerdoodles, Macaroons, Chocolate Crackles, and Chocolate Chips. There would have been lemon bars but I managed to burn both pans. There were more cookies on the cooling racks, but this is most of them.

This is an all day affair!

I leave for Texas on Friday so no more sewing for me until I get back. I'm scheduled to be back home on the 26th so maybe I'll have time for one last project in 2009 when I get back. Although I won't be sewing this week I hope to review a couple more projects before the year ends!

=================================

I have been getting a rash of spam comments lately. Is this happening to anyone else lately? For now I am just deleting them as they come and don't intend to change anything (they're not anonymous comments, so disallowing anons won't help), but I'll keep you posted.

Friday, December 11, 2009

Butterick 5079, A Twist on the Twist with Twists

B5079 Thumbnail

Here is a random project from my backlog, Butterick 5079. Because what better time to review a summer dress than when I've had to pull out the wool knickers? Perhaps it will do our Australian/New Zealander friends some good!

I liked the design of this dress in concept, but I have to say, it's kind of a lackluster result.

Rather than the twist being at the neckline, the bodice is cut with an overlay and the twist is several inches below the neck using the overlay. It's an interesting and creative design (that looks fab on this 3.1 Phillip Lim top)...but in real life it just makes you look like you have saggy boobs. Or the saggy boob issue could be related to my flat chest--if your bust is large enough to be differentiated from the twist it might be flattering and interesting. But on me, where the bust and the twist can't really be distinguished, it looks like saggy boobs.

Front The pattern envelope photo (though not the line drawing) makes it appear as though there is some gathering on the skirt at center front, or at least plenty of fabric. And there is waistline ruching, which always works for me. But again, once made up, these things don't quite add up. Although the skirt is pleasantly full, it is cut as an A line rather than with any gathering at center front and there is no extra fabric there for tummy camouflage. And although there is ruching, it is fairly high up at an empire line, and also provides no tummy camouflage. So I feel like the ruching merely provides a frame for my belly, rather than disguising it.

Lining the BodiceMy fabric was somewhat sheer and needed to be lined. I did not follow the pattern instructions, which were needlessly complicated and involved (1) woven lining and (2) a zipper, both of which are nonsensical in a knit. I cut the bodice out of a knit lining, and then trimmed away 1/4 inch from the neckline and armscyes of the lining to ensure a good turn of cloth that would not show the lining from the outside. I stitched the shoulder seams of the lining and fashion fabrics. Then I sewed them together at the neckline and armscyes, turning right side out through the strap tunnels. The photo at right shows one half turned right side out, and the other right sides together to show the stitching at neckline and armscye. Then sew the side seams.

I really liked this print and was a little disappointed in the result, although at least I only paid $2.97/yd for the fabric. The dress is wearable, but I don't feel great in it so I only wore it a few times over summer and I don't know how many times it will get worn next summer before it gets the boot.

In general I have found the Maggy London/Suzi Chin line of patterns for Butterick to be excellent, so I think this is just a blip and I will certainly continue buying the line.

All photos are here and the pattern review is here.

Tuesday, December 8, 2009

Simplicity 2754, Cowl Neck Empire Waist Knit Dress

Thank you for the suggestions on the panties! I make them with black cotton crotches, but that is not enough to contain the unexpected flow I sometimes get. I am intrigued by the idea of building in an extra layer, though. I make my pads of cotton flannel and even one layer of flannel might be enough. The crotch pocket idea is also interesting, but I would have to figure out some sort of closure for it; it would be horrifying if the lining wormed its way out when I was changing clothes at the gym! Will consider these suggestions.

=============================

S2754 Thumbnail

I will buy pretty much any pattern for a knit dress (as long as it's not a glorified t-shirt), so at some point I picked up Simplicity 2754. I liked the empire waist, cowl neck, and full pleated skirt (so much nicer than a gathered skirt in this style).

When I bought this yellow/gray fans fabric from Jomar in Philly it really said maxi dress to me, but I plan to use my rayon knit from Spain for a maxi-dress (it's too lightweight for a Fall/Winter dress) *and* I need Fall/Winter dresses more than Spring/Summer dresses. So I stuck to my guns and made it for Fall/Winter. With the shorter elbow-length sleeves it will be wearable into Spring.

Original Front Bodice When I initially put this together I hated it. I thought it looked like a nightgown. I almost wadded it. So I spent some time analyzing it and I realized a big problem was the front bodice. I had cut it without really paying attention and it was pretty much a single big pale yellow fan. I didn't take a photo then, but I pinned it back on and took the photo at left so you can see. I had already serger constructed everything, all that was left was hems. But I knew I would hate the dress if I let it stand.

So I cut out a new bodice, being careful to balance the motifs so that I had three instead of one. Then I carefully cut the old bodice out of the dress, clipping just outside the serger seams (luckily, there was adequate ease, so it was OK to lose some; I do not seam rip serger seams unless it is really, really necessary). It was a little challenging to pin the new bodice into the space, keeping all the seams in the right places, but I managed it in the end. I overlapped the seam allowance on the new bodice so that it extended out beyond the clipped off seam allowances of the other pieces and serger stitched with the new bodice on top, clipping off the seams allowances of the new bodice and just barely catching the edges of the original back and cowl.

It went together pretty well; I lost a bit of the reverse V shape on the empire seam and there is a little seam distortion on the lower right bodice seam (*my* right side, which is on the left in the photo), but in wearing this yesterday I think it has to do with the perpetual problem of my serger not keeping tension on the right needle thread. I have rethreaded, turned the tension dial, and done everything else I can think of the keep that thread from looping and nada. When I went to clip my work badge to the seam I noticed that the seam is almost doing a flatlock thing because of the loopy right needle thread. So I'm going to have to go in and sewing machine stitch that seam to make sure it doesn't pull apart.

The new print motif looks SO MUCH BETTER. The pale colors of the print combined with the relaxed fit do make it look a little nightgown-y in general (had I made a fitted wrap dress it wouldn't have been as much of a problem, I don't think), but I'll just have to live with that.

Back One of my mom's pet peeves that she passed on to me is that ready-to-wear, even on the high end, often doesn't match the back and front. So the front will have some sort of neckline embellishment, for instance, that should logically go all the way around the neck, but the back neck is plain. I think this looks so cheap! This dress suffered from that syndrome. While the front is designed with the empire waistline and pleated skirt, the back is just a single t-shirty piece. Cheap!

I lined up the front and back pieces and marked the empire waistline on the back. The front skirt is shaped to fit into that upside V waistline, so I just folded it down so that it was flat and even with the side seam and cut the back skirt like that. It looks so much better this way. I didn't make a swayback adjustment because of all the volume, and I think I lucked out here.

There's not much to say about this dress! It's cute, easy, and goes together well. The cowl is supposed to be cut on the bias. Because I had plenty of fabric I went ahead and did it, but honestly as long as you're using a lightweight knit I really don't think you need to. I have been into deep twin-needle hems on knits lately; the skirt on this ended up being really long (didn't want to shorten it in cutting as I keep getting burned by that) so I did the deep hem. It gives a little weight to improve the hang of the dress.

All photos are here and the pattern review is here.

Monday, December 7, 2009

Unmentionables and Stashoholism Confessional

Fabric.com 12-09

I have been ordering fabric like a mad woman lately! But I have also been sewing like crazy lately and the fabrics have been good stash fabrics (if you accept that there is such a thing)--silk cottons and now wool. I ordered this fabric really just to make it to $35 at Fabric.com for free shipping, but when will I not need a good quality stretch wool? I pre-shrunk it by wetting it in the shower with hot water and hanging it to dry. Cidell and I were talking about how much we love the smell of wool. This smelled so good!

The real reason for my order was the pattern. Fabric.com was having a 20% off sale and I just couldn't hold out any longer for a 2-for-1 deal at HotPatterns. I've never used a HotPatterns before, but I loved this one as soon as it came out and people have been making nice things out of it. My serger is gray right now and I have a list of gray projects to complete (including a dress of the stretch wool), but when I change it to red this pattern is on the list! Probably won't happen until after the holidays, alas.

======================

Sew Sassy Stretch Lace

I also ordered two sets of a 30 yard stretch lace assortment from SewSassy. That is one set rolled onto cards, and one set loose, to give you an idea. I really don't know why I ordered the bundles. Well, I mean I do know why I ordered the bundles--because I like the surprise element. It's like getting a sewing present. But in reality, I pretty much wear black underwear every day because (tmi) I spot 24/7/365 and anything else gets ruined on the first wear. So I should have just ordered a crapload of black and of course the bundles didn't come with any black at all!

I was pleased with the quality and service, however. I like that you can choose USPS shipping because USPS is the only delivery I can get at my house and I hate sending all my packages to work. The shipping charge was totally reasonable and it came super quickly! I will probably go back and order some black picot lingerie elastic for legs, and can use the light colored laces at the waist.

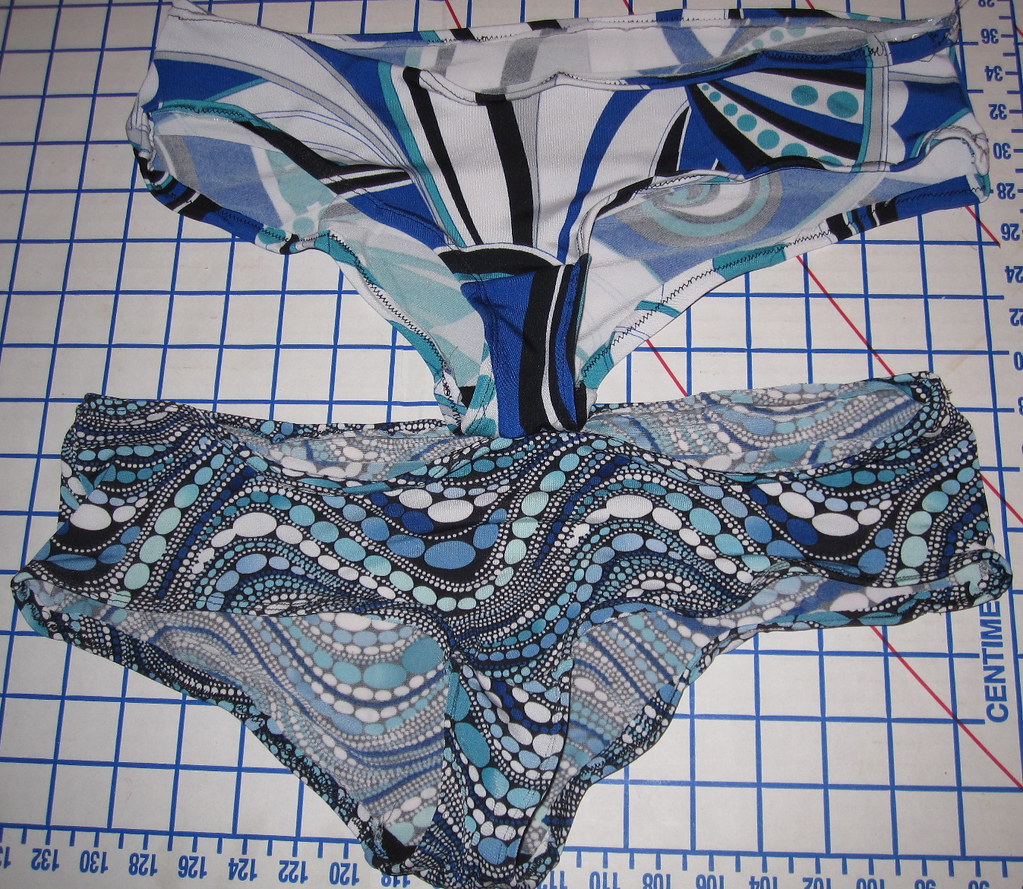
I had actually made some panties before ordering the lace, if you can believe it! I bought some H&M underwear a few weeks ago when I had forgotten to pack any and ended up really liking the style. I prefer a low waist, full coverage rear, separate crotch piece, and lower cut legs so they don't ride up and they fit the bill perfectly. Of course, the downside of my preference for full coverage is that I cannot really make them out of "scraps." This takes a not insignificant chunk of yardage, around 3/8 yard.

The only thing about the H&M panties was I had bought a size too small. Luckily, I have the technology to correct that! So I laid tracing paper over them and traced them with a pencil (my pattern is not symmetrical, but the resulting panties are fine so I haven't bothered to clean it up), added a bit to the sides, and voila! I have what I hope is a TNT panty pattern. I won't really know if it's TNT until the Spring, though. You can't tell if panties are going to ride up if you're wearing tights over them. So I feel like I shouldn't make *too* many of these until I know for sure!

First attemptsAnyway, I made the prototypes using clear elastic and a twin needle. They fit well and wear well (although I can't really wear them since they're not black), but the clear elastic feels chintzy. Also, the allowances roll out out and expose the clear elastic, which again is not uncomfortable but just isn't cute. So I decided that I was allowed to order the stretch lace, since I had demonstrated that I actually would sew panties.

With stretch lace So much better, right? They look better at any rate. Can't actually wear them because they're not all black. I switched Pills several months ago and now I have a few days' window where I don't spot so I have to wear all my cute underwear on those days. I just overlapped the lace at the seams, and one leg already had one of those long strings you pull from all the way around the lace, so I'm going to have to figure out how to finish those ends. I guess just zigzag them in place.

Next time my serger is threaded in black (and I have black picot elastic in hand) I'm going to have to do a black panty-sewing extravaganza. They're quick to cut and assemble, but it does take some time to pin the lace/elastic around the legs and waist so each pair takes about 40 minutes. I thought it would be like popcorn, but it's more like gummy worms.

So I guess I'm making my own underwear now. But there's still no way I'm going to attempt a bra.

Friday, December 4, 2009

Vogue 1056, Triple Keyhole Knit Dress

Vogue 1056 Thumbnail

This was a stashbusting project; I felt like I needed to sew something from stash to balance out sewing exclusively with new fabrics, which is always a problem with me! I bought this about a year and a half ago from G Street's $2.97 table. At the time I was seduced by the turquoise in the print, as this is my favorite color. However, I got it home and realized that it was a stealth stripe fabric. For some reason, I often just don't like stripes that much. I like them sometimes, but they are not my favorite. I find stealth stripe prints to be such a nuisance because then you have to think about directionality and which way is more flattering and it is all too much trouble. So this sat in stash and I fell more and more out of love with it, to the point where I thought I might have given it away. But there it was, at the back of the shelf.

I was iffy on the pattern, Vogue 1056, as well. I don't normally wear anything with a high neckline as I have a very low choking feeling threshold, and plus I like my collarbones. But I was really intrigued by the design and it is something a little new and different for a knit. I figured I'd combine the so-so fabric with the so-so pattern and wouldn't be too sad if either turned out to be the wrong decision, and I'd finally get the blasted fabric out of stash.

In the end, I am very happy with the dress! It was quick and easy to put together (I omitted the zipper because it's a knit for crying out loud) and the woven lining (ditto). The neckline is not stretchy because of the facing, but it slips over the head. I did it over my *crazy* I-haven't-sewn-in-forever-so-I-must-do-nothing-but-obsessively-sit-at-my-machine weekend and it took around 4 hours. The only remotely tricky part is the neckline facing, and it's really not that tricky and the pattern directions and illustrations are good.

Keyhole CloseupAlthough it's evident in the line drawing and should be a logical conclusion based on the design, I was somehow surprised when this turned out to be a triple keyhole. I was focusing on the center keyhole, which the model photo emphasizes, and you can't even see the side keyholes in the pattern photo. When I first put it on, I thought I had done something wrong! The side keyholes were very prominent and the center keyhole completely disappeared. I ended up inelegantly just bunching a couple layers of fabric together on either side of the center keyhole and tacking it down to make sure that it stayed open.

FrontBecause of my "striped" fabric, I couldn't follow the cutting layout. The front is kind of crazy as the two halves are cut as one at the neck, and then has a center seam below the keyhole (so the final cut out front is sort of a butterfly-shape variant; I feel like I'm not explaining this well) so you have to cut it out single layer and it's on the bias. This would have made my stripes all kinds of crazy, so I put a seam at the center neck joining spot and laid the front out on grain. This knit is thin (not to say cheap) and I used serger construction so that front seam neck isn't *too* bulky, but I would not recommend adding that seam rather than cutting as one in anything but a thin, drapey knit.

I ended up loving the way the stripes fall on the front--their subtle curve makes my bust look big and my waist look skinny! Perhaps I should give stripes more credit in the future.

BackAs with the Butterick 5130 Muse dress I was a little too enthusiastic about how much I needed to shorten the skirt in cutting. Oops. So, as I did for that dress, I added a band at the hem. Here I actually thought this was a very fortuitous accident, because the horizontal striped band at the hem I felt really added something to the design (and helped balance the play of stripes at the back neck yoke) and made the dress look more finished than it had with just a normal hem rather than just being necessary to cover a mistake! Wearing this yesterday, however, I still felt like this dress was a skootch too short for work. But since it's for Fall/Winter I'll always be wearing it with tights, so I guess it's ok.

I clearly felt I needed to review this soon because I took pictures of it both times I've worn it. I totally forgot I'd done the first set of photos! So you can see it with different legwear in the photos. The review is here.

Tuesday, December 1, 2009

BWOF 06-2009-101, Pleat Front Knit Dress

BWOF 06-2009-101 Thumbnail

You couldn't see a thing of this dress in the magazine, what with the dark blue color and the scrunched down loungey pose, but I loved the line drawing and this has been a very popular dress/top pattern with lots of cute examples of it made up.

I decided to go with the tweed-ish, metallic-ish cotton/poly (based on a burn test) knit from Jomar in Philly. I totally fell in love with the fabric even though it's slightly weird, but having now made it up I think I was totally justified! This was one of my projects on my happy sewing day.

Combined Sleeve Pattern I wanted this to be for Fall/Winter, so I lengthened the sleeves, as several people have also done. Luckily, Burda's directions explicitly tell you that the drafted cap sleeves are joined at the bottom seam, so I didn't have to do anything to the drafting. In my heavy-ish fabric I didn't want the top seam to be weighing down the sleeve so I combined the two pattern pieces, laying them together at the stitching line and marking the resulting dart where they diverged.

Sleeve Dart

I stitched the dart and then clipped it open to reduce the bulk. This knit fabric, unlike some, takes a press to some degree so I pressed it as flat as possible, and I think the end result is nice--it sits well at the shoulders and there is no noticeable bulk.

Sew Pleats Entire Bodice Length Burda claims that leaving the pleats unsewn will enhance a small bust. Have they ever met anyone with a small bust? Because nothing looks worse on a flat chest than an empty, billowy, echo chamber of fabric. I did not take this particular suggestion, and instead stitched the pleats down from the inside all the way along the bodice. I put in the full width pleats at top and bottom and sewed them about half-width along the length. However, after the dress was put together I went in and sewed the pleats even deeper, almost to the full width for the top and bottom. I think with the pleats sewn down it is flattering for a small bust. I also narrowed the bust dart drafted into the bodice front and lining.

Lining and Facing I followed the instructions for the front lining, even stitching the darts together, which is really kind of silly and unnecessary because the "lining" is really just an underlining, so it's anchored at all the the seams and not going to shift around. I used the rayon(?) jersey I bought in Hong Kong and man, is it good stuff! I can't wait to sew it into something, but now that I know how fab it is it has, of course, become Too Good To Use for any old project.

I used *gasp* facings, which I generally hate and never use. But here I was able to hand stitch them down in the front to the underlining, and then stitch in the ditch at the raglan sleeve seams and center back, so there is no chance of it flipping out. I used self-fabric for the facings and because my fabric is a fairly thick knit I think there is a little too much bulk going around the back neck, but I can live with it.

When I put this together it just wasn't looking great. It took me a little bit of playing but I finally figured out the midriff was just way too wide for me. I've made plenty of projects with wide midriffs, so it's not that the style doesn't work for me, it was just something about this dress. I narrowed it to about half the drafted width and it made a huge difference in the look of the dress.

I also had to take it in about two inches at the midriff/waist. I think it probably had to do with my fabric, which doesn't have great recovery. Burda doesn't usually draft with too much ease and I cut my normal size (though I think maybe I should do a 35 at the waist, instead of a 36, if there is such a size), so I'm not sure what was going on there.

Back


I did my usual swayback adjustment, although I see I could have taken a little more. But it's not a swayback that makes the back look so bad, I don't think. Man, it looks awful! I had no idea this was my rear view until taking the photo. I don't think I have those teardrop dewlaps under my shoulder blades yet, I think it's just something horrible about the way this sits on me. I hope. I have no idea how to fix this.


Front


But at least it looks cute from the front! It's really fun to wear, although now I'm going to be totally paranoid about how I look from behind. I will be walking around backwards to prevent anyone from seeing it.

All photos are here and the pattern review is here.