Tuesday, July 27, 2010

McCall 5579, 4th of July Kimono Dress

McCall 5579 Thumbnail

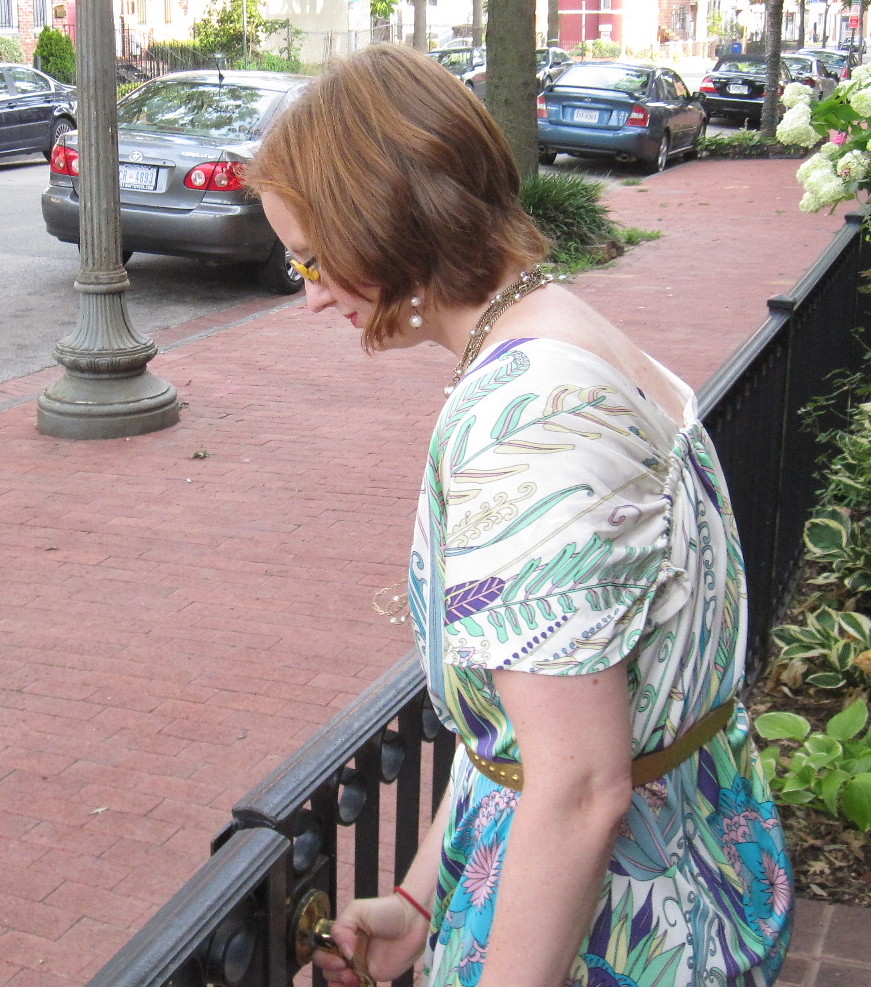
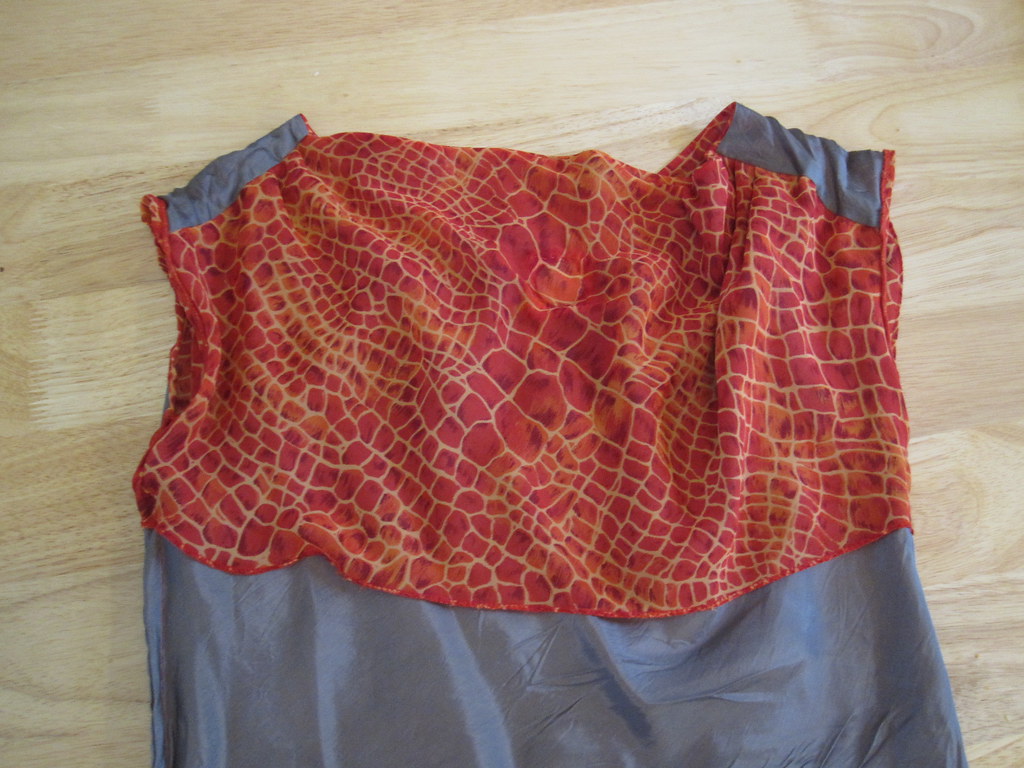
I bought this stretch silk charmeuse in Hong Kong with AllisonC (I think I paid about $3/meter for it). I enjoy subtle stunt dressing and thought it would be perfect for a 4th of July dress, as it is red, white, and blue but not covered with stripes and spangles. Of course, I didn't think so much about the pattern--you can't sit on the ground in this because the skirt isn't very full. I'd had it in mind for this pattern for a year, and in my frenzy of activity leading up to PR Weekend Montreal I managed to get it done! Unfortunately, with this fabric I got what I paid for and it is not holding up well and keeps getting snags. Hopefully it will last a couple years.

That don't suit me at all!


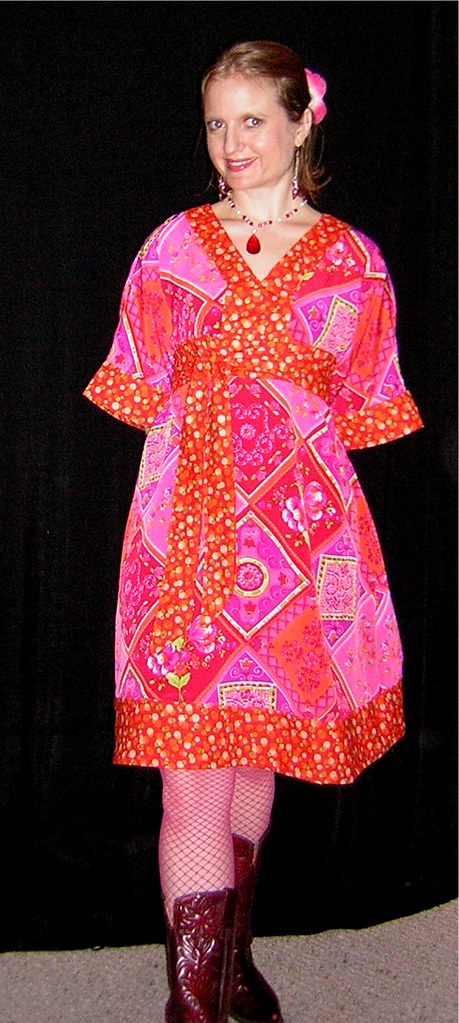
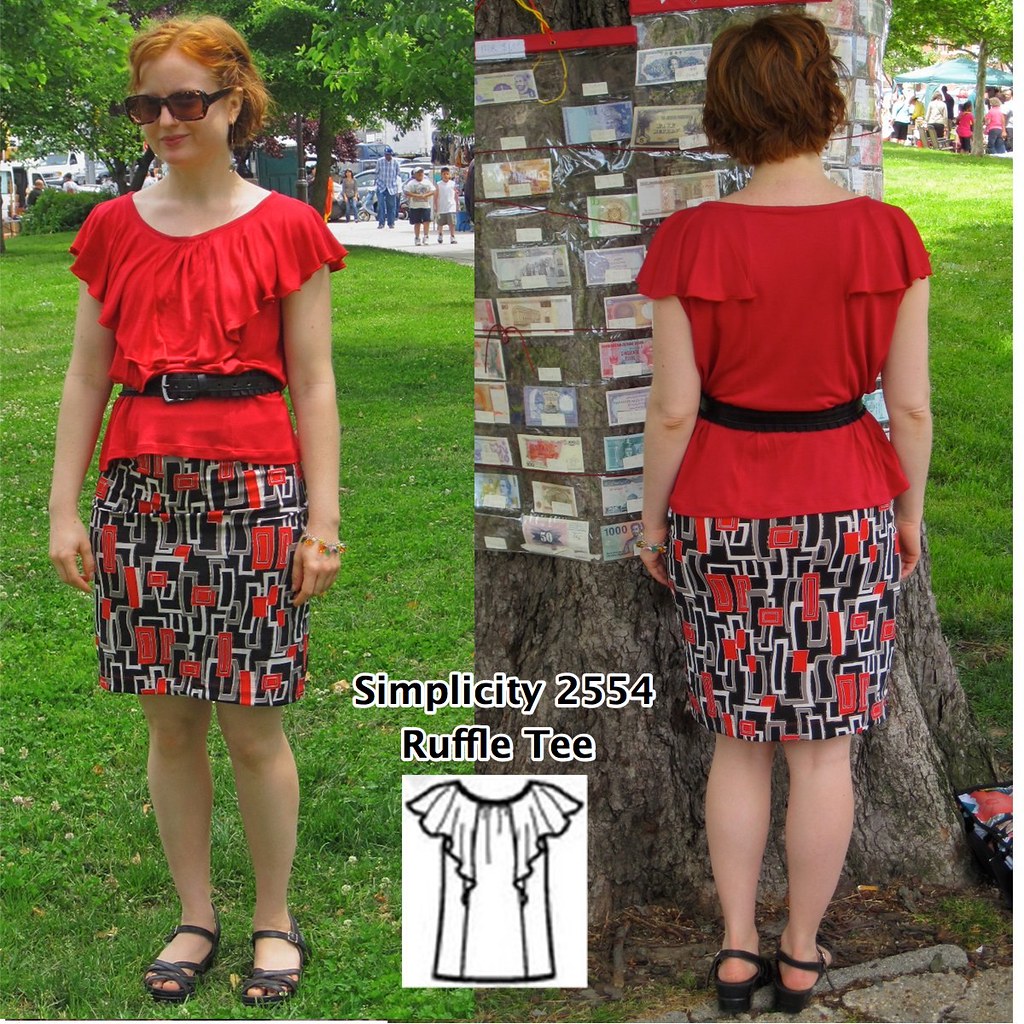
The whole time I was thinking about the dress I was debating whether to do contrast bands in red along the neckline and at the midriff. In the end, I decided not to. I don't know that the Duro look (see my Simplicity 4072 version at right) is now unfashionable, but the rage that lasted a good 2.5 years has definitely subsided.


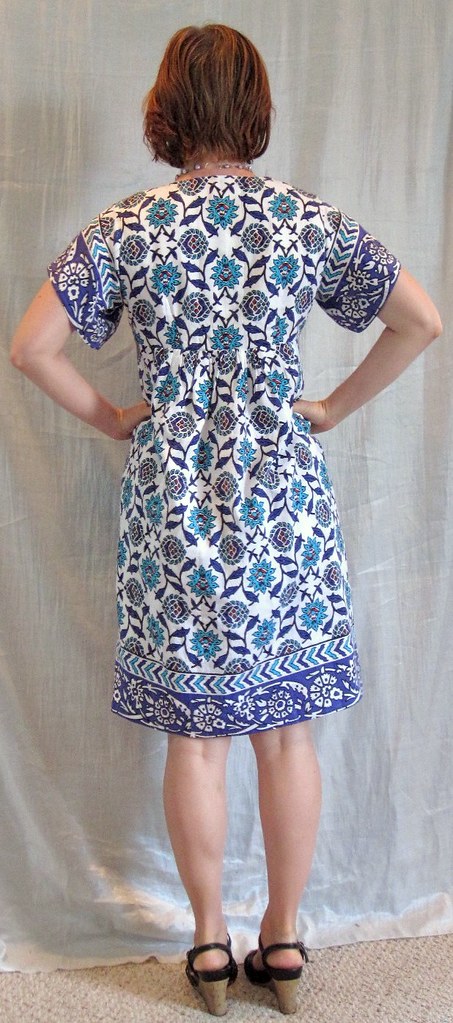
A kimono look is always in fashion, so I went plain old, figuring I could always dress it up with an obi. The one I'm wearing on the left is from Burda 06-2009-151 obi. The reverse side, which you can see in my Montreal collage below, is a silk brocade a friend brought me back from China many years ago. I have no idea what to do with it, so I was glad to finally use a piece!

Small Bust Adjustment

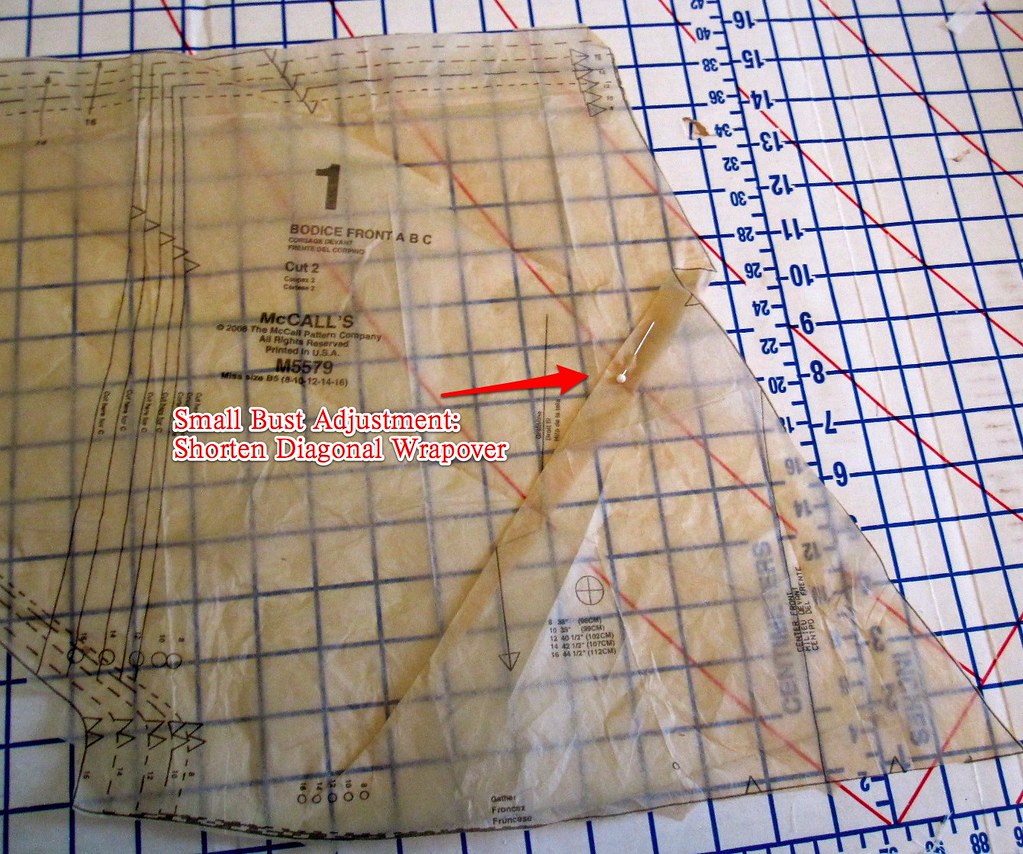
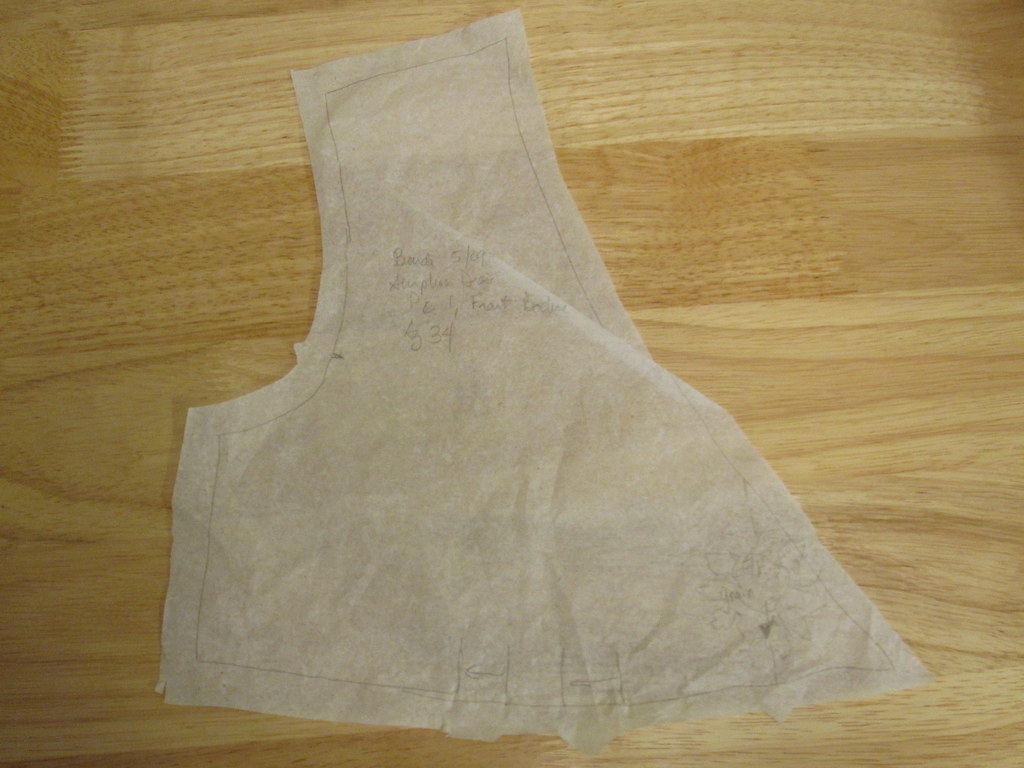
I did my usual small bust adjustment for a crossover top of shortening the diagonal wrap line. This doesn't have any problems with gaping.


Swayback Adjustment


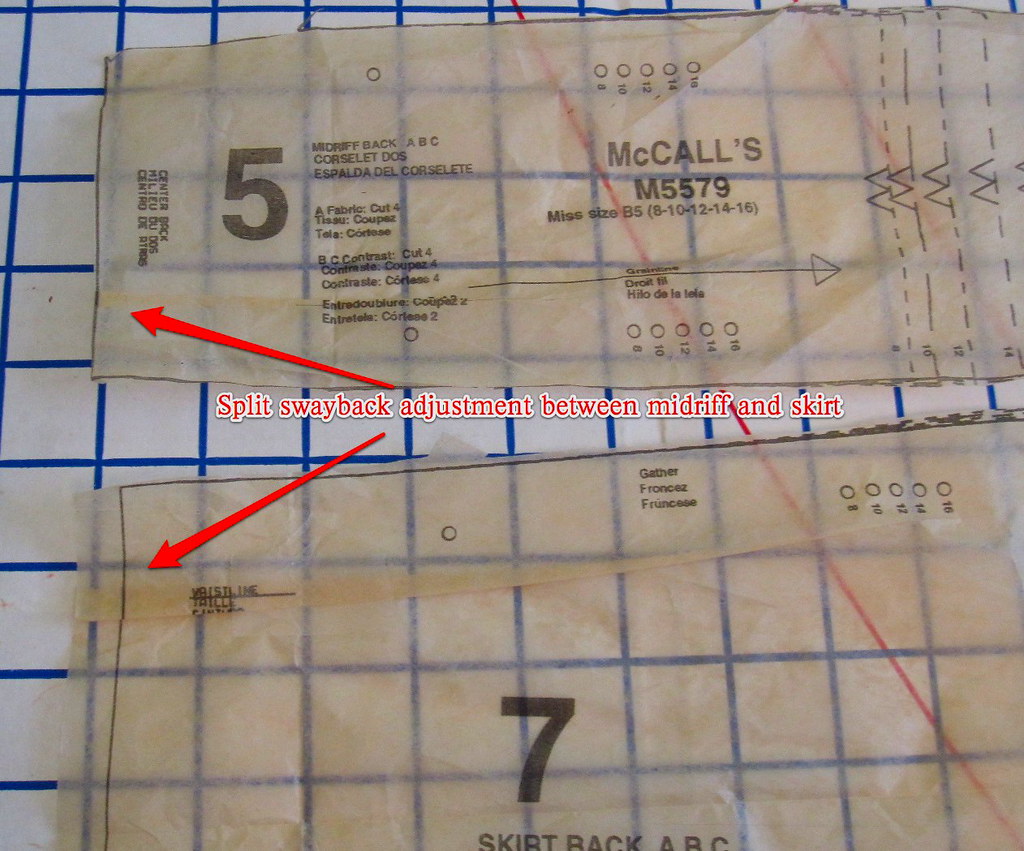
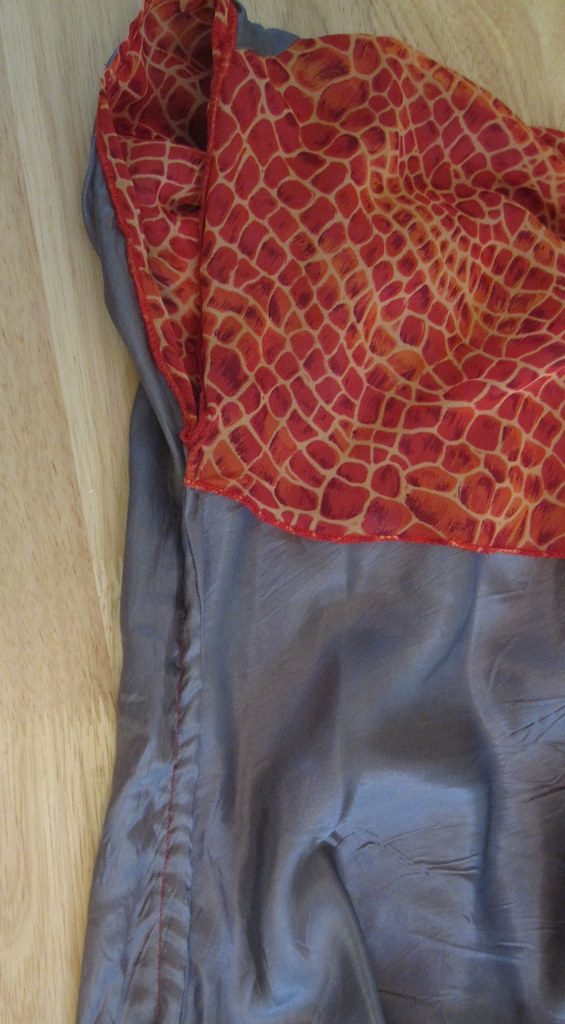
For the swayback alteration, I split the length reduction between the midriff and the skirt, which worked well. No swayback puddling.


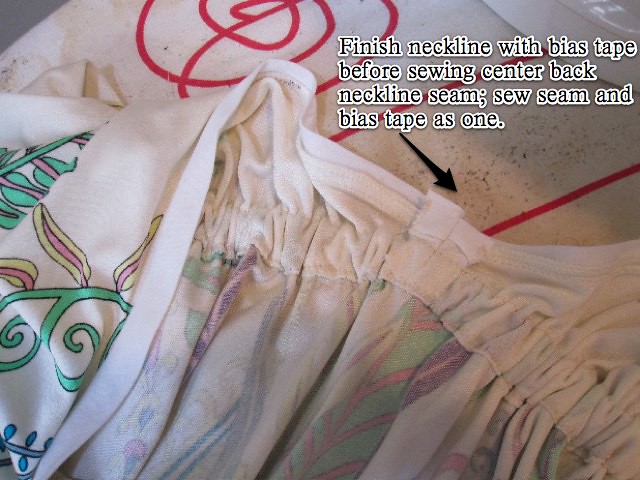
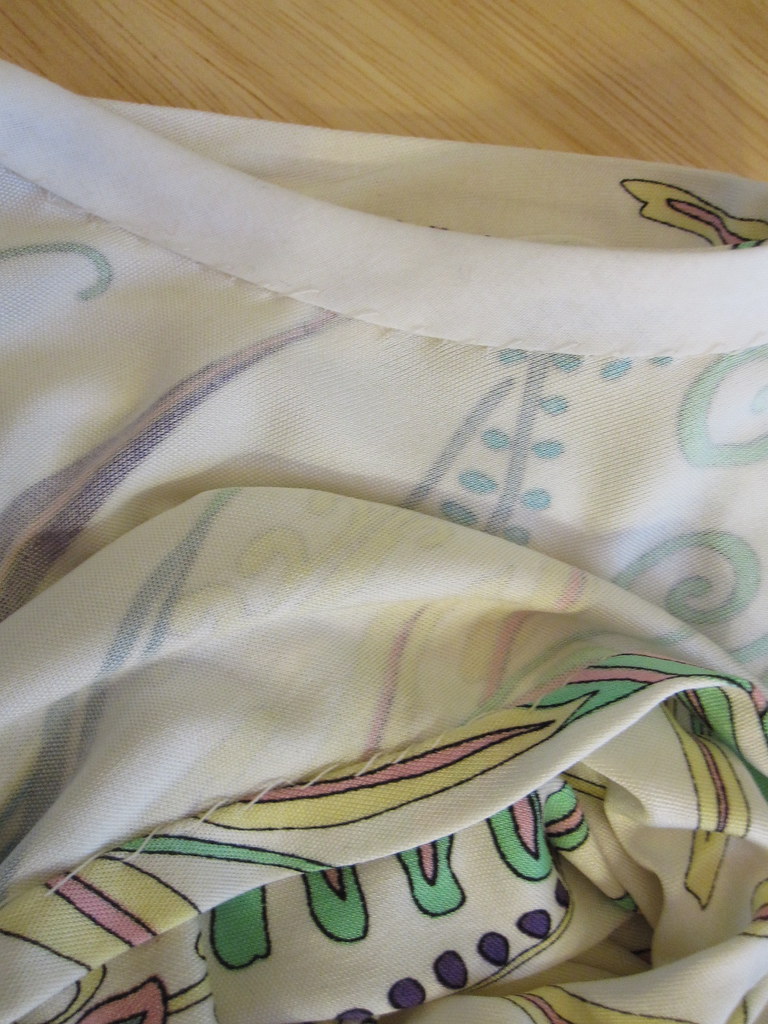
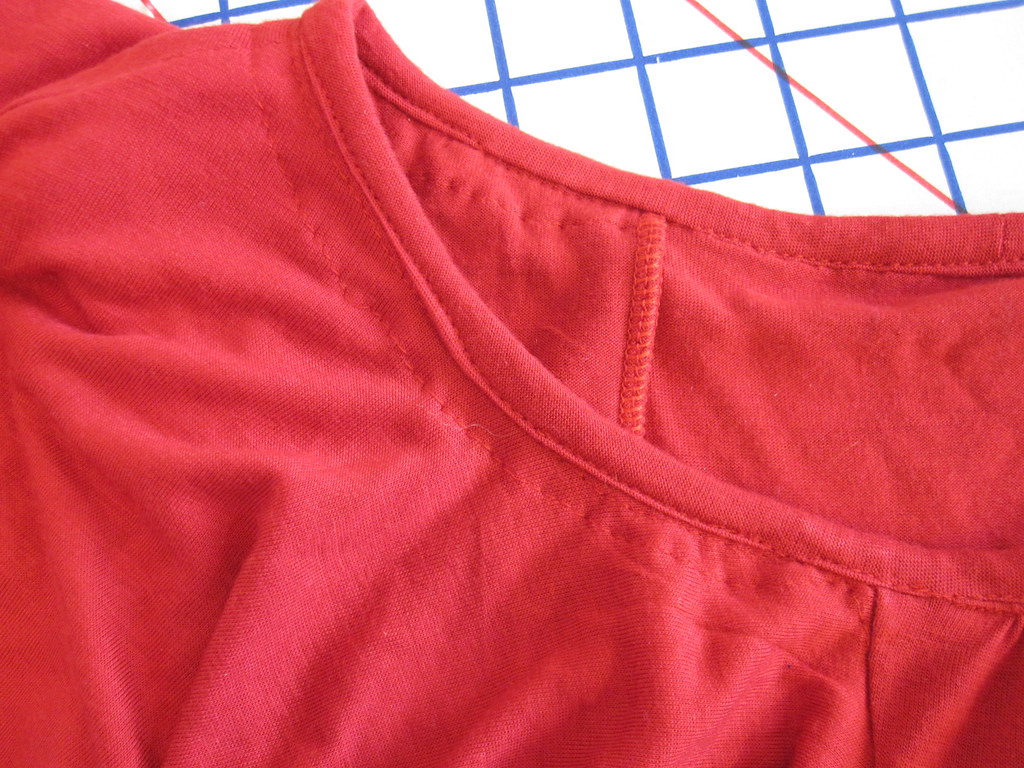
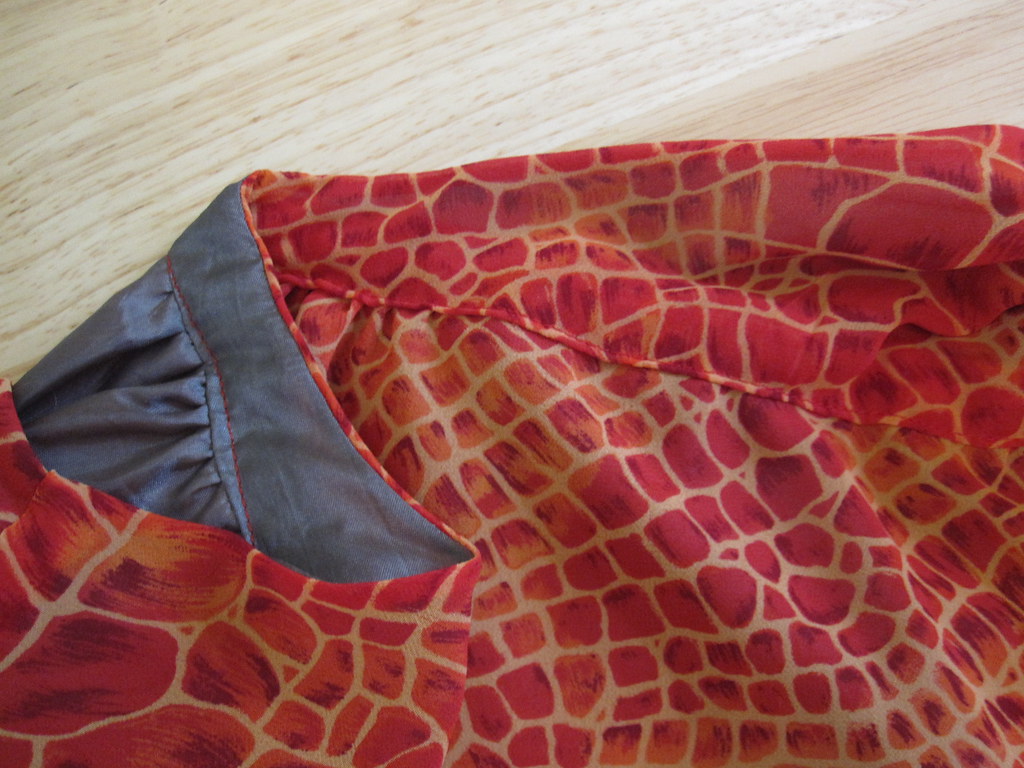
Rather than use facings to finish the neckline, I just used a self-fabric binding. As I recall, I didn't even cut the binding on the bias as the neckline curve is never extreme. I just cut the binding about two inches wide on the crossgrain, pressed into a double fold, sewed one edge to the wrong side of the neckline and then folded over and topstitched on the right side. A nice clean finish without any floppy facings.

M5579 I cut the skirt a little wider than drafted, the full width of my 45 wide fabric, for comfort.

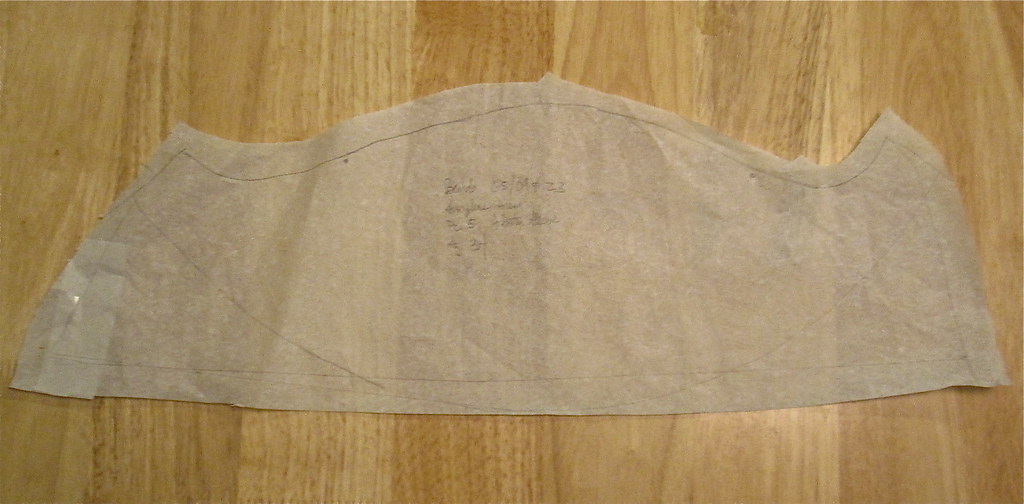
As depicted on the pattern envelope, the sleeves ended up elbow length, which was entirely unflattering on me. I shortened them about 3 inches at the shoulder seam, tapering to nothing at the underarm.


There are zero reviews of this pattern on PatternReview (well, now there is one) and the pattern is now out of print. I am so surprised by both of those! It is a cute pattern and not too complicated, suitable for beginners. This look never really goes out of style, or if it does it has not done so yet. It's as cute or cuter than several other patterns in this vein. Why it didn't get any love, I don't know. If you have it in stash pull it out and see if you have anything that will work for it!


All photos are here and the pattern review is here.


===========================

New Clothes for Montreal

My theme for my trip to Montreal for PR Weekend was red and white because I have a RTW red and white hat I wanted to be able to wear with everything. I had several pieces in my closet, but of course what is a trip without new clothes? Somehow over the weekend before leaving I managed to make two dresses and a top before flying out Monday morning: this dress, the Vogue 1161 Rachel Comey, and another version of the Simplicity 2938 princess seam tank top. That one was quite a coup. I had saved the fabric, leftover from Vogue 2787 for almost 3 years. The fabric I had left was in a long skinny piece. I knew that someday I would find a pattern that would work. And finally, I did. Although, it's probably a bad thing that it reinforced my tendency to save small bits of fabric.

Friday, July 23, 2010

Burda 06-2010-123, Silk Jersey Sack Dress

Burda 06-2010-123 Thumbnail

Right after I posted last week about my silk jersey score from G Street Fabrics I visited AllisonC's blog to see her fantastic self-made border version of Burda 06-2010-123 (you have to scroll through to the pink dress). Not only did I love the dress, but it was the perfect pattern for my find. The motif is 36 inches long, which is a dowdy, stumpifying length for me, but because the front of this wraps over the shoulders to the back I was able to use the whole length of the print, and the straight hem of the dress was made for a border print. Note that because of the limited length of my motif, I cut the dress about two inches shorter than drafted and with no hem allowance.

Bias Tape Neckline Finish Burda tells you to finish the neckline with bias strips after it is all put together, which is crazy because there is very little room to maneuver at the center back neck once the front and back are sewn together. I used a cotton batiste bias strip because I wanted a woven to stabilize this very wide neckline. I sewed the bias strip on before sewing the center back neck seam--because I find it easier to apply bias to a line than a circle--and before sewing the front to the back.

Finish lower edge with zigzag This actually ended up being a little short and I didn't want to lose any length in hemming, so I used a closely spaced zigzag stitch instead of turning up a hem. I considered a faced hem, but the zigzag doesn't look bad so I stuck with it. I checked out how DVF finished one of her silk jersey dresses; looks like she uses either a coverstitch or a twin needle. You can see that I also pinked the side seam edges rather than finishing them with a zigzag or serged finish. I was given a pair of pinking shears recently and I wanted to try them out.

Hand Stitch Although I took shortcuts on the hem and the side seam finishes, I decided that the best looking finish for the neckline and armscye edges would be a hand stitch. It didn't take *too* long, and looks quite nice from the outside--mostly invisible. I always get nervous doing a hand stitch and only taking one thread of the outer fabric, because it seems like all that will do is break a bunch of threads and your hem will fall out anyway. So I took more like 3 or 4 threads with each stitch. It still worked.

Saks.com - Peter Pilotto - Silk Jersey Dress I wore the dress to a party on Saturday and felt very luxurious in silk jersey. Mine cost about $14: $5.22/yd for the jersey plus tax and I used two yards, plus about $2.50 for the magazine (each issue costs approximately $6.67 and I assume I will use an average of 2.5 patterns per issue, though that is a bit generous), plus thread. I decided to see what I'd pay for a similar dress in ready to wear. I love how Sewspicious Minds does this for all of her pieces--it's such fun. The closest match is probably this Donna Rico silk jersey dress ($128), although I think mine is much prettier. However, I prefer to compare myself to these babies. Unfortunately, Spring/Summer clothes are already gone from my snoop shopping websites so I have to compare to Fall looks. The Peter Pilotto dress has sleeves and some ruching along one side; these features cost an extra $1781.

Saks.com - Emilio Pucci - Ruched Silk Jersey Dress Admittedly, your extra $2081 will buy you much more from Pucci. I love the allover ruching on this with the wandering external tucks, which create slimming lines. So I can't *really* compare my dress with this one. Not quite ready to pay the price tag for it, though.

Totally love this dress. It's trendy, luxe, and yet still me (I am usually neither of those things). The pattern was the perfect find. You can see how the vines wrap over the shoulder (pardon the hunchbackedness of the shot; my photographer decided to get cute and do "candids"). I did not even glance at it in the magazine, so a huge thank you to AllisonC for bringing it to my attention!

Vine Wrapover CloseupNot only is it stylish, but it was super easy, other than grading it down two sizes on the new roadmap pattern pieces over one of those odious "extra pattern in pink"s. It does not present any fitting woes, though I should have taken a wedge of fabric out at the upper back, about 1 inch at center back tapering to nothing at the side seams, for a swayback adjustment. I may go back and do that at some point. You could make this in an evening, especially if you are not compelled to try on every shoe, belt, purse, and accessory you own once a garment gets to a stage where it will stay on your body in one piece. Not that I do that. (I would have worn cuter shoes for the photo shoot, but we were on our way to the party which was about a mile walk each way and I didn't want to carry a ginormous purse with extra shoes in it.)

The back on this is not bra-revealing low, but it is kind of office-inappropriate low and the dress is short, so this will be play clothes. I'm getting a little too many of these lately, gotta focus on work stuff. Luckily, my work is casual so I can still wear bright colors and prints, I just need to be mostly covered.

All photos are here and the pattern review is here.

Tuesday, July 20, 2010

Simplicity 2554, Princess Seam Flounce Tee

Simplicity 2554 Thumbnail

There have been lots of cute versions of Simplicity 2554, so I had to jump on the bandwagon. This outfit was my last minute sewing before PR Weekend Philly and the photos are by LindsayT! The top fabric is a lightweight rayon knit leftover from my Hot Patterns Three Graces shirt (fabric.com, $5.25/yd) and the skirt is leftover from New Look 6429 (FFC, $4.75/yd), so (1) this outfit was practically free, and (2) these two fabrics from kind-of-fail projects are redeemed.

Pattern Layout It was a tight fit to get the whole pattern onto my leftover fabric (there is another long skinny princess piece that I cut off a spur of the fabric, not shown here) and I had to ignore the grain lines for the ruffle and the neck binding. Since the ruffle is basically a circle, I didn't think it mattered exactly where it was on the bias and where on grain, and the final project bears me out on that.

As for the neck binding, it is supposed to be cut on the bias but it seems insane to cut a lightweight knit on the bias for binding. And in fact, at PR Weekend Montreal Jeanne of Jalie recommended cutting knit binding down the length of the grain as it is most stable, which is what I did here. Even so, the neck is definitely getting larger and larger every time I wear it. I should have stabilized the binding with a non-stretch interfacing (the neckline is large enough to pull over the head without stretching). I am going to have to retrofit it with clear elastic or something so the top doesn't end up falling to my waist when I put it on.

Basting Too Deep Although my construction on this was mostly slapdash, I did take the trouble to baste in the flounce; my fabric is *very* lightweight and somewhat difficult to control and it was definitely worth the extra step. However, I basted the flounces on at the 5/8" seam line, not thinking that the "seam line" at the neckline is the 3/8" binding rollover stitch. So I had to unpick all the neckline basting. Do yourself a favor and baste the flounce at 1/4" on the neckline edge!

So, I'm afraid I have to take my sewing machine in for service. I can't stand the thought of being without my machine! But for several months now the needle has been leaving large puncture holes in my fabric, no matter what size or type of needle and what type of fabric. I always make sure the needle is pushed all the way up before screwing it in. It seems like this is something I would recall if it had been happening from the beginning. I have a Bernina 1008 purchased about 6 years ago and serviced (*ahem*) never. Is this a service issue? Is it possible for the, um, thingy-shaft the holds the needle to slip downward over time, causing the needle to plunge too deeply into the fabric and need to be tightened up? It is not hitting the bobbin case or making a wonky stitch.

Wind is Rising... I totally love the ruffle look of this blouse, very on trend, but the downside is that the slightest puff of wind picks up the ruffles and leaves me in disarray. My other quibble is that I'm not sure I love the way the back of the ruffle is short and sewn into the side back princess seam instead of being the same length as the front or going all the way around the neck. But all in all I adore the top. It is flattering and comfortable and very ready-to-wear.

The skirt is just my basic self-drafted knit skirt, lined with some Vera Wang flesh-tone poly knit. Looking at these photos I thought it was time to make it a little larger, but in wearing the skirt recently I realized that I drafted the sloper with a really high waist but was wearing the skirt a little lower, which was creating those high hip wrinkles. So I think I need to lower the waistband and the hem of the skirt and it will fit and flatter.

All photos are here and the pattern review is here.

Simplicity Tops

I feel like Simplicity is really on a roll here--three patterns in a row of uncomplicated but not boring, current, trendy, well-drafted tops. I have not thought of Simplicity as the fashionable pattern line in the past, but I think it is stepping up its pace to keep up with the fashion cycle and giving us looks while everyone else is still wearing them. Go Simplicity!

Tuesday, July 13, 2010

Burda 05-2009-123, Border Print Dress Knockoff

Burda 05-2008-123 Thumbnail

The Pattern Review challenge for July is Designer Knockoff, which is always one of my favorite contests of the year. It is usually my opportunity to do actually draft a pattern. This year, however, it is a two week challenge. Also, I am not necessarily low on mojo as such, but I have definitely been low on energy and time for sewing lately, so I was not up to the challenge of undertaking a huge, challenging project anyway.

I still wanted to participate, but needed to start with a pattern. After realizing that I wasn't going to be able to wear pencil skirts in 95ยบ+ weather and that my go-to dress when it's really, really hot is my loose-fitting cotton Tracy Reese sundress I decided to concentrate on styles like that.

Suzi Chin Maggy Boutique Border Print Dress (Plus) - - Nordstrom The fabric was a birthday gift from Karen two years ago. It's a really soft rayon in all my favorite colors. I have several border print pieces in my stash and in doing research on how RTW uses border prints I ran across this Suzi Chin Maggy Boutique border print dress. I really liked the way the border was used at the sleeves as well as the hem, and it just looked like a cool, comfortable dress.

The original dress is just a V neck, but I thought it would be a little nicer to do a surplice neckline (and honestly, they're easier than a V neck for me; I really, really hate clipping to within a thread of the V point because it makes me too nervous). Burda 05-2009-123 had the perfect upper bodice and a modifiable flutter sleeve.

Small Bust Adjustment (SBA) on bodice front I started by altering the pattern. My standard small bust adjustment for a crossover or wrap neckline is to shorten the diagonal crossover edge. I folded out my usual amount of length. Unfortunately, this turned out to still be a little gapey and I should have used more. In the end, I had to hand-stitch the overlapping parts of the right and left neckline together which I hate doing--it is admitting defeat. (More on the neckline below). I wanted to make a real effort with this project to match the print, and if you click on the bodice you can see that I traced out the flower motif so I'd get it in the same place on both sides (somebody made a Hawaiian type blouse and shared this trick, but I cannot remember who). For me, it turned out to be easier and more precise to cut out the pieces single layer, laying the first cut piece upside down on the fabric and lining up the motifs that way. Single layer, people. This is me making an effort.

Modified Sleeve Pattern For the sleeve, I needed a flat hem. If you click on the sleeve pattern you can see my tracing line of the original sleeve. I pretty much just extended the length out diagonally so it would have fullness at the hem and drew an almost flat lower edge. The resulting sleeve has a lot of volume and kind of a kimono style vibe. Honestly, I didn't know what to expect as far as how the sleeve would end up looking, but I like it, although the arrows go in opposite directions because the sleeves are mirror images, which I didn't think about. I used this sleeve as drafted for my silk wrap blouse and it is a perfect flutter sleeve.

Lining and Construction Burda has you essentially underline the bodice of this dress, and finish the neckline with a facing. That makes sense for the dress as drafted because it is meant to be made of a chiffon. For my opaque fabric, I sewed the shoulder seams of bodice and lining, and then finished the neckline by sewing fashion and lining fabrics right sides together. I interfaced the edge of the fashion fabric to help it keep its shape. I turned, pressed, understitched, and after the neckline treated the lining as an underlining, catching it in the side seam and folding it into the pleats and darts. You might be able to see that I took a hand stitch along the right side of the neckline to try to ease it a bit--despite the interfacing it really stretched out and was gaping.

Both skirt and lining were cut 60 inches wide so there would be a lot of ease and room for whatever breeze might stir up to alleviate the heat. To line the skirt, I sandwiched the bodice between the fashion skirt and lining skirt. The fashion fabric was gathered, with the gathering concentrated at center front and center back as in the inspiration piece. I pleated the skirt lining as per usual in order to reduce bulk. The downside of a border print is that you have to know exactly how long you want the skirt before you cut. I think this could be a half inch shorter, but it's definitely not worth taking the whole thing apart.

I was able to use a short zipper at the side seam because of the width of my skirt. However, the dress is a little hard to get on and off because the bodice is fairly close fitting. I would recommend keeping the zipper in the back as drafted.

I finished the sleeves and hem with a machine blind hem. I really should improve my blind hem skills as I always take too large a bite of the outer fabric. I lined this with an Ikea Knoppa sheet. The sheets are a batiste-weight cotton-poly blend with a coarse weave that breathe well and hold their shape and are $1.99. I keep a stash of them in the sewing room at all times. For this project I was able to use the finished sheet edge as the skirt lining hem. Score!

Jewels and Modesty Panel When it was finished, it felt like there was something missing where the bodice and the skirt meet. This is a very high empire line, way too high to wear a belt as would be my normal preference. I remembered that I had bought some turquoise (plastic) sew-on jewels in Hong Kong with AllisonC. The color is not an exact match but I felt that it added what I needed to that area to give it a little oomph.

After wearing this all day yesterday, I admitted that the neckline is just too low. When standing it only just covers my bra. When sitting at my desk, it gapes open. I really didn't want to put in a modesty panel because something about this dress already feels like a Chico's Kind of Day (the high empire and skirt volume, maybe?) and I feel like the modesty panel nudges it deeper into Golden Girls territory (not that I don't love the Golden Girls). Oh well. This is probably me being insane and I will forget how much I hate the modesty panel next time I wear it.

Side Back Quibbles aside, I really like this dress. The final result is more "inspiration" than "knockoff," but I prefer my changes to the original details. It is comfortable in the heat and I'm glad I finally got the chance to make up this birthday gift fabric. Thank you, Karen! Two years isn't *too* bad, right? Between this and my giraffe print cowl top I feel like I am stashbusting all over the place.

All photos are here and the pattern review is here.

Monday, July 12, 2010

Stashoholism Confessional: G Street Fabrics

G Street Silk Jersey 7-10-10 G Street, 7-10-10

After not having access to a car for six months I finally broke and signed up for Zipcar, which offers hourly rental on cars parked throughout the city, because G Street Fabrics was having a "Scissor Sharpening Event" and I really wanted my scissors sharpened. I was not the only one. I think the sharpening team they brought in (a husband and wife) was a little overwhelmed. There was a forest of scissors piled at their feet when I stood in line to hand over mine and they'd been there less than an hour. They had already reached the point of telling people their scissors wouldn't be ready until Sunday or Monday. I was a little concerned because I had rented a car specifically for the purpose of getting my scissors sharpened. Rental is quite expensive and I didn't want to have to pay for a car again the next day. I explained my situation and they kindly said they'd make sure that my scissors would be done in time for me to return the car.

Fashion Sewing Club has gone on summer hiatus in the past, but this year it has gone year-round, so I got to attend and see people I hadn't seen in ages. The topic was beach wear. Mmmmmmm, beach.

I had told myself no fabric, but I am weak. The $2.97/yd table was piled high and among the piles were many colors of rayon knits. I normally stay away from rayon knit because it is generally too lightweight for my taste and pills within a few washes. However, drapey, ruffly, flouncey t-shirts are the style right now and rayon knits are great for those. So I got four colors.

There was a sale on, so silk novelties were at $5.22/yd (normally $6.97). I saw a woman holding up that silk jersey and I started sending her "Don't buy that" rays with my mind. Luckily, she walked away. It appears that this border print motif was printed as a repeating panel on the jersey, rather than with the border along the selvage, which makes sense because then you keep the stretch along the cross-grain. For sale, G Street had cut the panels apart, each about a yard in length. There were three panels on the table. I got all three.

I'd like to make this up soon, but am in a bit of a dilemma for a pattern. There are two issues. First, the motif (fabric width) is about 50 36 inches long (*edit* Duh! I am always mixing up length and width). That is a stumpifying mid-calf length on me and I can't use the entire length of the motif. Second, I think I would like to use as much unbroken print as possible, but that means a dress without a waist seam. I really need a waist seam. I was thinking maybe McCall 6069, on the left, which has a waist seam. But is that low back office inappropriate? There's also the possibility of just a simple tunic shape with a small cut-on sleeve, something like Butterick 5211, right, and a belt. Of course, I didn't think to pick up that pattern on Saturday at Joann while it was on sale! And now the more I look at it, the more I think it is the best choice. Dangit!

Patterns, 7-10-10

Here are the patterns I did pick up. The two New Looks were sort of impulse purchases. I like the basic shape of the dress with the collar variation, and the skirt is really cute and could be an alternative to a pencil skirt. I like the interesting but office-appropriate B5353 Muse dress with the neck binding (I've had good luck with that pattern line in the past); the princess seams will be flattering and the skirt is not overly fitted. I like the faux wrap look of B5485. And a nice tee variation like B5497 is always appreciated (maybe for one of my new rayon knits...).

=============================

Pre-Wash Batiste When I mentioned that I had bought 10 yards of batiste and was in a dilemma as to how to pretreat it, several people recommended folding the length into thirds or quarters and then sewing all the thicknesses together at the selvage and the fold (TracyKM and Rose posted at almost the same time).

Genius suggestion! The photo at right is the result after washing. With the fabric folded in half selvage-to-selvage, I folded the length into quarters. I stitched on my longest stitch length in a dark thread so it would be easier to unpick (it is slow going to unpick through all those layers, though) and tossed in the washer and dryer. It came out of the dryer still slightly damp on the inside so I hung it up on the shower rod in the spare bathroom for a few days to finish drying.

The last time I washed a length of batiste it came out practically pleated, and it's a good thing I use it only for lining because no amount of pressing would completely eradicate all the wrinkle lines. The difference is huge! Thank you for the fabulous suggestion. I highly recommend this as a method for pre-washing long lengths of lightweight fabric.

Thursday, July 8, 2010

Simplicity 2594, Woven Cowl Top

S2594 Thumbnail

I love a cowl top--very flattering for a small bust--and Simplicity 2594 has some nice design elements. I like the pleats at the front shoulder and the shoulder yoke with back gathers. I cut the front on the bias and the back on the grain, because I wanted to deal with as little bias as possible. I probably should have cut the back on the bias as well, however, as the hang in the back is not nearly as nice as in the front. I bought this polyester chiffon giraffe print fabric online ages ago, probably sometime in 2007, intended to be part of an "Orange Juice and Lemonade" orange and yellow wardrobe. Stashbusting is good (although I still have quite a bit of this left). It's lined with what I believe is a rayon lining, from Jomar sometime last year for $1/yd.

This is part of my endless combinations wardrobe plan of pencil skirts and blousier tops. A red and an orange skirt are both part of the plan (red is done), and this will go with either. Unfortunately, once summer hit I realized that my wardrobe plan is nonsensical as wearing a high-waisted pencil skirt in high heat causes me to sweat intensely where the waistband stifles my torso and arrive at work beyond damp and into dripping. No wonder I make so many dresses! So I can basically only wear these outfits during our two week Spring (if that) and two week Fall (more reliable). Some of the skirts will go into winter with boots, but the tops are sleeveless and springy. *sigh*

Front Facing Although this pattern has nice design and the pieces matched up fairly well, being a Simplicity pattern it is missing some things such as a partial front facing. If you self-line the top, you don't need a front facing, but I was working with a sheer polyester chiffon that needed an opaque lining. I cut a front facing of fashion fabric to an inch below the armscye. When sewing the front neck seam I layered the pieces as: front facing, fashion fabric front, lining, and then flipped the front facing to the inside.

I don't have the instructions right now to refer to, but I am sure they were nonsense. I constructed this by first putting together the front, lining, and facing as described above, then basting the back and back lining together at the upper edge.

Back Yoke Application Next, sew the front shoulder seam by layering: yoke fashion fabric, front (with front facing flipped to inside so it is front fashion, front lining, front facing) all pieces pleated as one, and yoke lining. This means you have a total of five slippery layers at the shoulder while trying to sew the pleats into the front shoulder, so pin well. Others had mentioned that the markings for the pleats don't end up working out very well when you have a bias piece, so I mostly ignored them and just did my best to put three pleats into the front shoulder approximately evenly on both sides.

Next, I sewed the yoke lining to the back unit (back fashion and lining basted together at the top), lining fabric against lining fabric. I was hoping to be able to stitch the yoke as a burrito-type thing (side seams are still free at this point), but it is too short to roll up the entire blouse into it. So instead I turned under the yoke fashion fabric and topstitched in place. (I believe the instructions tell you to sew the fashion fabric first and then turn under and topstitch the lining; MUCH easier to topstitch the outer fabric instead so you can actually see what you're doing.)

Side French Seam Once the front, yoke, and back were all put together, I did French seams for the sides, catching in all the layers--fashion fabric, front facing, and lining--as one.

That just left the hem and the armscyes. I did not do a great job with the armscye; I don't know if the bias foiled me here or what but the gray lining pooches out in the back. I'm sure I should pick it out and re-do it. Maybe in the Fall when I can actually wear this outfit!

Coin Weight In wearing, I found that it was hard to keep the front cowl arranged nicely, as the neckline wanted to spread open and fall off the shoulders. Very annoying. I experimented with twill tape to see if I could ease the back neck into it to shorten and stabilize, but it didn't do anything. So then I started thinking about what I could do to the front to keep it there and hit upon the idea of using a weight. I used to have a ready-to-wear cowl top that had a weight at the bottom of the front facing, so I am sure it is a common thing. I sewed square of stable fabric with a heavy coin inside it (a $5 coin from Hong Kong!) to the inside of the front facing and it now wears perfectly.

Side Back I'm really happy with this top. The design elements lived up to their promise and it was not that hard or time-consuming to sew, and if you use a more stable fabric it would be even easier (though there is a limit to how much body a fabric can have and still look good). It really needs the belt to look nice--at least on my figure. On a bustier woman you might get away with no belt.

I really need to up my game on bias projects. The armscye and the hem on this are pretty bad (the hem is uneven, which I hide by blousing over the belt but you can still totally tell). I've never really bothered to figure out how to sew bias nicely and just avoid it whenever possible. It does create a nice drape, though.

All photos are here and the pattern review is here.