Friday, May 23, 2008
The Magic and Generosity of the Internet
Thank you everyone so much for your good thoughts, good vibes, and good wishes. Isabelle found me a place to stay with a fellow sewist. I leave this afternoon, and I found out from my mom last night that they're definitely not arriving in Paris until Sunday so I am very grateful!
Wednesday, May 21, 2008
Shameless Request for Couch in Paris
Soooo, don't hate me but...I'm going back to Paris. Friday. For work.
In a bizarre yet wonderful coincidence, my mother is leaving the country for the first time in over a decade to go to Paris. This weekend. It's so cool!
Here's the thing. I arrive Saturday night. My work hotel starts Sunday night. My mom is traveling with friends and has a place for me to stay, IF they arrive. She used to work for an airline and is traveling with airline friends on standby, so their arrival in a timely manner is iffy, probably 50/50. So I need to line up a backup place to stay on Saturday. I'm trying to avoid booking a hotel, because I won't know until Saturday if they're going to get there or not, so I will have to pay either way because I'll be outside the cancellation window. Since there's a good chance I won't end up staying in the hotel I don't want it to be too expensive, but since there's *also* I good chance I *will* end up staying in it, I don't want it to be too far away or grubby either. The only hostel that has openings has absolutely dismal reviews.
I have actually hosted a couple of people in DC through the Couchsurfing website, but have not had any luck finding a place to (possibly) sleep in Paris through it, and lovely Isabelle of Kitty Couture is going to a family reunion for the weekend (so I'm double glad I got the chance to meet up with her last week!).
Soooo, can anybody in Paris offer me a tentative couch to sleep on? I will store my luggage at Gare du Nord and let you know by afternoon if I need to stay, and will be completely on your schedule as to when to arrive.
Next post will be about sewing, I promise! (Or possibly Paris.)
Sunday, May 18, 2008
Stashoholism Confessional: Paris Edition
Well, I had so much fun blogging my Paris fashion! Thanks for playing along with me. Eventually, there will be travel blogging at Travel at Home and Abroad. The posts are actually all written, but I need to edit and post pictures *and* I'd really like to put up Vietnam first, since I went there first. But those posts are not written. So who knows. I'll post an alert when it goes up.
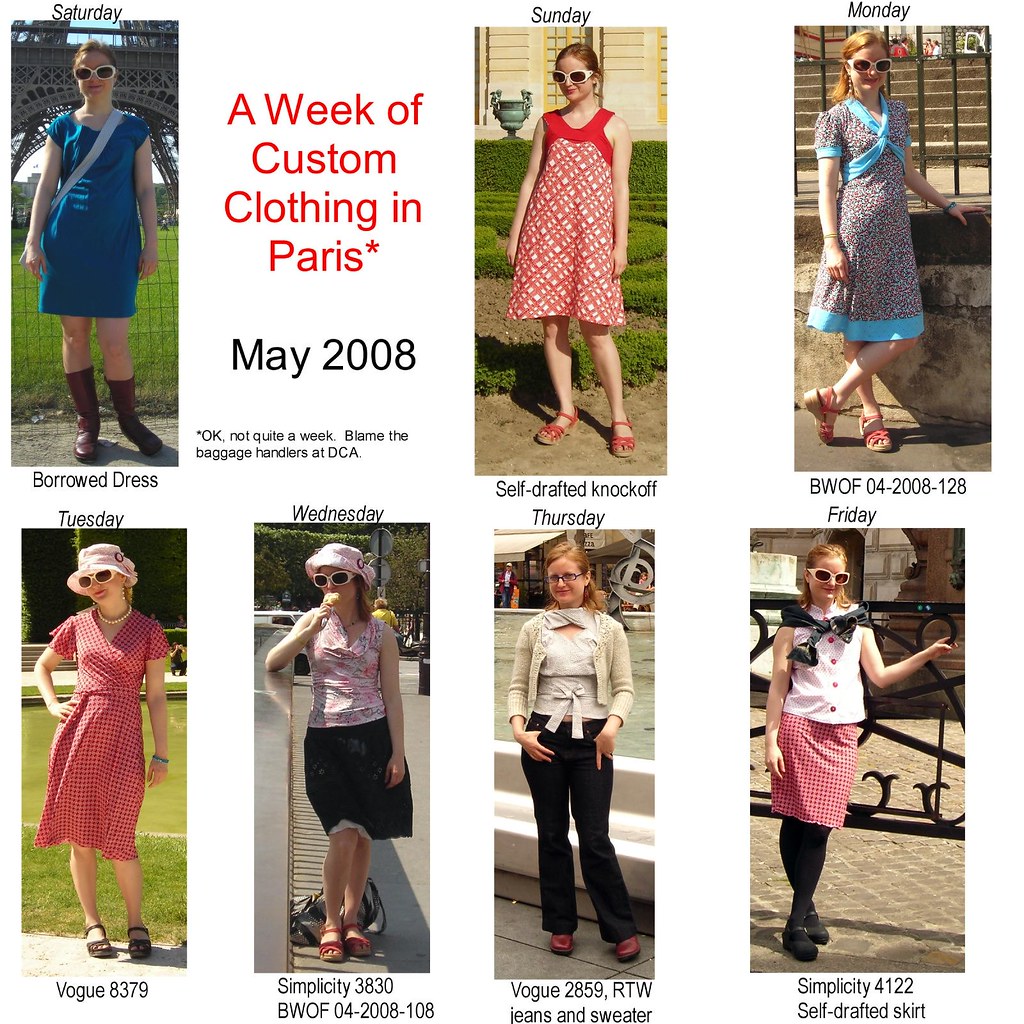
Here's a recap:
And now, the good stuff! Here are my fabric purchases. Only two, but I think all of us with stash problems have learned the hard way that more isn't always better. Sometimes it's just more. (I lifted that from the "Sabrina" remake, which I watched before I left to feed my excitement about my trip.)

The one on the left is from Dreyfus, purchased while I was with Karen. It's a beautiful polished cotton and I love the print. I didn't think to put anything on there for scale, but the polka dots are about 2 1/2 inches in diameter. They're big. And cute. I got three meters, with the idea of making the BWOF 04-2008-127 Marilyn-esque exclusive design. It may be my birthday dress this year. Total cost was around 13E.
The one on the right is an embroidered cotton batiste from Reine. More blue! I always think I should branch out from blue, but you know, it is just my favorite color and that's all there is to it. Around 21E for two meters. It will be a shirtdress, I think. I'm considering tackling Simplicity 4122 again, sleeveless again with a wide ruffle and then some layered ruffles at the sleeve (based on an idea from an expensive designer garment I saw in Printemps) and using an elasticated shirring in the back to give it some shape, or else making the bodice and skirt separate. I don't know. I need to think on it some more. If you have any shirtdress ideas with a slimmer cut skirt (at only 2 meters and around 50 wide, I can't eke out a full-skirt) let me know. A pear shape can be tough to dress sometimes.
Here's a recap:

And now, the good stuff! Here are my fabric purchases. Only two, but I think all of us with stash problems have learned the hard way that more isn't always better. Sometimes it's just more. (I lifted that from the "Sabrina" remake, which I watched before I left to feed my excitement about my trip.)

The one on the left is from Dreyfus, purchased while I was with Karen. It's a beautiful polished cotton and I love the print. I didn't think to put anything on there for scale, but the polka dots are about 2 1/2 inches in diameter. They're big. And cute. I got three meters, with the idea of making the BWOF 04-2008-127 Marilyn-esque exclusive design. It may be my birthday dress this year. Total cost was around 13E.
The one on the right is an embroidered cotton batiste from Reine. More blue! I always think I should branch out from blue, but you know, it is just my favorite color and that's all there is to it. Around 21E for two meters. It will be a shirtdress, I think. I'm considering tackling Simplicity 4122 again, sleeveless again with a wide ruffle and then some layered ruffles at the sleeve (based on an idea from an expensive designer garment I saw in Printemps) and using an elasticated shirring in the back to give it some shape, or else making the bodice and skirt separate. I don't know. I need to think on it some more. If you have any shirtdress ideas with a slimmer cut skirt (at only 2 meters and around 50 wide, I can't eke out a full-skirt) let me know. A pear shape can be tough to dress sometimes.
Friday, May 16, 2008
Paris, Day 7: Friday at L'Opera
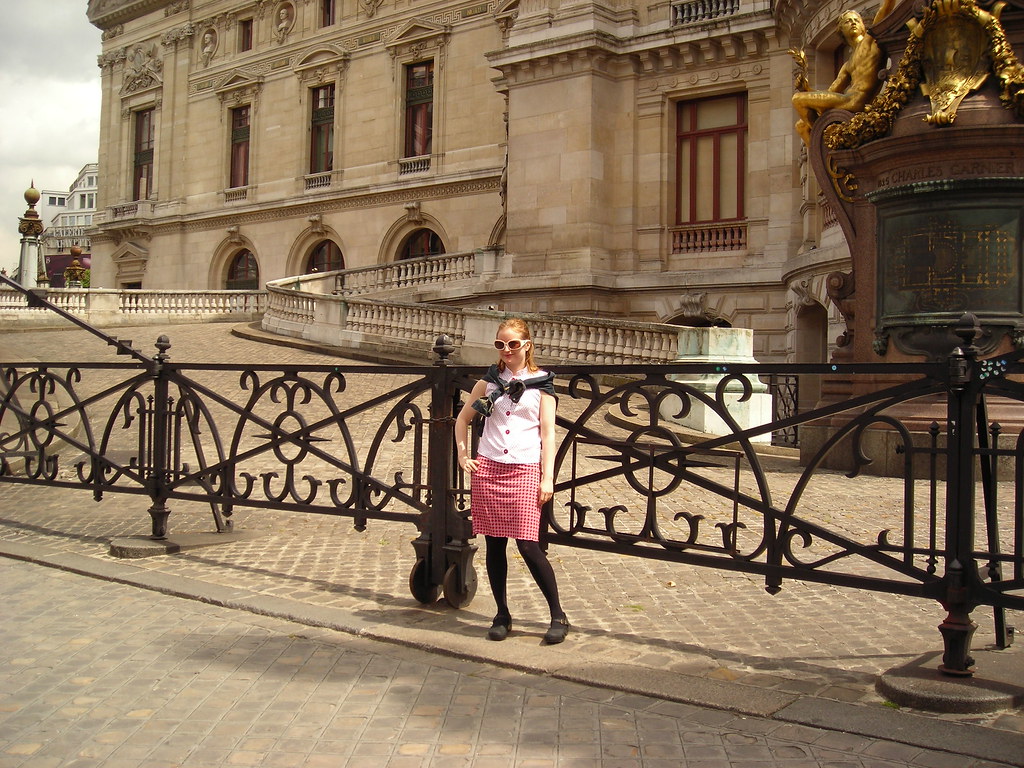
Today was our last day in Paris, and we decided it was fitting to devote it to shopping. I did *have* to take us to some picturesque background for the fashion photo of the day. So here I am at the Opera house. The weather was utterly variable today--a little bit rainy, a little bit hot. I could have worn footless tights and sandals, but eh, I was ok in full tights and mary janes. The skirt is the same fabric as the DVFish dress, and the line suits the blouse much more than the fuller navy skirt. At home I have never in my life tied a layer around my neck, but I felt very insouciant and Parisian tying my denim jacket over my shoulders. Everyone does it here. Well, with sweaters, not denim jackets. But I was still an approximation of Parisian.
S's husband had requested (!) that she buy a dress in Paris so she, you know, reluctantly agreed. As for me, on my very first visit to Paris when I was 17 years old I promised myself a Parisian dress. I was on a package tour with my less-than-mobile grandmother and I didn't get a chance to fulfill my wish.
Then when I came back three years ago just for 24 hours at the tail end of my Scandinavia trip because I was feeling the itch for Paris my Parisienne friend Rebecca took me to some boutiques where I discreetly suffered a heart attack at the 100E+ prices and luckily nothing fit--trop grande a la poitrine. You'd think with the alleged French appreciation for petite boobies I wouldn't have the same trouble I have at home of everything being too big in the bust, but it was the same.
I had my two cuts of fabric that will become dresses, but the promise I made to myself umpty-hum-over-a-decade years ago was still outstanding, so I was casually looking as well. Our first stop was Printemps, which S had been lulled by the guidebooks into believing was the "affordable" Paris department store. *cough* It was amazing to see high end designers up close (I went straight for the Sonia Rykiel, as I love *everything* she sends down the runway) but she quickly concluded that Printemps was a bit out of our price range. I was pleased while wearing my yoked blouse with tucks that there was a whole lot of yoking and tucking going on in the latest styles by the latest designers.
Instead, we went to the little mall next door and the cheap shops across the street where she found a cute linen dress and a top. I wasn't sure about buying my dress after all. Everything is in the current babydoll/trapeze line, which is very trendy but (1) the perpetual sewist's refrain of "I could make that" was echoing in my head, and (2) my vaunted Paris dress will have a life cycle of two years max if I buy now.
We later went to Rue de Levis (there is a Levi's store on there, but we don't know if it was named after blue jeans, somebody else named Levi, or the ancient Jewish tribe) where I tried on a mod/flapper rayon stretch dress with a drop waist that just made me a little too uncomfortable about the hip fluff to pay $50 for it.
I did, though, finally buy my Paris dress. It is in a trapeze line, and I will have to take it in a little under the arms because even the S was too big in the bust, but it's a lovely navy linen (which just happens to go with the wardrobe), made in Europe (Italy), and every time I wear it I will relish that I am finally, finally in my Paris Dress! (And at 29E, I don't feel so bad that it's a trendy line. Though I'm trying to avoid converting that into dollars in my head.)
This picture is horrid--the girls have both left and this is me at the end of a 7th long day of sightseeing using the self timer with the camera on a shelf inside the cabinet that holds wine glasses and without any kind of video editing program. But after all that talk, I felt like I couldn't leave you totally hanging.

I leave very early in the morning for the airport, and then it will be "Au revoir, mon Paris"...for, um, a week. I'll be back for work less than 7 days after I get home. Weird, right? BUT! My mom is leaving the country for the first time in well over a decade and it just so happens that she's coming to Paris and it just so happens that I can arrange my work trip so we overlap for a day. Isn't that tres cool? I won't have a computer/internet for that trip, but I'll try to do some fashion pics to post when I get home.

S's husband had requested (!) that she buy a dress in Paris so she, you know, reluctantly agreed. As for me, on my very first visit to Paris when I was 17 years old I promised myself a Parisian dress. I was on a package tour with my less-than-mobile grandmother and I didn't get a chance to fulfill my wish.
Then when I came back three years ago just for 24 hours at the tail end of my Scandinavia trip because I was feeling the itch for Paris my Parisienne friend Rebecca took me to some boutiques where I discreetly suffered a heart attack at the 100E+ prices and luckily nothing fit--trop grande a la poitrine. You'd think with the alleged French appreciation for petite boobies I wouldn't have the same trouble I have at home of everything being too big in the bust, but it was the same.
I had my two cuts of fabric that will become dresses, but the promise I made to myself umpty-hum-over-a-decade years ago was still outstanding, so I was casually looking as well. Our first stop was Printemps, which S had been lulled by the guidebooks into believing was the "affordable" Paris department store. *cough* It was amazing to see high end designers up close (I went straight for the Sonia Rykiel, as I love *everything* she sends down the runway) but she quickly concluded that Printemps was a bit out of our price range. I was pleased while wearing my yoked blouse with tucks that there was a whole lot of yoking and tucking going on in the latest styles by the latest designers.
Instead, we went to the little mall next door and the cheap shops across the street where she found a cute linen dress and a top. I wasn't sure about buying my dress after all. Everything is in the current babydoll/trapeze line, which is very trendy but (1) the perpetual sewist's refrain of "I could make that" was echoing in my head, and (2) my vaunted Paris dress will have a life cycle of two years max if I buy now.
We later went to Rue de Levis (there is a Levi's store on there, but we don't know if it was named after blue jeans, somebody else named Levi, or the ancient Jewish tribe) where I tried on a mod/flapper rayon stretch dress with a drop waist that just made me a little too uncomfortable about the hip fluff to pay $50 for it.
I did, though, finally buy my Paris dress. It is in a trapeze line, and I will have to take it in a little under the arms because even the S was too big in the bust, but it's a lovely navy linen (which just happens to go with the wardrobe), made in Europe (Italy), and every time I wear it I will relish that I am finally, finally in my Paris Dress! (And at 29E, I don't feel so bad that it's a trendy line. Though I'm trying to avoid converting that into dollars in my head.)
This picture is horrid--the girls have both left and this is me at the end of a 7th long day of sightseeing using the self timer with the camera on a shelf inside the cabinet that holds wine glasses and without any kind of video editing program. But after all that talk, I felt like I couldn't leave you totally hanging.

I leave very early in the morning for the airport, and then it will be "Au revoir, mon Paris"...for, um, a week. I'll be back for work less than 7 days after I get home. Weird, right? BUT! My mom is leaving the country for the first time in well over a decade and it just so happens that she's coming to Paris and it just so happens that I can arrange my work trip so we overlap for a day. Isn't that tres cool? I won't have a computer/internet for that trip, but I'll try to do some fashion pics to post when I get home.
Thursday, May 15, 2008
Paris, Day 6: Thursday at Centre Pompidou
Our run of good weather came to end yesterday evening at about 7 when the skies opened up. We had checked the weather and were prepared with our umbrellas, while the locals cowered at the foot of the metro stairs, unable to emerge out onto the street. Today continued cloudy and cool (though very little rain, thank goodness). This afternoon it cleared up and warmed up, so I'm hoping tomorrow (last day, sob) will be nice.
I wore jeans and boots to deal with the cold and wet, and topped my Vogue reissue from 1935 with the perfect little sweater I found at Goodwill(!) for $5. I'd gone to Goodwill hoping to find a wool sweater in an appropriate color that I could felt and shrink and then make into a shrug. I did that too, but this little one went with my wardrobe so well I decided to bring it as a layering piece.
We went to the Centre Pompidou to see the building and eat our crepes in the (surprisingly terrible) courtyard. We opted not to go in, but I had to visit the famous fountain. The fountain is on a much smaller scale than it appears in photos, one of the only things in Paris that has that effect, I've found.

From there we headed to Monmartre, and I had to stop into Reine (thank goodness it was open today). I got one cut of a beautiful embroidered cotton batiste. I spent a lot of time fondling the Liberty of London prints, but ultimately couldn't cough up the 21,95E/metre. I took a couple of surreptitious pictures of the mannequins.

I wore jeans and boots to deal with the cold and wet, and topped my Vogue reissue from 1935 with the perfect little sweater I found at Goodwill(!) for $5. I'd gone to Goodwill hoping to find a wool sweater in an appropriate color that I could felt and shrink and then make into a shrug. I did that too, but this little one went with my wardrobe so well I decided to bring it as a layering piece.
We went to the Centre Pompidou to see the building and eat our crepes in the (surprisingly terrible) courtyard. We opted not to go in, but I had to visit the famous fountain. The fountain is on a much smaller scale than it appears in photos, one of the only things in Paris that has that effect, I've found.

From there we headed to Monmartre, and I had to stop into Reine (thank goodness it was open today). I got one cut of a beautiful embroidered cotton batiste. I spent a lot of time fondling the Liberty of London prints, but ultimately couldn't cough up the 21,95E/metre. I took a couple of surreptitious pictures of the mannequins.

Wednesday, May 14, 2008
Paris, Day 5: Wednesday at Notre Dame
Though I met Karen by Notre Dame on Monday, I hadn't had the chance to go in or climb the tower. We decided that we should climb the tower (all 400 steps) first thing today while we were still fresh. It was a good call, as the steps were no problem for us, so that we could enjoy the spectacular views and getting up close and personal with the gargoyles.

Even though I had generously provisioned myself with a pain au chocolat to go with my yogurt for breakfast (approximate calorie count: 1000) I was pretty well wrung out after the climb and needed to reboot the calories. Luckily we were only a few blocks from Berthillon, probably Paris's most famous ice cream maker. I got a double cone--caramel with salt and butter and strawberry gelato. They were divine. I couldn't stop eating long enough to have my picture taken.
When packing, I was debating a little whether to actually include the eyelet BWOF skirt. I like it, but it doesn't look great with the Simplicity yoked top and having a skirt that matches only one top (the 1935 reissue) is kind of pointless. I dug deep into my closet and produced this top, from my UFO Watch 2008 project. It was perfect for the theme and looked great with the skirt. This was the first time I'd had a chance to wear it. Note that the way I posed made it snow down south. Oops.

Tuesday, May 13, 2008
Paris, Day 4: Tuesday at the Musee Rodin
By yesterday evening it had gotten cloudy, cool, and windy and I think I felt a little spit of rain so I wanted something that wouldn't be too chilly in the evening. It has sleeves and is a little below my knees so I decided on my Vogue DVF-knockoff for the day. This dress is very cute but easy to wear and even in wind there's no danger of flashing because the skirt is full and overlaps quite a bit. I felt very cute in my "Target" dress (the print reminds me very much of Target) and rtw hat I got from Filene's that goes with the wardrobe perfectly.


Monday, May 12, 2008
Paris, Day 3: Monday at Montmartre
Karen and I met up for some fabric shopping today. Unfortunately, it was a public holiday and Reine and its creepy half-size mannequins were closed. We did manage to sate our fabric appetites at Dreyfus, though. Here's what I was wearing (it's number 128 from the April BWOF plus section; I used a top pattern from 8/07 with the same shape in my size and the collar/scarf from the 4/08 magazine):

And here are Karen, Isabelle, and me at a cafe, taken by a very attractive waiter. I kind of wanted to ask him to take a picture with me, but that would have been weird, right? Right?
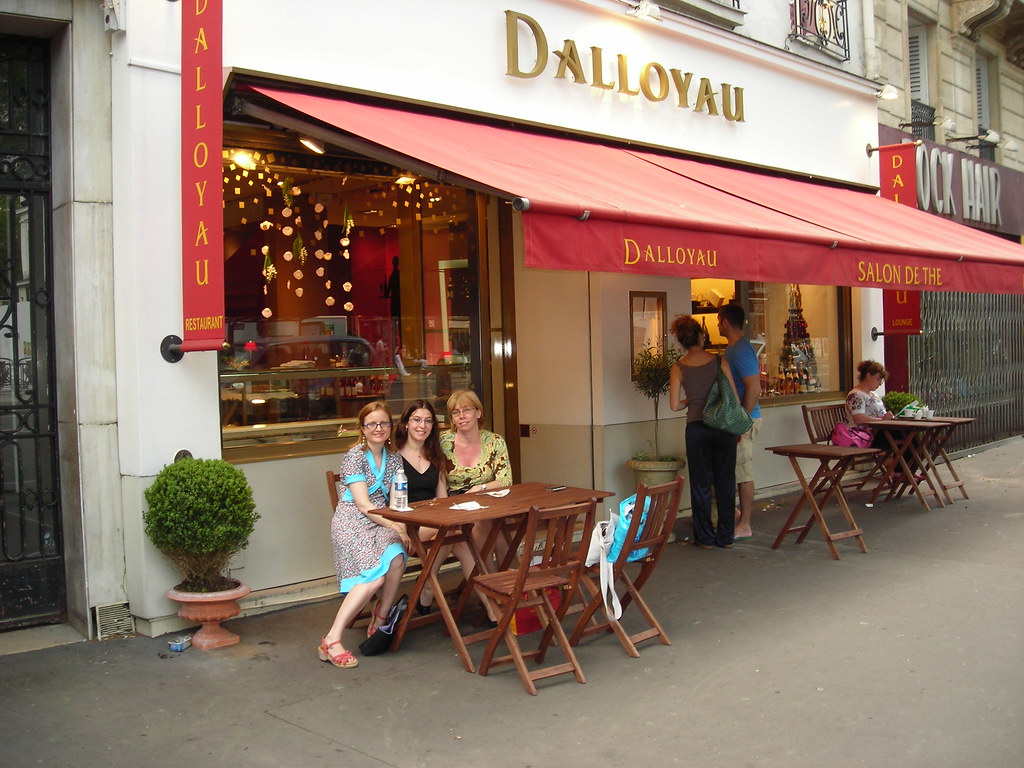

And here are Karen, Isabelle, and me at a cafe, taken by a very attractive waiter. I kind of wanted to ask him to take a picture with me, but that would have been weird, right? Right?

Paris, Day 2: Sunday at Versailles
I spent the morning shuttling back and forth between the airport to pick up my luggage. The first thing I did was put on sandals to go with...the Lilly Lemon knockoff! It ain't perfect, folks. I'll talk about its flaws in more detail when I get home and take photos and write it up. But from a distance and to the untrained eye, it looks pretty darn cute.
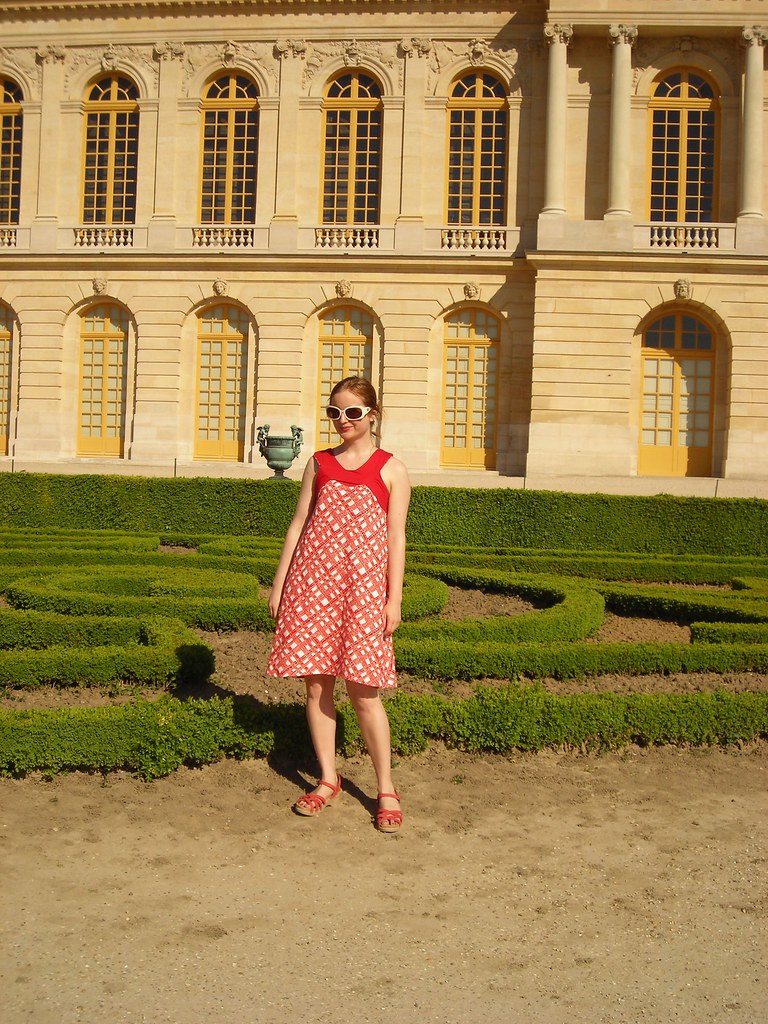
And here's the back, complete with the little bow (I think that's my favorite part):


And here's the back, complete with the little bow (I think that's my favorite part):

Paris: Day 1, Saturday at the Tour Eiffel
So the apartment we've rented comes complete with a computer and high speed internet so I thought it would be fun to post my Paris wardrobe as I go. I don't have an arrival picture because my flight was an unbelievable ordeal (12 hours later I was still in New York) and I'm pretty sure you could have smelled me through the screen by the time I arrived...sans luggage.
So the first day was not part of my Paris wardrobe, but a rather cute jersey top/dress (top on her 5'7" self, dress on my 5'1" self) co-opted from one of my travel companions. It's so cute that I may have to try to copy it when I get home, if I can ever find any plain cotton or cotton blend jersey that I like. I am so fussy about it. Here I am at the Tour Eiffel. Please note the boots. They take up so much room in the suitcase that I wore them on the plane to save space. This was a decision I would come to regret after wearing them for about 30 hours straight. Please note that it was about 80 degrees in Paris. Oy.

So the first day was not part of my Paris wardrobe, but a rather cute jersey top/dress (top on her 5'7" self, dress on my 5'1" self) co-opted from one of my travel companions. It's so cute that I may have to try to copy it when I get home, if I can ever find any plain cotton or cotton blend jersey that I like. I am so fussy about it. Here I am at the Tour Eiffel. Please note the boots. They take up so much room in the suitcase that I wore them on the plane to save space. This was a decision I would come to regret after wearing them for about 30 hours straight. Please note that it was about 80 degrees in Paris. Oy.

Thursday, May 8, 2008
Bargaining for Fabric
In our third podcast, Cidell and I talk about the April edition of BWOF. Yeah, we're a little behind because I keep jetting around the world. So I know I've kept you in suspense for way too long, but I'd like to introduce the fabrics I bought in Vietnam:

You can hear the kind of hard bargain I drove for them in the podcast. One thing I didn't get a chance to explain is how the stalls work. They have short lengths (about 2 meters) of lots and lots of fabrics. If you want a short length, you just get what's there. If you want a longer length, they get on the phone and call someone who magically appears a few minutes later with it. How they manage to keep track of hundreds of varieties of fabric and where in the world they store the extras is one of life's mysteries.
The swiss dot with orange polka dots was my first purchase in the Mekong Delta town of My Tho. I had a translator with me as that was the work part. I didn't bargain though--at around $3/yd, I couldn't ask to go any lower.
The stretch silks I got at the Ben Thanh market in Ho Chi Minh City (Saigon). I bargained for Cidell's fabric and ended up paying around $5 yard. When the asking price at the next stall, where I got the rest of the silk, was only around $3.50 yard, I was no longer quite so proud about my bargaining skills. I just paid their asking price, because I thought it would be obscene to get it any cheaper.
There is more fabric than you can shake a stick at. Here's the fancy stuff:

Here I am in hog heaven. Check out the slightly dazed, slightly manic grin.

And here's the girl who sold me the fabric at non-tourist-fleecing prices (I think):

I haven't decided what all it will be yet, but I think the blue floral might be the Duchess of Windsor dress from the March BWOF. I made it in a knit (and still haven't reviewed it) for Vietnam, and loved it:

fabric photos from the trip and all the photos from the trip.
You can download the podcast here, or listen to it below.
=======================================================
Cidell insists that I show you my Paris wardrobe. I leave in the morning so I don't have time to say anything about it. But a picture is worth a thousand words, right?


You can hear the kind of hard bargain I drove for them in the podcast. One thing I didn't get a chance to explain is how the stalls work. They have short lengths (about 2 meters) of lots and lots of fabrics. If you want a short length, you just get what's there. If you want a longer length, they get on the phone and call someone who magically appears a few minutes later with it. How they manage to keep track of hundreds of varieties of fabric and where in the world they store the extras is one of life's mysteries.
The swiss dot with orange polka dots was my first purchase in the Mekong Delta town of My Tho. I had a translator with me as that was the work part. I didn't bargain though--at around $3/yd, I couldn't ask to go any lower.
The stretch silks I got at the Ben Thanh market in Ho Chi Minh City (Saigon). I bargained for Cidell's fabric and ended up paying around $5 yard. When the asking price at the next stall, where I got the rest of the silk, was only around $3.50 yard, I was no longer quite so proud about my bargaining skills. I just paid their asking price, because I thought it would be obscene to get it any cheaper.
There is more fabric than you can shake a stick at. Here's the fancy stuff:

Here I am in hog heaven. Check out the slightly dazed, slightly manic grin.

And here's the girl who sold me the fabric at non-tourist-fleecing prices (I think):

I haven't decided what all it will be yet, but I think the blue floral might be the Duchess of Windsor dress from the March BWOF. I made it in a knit (and still haven't reviewed it) for Vietnam, and loved it:

fabric photos from the trip and all the photos from the trip.
You can download the podcast here, or listen to it below.
=======================================================
Cidell insists that I show you my Paris wardrobe. I leave in the morning so I don't have time to say anything about it. But a picture is worth a thousand words, right?

Monday, May 5, 2008
Yet Another McCall 5314 Wrap, With Bonus Origami Trim Tutorial
So I spent the weekend sewing my head off for Paris. I made the Milly knockoff, plus another dress, a blouse, and a skirt and finished a dress that still needed a hem band. I have another top cut out that I should be able to finish, and it would be great if I could also make a little shrug but not sure I'll get to that. So I *have* a mini wardrobe and will be entering the mini-wardrobe contest assuming I can find time to take and edit photos!
With the most recent sewing, my review backlog is up to about eight or nine projects! It's the photos that kill me. I did photos for my silk contest entry, Vogue 2859 (not that I am urging you to vote for me or anything) and for this project so I can at least post it.
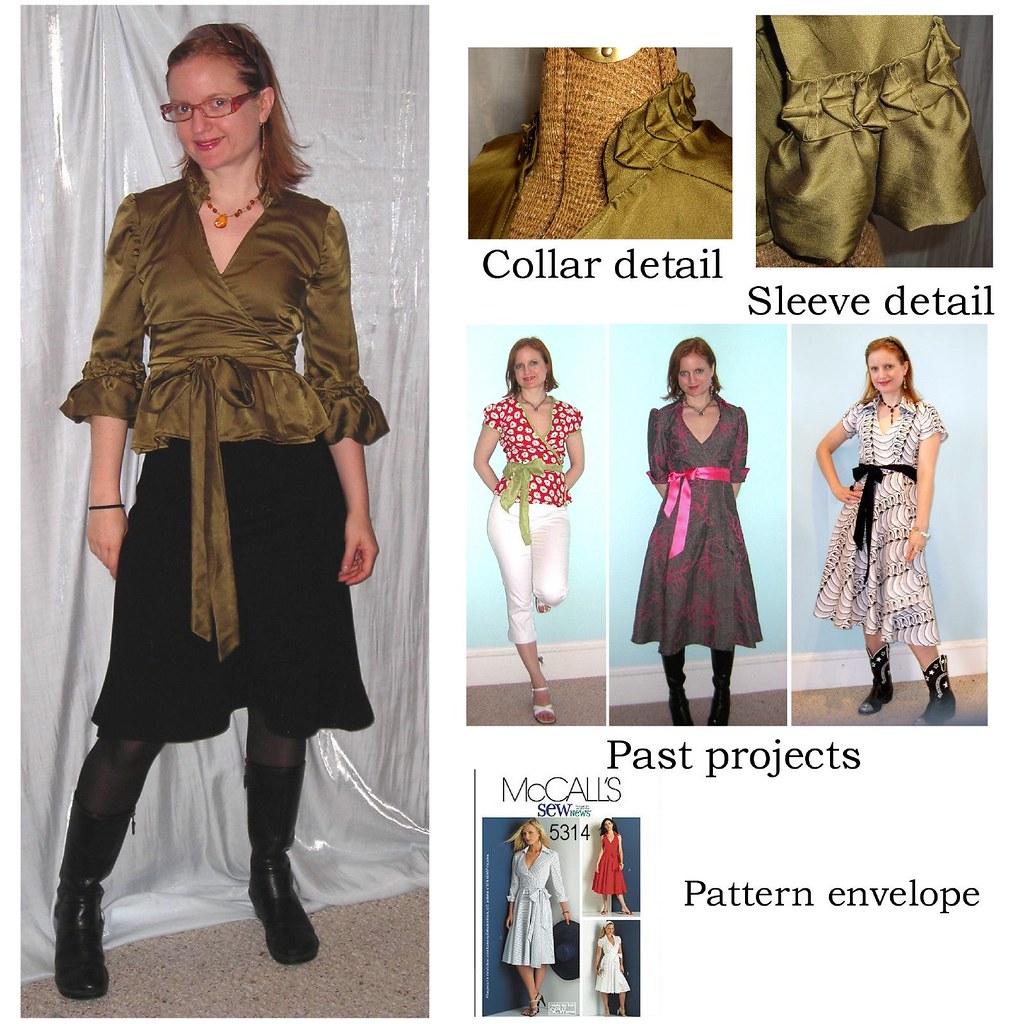
Obviously, I love McCall 5314. So when I was looking for a pattern to show off this gorgeous silk-cotton from Paron, a PR Weekend 2007 purchase, this one immediately came to mind. I have to say I'm doing OK using this haul up--7 of the 13 cuts have been used at this point, plus a portion of the batiste so really it's 8. Over half! This project is part of the Two Weeks of Winter Work Tops endeavor (still short a woven blouse even with this one, and the maroon gather neck tee was vomitous and needs to be reviewed as a "Did not work for me").
OK, so pattern chosen, fabric chosen. But how to make this "me"? How to dress up this basic pattern? I loved the trim on the evening coat in BWOF November 2007 #101 and had tucked it away in my memory for reference. This seemed the perfect project to bust out their technique. I also added little puffs at the ends of the sleeves. I really love this top, though it--like so many before it--is Too Special to wear too often or for ordinary occasions. This is the story of my life, or at least of my wardrobe. I finally wore it to work several weeks ago and felt like a princess all day.
To make the trim, first cut strips of fabric. Mine were three inches wide, with a total finished width of the trim at 1 1/4" (1/2 inch seam allowance). Start by making the strips into tubes, turning, and pressing with the seam in the center (rather than on one side).
Mark your pleats on the strips. I allotted 1 3/4 inches for the pleats with 1 inch in between.

Pin up your pleats.

Sew down your pleats. It was useful here to be working with two strips because I could alternate them on the machine without having to pull it out of the machine and cut the thread every time. Trimming those tiny threads that were left was a pain. Clipping threads is definitely one of my least favorite sewing chores. Of course, a bad sewing chore is still better than a good housekeeping chore!
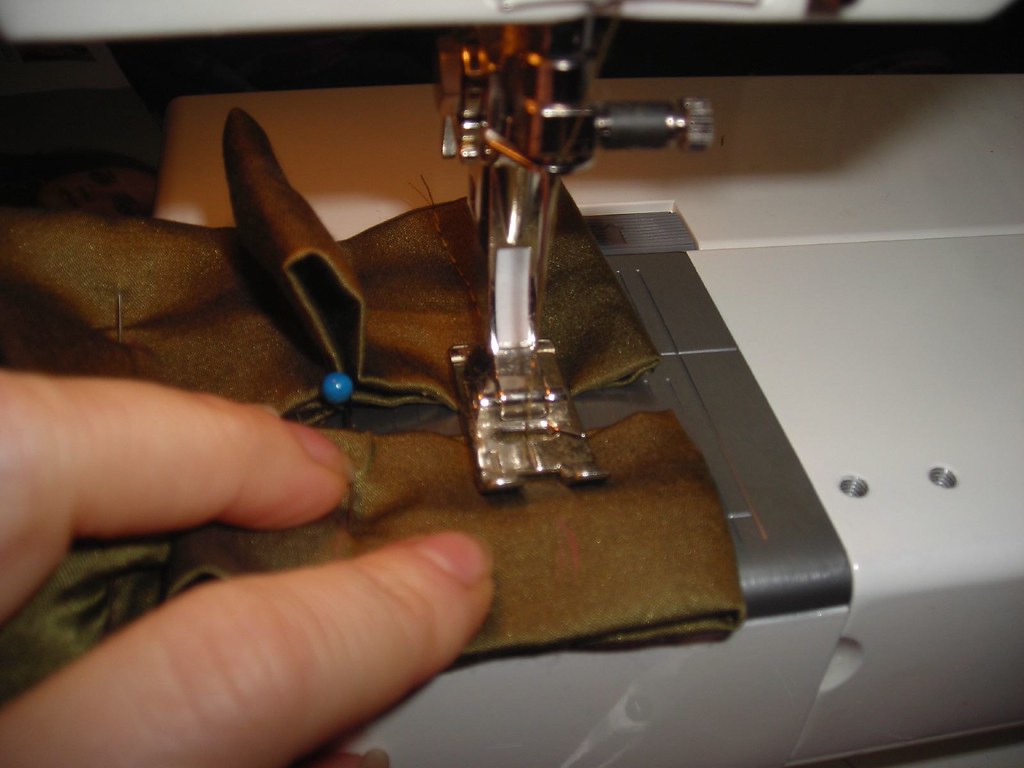
Press your pleats (doesn't matter which direction).

Here comes the time consuming part. At each pleat, fold the corners into arrows. Tack down each side of the arrow with an invisible hand stitch, coming up through the inside of the arrow and back down right outside it. Here's what it looks like on the underside. I took my project to the National Portrait Gallery and sat in the lovely courtyard to do this.
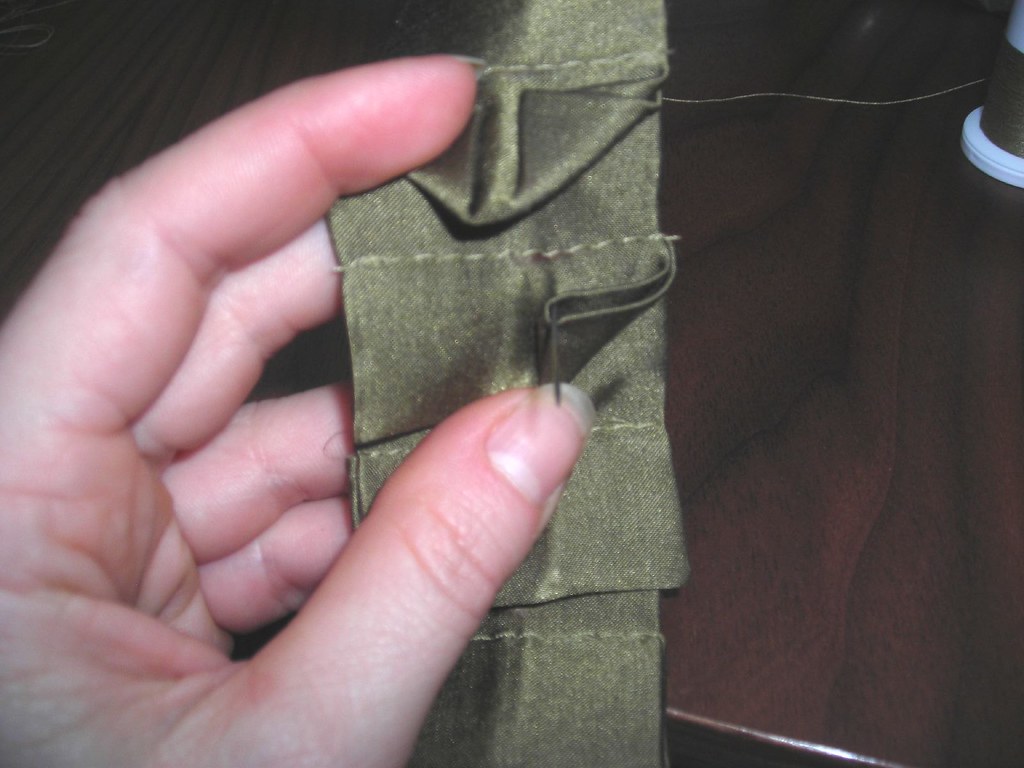
When you determine the length you need, finish the ends and then hand stitch in place on the garment. It creates a really luxe look, and adds panache to an otherwise basic garment (here's a closeup of it applied to a sleeve).
All photos of this and previous versions of the pattern are here.
With the most recent sewing, my review backlog is up to about eight or nine projects! It's the photos that kill me. I did photos for my silk contest entry, Vogue 2859 (not that I am urging you to vote for me or anything) and for this project so I can at least post it.

Obviously, I love McCall 5314. So when I was looking for a pattern to show off this gorgeous silk-cotton from Paron, a PR Weekend 2007 purchase, this one immediately came to mind. I have to say I'm doing OK using this haul up--7 of the 13 cuts have been used at this point, plus a portion of the batiste so really it's 8. Over half! This project is part of the Two Weeks of Winter Work Tops endeavor (still short a woven blouse even with this one, and the maroon gather neck tee was vomitous and needs to be reviewed as a "Did not work for me").
OK, so pattern chosen, fabric chosen. But how to make this "me"? How to dress up this basic pattern? I loved the trim on the evening coat in BWOF November 2007 #101 and had tucked it away in my memory for reference. This seemed the perfect project to bust out their technique. I also added little puffs at the ends of the sleeves. I really love this top, though it--like so many before it--is Too Special to wear too often or for ordinary occasions. This is the story of my life, or at least of my wardrobe. I finally wore it to work several weeks ago and felt like a princess all day.
To make the trim, first cut strips of fabric. Mine were three inches wide, with a total finished width of the trim at 1 1/4" (1/2 inch seam allowance). Start by making the strips into tubes, turning, and pressing with the seam in the center (rather than on one side).
Mark your pleats on the strips. I allotted 1 3/4 inches for the pleats with 1 inch in between.

Pin up your pleats.

Sew down your pleats. It was useful here to be working with two strips because I could alternate them on the machine without having to pull it out of the machine and cut the thread every time. Trimming those tiny threads that were left was a pain. Clipping threads is definitely one of my least favorite sewing chores. Of course, a bad sewing chore is still better than a good housekeeping chore!

Press your pleats (doesn't matter which direction).

Here comes the time consuming part. At each pleat, fold the corners into arrows. Tack down each side of the arrow with an invisible hand stitch, coming up through the inside of the arrow and back down right outside it. Here's what it looks like on the underside. I took my project to the National Portrait Gallery and sat in the lovely courtyard to do this.

When you determine the length you need, finish the ends and then hand stitch in place on the garment. It creates a really luxe look, and adds panache to an otherwise basic garment (here's a closeup of it applied to a sleeve).
All photos of this and previous versions of the pattern are here.
Subscribe to:
Comments (Atom)


.jpg)


