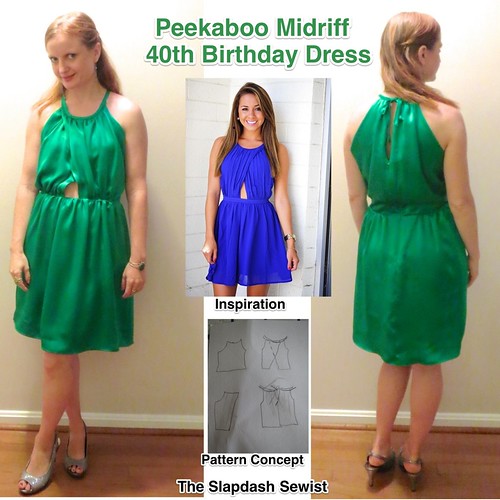
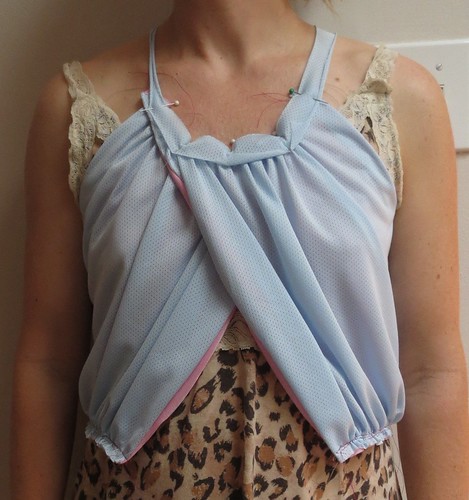
 I have been a little obsessed with cutouts lately, I'm not sure why. I put together a Pinterest board and the one that really struck my fancy was this (at right). And of *course* it had to be just a hosted image, with no link, information, back view, or front view without her hair covering the shoulders. But I got the gist.
I decided to make my birthday dress out of some gorgeous green silk I picked up at Paron in New York in August. The color is that of the famous Atonement dress, but having neither Keira Knightley's willowy body type nor the Gatsby existence calling for full-length green silk gowns (nor enough fabric either--I just barely eked this out with nothing to spare once I made my self bias tape), this dress it was.
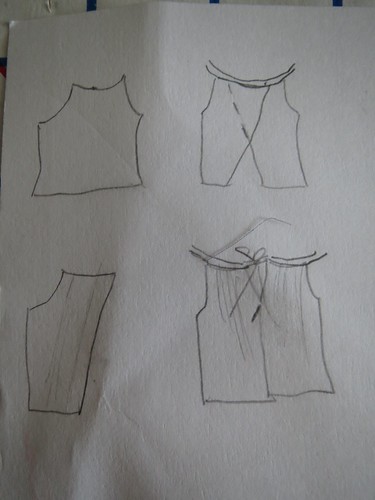
The first step was drafting the bodice. I drew up what the pattern should look like (sadly, I do not have a future career in fashion illustration!) and went from there.
I considered starting with McCall 5880, which has the right shape at the armscye as well as the look I wanted for the back. But it has an empire line, which I didn't want and I decided it would be more work than starting from scratch.
Then I remembered that I had turned my woven tee into a raglan version using the same method as for my knit tee. Perfect place to start!
I first created a full width front pattern (rather than cut-on-fold). I narrowed the front neckline 1/2 inch on each side. I marked 2 1/2 inches on each side of center front at the lower edge for my cutout. Then I made a diagonal marking from the corner of the neckline to my 2 1/2" mark.
I mocked up a quick muslin of the bodice front, using hair clips and pins to attach it to my raglan blouse and tried it on. Whoa. The opening was a bit much. You can't really tell from the top laying flat, but we were definitely in bra-flaunting territory.
So for muslin #2, I narrowed the width from center front to about 2 inches on each side, and rather than cut a straight diagonal line I curved it a bit to give more coverage. This muslin was what I was looking for, so I moved on to the drapey part.
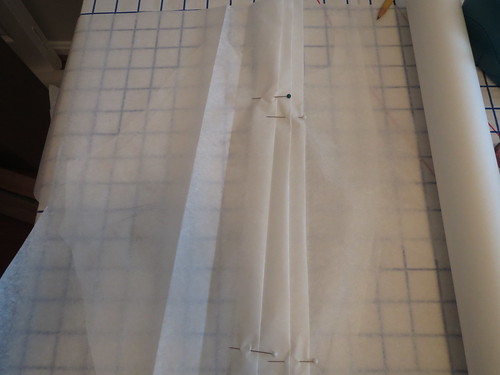
To get volume in the front, I first folded out three large pleats in my tissue paper to build in volume, then traced my pattern (the original pattern became the lining). I didn't have any particular measurement of volume in mind, so I wasn't too scientific about my pleats. Each pleat was probably about two inches wide (so, encompassing four inches of tissue because of the folds). I also rotated the bust dart to the neckline.
For the back, I made a diagonal cut from the neckline to the hem and added a wedge of tissue paper, as I didn't want additional volume at the back waist.
I cut out muslins of the front and back overlays and made a quick mockup of the full bodice--pretty much exactly what I wanted! The pattern drafting process ended up being much simpler than I expected.

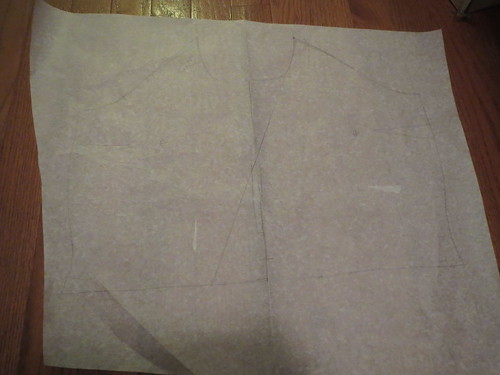
I cut the bodice and bodice lining from the fashion fabric because I didn't want the lining to roll over and show anywhere. Here you can see what the final pattern pieces looked like for the bodice.
I used the skirt from Simplicity 1796 and I cut the skirt lining from Butterick 5315. For the skirt lining, I made a facing for the center front at the opening, so there wouldn't be any lining show through.
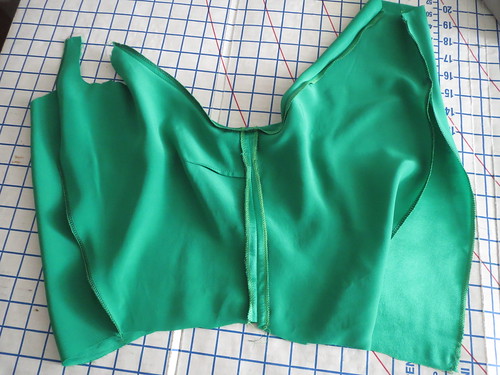
Construction was pretty simple. I started by sewing the side seams of the outer and lining pieces.
Next, I sewed the outer pieces and lining together at the armscye, diagonal center front, and upper center back, and turned and pressed.
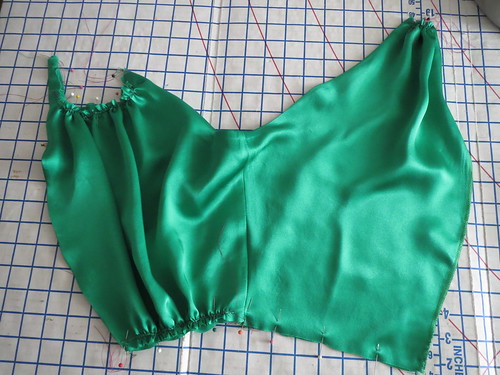
Then I put in the basting stitches for gathering on the outer pieces and pulled the gathering threads to match the outer piece with the bodice lining, basting the outer fabric to the lining fabric at the neckline and the lower edge. I left the lower edges separate about 2 inches from center back.

Once basted, I matched up the centers front at the neckline and pinned the left and right halves of the bodice together.
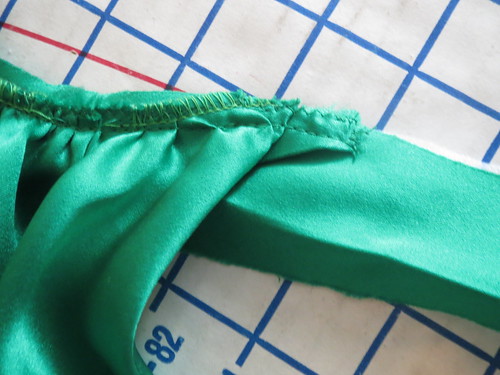
To finish the neckline, I used self bias tape. Because the entire weight of the dress hangs from the bias tape at the shoulders, I reinforced the shoulder areas with interfacing.
I first sewed the bias tape to the wrong side of the bodice. At the corners of the front neckline, you need to sew the bias tape to the very lower edge of the corner so that the raw edge will be fully enclosed.
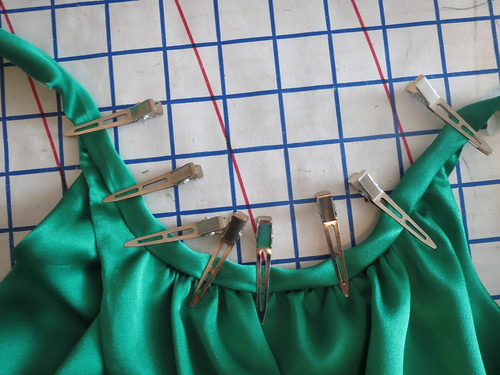
I then turned the bias strip to the right side and used the hair clips to hold the bias tape in place so I wouldn't leave pinholes in my gorgeous silk.
The skirt and lining were constructed separately with french seams at the side seams. The center back seams were left open in order to sew in the zipper.
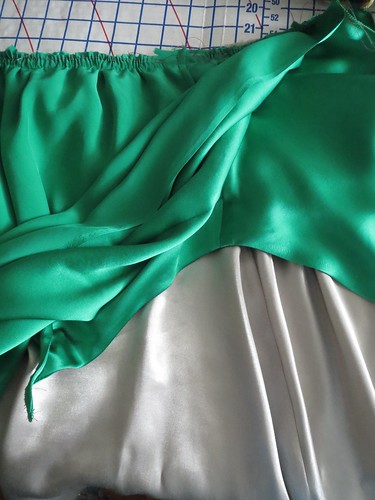
I gathered the outer skirt at the waist. The skirt lining is an A line fitted at the waist to reduce bulk.
To join the bodice and skirt, I sandwiched the bodice between the skirt and the lining and sewed together at the waistline, leaving the last two inches before center back open--this was for later doing a neat finish at the zipper.
I separately sewed the outer skirt to the bodice all the way to center back, leaving the lining free. Then I sewed the skirt lining to the bodice lining all the way to the center back.
After reinforcing my fabric with strips of interfacing, I installed an invisible zipper below my finished center back neckline opening.

I had not been quite sure how I was going to finish the lining at the center back, but luckily it all worked out well! Remember that I had left the lining and the outer pieces free for the last two inches before center back.
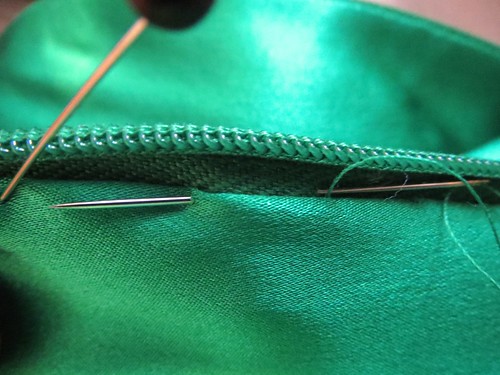
I folded the edges of the lining in and then hand stitched with tiny stitches to the zipper tape.
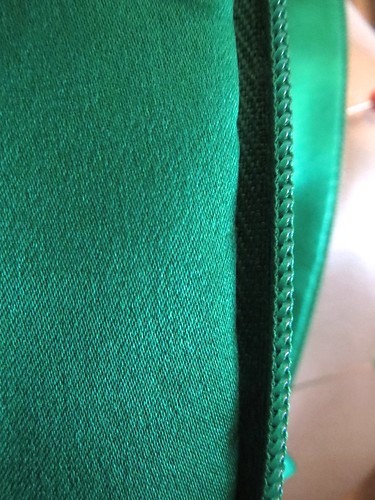
The finish is very neat on the inside, and the hand stitching is only barely visible.
I was thinking this style was a departure for me, but then I remembered I made a knockoff very similar to this in 2007 (though apparently never blogged or PR reviewed). The seven years later version shows less skin, though. Still, I guess that shows my taste is pretty consistent!
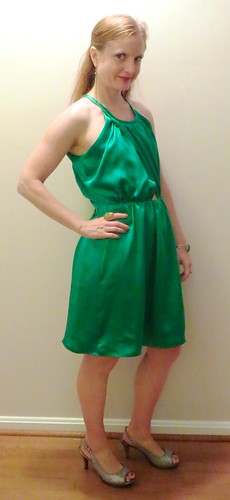
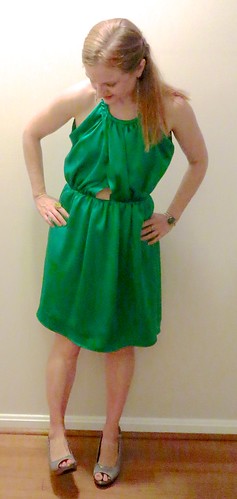
I love the way the dress came out. It is not perfect--it is a little loose at the armscye (which I really don't understand, because the top with sleeves is more on the too-snug side than the too-loose side); the front drapes slightly askew/agape; and I'm honestly not sure what's going on with the back waist--the pattern I started from had a swayback adjustment built in yet somehow it needs another 2 inches taken out. A full muslin and another round of pattern adjustment probably would have fixed those things. But I've always considered it paradoxical to put so much careful effort into special occasion dresses that will be lucky to see five wears rather than wardrobe workhorses that will be worn a couple times a month in season for five years. Not perfect is fine with me.
It was fun to do a drafting project that worked out and actually matched my inspiration! Alas, I haven't actually had the chance to wear the dress. It was pouring on my birthday and I didn't want to ruin it! I just need to plan fancy cocktails soon...
All photos are here and the pattern review is here.


.jpg)


30 comments:
Lovely dress and execution. Happy Birthday!
Sooooooo pretty! Love that color - it looks great on you. And the style is fantastic. I'm on a bit of a cutout kick right now too. I don't know why - I hadn't ever really wanted them before, but I think the recent Burda offerings are convincing my brain otherwise. Anyway, you look fantastic, and happy birthday!
How beautiful! Happy birthday to you!
You look gorgeous in your dress! I know that it's probably a cliche at this point with your coloring, but that green looks amazing on you. Happy birthday!
Happy birthday! You look amazing, and what better way to celebrate such an occasion? I love the color and I hope you get to wear it to lots of chic cocktail do's!
Happy birthday!!!! I concur with Michelle, you need more of this shade of green in your life, you look fantastic in it!
I have only tried the whole draping/drafting thing a couple of times and it's never worked out for me, but seeing your vision come to life makes me itch to try it again. You did a great job of explaining it as always, so this will definitely come in handy should someone (or you) wants to try it. :-)
Wow, amazing fabric and gorgeous colour, just perfect on you. Your pattern illustrating style is about on a par with mine - but hey, it gets the job done! Great drafting job - it's so satisfying when a concept comes to reality.
That Atonement dress ... sigh. Lucky for me I was NOT of age in the 30s as I would have looked dreadfully lumpy in all those bias-cut body-skimmers. (I think you could carry it off really well.) Gosford Park is another great movie for 30s costuming.
Happy, happy birthday!
Great job. The color is gorgeous on you. Happy Birthday.
So beautiful on you!! Happy, happy birthday!
I think the dress looks fabulous! Happy birthday!!
So pretty! This isn't Slapdash at all ;)
I really love how you search for and find inspiration. And then you figure out how to make something similar.
Gorgeous!
Happy Happy Birthday!
You really knocked that inspiration dress out of the park.
Wow, the colour looks amazing on you! I've been having some fun with drafting dresses too lately (although with knits), and I've also found that gathers and pleats mess with the ease meaning the fit is never quite what you expect. I think shortening the bodice might help the front sit flatter as it would keep the gathering running vertical? Maybe a combination of shortening the straps and the bodice length? Anyway, I really like this style - I like cut-outs too, and this is a good ratio of flesh to fabric (for my taste anyway!) Happy birthday, and hopefully you can fit in some fancy cocktails soon so you can wear this (oh, such a chore :) )
Great green color on you! Cute dress!
Maybe you don't have a future as a fashion illustrator, but you might consider fashion design! Lovely dress.
Looks great!! I love how it's both demure and not at the same time.
That green is stunning!
Fancy cocktails ... great dress... please remember to invite me :)
Thank you for sharing all this details about pattern drafting and sewing.
Have a nice day !
Olivia from France
You look beautiful in this very special dress! Thanks for the detail on your drafting and construction process--very helpful.
First of all - Happy Birthday! Your dress is gorgeous and the "atonement" green really suits you. You might not think your illustration skills are up to much but they definitely did the job in getting you the pattern you wanted - great job!
Awesome job!!!
Great dress and I love how you are not afraid to dive in and do jumping jacks in order to make up your inspiration garments - bravo!
Love your dress, and the color is perfect! It looks amazing on you. Happy birthday, and welcome to the 40s.
Hey Trena,
Hope you had a great birthday!
I was just looking up your clean finish tutorial as I may be using it soon.
Hope all is well since I haven't seen you blog for a bit.
Kyle
Miss your posts. (No pressure.)
Yours was the first sewing blog I ever saw and it led me to this whole world of blogs and tutorials. I usually lurk, don't comment much. I just want to say that I miss your blog posts and I hope all is well in your world.
Oh, and that green silk is absolutely gorgeous on you!
That dress is so adorable on you, and so perfect, I can't even express how great it is!
-Mimi
Post a Comment