I purchased the Gore-Tex from Fabric Mart last July when they had it for $9.99, so it's been in stash for a while. I leave for a bike trip in The Netherlands in early May and we have been warned to expect rain so I couldn't put it off too much longer. The Mini Wardrobe Contest is running this month on PR and I figured I'd kick start my bike sewing for the contest. The ladies on the discussion thread were very encouraging about tackling the bike pants so I decided to get them over with.
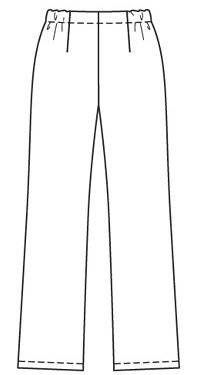 I looked through my Burda archives for suitable patterns. Despite my triumph with the lapped zipper, I decided that trying to do my first fly front in a difficult fabric in which mistakes are strongly discouraged--every needle hole is a potential leak--which has to be lined *and* all the seams must be sealed (making the order of construction complicated) was not in the cards. So I chose 12-2007-127, a pajama pant pattern with a flat front and elasticated side and back waist.
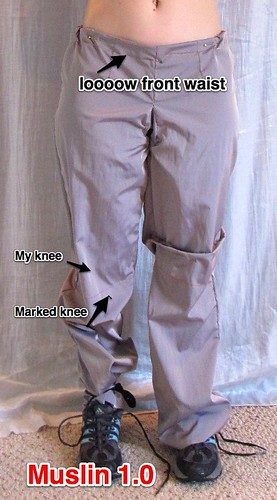 The first muslin is almost straight off the pattern sheet. My only change was to add a crotch gusset. I was pleasantly surprised by the fit and the look, which was not too Stay Puft Marshmallow Man.
 I had marked the knee line on the outside so I could compare it to mine. Unsurprisingly, given my short legs, it was about 1.5 inches too low (very useful info for making future Burda pants).
The front waist was also remarkably low. The back fit fine, mostly a function of the elastic I suppose but I was surprised that I didn't need any swayback adjustment for length or volume.
Even the width of the leg was perfect. I could easily pull them on over sneakers but there wasn't any more ease than was needed to accomplish that task. I totally lucked out with this pattern!
 Although the knee was too low, when I sat on my bike with my leg in the most upright position, that marked knee line was halfway up my thigh. One of the PR participants had recommended a knee gusset, which makes great sense for biking clothes where the knees go through a much larger range of motion than walking or running.
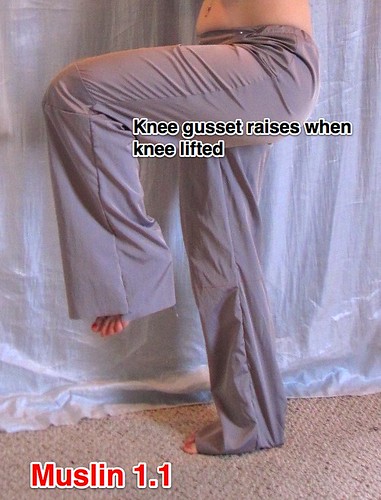
 Because the marked position of the knee moved a good six inches or more as I moved my leg, I added the gusset at the marked knee point rather than my knee. I reasoned that the extra volume is needed not when my leg is straight but when it is bent and therefore the gusset should be at the knee on the upswing. So while the gusset is below the knee when standing, when I raised my leg to parallel it was at the knee.
Unfortunately, when I went and sat on the bike, things changed a bit and the gusset ended up halfway up my thigh. I decided that the utility of the gusset was lost in these wild variations in position. I thought about it for a while and decided in the final version to add extra knee articulation with pleats. I had previously done a web search for cycling pants with an articulated knee. Now I did a search for rain pants with a pleated knee and lo and behold this is quite common for athletic wear. I didn't know whether to feel pleased that I'd hit upon the proper solution or disappointed that I'm not as original as I thought!
 On muslin 2.0, I raised the front waist. It now matches the back waist (or close enough for my taste). You can see that the waist on the rain pants is lower than on my cycling shorts, but I prefer it that way. The waistline is at a comfortable spot. Also, I don't know how comfortable the Gore Tex will be against the skin at the foldover waistband, nor the mesh lining. If I'm wearing rain pants, I will also be wearing a rain jacket, which will cover well below the pants' waistline, protecting me from the rain.
I also changed the shape of the crotch gusset for the second muslin. I am short and need a large range of motion to hike my leg up over the saddle to sit down on the bike, not to mention the discomfort of sitting on seams.
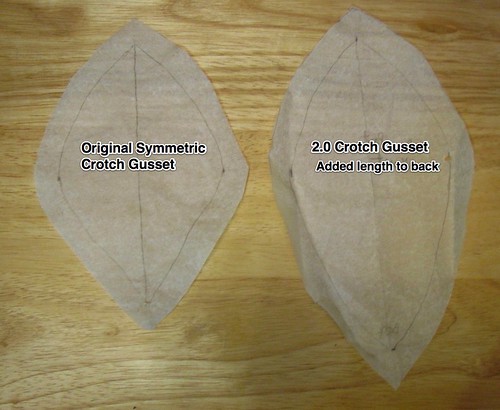 For version 1.0, I had drafted a symmetrical oval shaped gusset 6.5 inches long and 4 inches wide. I was pleased that it fit into the crotch so nicely and added a range of motion, considering I'd never made anything with a crotch gusset ever and all I knew about them was from looking at a few RTW items. Note that I did not change anything about the crotch of the original pattern--just used the gusset to add space.
Anyway, the first crotch gusset was remarkably functional, but I saw that while it reached the front of the crotch area, the back ended shorter than it could. So for the second iteration of the gusset I extended the back an additional inch and a half, making more of a kite shape. It now reaches the back of the crotch area.
A downside of making pants is that you end up saying "crotch" way too much. Ick.
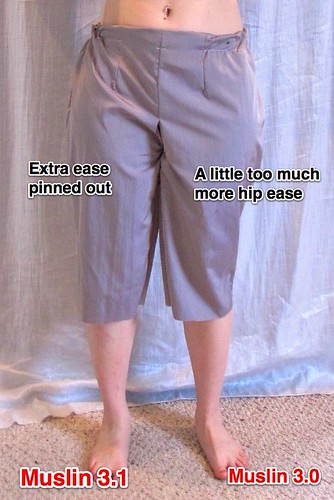 I again marveled at how un-Stay Puft these pants are. Then I sat down while wearing the muslin and realized the reason they're so flattering is that they have about 3/4 of an inch of ease at the largest part of my thigh. I had no problem moving in these pants and they didn't pinch or feel too tight, but I just am not comfortable with that little ease in active wear. I don't know how well the mesh lining will slide over cycle shorts or yoga pants over a long ride. And also, I really never want to make another pair of these things so I wanted to be able to accommodate some weight fluctuation.
So for muslin 3.0 I added an additional 3 inches of room in the hip and thigh. Whoa. Now I got your Stay Puft right here! I had drafted the additional room to match the saddlebag curve of my thigh and boy, did it. I pinned out some extra ease to give me a flatter appearance. I still had a good 2.5 inches of ease left, so I flattened out the pattern.
At this point I had reached the end of my patience. I admit that I didn't not actually sew up another muslin with the flattened hip curve. I felt confident in my alteration and was ready to cut the Gore Tex.
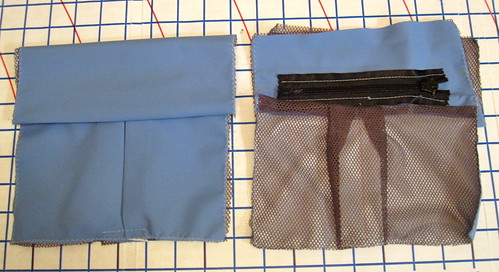 At this point I'd been working all day and felt like I had nothing to show for it, so I decided to go on to the pockets. I purchased 5 inch water resistant zippers from Joann and planned to make cargo-style patch pockets large enough to hold keys, money, ID, and cell phone (divided between the two pockets). I first muslined them to get size, including pleat width. The muslin looked good, but I decided I wanted a deeper flap. I don't know how "resistant" the zips are and wanted to cover them as deeply as possible.
Once I got started on the real thing, the whole construction order issue of sealing seams revealed itself as quite the puzzle. I am using iron-on seam sealing tape rather than the brush on stuff. I think it looks nicer, I trust it to be more secure, and most importantly I don't have any outdoor space in my condo for ventilation! How I would love to have a balcony for doing toxic things... Anyway, I had planned to treat the lining and fabric as one, but then realized that I couldn't seal the zipper seams from the inside if I did that. So I had to sew the zips in, seal the seamlines, then jigger in the lining.
Once the real pockets were completed, I realized that I couldn't have the deep flaps I wanted. As the pockets are only five inches wide, with the deep flap I couldn't reach in to actually grasp the zipper pull! Luckily, the flap is just a rectangle and had sewed the zipper on one layer (gotta minimize seamlines!) so I just folded it up higher and cut off the excess at the top.
That was a 10 1/2 hour day!!!!! I was tired.
The next day I cut out the real pants (Gore Tex layer) and sewed the outseam. Not as simple as it sounds because it involved the outseam, two rows of reflective tape, and pocket placement and then sealing all the seams. That was enough for one day. I am hoping to finish them this weekend.
All photos of this work in progress are here.

.jpg)
.jpg)


.jpg)


17 comments:
A cycling trip in Holland- I am jealous! Planning for rain is a good idea. I admire you for making your biking pants. It's sounds like hard work, but you are bound to have a better, more comfortable fit which I am sure you will appreciate if you are due to spend hours and hours cycling.
Wow what a concentrated effort on all of the elements of a perfect pair of biking pants.
I'm exhausted just following along.
Getting that far would have taken me at least 10-1/2 weeks! Hope the pants turn out perfectly (as it looks like they will) for your trip.
I am so jealous of your trip! and the amount of time that you get to sew!!! You've probably got an entire room devoted to your hobby too.... *grumble grumble* I get a hall! :\
You need to do a post on your sewing room sometime.
Ok. You've talked me into the crotch gusset. But, that's it. No pockets! You are putting me to shame. I really need to work on mine.
I am going to use that pattern though. I already have it traced.
And, I am wearing one of my two dresses with that lining. It is *noisy*. More convinced to just buy a bolt of Bemberg.
You have so much more patience than me. I would have run screaming to the MEC/Mountain Equipment Co-op here in Canada to buy some. Of course they wouldn't fit as well as yours...
You did some heavy duty muslin. I know it will be worth it.
Wow, impressive. Hopefully you can put all that muslining to work on more patterns after this, too.
You may have to change you name! Nothing Slapdash about all that. Impressive planning and execution. If it doesn't rain in Holland I think you may feel cheated - these pants are for wearing!
Wow. Very impressive. You say you are terrified of making pants yet you dive right in with Goretex and mesh lining for technical activewear? I admire your aplomb!
Very impressed with your diligence on these pants, Trena! Extra points for clever headline.
Nicely done! I look forward to the rest of the story as you complete these pants. I keep thinking about making a raincoat, but it would definitely need waterproofed seams. I'll be glad to hear how your pants work in the rain.
'The front waist was also remarkably low.' You can say that again!
Enjoy cycling in NL, with Cidell, I presume? Next time give a holler before, Belgium is just next door. We have wonderful chocolate for exhausted cyclists.
Thanks for the excellent journaling. I really enjoyed your recounting of all of the steps. I made some goretex pants for snow shoeing. It really wasn't as hard as it seemed. I know your finished product will be GREAT!
Sewing with gortex is not for the faint hearted. Fabulous work. When I made overtrousers for my husband I used a wicking polyester knit for the waistband, which he found much more comfortable than the original gortex band.(I did not enjoy the unpicking). As you say, the trousers are covered by a rainjacket, so you can cheat at the waist!
Ah muslining. Such a pain, but oh so handy.
Depending on how those pants work out, I just wanted to mention that I too took a bike trip to Holland in May in quite a heap of rain-- so much stopping & starting of light rain that after the first day, we never bothered to put on our rain gear at all. Sometimes we'd pull on a jacket, but mostly we just let our legs get damp and it was no biggie. Wet socks were the worst part, and you can't control that with rainpants anyway. (Bring lots of extras!)
So if you throw in the Gore-tex, take heart! You'll survive!
Post a Comment