
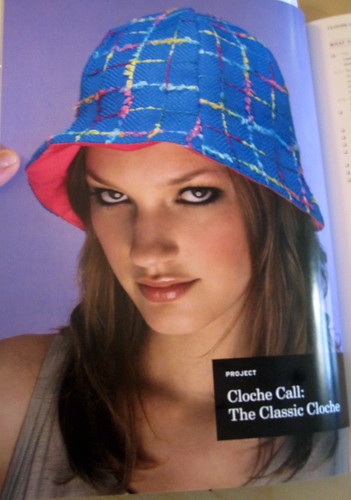
First up was the cloche from Saturday Night Hat. I previously made the newsboy. Although I still have and wear the hat, I wasn't crazy about the pattern as it was a little too puffy. The cloche looked like a good, standard pattern with no weird issues. I liked that the lining peeks out a little and thought it was a good opportunity to bring one of the lining tie silks into the mix.
The cloche is made of six identical panels. All patterns in Saturday Night Hat are one size and drafted for a 23 inch head. I shrank the pattern on the copy machine to fit my 21.5" head, but in measuring the pattern (seam allowances are conveniently marked) I realized I would do better with the original pattern and slightly larger seam allowances on a few of the panels.
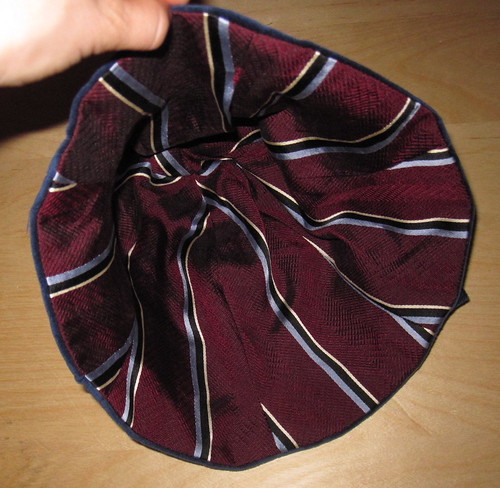
I used the striped tie silk for the lining, as I didn't have enough of the paisley tie silk. I thought the stripes might be fun with the panels. They are fine but I think to make a cute striped hat using this pattern the panels would need to be cut on the bias in alternating directions. I used the lining to test the fit on the pattern.
The fit just needed a little bit of tweaking for circumference, but I found the hat to be drafted a little short. The narrowest part that should fit snugly around the forehead is a little high up on the head. This is similar to the issue I had with the newsboy--the hat must be worn very high on the head to have the right visual effect. For next time I have altered the pattern to add half an inch to the length about 3.5 inches from the top of the pattern piece, which should put the hat more firmly on my head.
I decorated it with a little bow and a button. The hat is quite cute, but not very useful as a winter hat because of the length issue. It does nothing for the ears and feels very insecure sitting so high on the head. A small puff of wind would blow it away. I think this is a better design for a Spring and Summer sun hat (with a slightly longer brim) than a Fall/Winter warmth hat.
All the Saturday Night Hat photos are here and the cloche pattern review is here.
============================
The insecurity of the cloche was not a problem, as I had actually planned to make two hats!

Neighborhood Gal published a great tutorial for a beret back in December. The beret seems to be the hat this season. It's not a craze like the newsboy was, but I think of all the winter hats I see there are more berets than any other one style. Unlike Beangirl, I have had a longstanding love affair with the beret. My dad purchased a classic red beret at Disneyland (he grew up in LA) as a teenager that I rediscovered in high school. I named it Pierre and wore it all the time. I bought myself a classic red beret in Paris, just because. So the tutorial got me thinking about a beret, and a velveteen beret seems just about perfect.
The instructions are very clear, though I am math challenged. At first I ended up drawing a circle so huge it would have covered me to the shoulders. I really don't know how that happened, or why I didn't notice how big it was until I was done. I think it had to do with using a piece of tissue paper, a pin, and a pencil as a compass. It's really not an ideal setup.
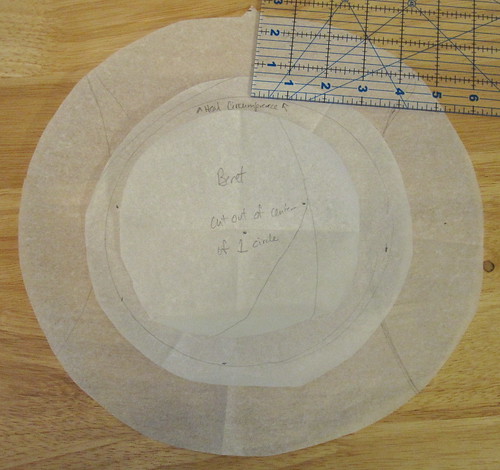 Visit the tutorial, but basically you draw a circle the size of your head and then another circle with the radius of the circle the size of your head plus another 2.5 inches (including seam allowance). I tried 3 but it was too much. You cut two of the larger circles of fabric and from one of them you cut out the circle the size of your head, minus seam allowance.
 Determining where to draw the seam allowance required me to think a little--normally you draw the seam allowance on the outside of the seam line, but for this project you draw the seam allowance inside the seam line--i.e., the small circle you cut out of the center of one of your large circles will actually be smaller than the size of your head by its seam allowance.
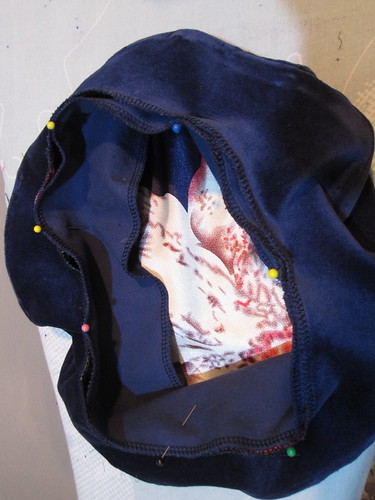
In the photo you see my pattern pieces. There is the large circle (cut 2). Then you see my reference piece that shows my head circumference. You can see that I originally cut this piece out with the seam allowance on the outside before thinking about how it would actually work. The top-most circle is the actual circle I cut out of one of the large circles with the seam allowance inside my head circumference mark.
I started by constructing the hat and the lining. Then I placed the lining inside the hat and serged the edges together. You can see I used some of the leftover silk from my McCall 5579 4th of July kimono-style dress.
As is my normal practice binding an edge, I first pinned the band to the inside of the hat and sewed in place.
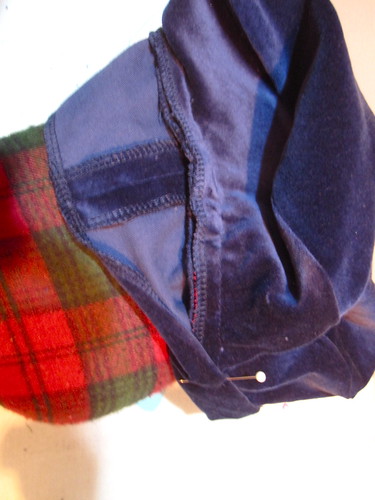
Once the first pass is sewn, you then fold the band over to the outside, fold under the raw edge, pin in place, and topstitch. This is so much easier than the traditional way pattern instructions advise, of pinning the binding first to the outside, then turning to the inside and engaging in a nerve-wracking stitch in the ditch situation from the outside in which you do not catch the underside of the binding half the time. Here, I topstitched rather than stitched in the ditch because I liked the look.
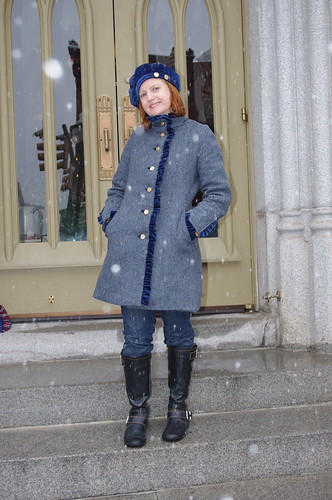
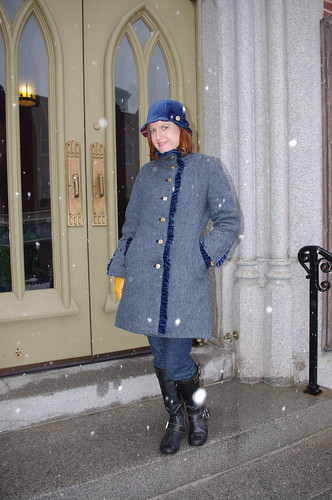
And voila! So easy! I sewed on two buttons as decoration. I get a ton of compliments on the hat, even more than on the coat! Considering that I spent 3 weeks on one and about 1 hour on the other, it seems a little unfair. `-)
All photos of the beret project are here and the beret pattern review is here.


.jpg)


.jpg)


31 comments:
I am totally in love with the beret as you know know. The colors are really quite amazing with your eyes.
I love the hats!!! I also love the "pink" hat from the previous post. I got make one of these. Thanks for sharing.
Lovely coat and the hats look great on you.
Totally fabulous! The beret is definitely my stand out favorite. What does Beangirl know anyway? :-) She's a Texan, we wear cowboy hats 'round here.
Well, we know how I feel about berets but that definitely is cute, especially in the velveteen. NeighborhoodGal's tutorial really does produce one of the nicer berets, doesn't it? I may have to overcome my deep, visceral hatred of-- sorry, my dislike of berets and make one or two of these for the Evil Monkeys. Too cute!
(And bite your tongue, Katie! I am NOT a Texan. Hmmph. Slanderous!)
that blue looks great on you.
You make the most PERFECT hats! That beret is totally cute on you and goes great with your fabulous coat.
Great hat to go with your fab coat!
You know, I just love hats on other people. The beret and coat together remind me - in a very good way - of Madeline (the children's books). Not too matchy-matchy but perfectly polished...
“To the tiger in the zoo / Madeline just said, ‘Pooh-pooh.’”
Trena, I like both hats on you but I do prefer the beret - tres chic! The color suits you!
Love them both! Your eyes looks spectacular with that color!
Fabulous hats!!!
I, too, have a love affair with berets and have way more than I need in my climate! That's not going to stop me making one from this pattern. I have some animal print velveteen and you've jsut given me the inspiration. BTW, you look terrific in this shade of blue.
I am fond of cloches, but I must admit that the beret looks just perfect. How lovely to have to coordinating hats to go with your new coat.
I've made several of the first type of style. Really cute with the lining!
As for the beret, wow! The buttons really make it pop, don't they?! I might have to make one of those...
Thanks!
You look cute in hats! Some people wear them well, and you are one of those lucky ones. I love hats, especially large-brimmed showy hats. Oh, Kentucky derby hats!
Some people just really suit hats and you are obviously one of them. My favourite is the beret, you look really cute in it.
Hi Trena,
I made some hats like your first one and wear them in summer--it's a really great style for a summer hat.
Your second hat is super cute!
Thanks for your comments and all the info about the massager! My back pain is SI joint related too! My chiropractor does Active Release Technique, which is a myofascial technique to break up adhesions in the muscles and to relax the muscles which pull on the SI joint. He has helped a LOT! It sounds like the massager is doing the same thing. I am also doing the Pain Free For Life program (a writing program). I can't tell if it's helping though because now I have my ab pain from straining my ab at the gym so I'm much more aware of the ab right now than my back these past few weeks.
The beret is you.
Gorgeous hat, gorgeous color for your eyes.
The colour is so pretty for you, I like both of the hats, but it is the beret that has me hunting for velvet pieces. I am sure I need one!
That beret is amazingly cute on you. (And that is a great picture!)
Super-cute ensemble!
Both hats are really cute but I prefer the beret - so sweet!
Dont be peeved that the hats are getting more compliments than the coat - everyone wears coats but who is wearing a fab hat like that?
Just enjoy the compliment!
Great hats! And don't worry about the compliments to the hats, first Kim's right about them, but also they just mean that your coat fits you so well it looks like a natural part of you.
The only drawback I can see to having such a perfect unmatchy match for a coat is that you may end up wearing it for months on end :-). But at least with two you ought to be able to switch between the merely cute and the warmer one.
Beware of cutting silk stripes on the bias though - in a hat that's already insecure you risk adding enough ease with the bias to have it flop onto the sidewalk..
I love both of your new hats and the color looks really nice with your eye and hair color. I don't think that they are too matchy with the coat. It's such a great outfit.
Love both of the hats.
The beret is fabulous - So cute !
& thanks for commenting - that Skippy helped me shovel alright, he barked at me the whole time I was cleaning the deck. I think it reminded him of the vacuum LOL
SQUEEEEE!
Wow. Thanks for trying out my tutorial and then blogging about it. I am beaming!
(And you look cute - as always!)
Sarah
Velveteen makes such luxurious looking hats. They are both adorable, but I especially love the beret! Fabulous pictures too. You look so happy!
Love both of these hats and how wonderfully they work with your coat!
Both hats are nice, but, oh-la-la, that beret is sweet! Not to mention perfect with your coat and eyes.
Post a Comment