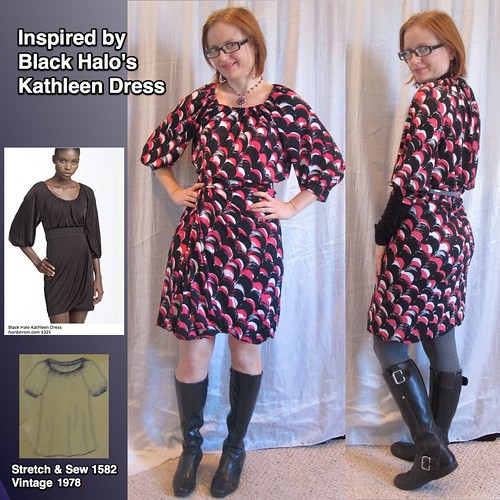
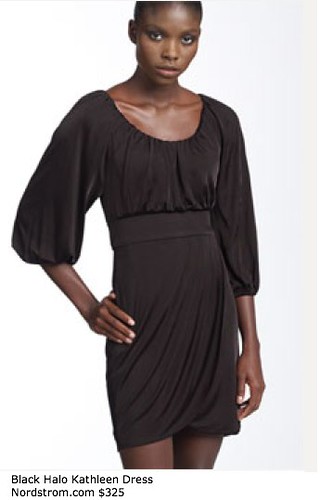
I have been inspired by this Black Halo dress since last year, and have been intending to make it out of this fabric, purchased from G Street's $2.97/yd table last November, for a year.
 I am always amazed when I actually follow through on these things.
 For the bodice I used vintage Stretch & Sew 1582, previously reviewed here. I have made this pattern probably 6 times by now and this is the first time of knit, though the Stretch & Sews are (as the name indicates) meant to introduce us to the wonders of jersey. It's a basic raglan sleeve peasant blouse with an elastic casing at the neck. Elastic is the least glamorous of the sewing notions, isn't it? Except velcro, I suppose, but that is not used in grown-up clothes. Odd to use elastic in a project imitating a relatively expensive original. Rather than finish the sleeve with elastic, as in the inspiration and the pattern, I used a cuff.
You don't need to look for this pattern. Burda publishes a peasant blouse every three months or so and I'm sure the Big 4 have at least one among them.
I cut the bodice at the marked waistline so that it would have excess fabric to blouse over the waistband.
For the midriff, I just used a straight strip of fabric 4 inches wide (including allowances). I cut the waistband lining of a firm double knit, as it needed to support a fair amount of weight with the skirt as well as hold the bodice up so it could blouse. When it was too late to do it, I realized this could actually have used an underlining *and* a lining of the double knit. The skirt is quite heavy, and it would have allowed me to have a nicer finish on the inside.
As it was, I sandwiched the gathered bodice between the midriff and lining and sewed all at once, encasing that seam in the midriff. Then I serged the skirt to the midriff and lining as one, so that serged edge is visible inside the dress. This is normally how I do things, but as the skirt is lined it would have looked nicer to be able to turn the midriff lining under and hand-stitch in place.
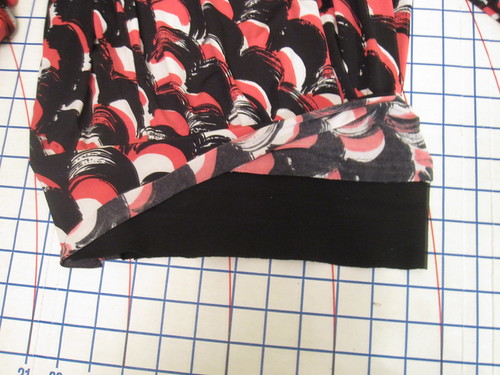
The skirt is what gave me so much trouble. I thought it would be simple, but getting that little upward jog at the hemline turned out to quite the ordeal. My rendition isn't perfect and is not quite as charming as the original, but I got close (after many hours of experimentation).
Start by cutting a rectangle for the outer skirt. In my case, my 60 wide fabric had those annoying super-wide selvages, so my width was about 46 inches. Cut the length you want for your finished skirt plus 2-3 inches (I used a lightweight rayon knit as my skirt lining, which is prone to stretching, so I went 3 inches to make sure that lining would never droop below the fashion fabric).
With my swayback, I had to add back darts to the skirt.
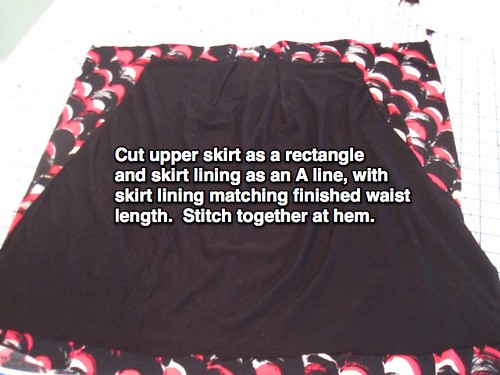
Cut an A-shaped skirt lining with the lower edge the same width as your outer fabric and the waist matching your midriff's lower edge (my midriff is quite snug, as explained, so I cut the skirt lining an inch or so wider and eased it in for comfort). The lining should be 2-3 inches shorter than the outer fabric so that your outer fabric will bubble.
Sew them together at the lower edge, right sides together. Then pull the lining through to the inside, so wrong sides are together, and line them up at the waist.
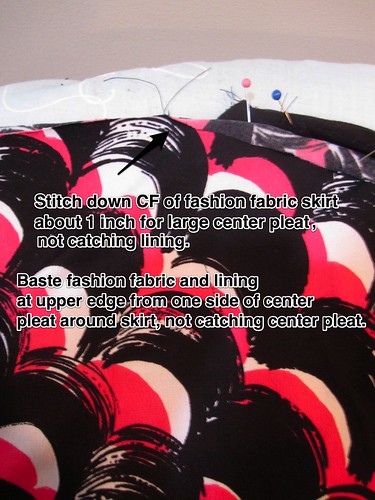
Find the center front of your skirt lining. Match up the outer skirt to the lining at the waistband from center back, so that the excess width of the outer skirt is at center front. Mark the center front of the outer skirt, then stitch along that marking for an inch or so (I sewed down about 4 inches, mistakenly thinking that the stitching would be entirely enclosed in the final pleat. It is not, and I had to pick it out). Then baste the skirt and lining together at the waist, from one side of the pleat all the way around to the other side. Do not catch in the pleat.

Next, find the spot halfway between center front and the side. I went for the right side, but it appears I did it opposite the original. Mark this spot.
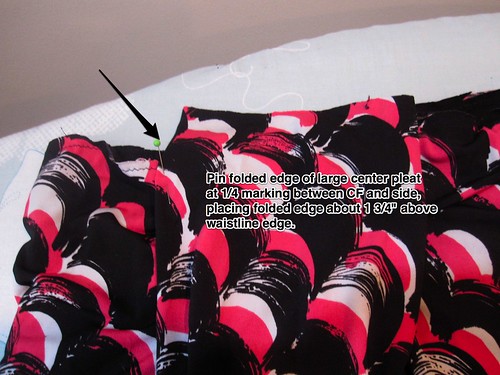
Now, take that fabric in your large center pleat and match up the folded edge with your marking. Pin the folded edge in place at the marking, pulling the folded edge about 1 3/4 inches above the waistline of the skirt. This is very important, as raising that pleat is what gives you the upward dip (bump?) at the hemline.
There should be slack in your large center pleat, it should not be stretched over to that spot. If it is, you have to move your spot closer to the center.

Now take the slack in the large center pleat, and use it to form smaller pleats, continuing the raised line above the waistline. Pin the pleats and then stitch across the waistline to keep them in place. Clip off the overhanging pleat fabric, then sew to the midriff.
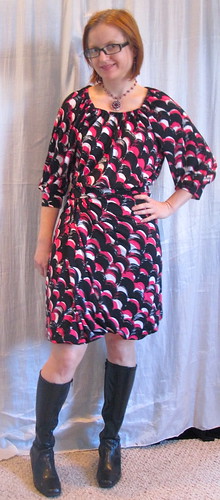
And you're done! If you don't have to take the time to figure it out, this is actually a quick little project and a lot of fun when it's completed. It's not my most successful knockoff in terms of getting it right, but I am pleased nonetheless.
All photos are here and the pattern review is here


.jpg)


.jpg)


13 comments:
What a cute dress! I always love to see knocked-off looks. Figuring out how to make it work is one of my favorite parts of sewing.
I love this! Perfect for this time of year paired with tights and boots :)
This is really cute on you. I like yours better than the original
Lovely job. It was interesting to see how you worked through the "knocking off" process. Dress looks wonderful on you.
What a cute dress in a cute print. When I sewed a print dress last weekend, I called it my "Trena Dress". You just validated that :)
Cute! I recognized that fabric so I went back a few posts and found you'd used it for a blouse a few projects back. Cute stuff!
I really like it with the black long-sleeved shirt underneath. Looks cool. (And warm.)
Very cute; you're the queen of colorful knits dresses! I love the fabric, and I really liked the tops, too - never got around to commenting before you put up the next FO!
I love this dress on you. Great job on figuring out how to do the knock-off job at the hem.
Impressive job of figuring out how to get the look you were going for. I think your hem looks really nice and I agree with Adelaide B. it looks super cool, kind of edgy, with the black t-shirt, tights and boots. Love that style.
Fantastic Knock-Off. The dress is so fun and the fabric is awesome!
Beautiful dress - you have designed and constructed it perfectly. I love that print on the fabric. This style really suits you - it looks fabulous with those boots.
This is brilliant! Thank you for sharing with such detail how you made this knockoff.
You really rock the bubble skirt look. (I love your necklace as well!)
Post a Comment