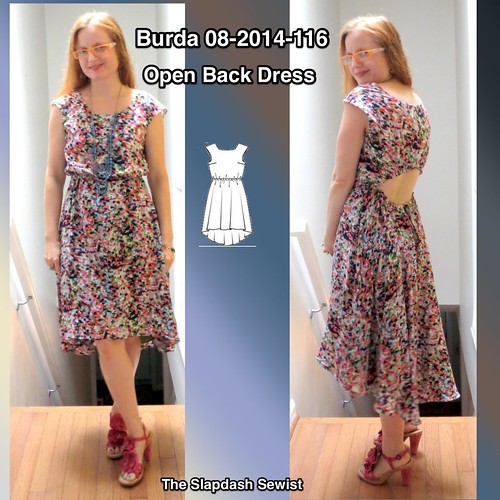
I have been enjoying the cutout trend and so when I saw Burda 08-2014-116 I instantly fell in love and had to make it.
I just happened to have a trip to New York planned, so finding the perfect fabric for it was on my list. This lightweight rayon was exactly what I was looking for--I love all the colors in the print, I like that it's a dot and not a floral (I love floral, but have a LOT of it), and it has the perfect floaty factor.
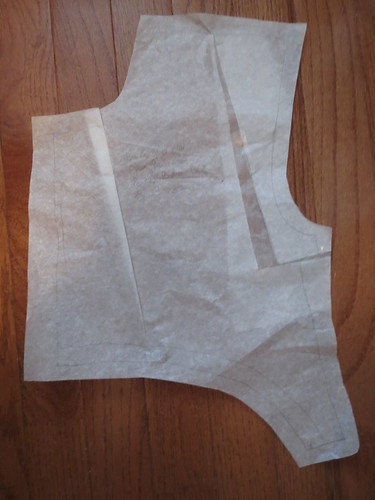
For the back bodice, I did a Broad Back Adjustment and also took a HUGE tuck out of the back neckline, which was really, really wide.
The bust dart on the front bodice is actually pretty small as drafted so I did not do any alteration for SBA. I think if you are larger than an A cup, you'll want to do a FBA even if you don't normally need to. The front neckline is a wee bit wide; I wish I had taken a little bit of width out of it at the pattern alteration stage.
The pattern is drafted as a boatneck, which is difficult for me to wear given that I am short. I lowered the front neckline 2 1/2 inches (!) from where it was drafted, and it is still reasonably high. So keep that in mind if you are at all chokey from high necks as I am.
For once, I didn't need to do a swayback adjustment to the pattern because the cutout is basically at the swayback.
The skirt was too long as drafted, so I folded out 1 1/2 inches on each piece before cutting.
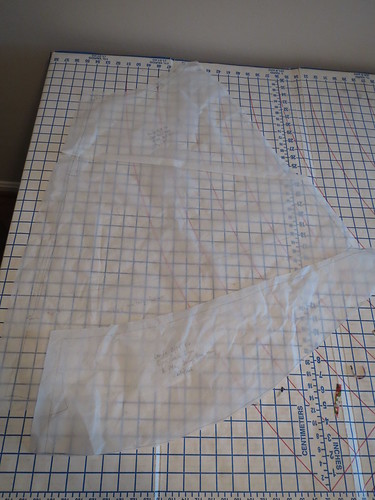
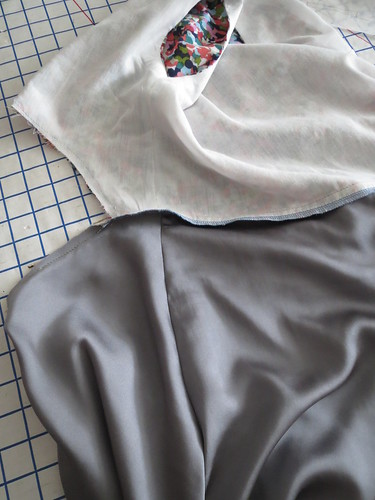
The pattern as drafted is lined in the bodice, but not in the skirt. This fabric was too sheer not to line the skirt. I'm *not* into the trend of having a short lining under a long sheer skirt (the 20somethings in DC are ALL OVER this look--like 50% of them on a Saturday night will be wearing this), so I thought a contrast lining was the way to go. I immediately thought of the gorgeous green silk/cotton I got during Martha Pullen's epic silk/cotton sale, but didn't want to waste the vast expanse of it needed to fully line the skirt. After agonizing over it way too much, I finally realized that duh, I could use cheap ordinary lining for most of the skirt and then add the silk/cotton at the bottom where it would show.

I lined up the center front and back skirt patterns and marked where the center front hit the center back. I later realized that the back skirt dips down below the front skirt at the waist, but luckily I gave myself a good 2 1/2 inch cushion and only the decorative lining shows. I then drew in the line for the decorative lining, making it about 2 1/2" wide in the front.

It all worked according to plan. I got my pretty contrast lining without "wasting" an acreage of lovely fabric.
Because there is no front or back center seam I couldn't do my usual all-machine clean finish. I would normally use this method in that instance, but I was intrigued in reading Burda's instructions for finishing; yes, the Wooden Spoon Method.
I have seen the Wooden Spoon illustration many times. I imagine that every month someone walks into Dagmar Bily's office and is like, "Disaster! There is too much white space on the instruction sheet!" and she pulls her best Miranda Priestly and is like, "Have you used the Wooden Spoon yet? Seriously, do I have to think of everything myself?" and they're like, "Of course! The Wooden Spoon! The Wooden Spoon will save us!" Seriously, I think it's in every issue. But the illustration has always made zero sense to me. Until now.
The Wooden Spoon Method:
As with my normal clean finish technique, I started by trimming 1/8" inch off the neckline and armscye edges of the lining.

Sew the bodice pieces together with their respective linings along the neckline and armscyes to within about an inch of the shoulder. Finish/trim the seam allowances (I do it in one with the serger). Finish the unsewn shoulder edges by serging, zigzagging, or your choice.
Turn the front bodice right side out. (I actually turned both bodices right side out and did the required pressing, since I figured it would be easier to do with the pieces separate than together. Then I turned the back bodice inside out again.)
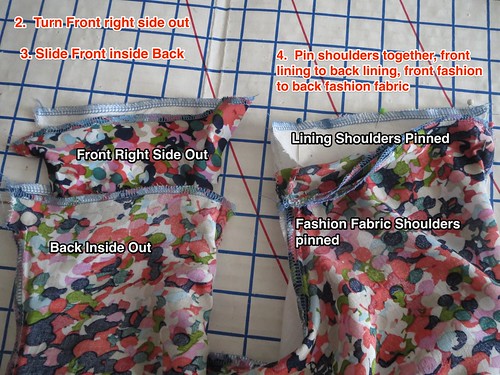
Slide the front bodice inside the back bodice/lining, with the fashion fabric right sides together and the lining right sides together. Match up the shoulders of the fashion and lining fabrics, and then pin. You now have four shoulder seams to sew: fashion fabric right, lining right, fashion fabric left, and lining left.
Sew the shoulder seams.
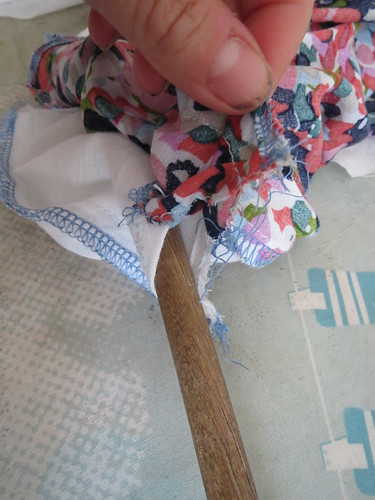
Now for the famous Wooden Spoon: Pull the front, which is inside the back, further through the back more toward the outside so the shoulder seams are no longer at the edge. Slide the wooden spoon into the holes where you did not sew all the way up to the shoulder at the armscye and neckline.
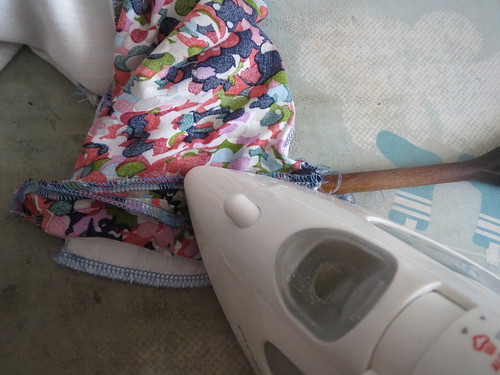
Position the shoulder seam over the wooden spoon, and use it as a "ham" to press open the seam. Frankly, I was pretty disappointed in the wooden spoon, which did not really make it easy to press open the seam. I should have grabbed my wooden spoon that has a flat handle, but now that I live in a two story house such frivolous trips back and forth to the kitchen are more carefully considered.
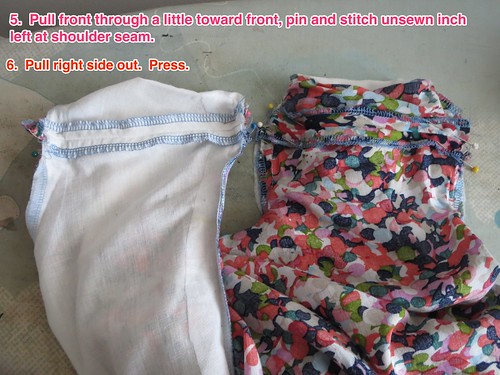
Once your shoulder seams are pressed, keep the front pulled through, match up shoulder seams of the fashion fabric and lining (which are right sides together), and pin the little hole you left through which the wooden spoon was threaded. Again, you have four shoulder edges to do. Sew.
Pull the front out the bottom to turn right side out.
I have to say, I am impressed with this method. My alternate method requires a few inches of hand sewing, but this method is all machine. Well done, Burda and your Wooden Spoon.

I sewed the side seams of the fashion fabric and lining of the skirt separately so they would hang free, and then basted them together at the waistline to be treated as one. I interfaced both pieces where the buttonholes for the drawstring would go, and then did the buttonholes through both layers as one.
The dress is pretty straightforward to put together. Once the bodice is completely lined, the bodice and lining are treated as one at the waist. I basted the two layers together to avoid shifting. Sew the bodice to the skirt up to where the back skirt dips into its hole.
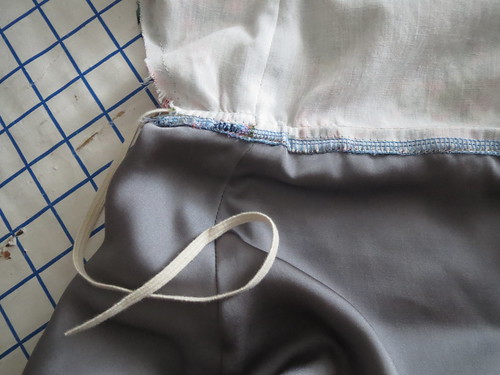
Use the seam allowance to make a casing and thread elastic in. Burda has a misprint in the instructions, which tell you to "sew the ends together." Unless you have a 17" waist and are looking for a figure 8 in the back, you want to sew the ends into each end of the casing. The join of the skirt/bodice/casing is a little ugly, but it gets covered up by your finishing--I used bias tape as described below.

Burda has you make a facing for the back cutout. I really don't know why you'd use a big unwieldy fabric-hoggy facing instead of bias tape. I used self bias tape, stitching it right sides together all the way around the hole then turning it to the inside to form a casing. Make your ties and join them with elastic in the middle, then thread through the casing.

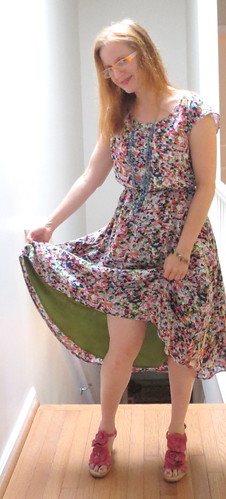
Love this dress! It was also pretty simple--it might be a fun 3rd or 4th project for a dedicated beginner. I may someday straighten out the hem, but the high-low thing is still going on and my other iteration, last year's birthday dress, was totally disappointing due to the poorly drafted pattern.
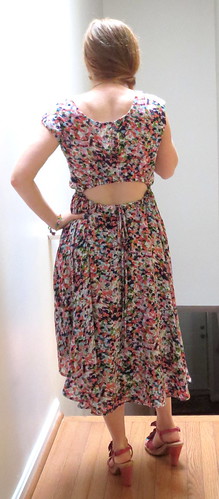
The cutout is just perfect, and I like the cut of the bodice with the wider shoulders. I'm considering drafting the cutout right out of it for a simple summer dress pattern--I feel like I'm seeing a lot of the simple dress with elastic waist (like this and this) this year and this one has well-balanced building blocks.
All photos are here and the pattern review is here. I'm still working on a photo location. Standing at the top of the stairs has more even lighting from the skylight--directly overhead instead of over one shoulder--than standing along the side wall, but then you get the gaping maw of the downstairs look, which is a little weird. Also, I'm afraid of accidentally getting too close to the stairs and falling backward down them.


.jpg)


.jpg)


30 comments:
What a cute dress - flattering and fun! I am studying up on your wooden spoon explanations, too:)
It is too early to understand that wooden spoon thing... but your dress looks great!
Your dress turned out lovely. I really enjoy reading about your sewing projects. It encourages me to sew more.
I love this dress so much! Great fabric, and so fun, pretty and flattering!
I was also allured by it when I saw the Burda preview but decided not to re-up my subscription. Regretting that a bit now.
How lovely--great dress, great on you. Fun to read about the wooden spoon!
Super-cute dress.
You had me ROFL with the wooden spoon and Miranda Priestly scene. The wooden spoon rolls around on me. Try a half round wooden dowel. A good hardware store can cut a short length for you (but you may need to purchase the entire 3 or 4 foot dowel). Cut a few and share with friends.
I absolutely love this dress on you. It's just perfect. And you had me cracking up at the wooden spoon/Miranda Priestly bit.
I fell in love with this one straight away too! Thanks for all your detailed construction info. I'm thinking of using a not-that-stretchy-knit so I may not line it, but if I do, this post will be invaluable!
Lovely dress! I love the lining with that print. You did a fabulous job on this. I see your hair is long and it is very pretty that way. :)
Well, I'm still confused about the wooden spoon instructions and always ignore them. But you are right, they are in every. single. Burda. The dress is super cute - I love how you used the good fabric for only a small portion of the lining. Great idea!
I love this dress!! I haven't actually done the wooden spoon in years. But, it does work well :) And, if you find anymore floaty rayon that is ideal for me, let me know ok? Spanx.
I have an unhealthy attraction to cut-outs on clothes, so this is right up my alley. I'd never heard of the wooden spoon method before, but your rendition cracked me up. ;-)
And also, I totally know what you mean about being nervous about falling down the stairs--I felt that way in our old house. But the lighting is pretty amazing there, so just be careful, OK?
Gorgeous sunback dress Trina!
I love that dress and I prefer your neckline too. I hate a neckline that strangles. I love the cut out... too cute (don't forget the sunscreen there tho). Rayon is my favourite fabric (you know if I can't have silk for everything) and I love the dots too. Lovely.
Oh I also wanted to add your idea to use the feature fabric just for the bottom of the lining is genius!
What a great dress. I've seen a few versions on the web now, but yours is particularly gorgeous. Thanks for your details too. I might even attempt the wooden spoon now...
-sewingelle
Lovely fabric, great dress. I haven't come across the wooden spoon yet (only just getting into Burda patterns) but I think it's the same method for the Deer & Doe Datura top (sans wooden spoon). I've made it 3 times and keep forgetting how I did it the last time....
I've been eyeing this dress pattern ever since the magazine came out... And now I think I really must try it! Potentially even with a wooden spoon. Based on all your fit adjustments (many of which I have to make as well), I think I am going to have to muslin at least the top part first.
Anyway, super cute! And thanks for posting all of your tips/alterations/spoon instructions!
I LOVE IT!!! I haven't tried the cut out style yet, but I think I may need to try it soon.
I'm still laughing at the image of Dagmar Bily a la Miranda Priestly ordering the wooden spoon bit in every issue - it seems to be there even if there isn't a dress that needs it! Thanks for the photographed instructions - my mind always wNders when I try to understand Burda instructions.....
Such a beautiful dress! It's so flattering and the fabric is lovely. Thanks for the explanation of the Burda technique.... I actually only recently tried to decipher it but just didn't get it. But now I'm definitely going to give it a go and I'll be seriously studying your photos and description.
Oh cute! I love the fabric - it's just so eye catching! I'd love to try a garment with a cut out in it, and this one is tempting!
LOVE your dress! It looks great on you and your fabric is gorgeous. I'm going to make a note of this pattern and maybe make it up for my daughter next spring.
I love this on you! Trying to decide if I'm too old for the back cutout. Hmm...
That cutout is so cute - gives the dress a very summery 40s-50s look. (Decades, I mean, not personal age.) :)
I've seen that lining method used in old vest patterns, but not the wooden spoon bit. Very interesting technique!
This dress is so beautifully evocative of summer, I love your contrast lining thriftiness and the clever bias finishing.
NiceGirl, have you SEEN the newest issue of Burda? imo it's a must-buy issue, full of interesting (& bikeable) pieces
So late to comment I know, but I love this dress on you and well done for mastering the famous wooden spoon method!
Beautiful dress! And thank you for the wooden spoon explanations--I always find your clean-finish tutorials and Burda clarifications super helpful and inspiring.
I read the wooden spoon method section about 6 times. I think I finally get it. Sort of. Maybe not until I do it myself.
Post a Comment