
I have had Vogue 8728 on my list for years. In fact, two years ago (or was it three?) I altered the pattern and drafted a stay for the ruched upper front bodice, though I ultimately decided that in my lightweight fabric it was better to underline the piece than to do an un-ruched stay. Every time I saw someone else make the dress, I was intensely jealous. And yet, somehow I was never into sewing it up. I really don't know why. Finally, I decided the time had come! The serger was threaded in white, and I am participating in the stash contest to move older pieces out.

This pattern is a vintage reissue, though Vogue doesn't say from what year. This photo popped up on Pinterest a while back, from a vintage shop (the dress has since been sold and is no longer on the website). It looked rather familiar! The Vogue is not an exact copy, but it was clearly in fashion when it was designed.
This dress needed self bias tape. I always use this continuous loop bias tape tutorial. It is a great method, but cutting apart the tube at the end is the worst part. It is both tedious and nerve wracking, because I'm always afraid I'm accidentally going to to cut into the wrong part.
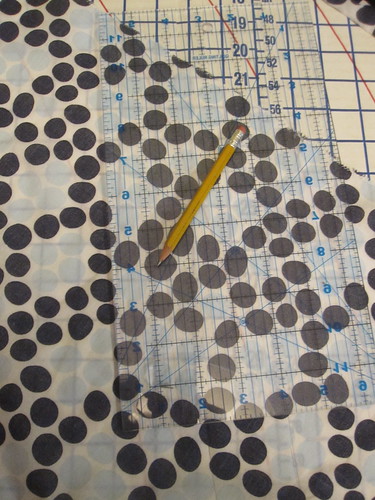
This time I had a flash of brilliance (though one that has been had before, I am sure!). I made my parallelogram and marked off my two inch bias lines, as usual. I find that a pencil marks well on almost all fabrics, and it doesn't matter that it won't come out because the only place there will be pencil marks is along the edges, which will be enclosed in any project.

Then, I used my rotary cutter to cut along my marked lines, leaving about a 2 inch uncut margin at each end. You MUST do all your marking before you start cutting. I think it would be fairly impossible to get accurate lines if you've started cutting the fabric apart.
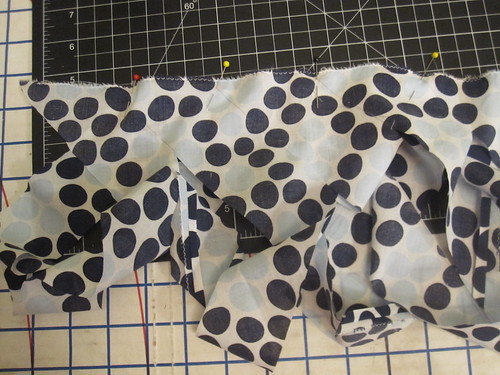
Next, I sewed it into a tube as usual, offsetting the bias tape at one end so as to get the continuous length. Please refer to the tutorial linked above for a full explanation. If you don't offset the ends, you will end up with lots of bias loops, not a continuous length.

Then I finished cutting along the lines. My two inch margins were rather unnecessarily generous. You could probably leave only 1 inch margins, though I am a scaredy cat and will probably still do 1 1/2.
I could not believe how much easier and quicker the cutting went. It took a fraction of the time it would take to cut apart a solid tube.
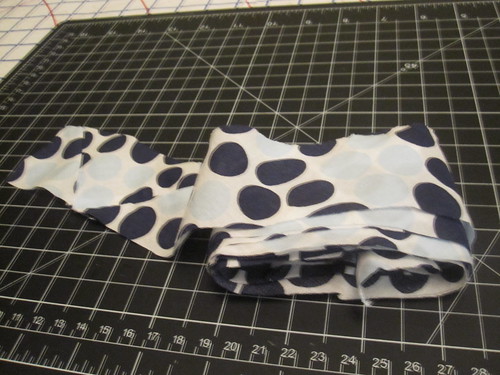
Not only was it faster, it was also more accurate. I always end up with skinny parts and fat parts when I cut apart the tube all at once, because it can be hard to see and follow the marked lines. With this, so much easier!!!! I will definitely be doing this from now on.

My polka dot fabric was very sheer, so I went with underlining rather than lining for the bodice. For the skirt I did a hybrid. I wanted pockets, and I didn't want the pocket bags to shine through the skirt. I cut the front pocket bag out of white batiste, and the back out of the polka dot, so it wouldn't be *quite* so noticeable.
I treated the skirt and lining as one for stitching in the pocket. Then I clipped into the seam allowances about an inch below the pocket, and stitched French seams in the two layers separately. This gives the skirt a nicer flow than if two layers were hemmed together at the bottom, but ensures opacity for the pocket.
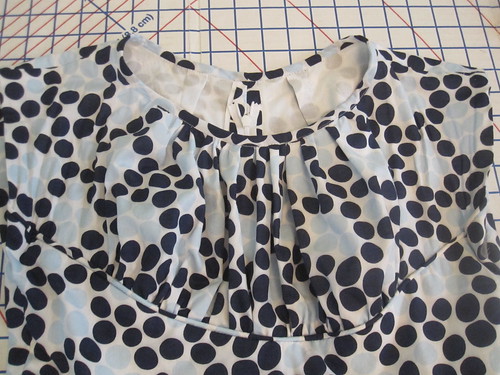
I added piping to the seam between the upper and lower bodice, using the tips and techniques shown here. It just seemed like it needed it to echo the neckline. I did not invent this; I know somebody has done this on this pattern before. I thought it was Joy of 21 Wale, but a quick look through Pattern Review isn't revealing it. It rather disappears into my print, but it makes me happy to know it's there.
I lowered the front neckline by 1 inch, as it was unflatteringly high. I think it could use a touch more.
I took two HUGE darts in the back neck. The dart width is 7/8", meaning each dart takes up 1 3/4 inch. The back neckline was *ridiculously* gapey. I do have a forward head and rounded upper back (aka terrible posture), but I don't see how anyone could wear that as drafted. I kept making sure the shoulder seams were exactly on my shoulders and not falling to the back because I didn't see how it could possibly be that bad, but they were placed correctly.
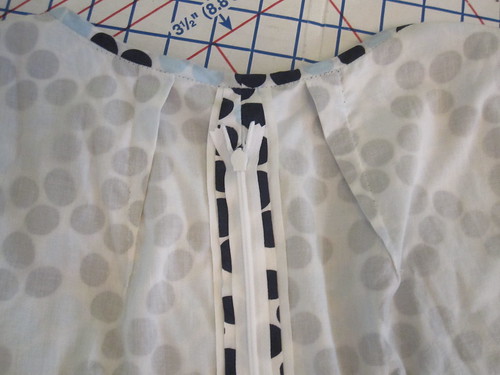
To get a continuous bias finish at the neckline, I started the zipper a few inches below the neckline at center back. The dress is not drafted with a CB seam, and it is designed with a side closure. I prefer a CB zip, so I just cut the center back with seam allowance instead of on the fold.

Because the bodice is underlined, I stitched the armscye hem to the underlining by hand for an invisible finish. This dress is meant to have shoulder pads and the distance from chest to shoulder is a bit tall. I should have shaved it down. The right shoulder was quite gapey so I took out about 3/8 inch of length at the shoulder, tapering to nothing at the neck.
I shortened the skirt 2 inches in cutting, and shortened it another two inches before taking a very deep 3 1/2 inch hem. It is drafted long!


I got this fabric in New York at H&M fabrics for $2/yard in November 2010, so it's been in stash for a while. Along with the bodice lining (cotton batiste), I moved 2 3/4 yards of fabric out of stash. And I finally have this dress!
I like it. I purposely left in a lot of ease at the waist. A cotton dress on a hot day is a nice comfort.
The design of the bodice is a little weird. I assumed that the curve of ruched upper front bodice would cup the bust, but in fact it cuts across it. For my small bust, this doesn't really matter, but it might look strange on a larger bust.
When I looked at these photos I was so confused, because my face is out of focus in all of them. My camera has facial recognition, which is a pain the patoot when using the self-timer because it takes forever to "find" me. I have to do gymnastics and position my face into every possible place in the frame before the self-timer catches onto my face and starts counting down. It went suspiciously well when I was taking these photos. Well, I'm pretty sure it was finding polka dot patterns it thought were my face. I once attended a presentation on facial recognition and they showed a soccer team photo where all the players' faces had been detected, but also the soccer ball's "face." At least the dress is in focus, right?
All photos are here and the pattern review is here.
.jpg)


.jpg)


54 comments:
So very pretty! I can't believe you got this fabric for 2 $ a yard - what a steal. I haven't made one myself but I've seen "shelf bust" patterns that have the seaming across the bust as well which I don't quite understand!
Pretty dress! I've eyed this one, but I keep dismissing it as not a realistic addition to my wardrobe. I don't wear just a ton of dresses though.
I'm definitely going to try precutting the bias tube--like you I've had trouble keeping the stuff even when cutting it out. So thanks for the tip!
I've been wishing for this dress since the pattern came out too, but not wanting to fight the fit in the bodice - big bust, weird seaming, all those gathers - but yours is the second one I've seen this week, and now I REALLY want one. This is just gorgeous. It really flatters you and the fabric is perfect. It has just the right amount of 'floatiness'. You bias tape trick is total genius as well. Cutting is totally the worst part of making continuous bias.
Totes adorable
I always get jealous when someone else makes this dress too! I can't understand why I haven't made it... Your version looks great (enviable) and cutting the lines on continuous bias beforehand is genius!
this is so pretty, what a perfect summer dress and a great use of the fabric. Lovely !!!!
So cute! This one has been in my stash for a while, too. Of course, I could say that about many, many patterns... :P
It's fantastic, Trena! This dress is on my wish list too, but now I can't even remember if I already bought it or not. Looks amazing on you!
P.S. Is that a new PR widget? Looks a bit different...
The dress is gorgeous and your bias trick is brilliant! I have to cut some for a project and I'm going to try that!
You are on a roll, girl! It's super pretty and very flattering! This pattern is in my stash as well and I will keep that front piping in my memory banks until I get around to it.
So lovely, Trena! I bet that facial recognition thing on your camera can be turned off -- sounds like a pain.
So very, very pretty. Looks perfect for a summer day.
Beautiful! I'm on a summer dress kick, and I think I have this pattern somewhere.
Yeah, I love this.
Oh I love this dress on you! The print is so perfect for the pattern and adding piping to the bodice was a stroke of genius. I have this pattern too, and your version surely will inspire me to pull it out this summer!
Trena, one of my favorite pieces on you! I am slowly starting my sewing again, and I envy your excellent fit, though I know it took a while to,get there's, Patience grasshopper, I always tell myself! Very cute dress, and I enjoy the thought process you detail in your posts!
This dress turned out beautifully! I see what you mean about cutting across the bust, but it still looks great. I really love this fabric.
And your epiphany about cutting the bias before sewing the tube - genius! That's one of the best tips I've seen.
I love how the pattern flatters your bustline while the fabric tones it down, so it doesn't look like you're overtly putting the boobage on display. While I like the look, I would have never considered it for myself. Until now, that is. I understand the pattern envy thing now!
Another Q, Trena - how do you keep track of your stash? Excel file or something else? I use an Excel file to track my yarn stash, but I'm out of control on my fabric stash & it's relatively meager compared to others' stashes.
Pretty dress! And the fabric is a really good match for it!
I've tried and failed twice with this pattern and I've now marked it in my giveaway pile.
Your dress is adorable. Mine was ridiculously large in the bust area, but I think your lowering of the neckline might have fixed that.
Might have to grab that pattern back out of the giveaway pile!
I too own this pattern but have been put off by the recommendation for knit fabric. Did you need to make adjustments for woven?
@Jane Elise, I honestly didn't even notice that jersey is one of the recommended fabrics. The other recommended fabrics are wovens and as a vintage pattern pre-dating the wide availability of knits (woolen jerseys being the exception) the knit recommendation is a strange one. It would be really hard to find a jersey lightweight enough to be gathered tightly into the ruching but with enough body to have definition and not just balloon. I might even venture to say impossible.
At any rate, It is definitely drafted with an appropriate amount of ease for wovens; I made no changes.
This is a super cute pattern and your version looks great on you.
Wow, this style is so flattering for your figure. Simply beautiful. Thanks for the tip on the continuous bias, that is just pure genius.
I've always imagined this pattern as a formal dress but I really like your summery version. I think the bust ruching would look terrible on me but it really suits you. Thanks too for the bias tip, I'll have to remember to try that next time.
I just dug out my pattern after I posted and saw that it also recommends woven! I completely didn't even notice that and just had in my mind jersey. I'm so glad I read this review. It has completely changed my mind about the pattern and I'm going to give it a go! Thanks for your reply, very helpful especially as my comment was not completely correct!
Nope, it wasn't me (: But maybe it will be soon, since this is waiting in my stash. That's saying a lot, since I so rarely buy envelope patterns.
This may be my favorite version of the dress. The fabric and the piping are perfect. It has vintage-y details, yet successfully avoids looking costumey. Also, seeing this work well on the less-generously endowed, makes me more likely to actually sew it!
Gorgeous dress and lovely summery fabric!
Beautiful.This pattern makes my favourite Summer dress. I piped 2 of mine too, but I don't know that I am the only one, it seems such a natural accent of the interesting seaming.
Lovely! Even out of focus you have that happy glow of a seamstress delighted with how her dress turned out. As you should be.
You look so pretty on this dress! The shape really suits your figure, and the light blue in the fabric plays against your red hair colour and looks just right for summer.
This pattern has been sitting in my stash for years. So I appreciate the thorough review and tips.
The dress and you look wonderful. Thanks for the fitting hints! Maybe I will buy this pattern. I start to like it more and more :-)
Great version of this dress and great stashbusting. I think the piping adds a lot to the dress, even though it's subtle. Good call on the depth of the neckline, and I can't believe how wide the back neck was until you fixed it. I own but am afraid of fitting this pattern!
I had a short stint as a drapery workroom sewer, and one thing I got really good at was cutting and sewing bias strips. Not a fan of making the tube myself, but glad you found a trick to help it go easier for you!
I really love the style of this dress. It is flattering on you. The piping is a nice design touch. I love dots.
I love this dress, and it looks so great on you! The light blue polka dots in the mix are a fresh surprise. And I LOVE your trick for cutting the continuous bias loop/strips in two steps - as you said, way faster and more accurate. And I love that you used the word "parallelogram" :-) Great use of the stash! Bring on the hot summer days.
Your dress looks great and very pretty for summer. The style is very flattering on you.
I just realized I have this fabric in my stash!!! I bought it at One Love here in midtown but that makes sense since the owner has (I deduced) US residency. AND I once saw a fabric that I bought at Jomar there that was also sold by Gorgeous Fabrics. Wow!
I love that dress too. Might make it in a lightweight knit, though. And with a different skirt, I shun gathers as much as possible in skirts. Well, everywhere on my body, pretty much!
But, yeah, you have me sold on this one. Lovely!
This is gorgeous! It looks beautiful on you!
I've never noticed this pattern before, such a pretty dress especially on you.
Love how this turned out! It looks very current, but has a little vintage twist! Job well done. I love dots too :)
All of your hard work paid off. That dress is absolutely breathtaking. You did a wonderful job.
Great dress, and your tip for cutting the bias strip is genius. Tried it today and it worked brilliantly!
This is the perfect dress for robbing a bank b/c the cameras will keep the dress in focus and blur out your face. Genius!
Thanks for all the tips. I have the pattern and fabric picked out, but haven't figured out how to handle the pockets. I'm going to try your techniques.
Pinning your bias tape tutorial! Thank you!
So gorgeous!
Beautiful!
Oh my... I love that dress. It looks so lovely and summery, but it really could dress up nicely. Well done.
Gorgeous!
I'm with you on the bias cutting part, sister! Very good job on it all and the style of dress is uber flattering.
Great looking dress. I can always count on you to inspired. This one has been on my list as well.
Ah hah, that's a new twist on bias tape for me, too! Clever! The dress looks so flattering on you, nicely done.
I so love this dress on you - looks like a fair but of work to get the fit spot on and to make the perfect bias tape, but totally worth it when the end result is so gorgeous!
It is very you! You look beautiful. I love the continuous bias technique.
Post a Comment