
When I got the July issue of BurdaStyle magazine, 07-2011-105 immediately caught my eye. I love the drape of the silk at the shoulder and it seemed like a simple pattern to showcase a stunning fabric. It is in the vein of the giant sack that Burda has been showing for the past two years, but I imagined it with a cinched bottom band. The drop waist is not a style that has worked for me in the past due to my pear shape, but I see it all over the place and think it looks cute on other people. I decided to expand my horizons.
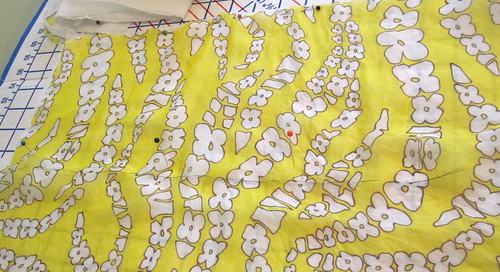
 The fabric I chose is a beautiful sheer yellow silk from Kashi at Metro Textiles in June 2009, an impulse purchase made on the strength of the color. He called it a Thai silk; it had a bit more body than chiffon before pre-washing, though it mostly lost it in the washing.
 Before cutting into this relatively expensive fabric ($10/yd), I muslined. I know, collective gasp. One of the reasons I muslined was to determine if this really needed to be cut on the bias. The muslin looked fine on straight of grain, so I cut the real thing on straight of grain. It might have helped to cut the batiste lining on the bias, but no way would I ever EVER try to cut silk chiffon on the bias. It would be the death of me.
In the first iteration, altered only to narrow the bust dart for an SBA, the stitching line that creates the flounce was too low, and I also felt to far over to the side. While it looked ok with the flounce all tucked up and arranged for final wearing, it exposed my bra underneath that. With sheer fabric, I didn't want to take that chance.
I modified the pattern to move the front stitching line one inch toward the center on both left and right front and raise it by 3/4 inch. Only a teeny skimpy flounce remained on the left front, so I added an inch back to the flounce, as you can see in the brown pattern tissue addition. Rather than re-make the muslin, I just sewed the placement line 1 inch closer to the middle and 3/4 inch higher. No more show through.
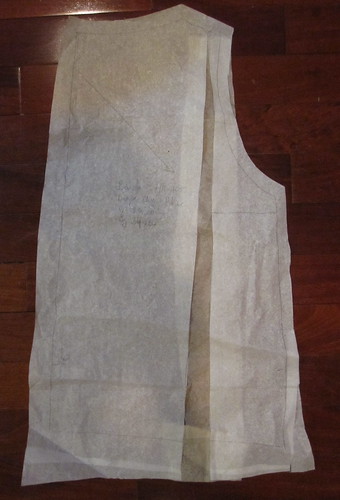 I also found that the back was too tight. I had not adjusted for a broad back because the style is drafted to be large, but it turned out I needed more room not just at the shoulder blades but also the hip. So instead of doing my usual L shaped adjustment, I split and spread from hem to shoulder to add width. I had taken a swayback adjustment in the muslin and found that the back tended to ride up to my natural waist rather than stay dropped over the hip, so I undid the swayback adjustment to give myself more length to the hip.
Rather than have to wear a separate camisole (unthinkable in this heat, truly), I drafted a lining for the front from the right front piece, which conveniently had the center front marked. For the back lining, I used the back pattern but dropped the neckline an inch so the lining would not peek out. The lining is Vogue Fabric's cotton batiste ($3.50/yd).
 Man, dealing with silk chiffon sucks. Why do I keep torturing myself with it? I really need to learn how to do the starching thing. But where do you spray it? I don't have any outdoor space and I don't want to spray a bunch of starch inside my house to create a permanent film of stickiness!
Anyway, to mark the placement line on the fronts, I thread traced. I put the pattern piece down on top of my cardboard cutting mat and the put the cut piece of fabric on top of it, in the process realizing that my cut piece of fabric bore very little resemblance to the pattern piece. Moving on. I then stuck pins straight down into the cardboard about an inch and a half on either side of the placement line, like a beetle on a specimen card. Then I thread traced. Even so, my thread traced line wandered amiably like a country creek but it gave me an approximation of an idea of where to line up the two pieces!
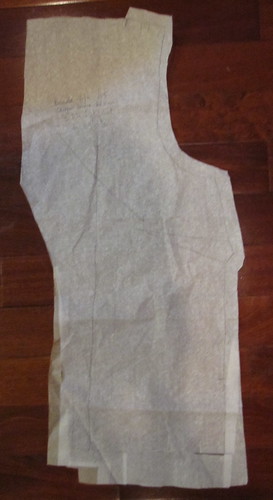
 The pattern is designed to have a contrast band run the whole length of the bottom, including onto the flounce. However, I wanted to have a casing at the bottom, so it required a little engineering. My plan was to finish the flounces with a serger rolled hem and sew the seams as French seams. So I did not add seam allowance to the flounces, while the shoulders and the SA below the flounce stick out from the pattern as "notches," as you can see above on the right front pattern piece and in this closeup of the two front pattern pieces.
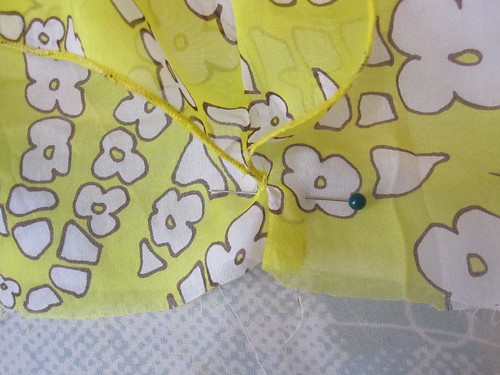 Before I serger-finished the flounce edges, I clipped horizontally below the flounces to create the seam allowances. Then I finished the edges up to the end of the clip before sewing the french seam underneath. I couldn't get the serger in all the way, so the final little bit is just a machine zigzag, but I I was happy with the way my idea played out; it looked great once the band was sewn on.
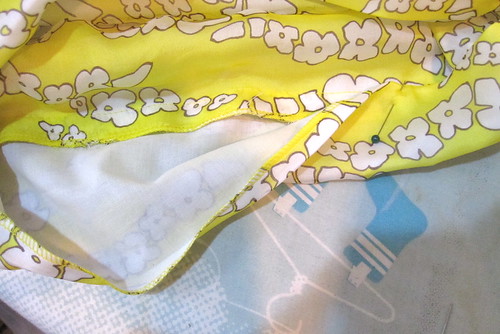
I attached the band as per my usual procedure for things like this. Rather than first sew it to the right side and then attempt the impossibility of stitching in the ditch while catching the underside of the fabric, I sewed the band first to the wrong side then turned over and topstitched to the right side. I left an opening in the seam on the left side, the side closest to the flounce, for the tie.
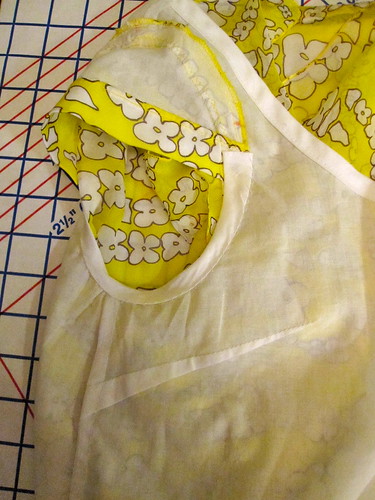 The lining was constructed separately, the neckline finished with a bias binding. The lining and fashion fabric are sewn together at the armscye and the lower band. The armscye on this was oddly tight as drafted and I had to trim off about half an inch at the lower half of the armscye and probably could have done more. I added a small cap sleeve (I stupidly used the sleeve from a knit dress and it had to be drastically shortened to allow for any arm movement). The armscye below the sleeve is finished with bias tape, which I hand-stitched to the lining to keep in place.
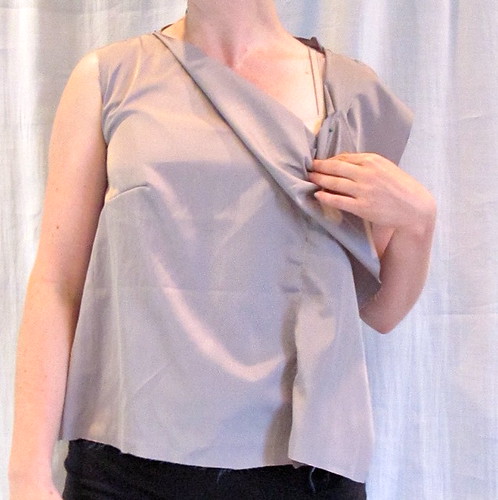
The last step is attaching the strap to the flounce and creating the drape. The directions for this in the magazine were atrocious, and the line drawing makes it look extremely complicated. In fact, it is super easy. I made my first video to show how it's done! Exciting.
1. Sew your fronts wrong sides together to create the flounces.
2. Pin strap to the corner of the left front (larger) flounce; stitch.
3. Pull the corner of the right front through underneath the strap and arrange.

 I obviously showed no creativity in the color of the bottoms that I paired this top with, which I did not realize until I was putting together the collage. Oh well, navy is a good match for yellow.
 I'm not going to call this project a fail, but my instinct that this silhouette wouldn't work for me is confirmed. I was envisioning something like this DVF, and in the muslin the elastic banded bottom seemed to work, but when the real thing came together it just didn't look any kind of good with elastic. I don't know if I didn't have enough length or width or if the batiste + silk was just too thick at the band, but it looks like a balloon rather than a sophisticated top.
I took out the elastic and just did a tie, but the style is still not flattering. You can really see the sackiness with the eyelet skirt. I think this is a style that works for apple and rectangle shapes but is hard for pears. Most tops in this style are made with jersey and I think there's a reason for that. Even lightweight silk and cotton batiste have too much body.
It is also a little fussy to wear, as the short end wants to flip up over the neck (as you can see in the jeans photo in the thumbnail at the top).
However, I do like it tucked into the lace skirt so I have a way to wear it that doesn't make me look like the Stay Puft Marshmallow Man.
All photos are here and the pattern review is here.


.jpg)


.jpg)


42 comments:
This is awesome. What a versatile top. Job well done!
I love the video tutorial. Thanks for taking the time to do this for us readers.
Love how the top looks so bright and breezy. And what a great video! It's so much simpler having a pattern specific design detail explained like that. Thank you.
Muy elegante Trena !!!
I love all three of these looks on you-where did you get those zebra heels? OMG, I'm in love. Actually, where would I wear zebra heels in Klamath Falls OR...
Back to your work-I like the blouse tucked in and with the jeans especially. Both are great looks for you. The third would work with a plain skirt I believe. You look great in all three however.
I heard on a quilting podcast recently about doing a starch soak in the tub. I wonder if that would work for lighter weight fabrics, too?
I'm loving the last two looks. The first is sassy conservative and the jeans the upped the hotness factor 1000%!!! I love the blouse on you.
I kind of like it paired with the jeans.
I wish I could wear yellow. My olive skin tone is usually very wrong for most shades though. (Yeah, I'm whining.)
Excellent! I was looking at this pattern last night wondering if it would work for me. Thanks for posting the tutorial. BTW-Do you ever sleep. Man O man; you crank them out so fast. Way to Go, Girl. Oh yeah, I like the way you style this cute little top.
This looks amazeballs tucked into the navy pencil skirt. A fun, but still appropriate outfit for work. I also really like the look w/ skinny jeans and heels (hello perfect date night look!).
I skimmed right by this look in the magazine because I thought it wouldn't work and would look too weird. Thanks for the inspiring post.
I was surprised to see you write, "But where do you spray it?" To stabilize chiffon with starch, you soak it in diluted liquid starch -- or mix up powdered starch with water, or use corn starch in water, or even stiffen it with sugar dissolved in water. Then you wring it out and hang up the yardage to dry. Then you press it, to set the starch and take out wrinkles. Spray starch does not get the fabric stiff enough. (Which is one more reason not to ever, ever, ever mess with chiffon again, sez I to myself, whenever I foolishly forget what a right royal pain this fabric can be.)
It looks great on you, you are much too critical!
Thanks for the video it is a huge help.
i think the shirt and skinny jeans combination is a total winner, especially with the cute zebra pumps! although i really like it tucked into the pencil skirt for the office.
I think it looks incredibly -interesting-, and thanks so much for the video. As to starch, remember this stuff is meant to be sprayed on an ironing board, it doesn't fly out that much. I'd say do it on your kitchen floor - a quick mop with just water and it'll be gone. I dries stiff, not sticky.
Ok, I know what you're saying with the pear shape and banded drop waist - just not a look that works on me either. BUT I think the way you styled it with jeans is super cute and really works. And it also looks fantastic tucked into the pencil skirt. So, definitely not a fail.
I'm sorry you think it is a fail, but--tucked into the narrower navy skirt--it looks like a WIN to me.
BTW, you don't have to do the spray starch thing. You can use diluted liquid starch in the bathroom sink. Then you squeeze it dryish and hang it over your shower curtain rod to dry before working with it.
What a lot of work for a "simple little top", but so well worth it. I do think it looks wonderful tucked in with the eyelet skirt. Works well with the jeans, too. Love those zebra shoes!
I adore this tucked into the skirt. It looks so classy, and you rock it with the skinny jeans. I know what you mean about the Burda sack though.
I thought this looked completely shapeless in the magazine, but your version has instantly made me want to make it anyway. Lovely. Thanks for the construction tutorial.
I love this tucked into the straight skirt. It gives you a beautiful x shape and the colour is gorgeous on you
I Wonderful with your top tucked in and perfect with the jeans. Yes, that Burda sack thing is still going strong. But you did a terrific job with a very uncooperative fabric. Thanks for the useful video; it's a terrific resource.
My favorite views are A (black eyelet skirt) and B (skinny jeans). I thought of Jacquie from Homemade couture when I saw it in the preview but you have completely MADE this pattern. Burda needs to give you a prize for your contribution to the sale of August 2011 issue, LOL!
Me again. My word was: baste, can you believe it??? LOL
I like it tucked in as well. I have not tried the starched method yet either but might get to it this month. I have a lot of chiffon from the fabric.com Vera Wang extravaganza last year... or was that the year before?
why not spray it in the bathtub area.. then when done spray the bath and area with cleaner.. of course you want to time this for when the bathtub needs cleaning
I think it looks fabulous! Love it tucked into the lace skirt.
Isn't that the prettiest top!
My favorite was with the skinny jeans and the darling zebra heels. Way to rock the look.
The video was very clear.
Was planning to make this, so your post is very timely! Didn't understand why this style needs to be cut on the bias and why the separate band at the bottom, especially as you are creating extra weight on such a light bias cut fabric as silk chiffon. Cutting on the straight grain seems to be with a wide hem seems to be enough already. I haven't seen the english instructions, but read through the german ones, and they seem pretty clear. The original instructions call for zigzagging the flounce edges.... but on bias cut chiffon, that must be a nightmare! I think I'll just serge them like yours! Thanks for the post!
I love your top with jeans! You look great :) Making me reconsider skinny jeans in fact...
I just love it. All the looks (pear or not). You are too cute. The fabric is such a good match for the pattern.
The top is very pretty, and the fabric is gorgeous! You're right though it's a hard style to wear unless the wearer has narrow hips; there's no way I could wear this over a wide skirt. I like it tucked in, and I think it looks nice with the skinny jeans, too.
I'm so so glad you made this, thanks so much! This was my favourite pattern from this issue and one I hope to make in the future. I really think this looks nice on you in all three scenarios - sometimes I think we're our own worst critic for fit. The average non-sewer will just see a lovely blouse in a pretty fabric and not think about apples and pears. :)
The drape is so fun, and the fabric is really pretty. I think tucked into the skirt is my favorite way as well. Perhaps there's hope for Burda yet. When I get myself together enough to sell the issues I won't use, perhaps I can justify renewing my subscription.
~Elizabeth
I think you look nice in this light blouse - no marshmallow man in sight. I was intrigued by this top in that issue so thanks for going above and beyond with the video. Very cute paired with those jeans and shoes ;-)
I agree it's a difficult shape to wear, but with the gorgeous fabric with a very appealing tie I do think it looks really good with the skirt and not too bad with the jeans.
This is a brilliantly helpful review although I think I am still too scared to attempt this one. I love the tucked into a skirt look on you.
I remember this design from that issue and have it on my list to make in the future. I love, Love, LOVE your version. Thank you so much for sharing and I want those zebra print shoes.
Wow! You did such a great job on this! It's a beautiful top and looks great with all your bottom options. Looks like it was tricky to sew up. I'm so impressed!
WOW! A video tutorial!! You put us all to shame! I wanted this blouse and then was put off by another review and now you've got me drooling again, thanks to a simple video. I would never have been able to make sense of my Burda instructions in French!
Many many thanks!
www.dinahleekung.com
Fantastic video, thank you! This really looks very nice on you, especially tucked in or worn with a very fitted bottom (like the jeans). With the full skirt, there is too much volume, but the other looks are wonderful! Job well done!
Starching suggestion: Spray it in the bathtub or shower. Then, any excess will just wash down the drain.
I just traced this pattern, and then read your review - very glad I did as it has prepared me a challenge, I'll definitely make a muslin too. Thanks for the detailed post :)
I was trying to decide what to make my Mom for Christmas, because she is rather conservative and "Canadian" (read: Fleece is a fashion fabric...) in her dressing, but I know she does like the pretty stuff, just never thinks of buying it. I saw this beautiful jewel toned printed satin when we were shopping and while looking through my Burda's, thought of this top you made. She's an apple/noodle so this will look great! Thanks for the great tips too! Now, to get it done without her finding out..... Oy!
Post a Comment