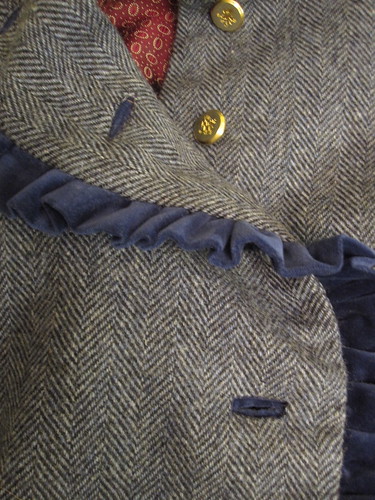
 I am not one to make sewing resolutions, and although I have a list of things in my head that I don't know how to do but ought (*cough*fly front*cough*), I don't really feel the need to "grow" in my sewing. It is a hobby for *fun* and it clothes me quite well without knowing all that fanciness. I only turn to new techniques when they are the perfect touch for a project--I don't choose projects to try new techniques. My most recent coat project (this is a teaser for the finished product, which I have not yet photographed) involved velveteen trim and somehow I got my heart set on bound buttonholes with velveteen lips, so it was time to give it a try.
First of all, lest anyone accuse me of not being slapdash, let me note that I made ONE sample before going on to the coat, and it was rather wonky. My learning curve plan, an ingenious one if I say so myself, was to start with the bottom buttonhole and work my way up so that by the time I got to the top, where people were likely to actually see/notice the buttonholes, they'd be ok. It worked out pretty well for me. And where any possible shortcut could be taken, I took it (sewing the lips in a strip, marking only one side of the fabric, marking only the length of the buttonhole).
Though I have read many, many bound buttonhole tutorials over the years and sincerely appreciate every single one of them, the particular one that finally pushed me over the edge was Gertie's tutorial, with very clear step-by-step instructions with a photo for each step. This post is less a tutorial than a document of the blood, sweat, and tears that went into making my bound buttonholes.
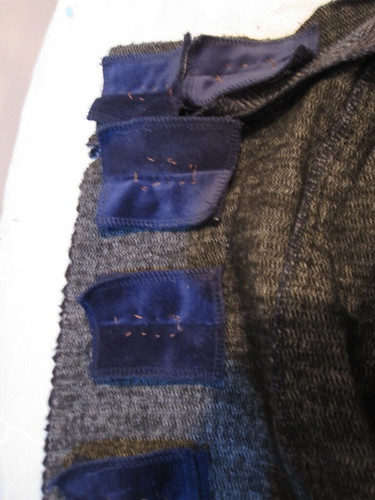
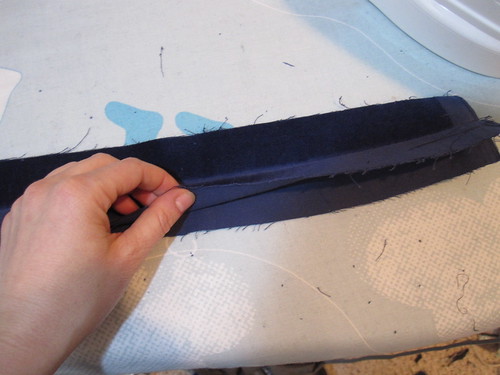 My first shortcut was to make the lips in a strip rather than individually. This is really only a convenient change if you have a serger.
Start by cutting two strips of fabric as wide as you want the final lips to be with a total combined length adequate for all your buttonholes. I cut mine two inches wide and allowed 3 inches of width for each of my 7 buttonholes (well, originally 8 but I re-cut the collar). This was generous and I trimmed them down once they were sewn in place, but I want to have plenty of room to maneuver.
Place the fabric right sides together and sew down the middle with your machine's longest basting stitch. Then fold each strip onto itself, wrong sides together, and press. Use the serger to trim and finish the long strip into individual lip units. The serging should be enough to keep the center basting stitch from unraveling while you're handling it.
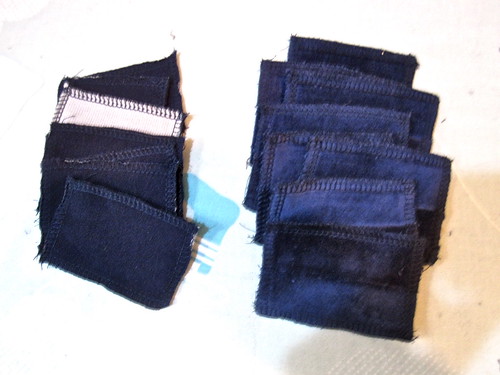
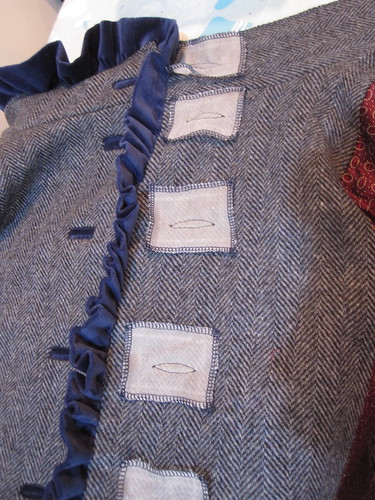
You'll also need squares of fabric to sew into and pull through to the inside. For lack of a better word I call these "windowpanes." It's best to use the lightest weight fabric possible. Gertie recommended silk organza, but I didn't have any the right color and knew it was bound to show somewhere. I found some silky lightweight navy poly from the Carol Collection in stash. I cut it into a strip as for the lips, interfaced all at once (the white square in the photo was flipped over to show the interfacing), and serger trimmed to individual lengths. Once you have all your windowpanes and lips, you're ready to move on.
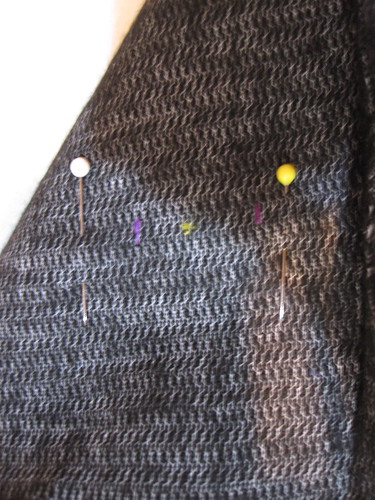 Now it's time to mark the buttonholes. I think technically one is supposed to do the bound buttonholes while the front is still a separate piece. I never use the marked position for buttons because isn't having custom-placed buttonholes in the exact right place for your body part of why we sew? I constructed the shell of my coat so I could mark the button position and then did the bound buttonholes.
I marked the buttonhole position on the wrong side with chalk, but unfortunately with a lot of handling the chalk rubbed off, so I did tailor's tacks to supplement. Although every bound buttonhole and welt pocket tutorial in existence urges you to mark the center line (the opening) of your buttonhole *and* the two legs, I don't bother. I just mark the two ends of the buttonhole and use the edge of the presser foot as the guide for the width of the space between the two legs.
The reason I mark on the back is so that I only have to mark once. After the markings are completed, just pin your windowpane squares to right side. They don't have to be perfectly centered over your marked buttonhole position, and therefore it doesn't matter that you can't see them while sewing.
 Now you sew all the legs of the windowpanes. Using my tailor's tacks as a guide for length, I would sew one leg, then position the presser foot so that the edge was slightly past the first length (I wanted wide windows so my lips would really show) and sew the other leg.
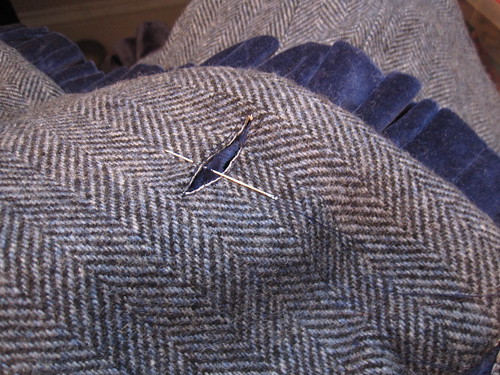
Once the legs are completed, clip into the center and slit through the center to about 1/4 of the way to each end, then clip a Y to the corners. I really need to treat myself to a pair of nice embroidery scissors because my rinky dink thread snips are not adequate for this task, and shears are way too unwieldy and cumbersome.
Turn the windowpanes to the inside. They look like flowers! Until you press them. Then you have a nice set of windows, as seen at left.
At this point I was feeling cocky. All the preceding steps took little more time than making regular buttonholes would have, and were not at all difficult or fussy. Ah, hubris.
 Then came the lips. Hooboy, the lips. It seemed easy. Just pin them into the windows and sew to the cut out triangles and edges of the windowpanes. I don't know if it was a function of the nap of my lip fabric or if this is what is hard about bound buttonholes, but after many, many, MANY failed attempts I ascertained that the only way to avoid flying a scuba flag of 100% diagonal lips (I mean, truly, wouldn't chaos theory predict that at least ONE of them would accidentally be straight?) was to hand baste the lips to the little triangle and the side flaps. Pinning was a joke. Hand basting the lips to the windowpane square very near the opening but not actually along the stitching line made no difference whatsoever in the scuba situation, it had to be along the final stitching line. And even then they shifted during sewing.
 The time efficiency I had just been crowing to myself about flushed itself down the toilet and into a black hole and installing the lips in my easy, breezy windows took a good five hours.
Although it makes logical sense in terms of construction order, I think the psychological sense of making bound buttonholes in the middle of construction rather than at the end is even greater. If you knew that a mere 7 hours of buttonhole work were all that stood between you and a finished coat, I don't think anyone would ever make bound buttonholes.
 But of course, you're not actually done. There is still the facing to deal with. My original plan had been to make windows as I had for the front, but of course without their own lips. But then I remembered a tutorial in Spanish Snap Buttonholes that Kay the Sewing Lawyer posted a while back. It sounded like a much better plan to make the windows all in one as an oval rather than messing with the Y cut and little triangle nonsense.
 On this side I did use silk organza, figuring a little bit of white showing on the facing wouldn't bother me. I didn't actually look back at Kay's tutorial before starting so I didn't put my windowpanes on the bias.
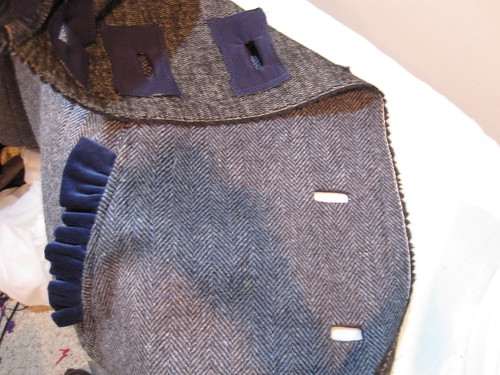
The hard part here was that the coat was almost fully constructed. I knew the only way I would get the outer and facing buttonholes to line up was if I put in the facing buttonholes after the facing was sewn to the front. Especially with my thick velveteen ruffle between, there was no way to merely baste the facing on (broke 3 needles as it was!), mark the buttonholes, take it apart, and then sew it again in the exact same place. Absolutely no chance of that happening. So the hardest part here was maneuvering a giant lined coat under the sewing machine to sew the football-shaped buttonholes. I was actually panting by the end of it, and felt like I'd gone 3 rounds in a wrestling match.
 The last step was to secure the facing buttonholes to the outer buttonholes, to make sure they'd stay lined up and to keep the button from getting lost in that void. Here, the thick velveteen of my lips was an advantage because I was able to whipstitch by hand, catching only the inner layer of the lip (remember, the fabric is folded on itself) and the edge of the Spanish snap buttonholes.
I ended up making 9 of these (in addition to my sample), as I put six buttons on the body of the coat, started with 2 on the collar but realized it just wasn't going to work (not enough length on the collar to place them properly), re-cut the collar and did another one. None of them are perfect, but they're all passable. And I realized to my chagrin that they hardly show at all when the coat is buttoned! I am a little concerned that the nap will wear off from the frequent friction of buttoning and unbuttoning, but as long as the fabric doesn't give I will survive.
All photos of this process are here.
I don't think bound buttonholes will be making a frequent appearance in my sewing, but I'm glad that I've tried them. Now I can coast for the rest of the year, since I've already done something new!


.jpg)


20 comments:
Those are beautiful, and now I know I will never, ever, never do them.
What a great job you've made of these. I love the velveteen trim.
Congratulations on all the effort and the gorgeous result! The velveteen ruffle is delightful, but the bound buttonholes are the extra touch that will make the coat really special. Very clever of you to do in the middle of the project. If that were my coat, it would hang in the closet forever with one buttonhole half-bound.
I am intrigued by this jacket and cannot wait to see the final photos! Impressive you! Learning a new and tricky technique on heavy difficult fabric! I think you did a fantastic job "wrestling" them into existence.
I love bound buttonholes, and your coat promises to look gorgeous. I've never done them (bound buttonholes), but have already figured in advance I won't need to practise because I have done welt pockts. (Without practising those beforehand, of course.) What good is sewing without a little adventure?!
Like you I have just done my first bound buttonholes, but i did them on a stretch knit. I am kind of glad that they are hidden by the buttons when I am wearing the garment. And I only did them because I don't have a stretch buttonhole on my machine and I happened to be feeling a bit gung-ho at the time. But I was a little circumspect. I tried Gertie's way, and Summerset's way (and another way but I forget whose) first and was pretty gobsmacked (as we say in the UK) by how very fiddly and time-consuming Gertie's way was. And I just could not get them straight. Maybe the jersey didn't help. The other way was so-so, and in the end I went for Summerset's method. All final faults were user error.
Misafir
What a tease! I can't wait to see the finished coat. It looks great so far.
Thank you for the advice on shortening up the process a bit. I am finishing up a coat myself and that will help. Can't wait to see the finished product.
Thank you for the lovely photo shoot of your technique. I must admit that I was distracted by the delightful ruffles on your completed garment. I looking forward to seeing your review and photoshoot of the coat.
Rose in SV <--has never attempted a bound buttonhole, so she is in awe.
I just want to agree that Gertie's tutorial is awesome...I've read it before and don't have to to these kind of buttonholes yet/at the moment, but she made it seem really doable. You're project is looking good!
Heather (newbie commenter, reader for a while!)
Heather
This is a tease, it looks like a modern day Jane Austin jacket. Great ruffle and the buttonholes look fabulous.
Wow, those are fantastic! Not at all slapdash. Can't wait to see your finished coat :)
Amazing. I can't wait to see the jacket as it looks tantalizingly gorgeous!!!
I am also a fan of bound buttonholes, especially on coats and jackets. So classy!
I got your message about my coat fail... and I'm sorry to say that the coat has moved on to wadder heaven as of a few days ago. :(
Good job! I'm one of those people that try to learn something new with each project. Or at least try to perfect something I've rushed thru in the past...
I really like those buttonholes!
Your buttonholes look lovely - such a nice finishing touch. Great jacket too - can't wait to see it on you.
Please put me out of my misery and show me your jacket/coat? You did a beautiful job on those button holes. I haven't done them yet. Who knows maybe this year.
This looks like an awesome jacket, the combination of tweed and ruffles. The buttonholes look very good, great result. I won't sew them very often either.
And I heard you're coming to the Netherlands in May! It will be so nice if we have a chance to meet.
LOVE the fabric and velvet combination! I remember making bound button holes once, they were a lot of work, but so nice to look at. You did a great job.
Looks so cute - the blue ruffles and bound buttonholes with the tweed fabric. Can't wait to see more!
Post a Comment