
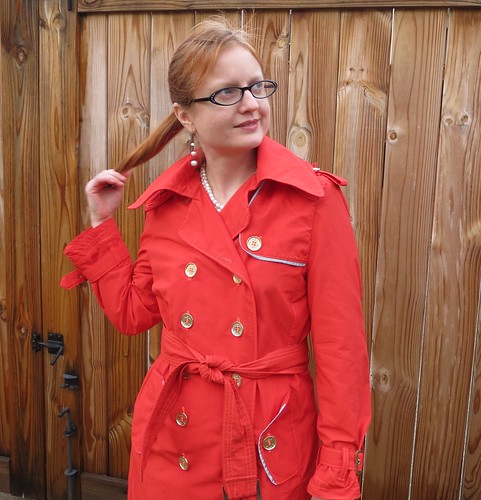
So last Spring, almost a year ago now, I was in a mood to tackle a big project and to do it right. I don't know why that came over me--it's unusual! I am more of a "make it in a weekend" gal. So I decided it was time to make a trench. Burda 11-2012-118 is *almost* the perfect classic: it has the separate collar stand, double breast, and gun/rain flaps--but the latter are weird and asymmetrical. A totally unnecessary variant! However, it was relatively easy to turn them into the classic look, and the pattern needed only my usual fit alterations to be perfect.
Fabric Mart had some fabulous red water resistant (more on that later) nylon allegedly from Marc Jacobs, I splurged on fabulous hardware from Pacific Trimming, and patiently got started.
Well, back up. After tracing out and altered the pattern I cut it out in a coated linen I got from Fabric Mart a while back. Luckily, I thought to actually test the fabric for water fastness before starting to sew. Not only did the waxy coating on the linen offer no water resistance whatsoever, it seemed to actively soak up water *worse* than your average fabric. So that's in pieces in my sewing room still.
So with the red fabric, I sewed some scraps together and tested various configurations. I found that by pressing the seam allowance to one side and topstitching, the seams were surprisingly waterfast and I decided not to use waterproof tape on them.
I got the shell of the outer fabric most of the way constructed using my most meticulous craftsmanship...and then my partner and I bought a house. So that went into a box for months and months while we moved etc. Then in October we planned our trip to Italy--two weeks in advance (we had a rough Fall with deaths in each of our families). And since it was October, it was predicted to rain the whole time we were there. Eep! I needed the trench coat, and I needed it now! So much for taking my time on this project and doing everything right.
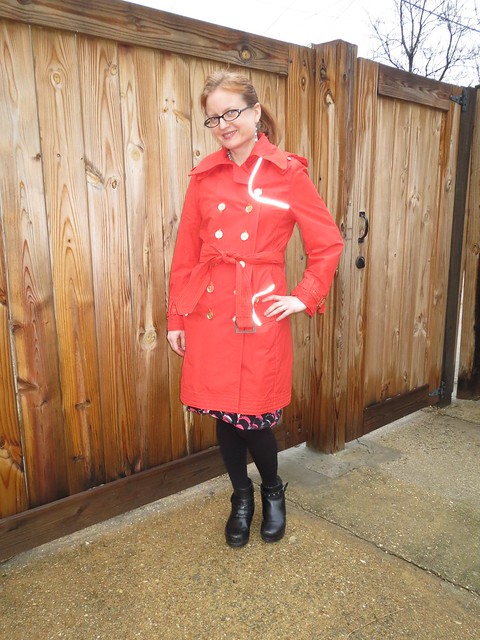 |
| Taken with Flash to Show Reflective Piping |
There were a few special details that were important to me. I wanted to add some reflective piping, to give me more visibility when biking in the rain. I wanted the front storm flap to be functional. I wanted the traditional epaulets and sleeve belts, as well as tie-but-belt-buckle belt (I didn't put any eyelets in the belt). I wanted a chain for hanging it on a hook. And I wanted a functional but removable hood.
And I wanted all this in two weeks. Hence, why there are no in-progress photos and no construction information. I figured I'd rather post (after months of silence) than spend another couple months trying to recreate the construction process.
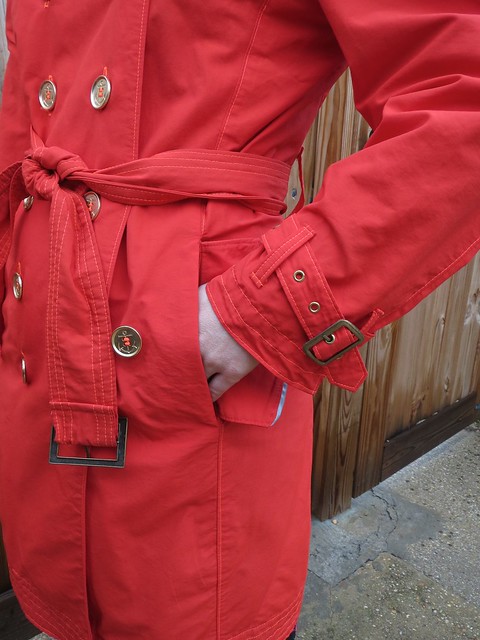
I kept a Burberry trench open on my computer at all times and used the zoom function on every possible detail. In the end, I think I only got one thing wrong. I looked at the pocket flap over and over and it really looked like it was attached behind the pocket and buttoned in front of it. I'm still not sure which way the Burberry goes, but I knew at the time it was probably a mistake and it was. As I discovered while walking home from work in a snowstorm while wearing my trench, the precipitation just blows right into the pocket. Alas. I will add a second flap on the front of the pocket so the flaps can button either way, depending on wind direction.
I think my most proud detail on this doesn't even really show to the casual observer--the lined vent, my first one ever. I watched this video over and over and it really worked! It made me extremely nervous to cut away my lining fabric for the underlap side. I hate doing things that can't be undone. But I had faith and went forth and the vent is beautiful.

My stupid mistake was that I haven't made a double-breasted coat in so long that I totally forgot that one row of buttons is functional and the other is supposed to be fake. I made them all functional. So there are a million buttons to button if I want to wear this buttoned. Ah well. In a way it looks better, because if I just wrap the coat closed and hold it in place with the belt rather than buttoning it, which I do more than actually buttoning it, then you still get the effect of the double row of buttons.
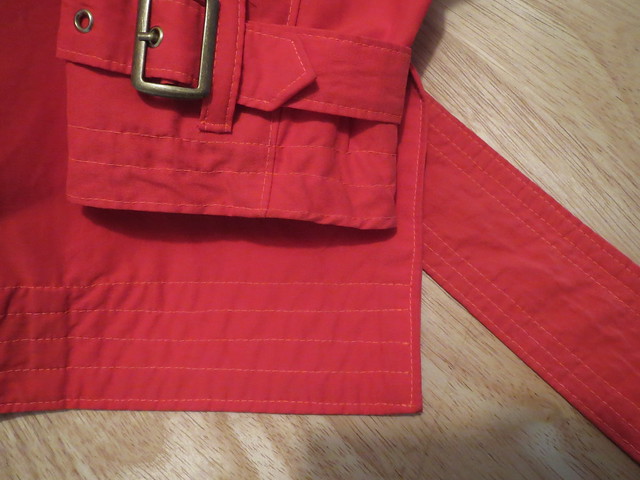
This fabric doesn't do "crisp." Cidell kindly took the photos and asked if I wanted to steam it first. Ha! In order to give the sleeves and hem *some* body, I sewed multiple rows of parallel stitching, which worked out pretty well.
Believe it or not, the floppy pocket flaps are interfaced in heavy interfacing on both sides. I also interfaced the lapel to a little beyond the roll line on the fashion layer (as well as fully interfacing the facing).

The only poorly done details on what was supposed to be a meticulous project are some of the buttonholes (appalling) and the hood doesn't really button under the chin. The hood was the last step and I was sewing it deep into the night before we left the next day for Italy. I found a Burda pattern with a hood, and shrunk it by about 30%(!) for my tiny child-sized head in a two muslin process. It amazingly looks pretty good, especially with the sporty mesh lining, but the ends are too thick to work the buttons into the buttonholes without extreme effort. Luckily, the drawstring (with red elastic cord purchased from Pacific Trimming for a luxe touch, rather than the more readily available generic black) and gold cord stopper keep it in place.
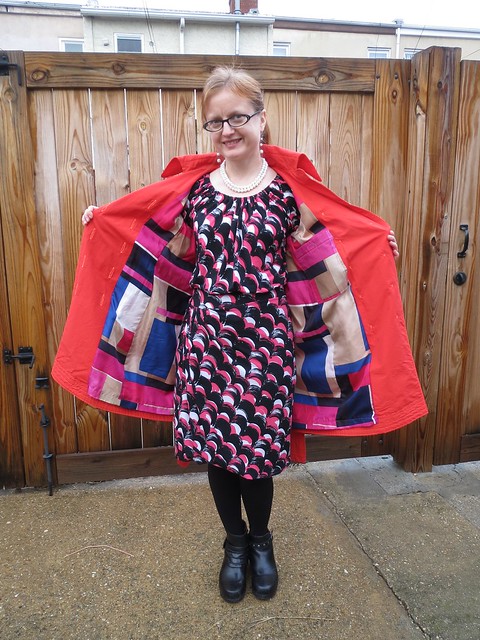
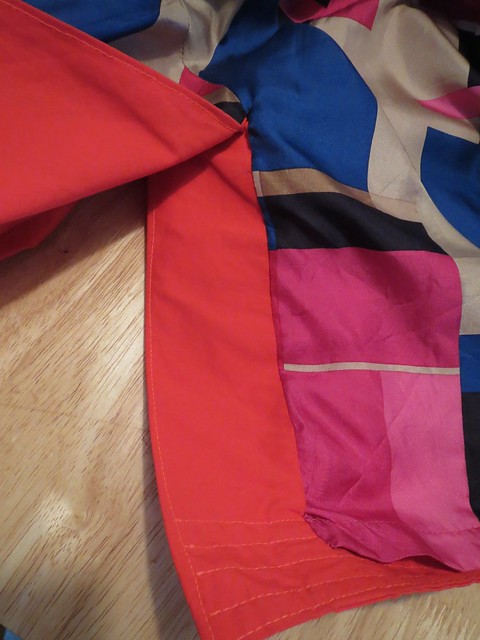
It's lined with a silk print I got on eBay for a great price. The print has pinks rather than red in it, but I think it works. I considered adding an interlining layer, but decided I wanted the coat more for Spring/Fall and so the nylon + silk would be warm enough. In fact, it is the perfect weight. As mentioned, I was able to wear it when it was snowing with heavier underclothes (but it is not very cold in DC when it snows for the most part--just below freezing) and have already had plenty of use out of this Spring.
I was proud to wear this coat in Italy, though I flew too close to the sun and got soaked one day. Our last morning in Parma we ran out to get cheeses and bread and snacks for a picnic on the train to Bergamo. It was POURING. I just wore the coat, no umbrella. Well, if you have this fabric, let me warn you. It is water resistant. There is a big difference between water RESISTANT and waterPROOF, as it turns out, and I got absolutely soaked. In a light rain it's great. In a heavy rain, you have about 10 minutes of comfort and the rest of the day of drowned rat. It's no substitute for an umbrella! I had a moment of rage that I had put so much work into something that was supposed to last for at least a decade and it didn't function as intended. But now I'm over it. And really enjoying wearing this in our light Spring rains!
All photos are here and the pattern review is here.


.jpg)


.jpg)


32 comments:
Awesome jacket... love the details and the color.
What an extraordinary amount of work. I love the attention to detail, although I admit that I'm too lazy a sewer to attempt anything like this. Once again, I'm so impressed.
Your rain coat is beautiful. No one would know it wasn't purchased from a high end store. Reflective piping is genius and as for the two rows of buttons, I've purchased raincoats with much more annoying features :-) Besides, it's that type of detail that makes it look high end. Also the gold buttons, cord, etc. I made a rain jacket for my daughter a couple years ago and it took a long time and didn't have the details yours does :-)
Your coat looks great. Glad you have posted again. Have you tried using Scotchguard on your coat? I live in the land of heavy rain and it really seems to work.
Love your coat. Very ambitious! I agree with Eileensews about the Scotchguard. Also, there are products called "Tech Wash" that let you launder in waterproofing. We use them to extend the life of ski clothes.
Gorgeous jacket! I have some of what I suspect is the same fabric from FabricMart, bought with the intention of making a lightweight anorak-style jacket for spring/fall weather in Seattle. For all of the "rainy" reputation we have here, our rain is mostly light showers, so I think I'll be fine, but THANK YOU for the heads up that I'll still want an umbrella in a downpour!
Camp dry. It's a spray on waterproofing chemical that is used on tents and such. It smells terrible, so don't do it inside, but it works like a charm and only costs a few dollars at Walmart. :-) (Note: I think you have to re-apply after each wash though.)
Otherwise, this jacket is gorgeous! Love the color and style. And THANK YOU SO MUCH for the video on lining a vent--I'm currently making a suit for my son and Burda's cryptic directions for a vent aren't cutting it.
Wow, that was a decidedly non-slapdash project.
I'm glad that the wear time justifies the construction time.
The jacket is beautiful and you should be proud.
This is a very beautiful-and functional- trench coat!
I love the fact that you made the gun flap to be functional! Decorative ones drive me nuts. I used the exact same fabric for a sportier sort of rain coat/anorak... I found out eventually that it's not truly waterproof, too! But I find the material super comfy and easy to move in and mostly wear it to go between car/home/grocery store/etc. Also, I do suspect this is actually a Marc Jacobs fabric-- I was able to locate a number of MJ rain coats with this material on the interwebz last year, and actually did a bit of copycatting for my sporty raincoat. http://www.kathy-sews.com/2014/07/simplicity-2153-designer-inspired.html
You have blown my (contained in an adult-sized head) mind. What the...? Such a big, impressive project, and a great result. One way to think about the water-resistant vs. waterproof thing: for those times you are not in a downpour, water-resistant is probably actually the more comfortable (breathable) option.
And you bought a house? We want to hear more! Sorry that the fall had such sadness--hope things are brighter now.
This is fantastic! I've never seen a trench so I love your style of just going out and making it yourself!
Great colour choice, really admire this.
I hope you have treated yourself to rewards and pats on the back. This is a wonderful project. lovely for your climate and packable! You are a great inspiration to those of us who like functional clothing as well as beautiful clothing.
Wonderful! The workmanship is fabulous.
Very nice job Trena!
Great job! Glad to see you posting again!
First congrats on the new house! I hope you have an amazing sewing room. Second it's good to see you back blogging. I've missed you and wondered if you'd just gone away. Third the coat is amazing! Hope we'll be seeing more new garments and that you're all settled in!
I absolutely love it! This is the kind of project that is worth the attention to detail. Definitely a keeper for many years and the colour is great!
Fabulous! Great coat. I love traveling with a thinner coat.
Great news on buying a house too!
I know it comes with three sewing rooms and enough storage space for your fabric buying spree in Italy.
Great coat, love that you used red. Enjoy!
I too am normally a quick project sewist, but I bought a coat pattern specifically to go slow and meticulous. I imagine that my sewing process will end up like yours- good intentions... As long as it looks good and works, that's what's important- and yours looks great. I hope I have half the success!
wow that looks splendid and I admire that you got it done under a bit of pressure.
this is so great! I really like the reflective piping- what a great touch :)
Really good job! And I love the pedestrian/bike safety features :-). I've also found that angled pockets are a lot more functional than vertical ones, but you won't be making another for a good while :-).
Don't fret too much about the water resistant vs proof. Soft shell fabrics were developed after years of everyone struggling with their waterproofs, including their goretex which was never -that- breatheable. All told, if you're going to be moving at all in your weather layer, you won't be too cold if you're a bit damp. And much rather be a little rained on than bathed in sweat. Weather resistant covers 95% of real-life conditions, weather proof is much more specialized. You can always supplement with an umbrella (or a trash bag, depending on the circumstances) if you get caught in a downpour.
Wow this looks amazing, it was obviously a huge amount of work with all those details, but well worth it.
Wow. Beautiful. Every time I get down on how long it takes to make a jacket, I remember how great they look in the end and how long they last in your wardrobe. So worth it! I was wondering where the detachable hood connects--is it under the collar in the neck seam?
I bought this fabric as well and made up a spring coat. It definitely can only support a drizzle. I just use that as an excuse to stay indoors in inclement weather!
Fantastic coat. Miss your regular posts. Stop living life and sew.
Worth all the work - it looks great!
wow - just came across your blog - loveit BTW - coat is amazaballs!! colour, style, buttons every last darn thing - well done
Looks lovely. Never woulda thought of that color, but it's perfect!
Hope you are ok Treena. Merry Christmas.
I've missed your reviews, hope all is Ok with you.
Post a Comment