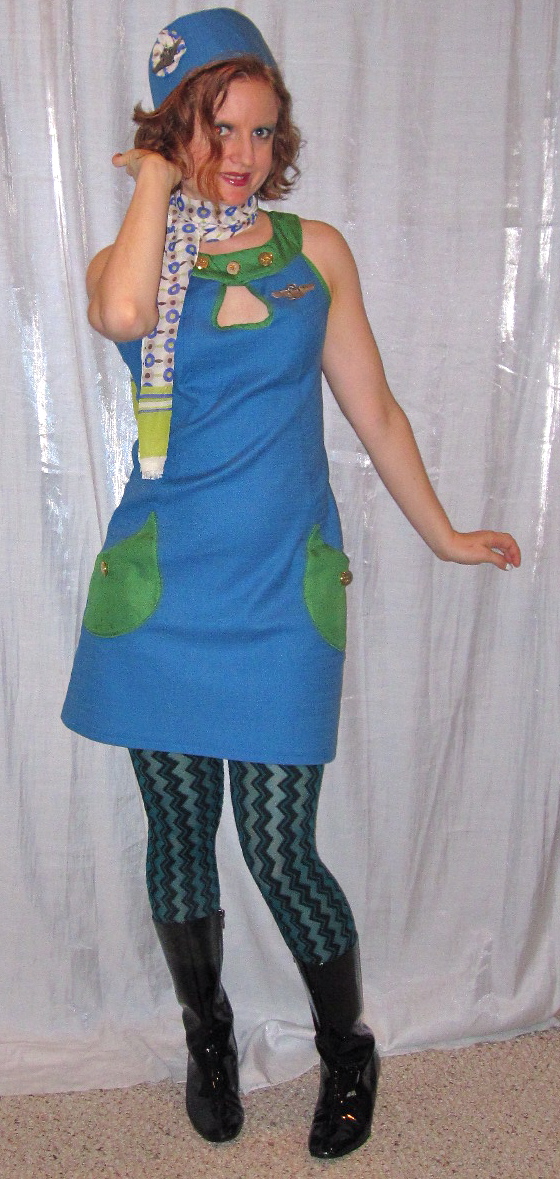
 When planning this costume, I knew a pillbox hat would be an essential element. While making the uniform and realizing that there is a fine line between Air Hostess and Diner Waitress, I knew the hat had to make up the difference so I wanted to do a fabulous job. I wanted to make the hat out of the blue fabric, because the green poly was just so awful (as previously discussed). I had enough scraps to cut the band; I had to piece the crown, but I just barely got everything cut out!
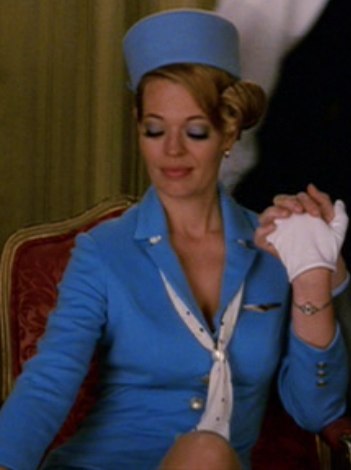 For the dimensions of the hat I turned to (what else?) Down With Love. Based on the movie costume, I planned for it to be four inches tall. However, once I got it in process I realized that was a bit too tall so I cut it down to 3.5 inches, and I think the height is good. Someone taller than me with a bigger head (I have a child-sized head at 21.5 inches) might do well with four inches.
You may recall that I went through a millinery mania last year but, as with so many of my manias, I lost enthusiasm after buying my relatively inexpensive but still pricey hat block and supplies without actually producing anything (other than my sewn hot pink newsboy cap from a pattern, which made use of exactly none of those supplies). However, now that the weather has turned cool again my interest is renewed and for this hat I went back into my hat-making resources to see what I could learn. I learned quite a bit!
MATERIALS
Outer fabric
Lining fabric
interfacing
Frame material (I used plastic needlepoint canvas, available in large sheets for cheap at fabric and craft stores)
duct tape or yarn
needle and thread (i used my sewing machine on this project, but it is totally possible to do it all by hand and it is not endlessly laborious or time-consuming)
STEP 1: DRAFT YOUR PATTERN
This step was fairly easy for me as I just turned my pillbox hat block upside down and traced around the crown, and then made measurements of the brim side for the brim pieces. I think the brim pieces should have had curved top and bottom edges, because the grain is a little weird at the side seams, but flat pieces worked just fine for my purpose.
If you don't have a hat block to trace, you can just make a circle for the crown (mine is a bit oval), though it will involve a bit of math. To get the dimensions of the circle, measure around your head. This will be your circumference. To draw your circle, figure out your radius (remember the formula is 2лr (that's 2 x pi x radius, where pi=3.14).
So, for my child-sized 21.5 inch head:
2лr=21.5
лr=10.75
r=3.42, or approximately 3 1/2 inches (or if you want to get more precise, 3 7/16, or you can use cm)
You can either rig up a compass-type arrangement to draw your circle, or you can double the radius to get the diameter, in this case 6.84 inches, around 6 7/8 inches, draw a + in which the two arms are 6.84 inches and cross in the center, and draw your circle around that.
You'll need to add a seam allowance around the circle.
Then draft up your side band (a rectangle 4 inches tall and the width of your head + 1/4 or 1/2 inch ease + seam allowances at top, bottom, and side seam).
STEP 2: CUT OUT YOUR COMPONENTS
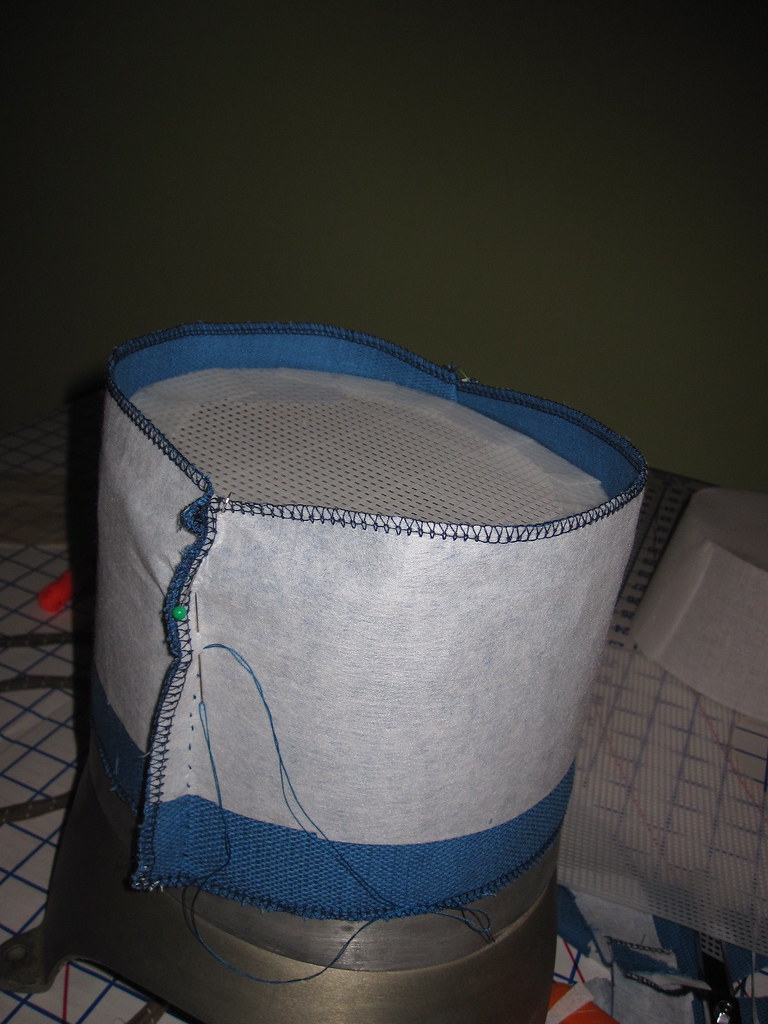
 To cut out my frame, I put the pattern underneath the canvas and traced around the pattern (omitting the seam allowances on the tip altogether, and the omitting the upper and lower seam allowances of the band) in highlighter, then cut it out. To assemble the frame, I used duct tape. This was fine for the side "seams" and the top, but I also ran duct tape around the bottom edge to ensure the canvas wouldn't be sharp. I really, really regretted this when I was sewing the hat to the frame so don't follow my lead there.
 I interfaced both my outer and my lining fabric to make sure everything would be sturdy and crisp looking. I used medium weight fusible interfacing.
STEP 3: ASSEMBLE THE FRAME
 Then it's time to make a frame. I actually started by making a buckram frame, but I have a sneaking suspicion that the buckram that Joann sells is not--gasp--hat-making grade. There was no way the frame would have provided any kind of structure when my fashion fabric had about 10 times more body. So I set that aside and went for my costuming/make it work favorite material--plastic needlepoint canvas. Tape the top and the crown together on the inside and the outside with duct tape. Easy.
STEP 4: SEW OUTER FABRIC
 The next step is to assemble the outer fabric. It helps to have (1) stretchy fabric and (2) largish seam allowances because you're going to assemble it on top of the frame. This means that the outer fabric will be slightly larger than the frame and slightly larger still than the lining. I didn't account for this in my pattern (I cut all components--outer, frame, and lining--the same size), I just dealt with it at the construction stage.
 Once my frame was constructed, I hand stitched the outer fabric in place around it. I went back and reinforced the stitching by machine, but the hand-sewing would have been enough to keep it in one piece.
STEP 5: ATTACH OUTER FABRIC TO FRAME
 This is not necessarily an essential step, but I felt the hat would look better if I stretched the fabric over the frame and sewed it to the frame. Normally, I would just sew the outer fabric and lining together and sandwich the frame in between, but I wanted this to have a tight fit. I used a curved needle and took advantage of the properties of needlepoint canvas (i.e., that it's intended to be sewn upon and has little square openings for the purpose). Sewing through the duct tape was horrible. I should have just stopped and ripped off the duct tape but I did not because I am dumb. But once the fabric was sewn in place the hat was already looking pretty great.
STEP 6: ASSEMBLE LINING

Next step is to make the lining. I assembled it on my hat block because I have one, but if you don't you can just sew it with slightly larger seam allowances than drafted (this is assuming you have used perfect seam allowances on the frame and slightly smaller seam allowances on the outer fabric). Because the outer edge will be hand-stitched to the outer fabric, there is no need to leave any seam openings for turning.
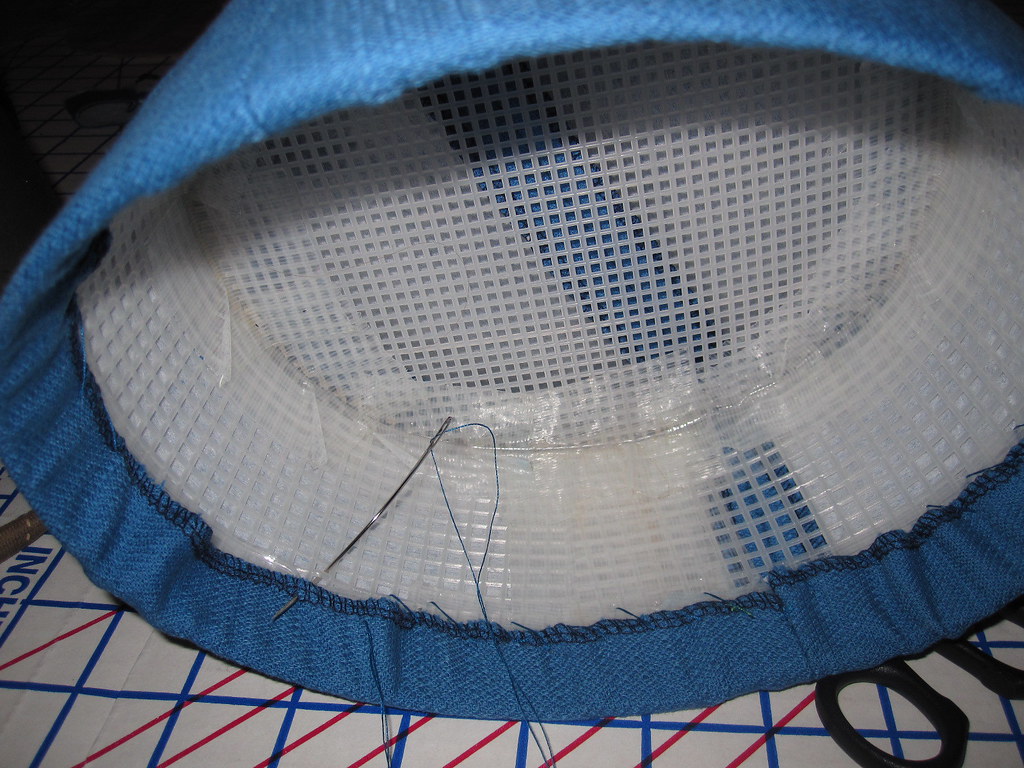
STEP 7: HAND-STITCH LINING TO OUTER FABRIC OVER FRAME
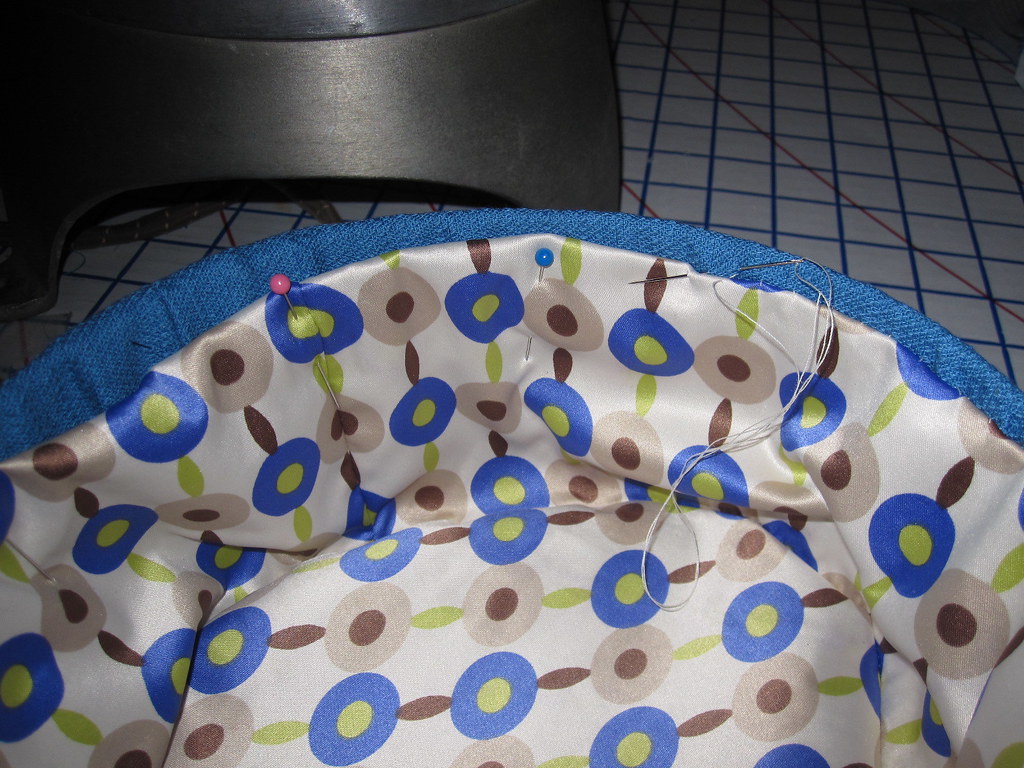 Once your lining is assembled, place it into the hat, turn under the lower edge and pin in place, and hand-stitch to the outer fabric. It really doesn't take that long and gives a nice finish on the inside. I sewed little loops of ribbon on the inside that barely stuck down below the edge of the hat to put bobby pins through to make sure it wouldn't fall off.
STEP 8: EMBELLISH
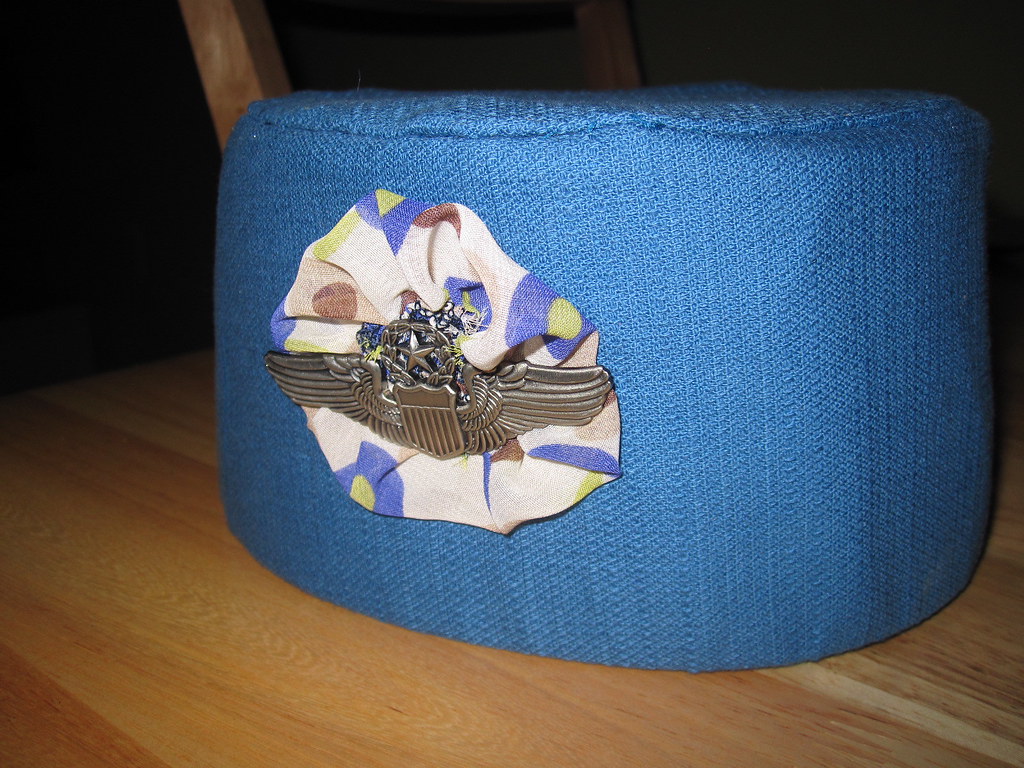 The hat needed a little something once it was finished. In Down With Love the decoration is a hat pin, but since (1) it is ludicrous to pretend that I have enough hair to make use of a hat pin, and (2) I do not have a hat pin, I went with a cockade. I cut a circle out of my sheer print (using a bowl with a diameter of around 6 inches, I think), serged the edges, gathered it up in a yoyo, and pinned it in place with wings.
 And voila! LOVE the hat. It totally made the costume.
All photos of this project are here, and you can read more about the concept and the uniform if you're interested.


.jpg)


.jpg)


11 comments:
What a great outfit! Looks like you had as much fun making it as wearing it.
That was a lot of work to make that hat! You did a nice job and it looks great!
Needlepoint cancas is so handy for many projects. i love the hat!
I bow to the costume queen! :) Thanks for the tutorial. I doubt I'll ever have the need for a pillbox hat but it was so interesting to read how you made it.
Awesome. No, you cannot be a retro stewardess without a hat. In fact, I wish it were totally mandatory on ALL airlines. Unfortunately, I fly on Southwest a lot and we all know how they dress... It's enough to make you cry.
I am sooo impressed, I don't even know where to begin. Me, I would have been trolling Ebay for a pillbox hat...
Absolutely, great hat. Thanks for filling us in on how you did it, I'm sure more readers will stumble into your blog after searching for a pillbox tutorial. Very generous of you to share your knowledge!
Or a cockage tutorial, for that matter. I didn't even know what a cockade was!
Could you make it out of cardboard?
Anon 6/1, I think you're asking if the base can be made of cardboard? Sure, but there are 2 things to keep in mind.
1. Cardboard won't bend smoothly, so you'll have to be very careful to make sure you don't end up with creases in the sides of the hat.
2. Stay out of the rain!!!!
Thank you - your instructions helped me make a hat for an usher uniform.
Post a Comment