Wednesday, February 29, 2012

Happy Leap Day!

Leap Day 2012
As an single professional woman in my mid(ish)-30s, I am contractually obligated to love Tina Fey and 30 Rock.  I dutifully fulfill these obligations.  But truly, 30 Rock is an awesome show.  Last week's episode--available for free on Hulu as of this writing--was about Leap Day and it was hilarious.  I highly recommend a view.

In Liz Lemon's world, Leap Day is a big national holiday with a parade in every town, an old man who emerges from the sea every four years to throw candy in exchange for children's tears, and--of course--particular colors that everyone wears that day with St. Patrick's Day pinching type consequences for those who fail to do so.  I had to get in on the action, if only to pretend that I am friends with Liz Lemon.

Leap Day's colors are yellow and blue.  I don't have anything that combines those two colors but given how many clothes I have, ahem, there is enough yellow and blue in the wardrobe to last me a lifetime of Leap Days (though its position in February--usually the coldest month here in DC--is somewhat of an impediment).

For Leap Day 2012 I went for Vogue 8633, accessorized with a blue scarf I wore for just about every interview I had in law school, a blue bracelet, and my blue glasses.  And also tights and boots--it's a good thing DC isn't holding a Leap Day Parade this year because it is cold and pouring rain.

Due to my love of costumes, I generally dress for holidays.  In a subtle way, though; wearing the particular color associated with the holiday, rather than a literal Quacker Factory-style be-spangled, be-jeweled, and be-dazzled sweater. 

How about you?  Do you dress up for holidays?  And what are your big plans for Leap Day?  (My plans involve wearing yellow and blue and going to work.  Very exciting.)

Friday, February 24, 2012

Upgrades and Stashoholism Confessional

My Jukie MO644D!

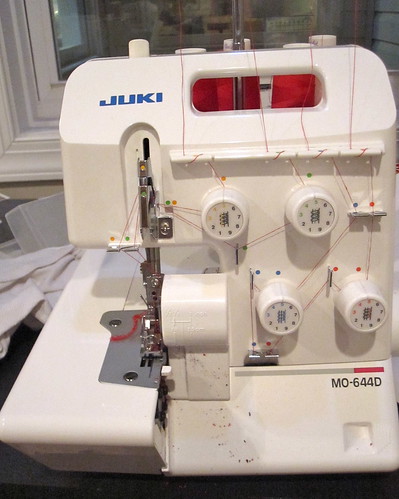
Aaaaand we have a new serger.  I had been meaning to get one for months.  After I couldn't get the tension fully repaired on my old Bernette (it overlocks fine, but won't rolled hem) I gave it to my mom when I went home for Christmas.  It was a nightmare to transport, and I'm pretty sure I cracked the overhead bin as I pulled it out (it didn't really fit; to pull it out I had to stand on the seat and tug with all my might and it emerged with a loud pop).  I gave it away on purpose so I wouldn't continue to use it but would buy a new one.  I "temporarily" went back to my old White Speedylock, which never had great tension.

 Ming kindly loaned me her Brother 1034D to try out.  Threading the lower looper is a DREAM on the 1034D, but I decided that I would treat myself to a little bit of an upgrade.  I thought I wanted a Juki, and the Juki website said there was a Juki dealer in metro-accessible Maryland.  It's a good thing I called them before heading over, though, because they went out of business who knows how long in the past.  So I continued to dither.

Clip Ends of Collar
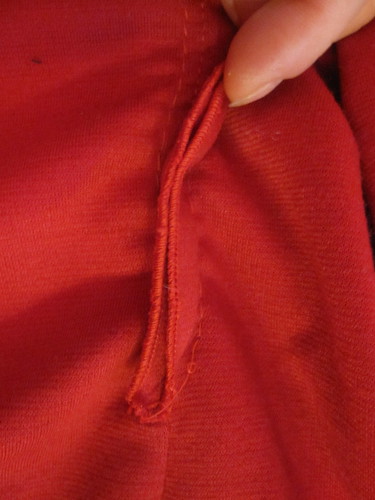
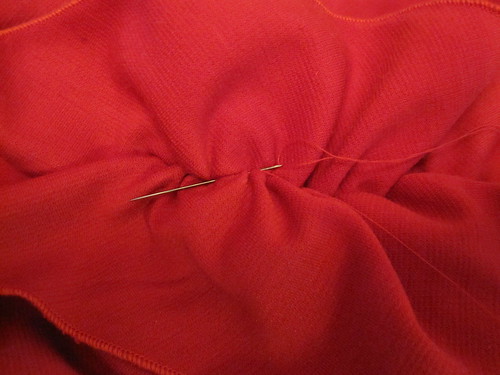
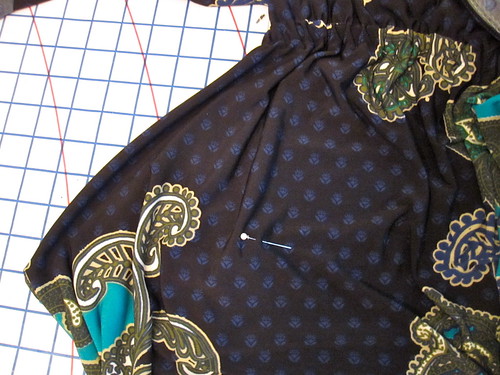
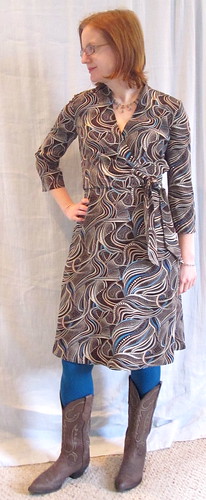
Then I was working on my red dress.  The tension on the old serger was never great but it pretty much gave out as I was trying to rolled hem my ruffle.  If you click on the photo you can see it larger.  Those threads are barely holding themselves together.

So of course now it was a crisis!  I wanted to finish my red dress, but I couldn't go any further on it until the ruffle was properly hemmed (it would have been unpleasant to finish the edge after the gathering was done).

I had been waffling between the 4 thread and 5 thread Jukis.  I have, in the past, had a problem with buying the cheap version of what I want, hating it, and eventually buying the expensive version.  This wastes both the money spent on the cheap version and adds unnecessary aggravation to life.  So I have focused on buying what I really want rather than cheaping out.

However, after much thinking, I decided getting the 4 thread would not be cheaping out.  I have no idea what a 5 thread serger is used for, but I understand the chain stitch is generally used in the home dec context.  Given that I wouldn't know how to use it and have obviously not been missing the functionality in my life, I finally decided on the 4 thread Juki MO 644D.

Gather Stitches on Either Side of Ruffle

The other thing that was stopping was how to actually GET the serger.  As mentioned, there is no dealer closer than 90 miles away (I don't have a car). I can't get private carrier packages at home because I work and it is not secure to leave things on my front porch.  I hate having large packages sent to work because it is unfair to ask the mailroom to handle my personal stuff.  And I wanted it NOW.  Enter Amazon Prime.  Love.  For $4.99, I got overnight delivery on a Saturday.

Threading the lower looper is no fun on the Juki--certainly nothing like the sliding lever of the Brother 1034D and it doesn't even have the lever that brings the looper into the main body of the serger like on my old Bernette.  It comes with a fancy paperclip you can use to thread it, but it is more trouble than it's worth.

But overall threading is not too bad, and it has a threading map inside the front cover.  So I thread it and do a test stitch aaaaaaand:  thread nest.  Rethreaded the lower looper.  Thread nest.  Rethreaded both loopers.  Thread nest.  I was just about ready to cry, thinking I had gotten a lemon.  So then I rethreaded the lower looper in a different color.  Thread nest, but it wasn't the lower looper like I thought.  Rethreaded upper looper in a different color.  Huh.  It was actually one of the needle threads.  It turned out it hadn't fully clicked into the tension disk.  Argh!

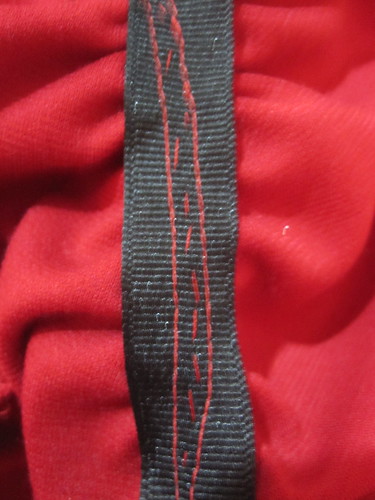
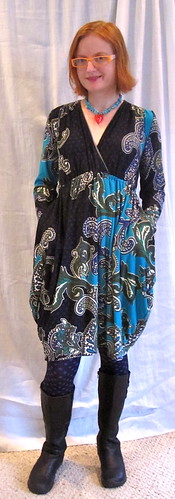
Once I got it actually working it was fabulous.  I did the rolled hem on the ruffle of the red dress (after shot on the right) and it's perfect.  For edge finishing and construction on a regular overlock stitch it's been perfect. It has its quirks--I will do a full review after I have more time with it--but overall I'm pleased with it and I'm so glad I finally got this taken care of!

========================
  
Guss Woolens 2-2012

I have been out of control on the fabric shopping lately.  It is a real problem.

After our successful DC Pattern Review Meetup, Nikki continued our streak by organizing a Baltimore Fabric Crawl.  We started at Guss Woolens, which I had visited previously, but hadn't gone upstairs.  There is a small room on the first floor and then on the second floor is a largish room with a big table in the middle and the table is piled with by-the-piece remnants at really reasonable prices (there is also a third floor but it only had a few items and none were interesting).  Guss specializes in wool (as you can guess from the name) and there were a fair number of them on the table.  Most of its stock is menswear, which generally doesn't tempt me.  However, I was totally drawn to the wool herringbone.  My photo is gross, but it's a soft white with aqua accents.  It's a little bit of an oxymoron of a fabric--the color is too light for Winter but it's wool so it may be too hot for Summer.  It was $20 for the piece, which is over 2 yards long, and I finally decided I had to have it.  Not sure what I'll make with it.

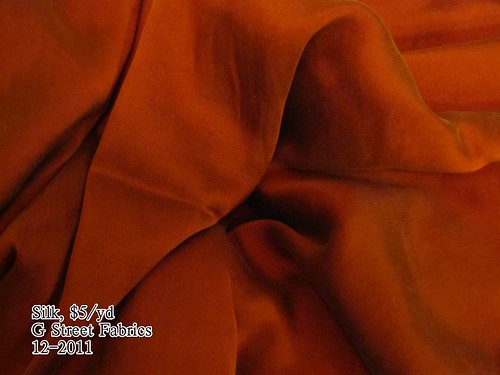
Underneath the cutting table downstairs they had a few tie silks.  I wear my tie silk obis (I've made 3 at this point) all.the.time so I got a 1 yard cut for a purple and gray one.  I was suspicious of the $5/yd price, but I burned it and it really is silk!  Huge bargain.

We also headed to Michael's/A Fabric Place where we petted some amazing (and amazingly pricey) designer wools, but I didn't get anything.

G Street 2-2012
I am obsessed with stripes lately, even though I hate sewing them.  This pink, red, turquoise, and white stripes knit is a little crazy, but it has all my favorite colors and is a nice, opaque knit with good recovery.  The taupe fabric is for knit lining.

Fabric.com 2-2012

So, speaking of opaque knits, why are they impossible to find?  Ugh.  I have been wanting to make solid-colored long-sleeve t-shirts forever but have never been able to find good quality knits for it.  I ordered some rayon/lycra knits from Fabric.com, thinking that their high lycra content indicated good quality.  Nope.  It is the same lightweight, sheer, no recovery, endlessly growing rayon knit available everywhere.  I did my first return to Fabric.com with them (which was super easy--I sent them an email, a few days later they sent me a UPS label; I just had to box up the fabric and drop it off at UPS).  I kept several of the things I ordered, though, the blue stretch lace, off black sweater knit, yellow stripes, sparkle sweater knit, yellow floral watercolor knit. 

The red sweater knit was *not* described online as metallic, even though it is very, very metallic.  I debated keeping it, but finally decided to do so.  I made a top out of it and it pilled terrible on the first wear!  I might have snagged it on something because the pilling was in one spot, but I was so annoyned.

G Street 2-2012

On yet another visit to G Street, I found these heathered turquoise and metallic black and white stripe knits.  I can't stop!

Exquisite Fabrics 2-2012


Elizabeth 
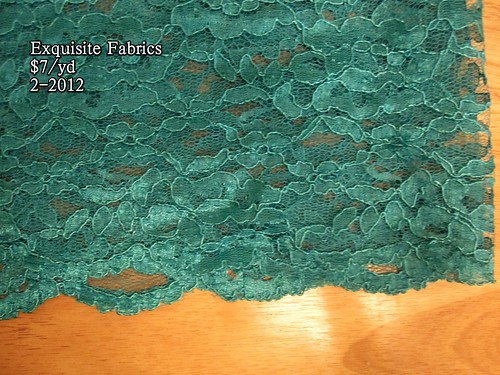
came to visit DC last weekend on the spur of the moment, and we made an excursion to Exquisite Fabrics, which is open through March 23.  They still have most everything on discount.

Lace tops are huge this season, as in this Valentino embroidered organza top ($1890 on Net a Porter).  When I saw this lace at a bargain price (it is poly, but quite lovely) I had to get it.  It perfectly matches the batiste I got at the DC PR meetup swap.  That's gotta be a sign, right? 

Now I need to find a pattern and make some decisions.  First, do I want a pullover blouse?  They aren't great for me because you can't really have waist definition in a pullover blouse.  But a zipper really weighs down the lace.  Second, so I want to line the top or make a separate tank top to go under it?  It is again a zipper issue.  Inserting a zipper directly into lace could look terrible.  But I really prefer the lining on a sheer fabric to float freely at the side seams and hem, attached only at the armscye and neckline.  Dilemma.


========================

My other upgrade is at work.  For the next six months I am working one level higher in my organization.  It is a great opportunity and I will learn a lot.  However, it will mean more days and hours in the office and will cut into my sewing time.  In my usual position, I work a compressed schedule of longer days with every other Friday off.  I get about 70% of my sewing done on that bonus day.  In my current position, there are no bonus days.  Perhaps that's why I've been buying so much fabric--I know I'm not alone in buying fabric when I don't have time to actually sew! 

Hopefully I can work out a new rhythm, but if you see less of me the next 6 months you'll know why.

Wednesday, February 22, 2012

Burda 11-2011-120, Ruffle Front Red Dress

Burda 11-2011-120 Thumbnail

While I have not been loving Burda lately, there is generally at least one piece I like in each magazine. Burda 11-2011-120 immediately caught my eye in the magazine.  That ruffle down the front is a great tummy disguiser *and* bust builder--two for the price of one!  I sewed it in some red double knit I bought in NYC in November 2010 for $2/yd--a huge bargain as the fabric is quite nice.

 This dress comes in sizes 38-46, meaning I had to grade down 2 sizes to a 34 at the shoulders and bust.  Grading two sizes on the (not so) new roadmap pattern sheets makes me want to claw my eyes out.  While I have kept up my Burda subscription, I sew way more from old issues than current ones, so the new pattern sheets are always an ugly surprise when I pull out a newer issue.  I think that is part of the reason they have gone to 80% sack dresses--they're the only thing that isn't horrible to trace.

Use Pins to Mark CF


This pattern only works for fabrics with no discernible wrong side.  The center front seam is sewn wrong sides together several inches from the edge of the fabric and the extra "seam allowance" forms the ruffle.  I made view B, on which the ruffle ends several inches above the hem.  On View A, it continues all the way down.

To mark the center front seam, I stuck pins into the pattern piece and cut fabric at about 4 inch intervals at the marked seam line.  I folded back the pattern at each pin in sequence, marking at the pin on both left and right front.  Be sure to mark on the *right* side of the fabric, as you will eventually be stitching on the right side.

Stitch to a Point at Collar


The pattern comes with the choice of a fairly standard band collar and a more dramatic high collar.  I went for drama.

I ignored Burda's directions for the collar, mostly because I didn't want to puzzle them out.  They involve something to do with trimming the allowances off the undercollar and finishing it with ribbon.  In the end, I probably should have tried to decipher them, or come up with a different method because the finish is not great.

First, I stitched the outer collar to the neckline, stopping at the stitch marking on the end.  Next I sewed the under collar to the outer collar, again stopping at the stitch marking as you can see in the photo.  After both collars were sewn on, I trimmed the ends beyond the stitching.

(BTW, pay no attention to how horrible the finish is on the ruffle.  I bought a new serger in the middle of this project and had it overnighted because I was so impatient to finish the dress!  The old finish was trimmed off and a put in a fabulous new rolled hem.  More on the new serger later.)

Collar Finish

To finish the collar, I hand-stitched the under collar to the allowance.  However, because the seam comes to a point at the end I had to roll the under collar over and the raw edges are not enclosed at the very end.  I don't like the way it looks.


In the end, I'm not sure I know a better way to finish a collar like this that tapers to nothing at the end (a facing isn't possible because of the way the ruffle is formed).  If I make this again, I will just use the traditional band collar, which has enough height at the end to tuck the seam allowance up into it.


Hand Stitch in the Ditch

To gather the front ruffle, I ran machine basting stitches on either side of the ruffle.  I tried on the dress and adjusted the ruffles to my preference.  Burda gives the length to which the ruffle should be gathered, but I wanted to distribute the gathering in the most flattering way for my body.

  Once the gathering was in place, I pinned a ribbon to the underside of the ruffle, per Burda's instructions. Then from the front I stitched in the ditch by hand, catching the ribbon, as you can see in the photo (here is my line of hand stitching). You could definitely use the machine for the this step, but I always have a hard time making sure I'm catching the ribbon on the underside in this sort of situation and hand sewing gives better control.


3 Rows of Stitching on Ribbon


I was concerned that my stitch-in-the-ditch wouldn't necessarily hold the gathers exactly as I wanted them, so I next ran a line of machine stitching on either side of the CF seam, between the seam and the row of gathering thread.  With three rows of stitching on the ribbon, I feel confident my gathers will stay in place!


I might have taken up a little too much length with the ruffle, as the center front seam below the ruffle was poking out.  I took in about half an inch along that seam at the hem, but it still doesn't sit great.

BackFront


When contemplating the dress, I feared it would be a wardrobe piece of little utility because it would be too vavavoom for work.  As it emerged from under the needle, though, I changed my opinion.  It is definitely flattering and a little bit flirty, but I don't think it is outright sexy, especially with the long sleeves (I wouldn't wear those shoes to work--or anywhere I have to walk more than 3 steps).

The pattern is designed for a non-stretch woven, and I did not make any changes to fit to account for my double knit.  Therefore, the final result has a fair amount of ease.  I kept it that way because I did not want it too fitted for work, but I might go back and take it in a tad more at the side and center back seams, as it is almost droopy in places. 

I am also half-tempted to rip out the sleeves and shorten those way way WAY too long shoulders.  I am working on developing a TNT tee, and the shoulder seams on the tee are seriously about 2 1/2 inches long.   I have very narrow shoulders.

I finished the dress in time for Valentine's Day and it was properly appreciated.  I totally love it--it is a great style for me.  I'm even thinking of making a sleeveless version for summer.  Maybe in a cute print?  Though it's hard to find a print that looks good on both sides of the fabric.

All photos are here and the pattern review (my 250th!!!!!) is here.

Tuesday, February 14, 2012

Burda 11-2009-120, Square Pocket A Line Skirt

Burda 11-2009-120 Thumbnail

Since biking became so much easier with the introduction of Capital Bikeshare (one way trips! no locking up!) my clothing needs have changed rather drastically. Where I had been adopting a pencil skirt silhouette and have long eschewed the A line skirt as unflattering to my pear shape, I am now having to make the switch to skirts with volume so I can safely put my foot down for balance while stopped at red lights (one can manage getting onto a bike in a fitted skirt, it's the stopping without falling over that's impossible).

I had seen Burda 11-2009-120 a couple times--both Amanda and Elizabeth have made it--and I thought it might be a good biking skirt.

The fabric is from The Carol Collection.  I cut into it for the under-collar and facing of my Vogue 8307 Armani-style coat


Cut Lining Smaller than Pocket
The pockets are lined and then topstitched onto the skirt, leaving the upper edge loose to create the belt loop.  Luckily, the forest green color of the Vera Wang silk/rayon satin Fabric.com was selling in January 2010 was a great match for the fabric.

To make sure the lining wouldn't show, I trimmed a scant 1/8 inch off the edges of the lining other than the very top edge that lines up with the waistband.  You can see on the pocket that hasn't been pressed how this causes the pocket to balloon because the two pieces are not the same size--the lining is slightly smaller. (More photos illustrating this in the album.)

I always like to press from the wrong side for things like this, so that I can roll the seam and see a tiny edge of the fashion fabric peeking out from down below.  Then press.  You can see that despite the size difference it presses flat.


One Large Pleat in Lining


The instructions for the lining have you cut the front piece minus the pleats. I felt that would defeat the purpose of the skirt--without the pleats the A is not very wide and might not be enough room for biking. I cut the lining the same size as the front skirt, and just did one large inverted pleat rather than two. The lining--also from the Carol Collection--is quite thin and doesn't add bulk to the project.
Waist Facing and Lining


The waist is faced with the same Vera Wang satin as I used for the pocket.

To insure that the fit remained consistent (as the wool is a rather loose weave) I stabilized waistband with ribbon as I did here.  I also interfaced both the outer waistband and the facing, the wool with a heavier interfacing and the facing with a lighter.


Pocket Closeup


The details on this stood out better with topstitching, so the pockets, tabs, and waistband are all topstitched.  I just love the shape of this pocket!  It's such a clever little detail with the built in belt loop.

Pleat Topstitching


To make sure the center front double inverted pleats sits properly and to emphasize the feature, I topstitched the edges of the pleat.  At the hem, I marked and pressed and then topstitched with the hem turned up in place.  It keeps the pleats nice and crisp.

FrontVintage Front


I took a risk with the length of the skirt, as it is hemmed below the knee.  This is a challenging length for me, as I am short.  It can really only be worn with boots, which is somewhat limiting, but it is not a skirt that will look right in Spring or Summer anyway.

I think it came out well and I really like the details and the topstitching. 

It is a good complement to my vintage fabric Burda 09-2007-120 tie neck blouse.  I feel so very 70s, though I am no rival for the queen of 70s, Sewspicious Minds!

All photos are here and the pattern review is here.

Thursday, February 9, 2012

Burda 7442, Knit Dress with Pannier Pockets

Burda 7442 Thumbnail


Miguelina Marina (once sold on Gilt, can't find a better reference)
Source: gilt.com via Trena on Pinterest


The pannier style is a little weird and fashiony, but for some reason I love it (last seen in my Drape Drape dress of a couple years ago).  Counterintuitively, I find it flattering on a pear shape with large hips and thighs--those curves are meant to be part of the silhouette.

I love that Joann now has occasional sales on Burda envelope patterns and at the last one I picked up Burda 7442, which also comes with a jumpsuit in the envelope.  I don't think I'm going there but it's an option. 
Size 34-42


Overlap Centers Front

The bodice is meant to be fully lined, but that seemed unnecessary, so I cut it single layer.  As usual for a wrap style, I shortened the front crossover for an SBA, though I needed to shorten it even more.  As an ad hoc additional SBA, I overlapped the bodice sections about an inch more than they were drafted for--the notches in the photo mark centers front and are supposed to be lined up.

Stitch Side Seam Above Pocket
The panniers/pockets are drafted as giant projections on the side of the skirt.  To sew the skirt and bodice together, you clip into the skirt's waist seam allowance where the pocket begins.  You are supposed to just leave those ends flapping, but I found it difficult to make sure they were properly caught into the waist seam so I used a narrow zigzag to join them.

Offset Seam Allowance


The seam allowances are meant to be exposed at the waist seam.  That look can work in a cotton or rayon jersey, but in a polyester print with a definite wrong side that would just be droopy and sad.  The bodice and skirt have different seam allowances at the waist, so I marked both seam allowances and joined them along that line, offsetting the upper edges.
Picot Elastic
Once it was sewn, I turned down the seam allowances and stitched them to make a casing for the waist elastic.

I found this green picot elastic at PR Weekend Montreal and was just tickled, as it is one of my colors.  It doesn't like to be sewn and I had to hand baste the whole thing in, ugh, but I think it's a nice touch at the bodice, especially at that crossover.

You can also see the stitched in elastic casing on this shot.

Tack Pocket in place
Because of fabric limitations, I had to shorten the pocket/pannier extension several inches.  I suspect you'd have this problem even if the pockets are full size, but mine did not want to stay put.


I put on the dress, tucked in the pockets to what seemed the optimal place, and pinned.  I took a few hand tacks at the pin to keep the pocket in place.


Front
Side


This is a fun pattern.  I realized after I started laying it out that my fabric was a border print.  I didn't have enough of it to be very strategic about my layout (centering the turquoise motifs in the middle of the skirt, rather than the side), but I think the somewhat jester-y final result fits the style of the dress.  I was able to cut the back to center that large medallion motif.


I'm not sure I'll make another of these--a little goes a long way with this style--but the bodice is incredibly flattering on me--almost makes me look boobalicious. I will be reusing it with a different skirt.

All photos are here and the pattern review is here.


Tuesday, February 7, 2012

Stashoholism Confessional: A Long Time Coming

Golden D_Or 12-2011


One of the things I looked forward to over the holidays (in addition to seeing family, of course) was going back to Golden D'Or in Dallas, where I had scored so handily last year.

I have not been crazy about Burda lately (so much with the shapeless!), but I was definitely interested in the Burda 11-2011-114 drapey faux-wrap top. I didn't have anything in stash really suitable for it, and when I found the drapey pink sweaterish knit at Golden D'Or it seemed perfect.


Copper Sweaterknit Accessories
I have already sewn up the copper sweaterknit.  My dear friend and neighbor (we bought condos next door to one another) loooooves copper, and I immediately thought of her when I saw the fabric.  Metallic copper sweaterknit for clothes is a little whackadoodle, even for me, but it is great trim for accessories.  I made her a fleece hat with sweaterknit brim and a fleece-lined scarf.  I bought a pair of gloves and hand-stitched a copper cuff to the inside lining, for a full set.  My photo is terrible but the gift had already been handed over before I realized it, but you get the gist.

Michael_s Fabrics 12-2011

You may recognize this silk jersey as the same print in a different colorway as the perfect knit wrap dress I just sewed.  I believe the silk jerseys were originally $24/yd.  I got the turquoise print for the wrap dress on sale for $12.  And then I saw this on sale for $6.  When you see silk jersey for $6/yd, you just buy it.  Unfortunately, I hesitated for a day and only got two yards of this, which is all he had left.  It is extremely narrow.  I would like to make another McCall 6069 cowl dress (with a non-cowl back bodice), but haven't investigated whether I have enough fabric for it. 

G Street 12-2011


Source: flickr.com via Trena on Pinterest


Ever since I first saw this Robert Rodriguez dress, I have been wanting some copper silk. Not to try to copy the dress (way above my skill level), but just because it is so rich and gorgeous! When I found it on the $7.97/yd table, with 25% off sale plus a coupon, I had to have it.  I am thinking maybe Burda 7519, or at least the sleeves from it.  I dig the carapace sleeves.  In pre-washing, I realized the copper silk is a stretch, so I may have to do something to take advantage of that property.


Joann 12-2011

I have this giant fleece robe I wear when it's cold.  It is red with plasticky dragons on it.  I got the fabric on clearance from Joann and it's fairly hideous.  Also, the robe is about 9 years old at this point and pilled (on the plus side, the plasticky dragons in the seam allowances that used to poke me have finally worn off).  So, it's time for a new robe.  This leopard print amused me.

G Street 1-2012

This was my first purchase of 2012, and already I made a mistake!  In the store, the mushroom-colored knit on the left looked gray, but then I got it into sunlight and saw that it is brown.  Argh!!!  I don't wear brown.  I guess I will use it for knit muslin.

I am almost always allowed to buy knit prints when I find them and I like the colors in this border print.  Orange!  There is never enough orange.

The Schiarparelli pink silk charmeuse caught my eye on the $7.97/yd silk table.  It will make a fabulous lining for something.

==============

I have bought more fabric since these items--including on the Baltimore Fabric Crawl--but I am so slow in posting this that I won't wait until I have photos done.

==============

I am terrible at answering questions.  I apologize for that.  Here are two recent ones:

MySummerTouch asks:
I wonder what do you do with your traced Burda patterns? Save them or throw them away?

I generally save them.  There are probably a few I've thrown away because the pattern was terrible on me.  I fold the pattern pieces together into a rectangle bundle (making sure the pattern number is facing out) and put it into a plastic page protector sleeve.  I have giant three ring binders with the patterns arranged chronologically in them.  With three ring binders, it's easy to open up the rings and put the latest pattern in the proper order. 


However, it is getting to the point where I have a LOT of traced patterns.  I need more binders, but the giant ones are expensive!  I get lazy about actually filing the patterns, too.  I should probably do a cull of patterns I will not realistically sew again, but the tracing is so much work that it's hard to just toss it!


Has anybody developed a brilliant system for saving these tracings?


Thank you all for your supportive and helpful comments on my pants post.  I have looked through the resources you recommended and may eventually be ready to tackle them again.  I actually sewed up a muslin of a Palmer/Pletsch pattern that fit better out of the envelope than the Burda did after 4 muslins!  However, I made the stupid mistake of assuming that a P/P pattern would not have the ridiculous ease of a normal Big 3 and sewed according to what size I "should" be.  The good crotch fit may only be because the overall muslin is way too big.

JENL observed:
I think a lot of the problem was the weight of the fabric-it looked too light and shimmery? Perhaps a little bit of a pressing issue-though I know you were just making a sample.

I actually like using "worst case scenario" fabric for a muslin.  Not to mention I bought like 10 yards of that stuff at Jomar, only to get it home and realize it was too loud to be used as lining!  The shiny, unforgiving fabric reveals every fitting issue in stark clarity, so there will be no surprises in real fabric. 

Friday, February 3, 2012

Vogue 7693, Mock Wrap Dress

V7693 Thumbnail

I've been wanting to make Vogue 7693 for a while.  So long, in fact, that the pattern has gone out of print.  Which is to your benefit, because I'm going to tell you up front that I do not recommend this pattern.  It is poorly drafted, the directions are bizarre, there is no way to complete the project without a lot of hand sewing (I don't even mind hand-sewing, but this is just because it was drafted without a way to finish it by machine, not for a high-end couture look), and the end result--while nice--is not special enough to warrant all this woe.

This is one of the fabrics I bought from the Grand Bazaar in Turkey in 2010.  Crazily enough, the Selfish Seamstress ended up getting the same fabric (with the same line about it being cotton) on her visit last year.   When I proudly told the boyfriend I had sewn up one of the fabrics I bought on our trip to Turkey, he was like, "What?  You're only now getting to it?"  Oh dear, you have *no* idea.  I reminded him that he has seen my sewing room and that it is stuffed with fabric waiting to get sewn.  He conceded the point.

SBA on Both Fronts

I did my usual broad back and swayback adjustments on the back.

On the front, I did my usual SBA for a wrap style of shortening the diagonal neckline edge.  Because I find that the Big 4 need huge amounts of length taken out to avoid gaping, I did it in two folds rather than one.  Make sure to do it to both pieces!  I also narrowed the dart in the left front.  The right front has no dart and I made no additional adjustments.  Luckily, the end fit is very good with a secure, non-gaping wrap.  


The instructions for this dress are awful.  They show the most convoluted, time-consuming, tedious method possible to finish everything.  I ignored them.  The instructions talk about something crazy with hand-sewing the shoulders of the lining after everything is done, I don't even know.  I stitched the shoulder seams in both fashion fabric and lining and stitched together at the neck, as per usual, and the sky did not fall. 


Skirt Opening Finish
One of the many drafting errors on this pattern is on the skirt.  The left front (underlayer of front) does not extend all the way to the side seam, so the waist edge of the skirt must be finished separately beyond that point.  The marking on the skirt from which you are supposed to finish is about 5/8 inch from the side seam.  However, the actual difference in length is closer to 3 inches.  I walked the pattern pieces to make sure it was not my error.  It was not. (This is in addition to the length problem with the right front bodice identified by Mickey Fan.)

For an opening that large, I felt the skirt needed more stabilization than just being turned under and stitched (as per the instructions).  The A line skirt is meant to be cut on the bias (I did not have enough fabric to do so, and this rayon has enough drape that it didn't need it), which makes stabilization even more important.

I clipped into the seam allowance from the actual joining point--not the marked joining point, and stitched a piece of ribbon on the right side with the edge just above the seamline and then flipped to the inside and topstitched.  I extended the ribbon a little bit into the joining point of the left front and skirt for full stabilization.

After the dress was completed, I had to tack the tie for the underlap to this finished edge of the skirt, because it was distorting the hang of the dress when it extended from the side front rather than the side seam.


Hand Finish on Lining


Because the lower edge of the right front (the layer that wraps over in front)  extends below the waist seam, that inner side seam on the lining must be closed by hand (leaving a gap to pass the underside tie to go through).

As drafted, the skirt is not lined, and I followed the pattern instructions on that (in retrospect, I really should have lined the skirt--rayon is quite flimsy).  So I also had to hand-stitch the lower edge of the lining to the seam allowance at the waist.  For that you, can stitch in the ditch but I am not a skilled ditch stitcher (and somehow my lining ended up short).


Treat Lining and Fashion as One at 
Armscye

Once the side seams of both layers were sewn, I treated the fashion fabric and lining as one at the armscye.  The sleeve on this is quite narrow, which I didn't notice in cutting.  I stitched it with a tiny seam allowance but still have some restricted movement.


Custom Piece from Etsy
Source: etsy.com via Trena on Pinterest


The best part about the pattern is the little back collar and the shaping in the front.  I will probably re-use that detail at some point.  I like this custom lace outfit from Etsy.  I can see doing something like the lace top without the full collar using the neckline from V7693.


V7693

Side-ish


In the end, the dress is pretty and flattering, but the drafting is just so terrible!  This look is generally drafted as a full front with a front overlay, as in Simplicity 2369.  S2369 is for knits, but you get the general idea.  I think that is the better way to achieve this style and there are better patterns for this look.

All photos are here and the pattern review is here.