Thursday, June 30, 2011

Outfit of the Week: Orange and Navy

Orange and Navy I made this blouse, McCall 5426, in the Summer of 2008 of souvenir fabric from Vietnam. I never wore it much, though, because I couldn't figure out what to match it with. It doesn't look great with gray, and I just cannot bring myself to wear orange and black together (it's just too Halloween--and I love Halloween!). Also, it gapes between the buttons. I finally sewed on snaps between them, but I think I have figured out the reason it gapes is that the self-facing for the placket is not sewn down on the inside, so it pulls open. I need to hand-stitch the placket facings to the underlining and I think it will solve the problem completely.

Last Fall I was walking down the street and saw a girl in a navy dress and orange shoes and she was an epiphany: orange and navy! They look great together.

So come Spring, I matched the blouse with 04-2008-108, which I made in the Spring of 2008 for my trip to Paris (I wore the skirt to visit Notre Dame and eat Berthillon ice cream). Obviously this photo is a few months old because I was still in tights.

The outfit doesn't entirely work, due to the belt and the shoes. I think they need to match. I wish I could find some comfortable gray shoes! But the orange and navy are spot on, I think, and with the addition of the navy I think the gray works too.

What are your epiphany color combos? I am planning a yellow and white blouse and not having a lot of success coming up with skirt ideas other than gray (although thinking about it, navy might work with that combo too).

Tuesday, June 28, 2011

McCall 6070, Double V Surplice Knit Dress (de Espana)

M6070 Thumbnail

I picked up McCall 6070 last year because I was attracted to the casual breezy look of it. I'm not sure why I bought the pattern, as there is an almost identical view in Simplicity 3503, which I've already used to make my maxi dress. I guess I just like variety!

Samina asked about this fabric as the skirt to go with my ruched front top. It is a rayon knit that I bought in Barcelona in September 2009 while shopping with Paco! I love buying fabric as a souvenir, as it reminds me of the trip every time I wear the garment.

Small Bust Adjustment (SBA) I did my usual small bust adjustment for a crossover front of shortening the crossover. In this instance, I'm not sure it was totally necessary. With both the front and back being equal V crossovers, the weight hangs evenly from the shoulders and keeps the bodice flat against the chest, unlike with a higher back neckline that can cause a top to ride forward, resulting in front gapeage. With this alteration on this dress, the center front of the skirt is a little shorter than the sides because of the shortened bodice. But no gaping, so I won't quibble.

I did *not* narrow the gathering area below the bust. It is the perfect amount of gather for my A cup, so I would think larger cups might want to consider slashing and spreading to add more room there.

Because the weight of the fabric holds the bodice flat against the chest, I did not use clear elastic in finishing the neckline as I normally would, just folded over and twin needled. In retrospect, I should have used the elastic--not to snug up the neckline, but to help support the weight of the dress. My rayon knit is rather thin and so I lined the midriff and skirt, which puts a lot of pressure on the bodice to carry the weight.

Internal "Suspenders" While this is better quality rayon knit than most (I have a whole rant of that for a later post), it is still rather wimpy with little strength and recovery. After a day of wearing, I realized that, with the progressive stretching of the rayon, after several wears the apex of the V was going to show my navel. So after the first wear I sewed ribbon "suspenders" in to support the weight. The suspenders are sewn to the midriff seam allowance (for maximum strength) and tacked to the shoulders to keep them in place. I haven't worn it with the suspenders yet, but a try-on showed that the shortening of the CF hem nearly disappeared and that the bodice felt much more secure than before. They do not create a line on the outside.

Because of limited fabric, I did a serger rolled hem on the skirt to preserve as much length as possible. However, the benefit of the rayon stretching is that I will eventually be able to put a regular hem in (the skirt is already about an inch longer than when it was finished a couple weeks ago). Looking on the bright side here, people.

For swayback, I shortened the waistline edge of the back skirt by about an inch at center front, tapering to nothing at the sides. I should have done something about the midriff and/or pleated the skirt lining rather than gathering, because the back fit is not gorgeous (doesn't hug the back but kind of hangs off the upper midriff seam), but it is not noticeable either.


Front

This dress ended up exactly as I had hoped. It is cute with a little bit of style and also very comfortable to wear for summer. The downside of Super Special Souvenir Fabric is that if anything goes wrong with the project it is a little devastating. Luckily, there was nothing devastating about this! I left off the back tie, because that seemed to be just too casual for work, and I did not have any trouble with the shoulders falling off.

All photos are here and the pattern review is here.

Friday, June 24, 2011

This is Why We Finish Our Seam Allowances!!!!

Shredded Front Pocket I first developed my slapdash ways as teen rebellion when my mom was teaching me to sew. One of the things she insisted on that I absolutely loathed was that I had to finish all the edges. To this day, my mother does not own a serger as she fears the threading. So all those edges were finished with zigzagging. Zigzagging takes forever and is ugly to boot. So in my rebellion, when I sewed unsupervised I did NOT finish my edges. It was liberating.

I actually never had a garment fall apart, surprisingly, but at some point in my later teen years I came around to my mom's side and started finishing all edges, a habit that persists to this day--though I now blessedly have a serger. I might even go overboard in finishing my edges. I know that many people don't finish edges that are protected by lining but I do: both the fashion fabric and the lining have every edge serged. Unless I am doing a very narrow hem, the enclosed edge of the hem is serged. Every.edge.

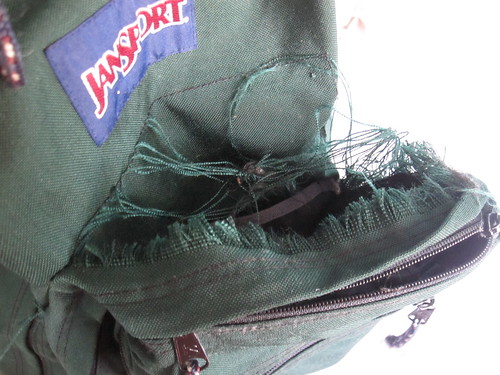
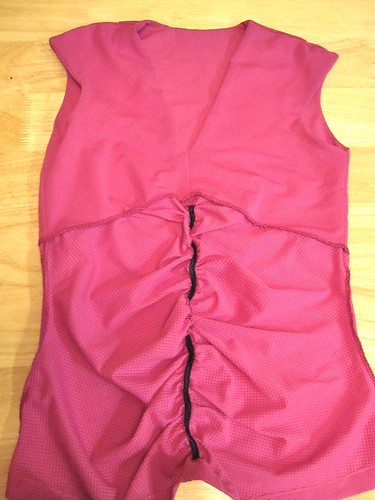
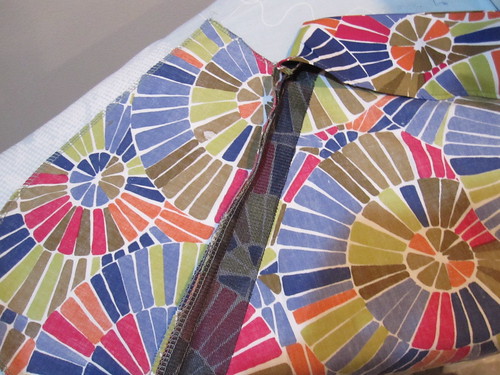
You can imagine my annoyance, then, when after the sticky of some mango sticky rice I purchased a street fair leaked all over my backpack and I put it in the wash I pulled it out of the washing machine looking like this. Argh! Because the edges of the pocket bag had not been finished, they just disintegrated beyond the stitching line in the wash.

Bottom Repair I was especially annoyed because only a couple weeks earlier I had finally gotten around to fixing the bottom. It had a rip in it from law school (let us note that I graduated from law school 10 years ago last month), from carrying sharp-edged binders in the same place and same way. The hole had finally gotten to the size where things were going to fall out of it. I cut a double layer of rectangles in the heaviest fabric I could find in stash, a linen(ish) tablecloth purchased at a thrift store several years ago. I stacked the rectangles and attached them to the seam allowances on the inside so the weight would be supported on the already proven seams rather than the hole-y bottom. Then I stitched around the hole to secure it to the fabric. Voila! Good as new.

Some might say I should have taken this as a sign to just get a new backpack, and I was tempted. This is not my every day backpack, a black affair that is more "professional" (lol). I commute on foot or by bike, grant me the backpack. But I use this backpack weekly for grocery shopping and other schlepping. It would be a justifiable purchase.

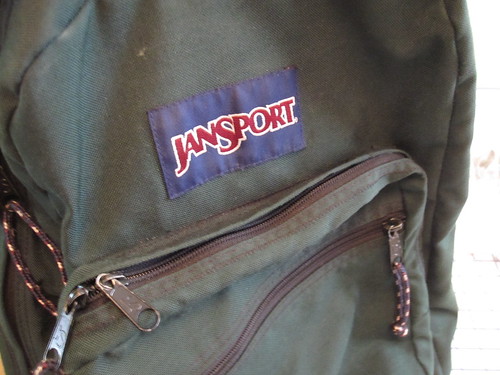
Nowadays, backpacks--like iPods--are available in a variety of colors to express your personality (I mean, so cute, right?). Back in the dinosaur age when I went to college, backpacks were like Model Ts: you could have any color you wanted, so long as it was forest green. (They might have also had black, but I'm pretty sure that is the extent of the choices available.)

This is actually not the first iteration of this backpack. Jansports have a lifetime guarantee, and I actually ripped an identical hole in the bottom of another backpack with the same binders in law school. I believe the original backpack was purchased for college. In law school I was too poor to buy a new backpack, so I used the lifetime guarantee to send old ripped backpack to Jansport (after trying unsuccessfully to fix it myself) and they sent me this one in return, basically the same as the old one, in the same forest green color.

I thought for a while about how it would be fun to have a cute backpack instead of a dinosaur-age non-self-expressing forest green one, but damn it, this backpack is perfectly good (other than the ripped bottom and shredded front pocket). The materials and workmanship (other than failing to finish seam allowances) are still in perfect condition--which is why Jansport offers a lifetime guarantee!

Pocket fixed! open 
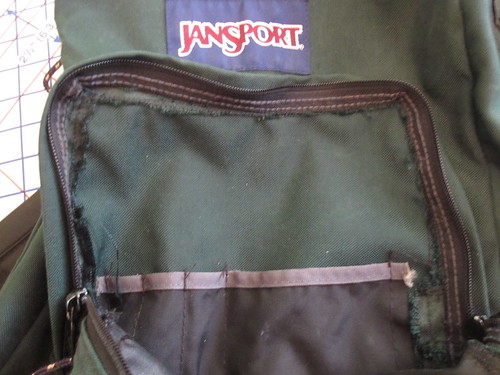
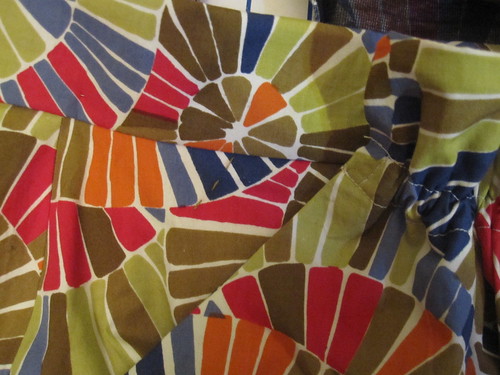
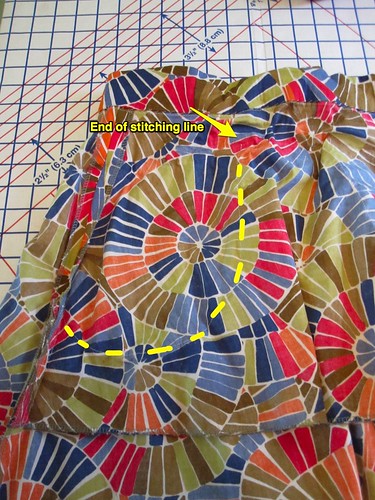
So I bit the bullet and took a couple of hours to fix the shredded pocket and zigzag every last exposed edge in the entire backpack. For the pocket, I first trimmed off all the shreds, then zigzagged the edges. Then I sewed the pocket edge back onto the backpack, approximately following the still-extant original stitching line. You can see in the lower right how much seam allowance was originally used for this operation--I lost nearly an inch in the shredding incident. It took time and patience but wasn't difficult.

Pocket fixed! closed And now it's as good as new! Or close enough for my taste. I am sure someday something irreparable will happen to the old forest green dinosaur and I will replace it with something self-expressing in the turquoise or floral family. But the old forest green dinosaur has lived to see another day, and will cart home groceries for years to come.

Consider this your PSA, when you find yourself mind-numbingly bored while finishing your seam allowances: Yes, it really does make a difference!
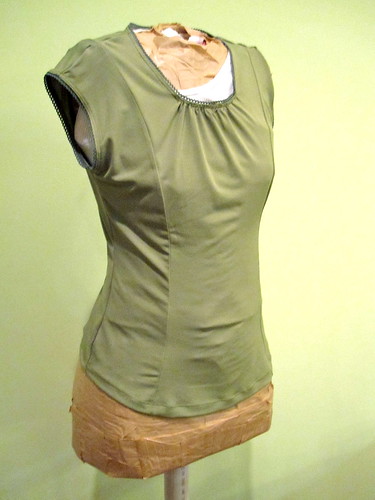
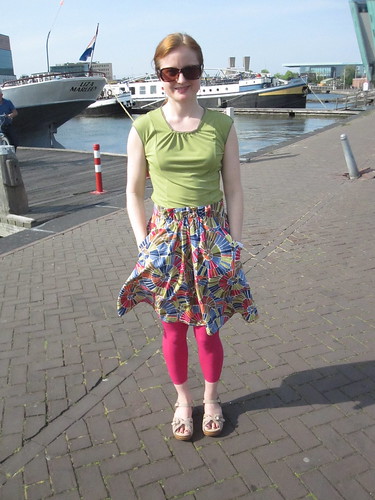
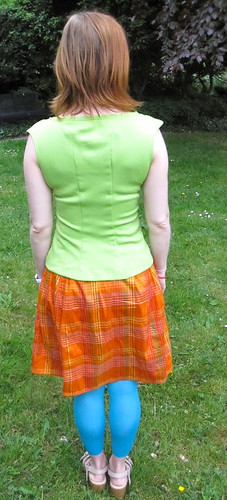
Wednesday, June 22, 2011

Burda 05-2011-107, Ruched Front Top

Burda 05-2011-107 Thumbnail

As Cidell and I discussed in our recent podcast, the May issue of BurdaStyle gave me hope for the future. Although it still provided a diverse selection of giant sacks, it also contained some clothing with actual fitting and great details. One that immediately caught my eye was this top, Burda 05-2011-107, as well as the dress version. I love me some ruching, it is great for a little bit of tummy disguise. I was in the mode of looking for top patterns for my trip and it immediately went into the mix.

While I like the twisted strap idea--I used it in the Vogue 8386 dress in my avatar--I wanted shoulder coverage in the tops I was making for the bike trip. I also was not keen on the back view of this pattern, which is a single piece V. I am not crazy about patterns that have only a separate upper bodice and skirt in the front and not in the back.

For the upper bodice and lower back I turned to BWOF 08-2007-105, which I have used several times as the base for other patterns, such as my knockoff of New Look 6729 and my adaptation of plus size Burda 04-2008-128. I pulled it into service once again here. So technically I should probably review this as the 2007 pattern, but the most distinctive feature is from the 05-2011-107 pattern so I'm going with it.

Inside of Top I used one of the wicking waffle weaves I bought from FFC ($3.95/yd). The fabrics came in two different textures, a thick cotton-y texture, like the green for my S4076 twist top, and a thin, slightly sheer version that I used here. Because it was slightly sheer, I fully lined the upper bodice. This was also an easy way to finish the neckline and armscyes. I raised the neckline on the original draft simply by sewing up the center front seam further than marked.

The instructions for the ruched lower part have you gather both center front edges separately and then sew the pieces together. It seemed like it would be a challenge to sew two gathered edges together, so instead I sewed the center front seam with ungathered edges. Once it was sewn, I put in gathering stitches on either side of the seam and gathered. That worked ok, but I couldn't get the seam to stay gathered. I tried zigzagging over it, but that did nothing. Then I hand-gathered, which was ok but still not very stable (if my gathering thread popped I'd be SOL) and the gathers wouldn't remain evenly distributed. My third method was the charm: cutting a length of elastic to the finished length I wanted and stretching the elastic while sewing it to the CF seam. I probably should have stuck with the method in the directions!

Back This fabric, though it is a jersey, is not very stretchy. I didn't really notice this until it was made, but you can see from the back that I really should have sized up. It is super tight over my large lats (need to do a broad back adjustment on knits, too). It is also much clingier than I would prefer at the waist, but if it is not well-fitted there the ruching will droop so I think showing waist lumps and bumps is what you get for disguising tummy lumps and bumps.

Front Something ended up weird about the bust on this top. Though I have used the pattern several times and not had any trouble with it hanging off the bust rather than gently cupping the area, here there was no cupping. I did a little bit of hand gathering under the bust to try to create some shape, but it is not a perfect solution. I'm not sure what I'd need to do in the future; maybe gather the upper bust piece before stitching to the lower bodice?

Although the fit of this top isn't perfect, I quite like it. It was as flattering (from the front) as I'd hoped, and has a great style. A pattern with a separate upper bodice was a great fit for the thin fabric; it would have been needlessly hot to double the entire top, and self-lining the upper bodice dealt with the sheerness factor nicely.

All photos are here and the pattern review is here.

Thursday, June 16, 2011

Burda 12-2010-105, Shoulder Princess Tee

Burda 12-2010-105 Thumbnail

I really liked the shoulder princess top in Burda 12-2010-105. The princess seams and interesting panel lines, along with the little neck ruffle, looked really fantastic with the French seams (or maybe they're flat felled) and semi-transparent fabric.

I should start by saying that this is not the most helpful review of the pattern. It's meant to be made of "stretch cotton tulle" or stretch satin. I made it in a knit, eliminated the interesting panel seams, tucked the front ruffle down, widened the shoulder for more coverage and left off the sleeve, and lengthened it by four inches. It doesn't really resemble the original at this point!

It was easy to eliminate the panel seams as the pattern is drafted in a regular princess style with full length front, side front, back, and side back pieces and the panel seams are just marked on the pieces. This made it easy to trace for my purposes.

Picot Elastic Details I found some olive green picot elastic at one of the little trim and elastic shops in Montreal during PR Weekend and had to get some. It's a color I sew in often enough that I was bound to make something it would go with eventually! As with my hot pink top with black lace trim (which pilled on the first wearing, grr), I was just so over making solid-colored items that I had to add a little something.

I had originally intended to have the little front neckline gather stand up as a ruffle as in the original pattern, but I had not thought to finish the edge of the fabric first (I would recommend a serger rolled hem or a close zigzag rather than turning under), and I didn't really like the way it was looking in my floppy jersey. So I turned under the neckline all the way around and finished it with the elastic. I had to hand baste the elastic on to get it to sit properly so the picot edge would just peek out.

Back

Aside from a little pressing divot that I apparently wasn't able to press out at center back, the back view on this works. I did swayback correction by taking a wedge out of the center back piece and taking it in along the center back/side back seam as for darts.

Shirt-tail Hem

Although I lengthened this top 4 inches--the original is only slightly longer than waist length; I am well past the age of belly-showing--I kept the shirttail hem. In the end, I don't think it works for this particular project. The jersey is really floppy with no body and it really doesn't sit well if not tucked in. The fabric does nothing for a non-flat stomach and just kind of flops over the hips, and you can see all the lumps and bumps of the skirt's waistband (and what's underneath the waistband, ahem) through the fabric. I was fairly disappointed in that, as I love the color. I may go back and put in a slightly shorter, straight hem and see if that improves wearability.

All photos are here and the pattern review is here.

Tuesday, June 14, 2011

A Podcast! and Stashoholism Confessional: Fabric Mule Edition

As you may have already seen on Cidell's blog, we finally did another podcast! Only a two year time lapse. That's not so bad, right? We discuss the changes Burda has made to its website and tracing sheets, what we think of the style direction, and the May and June 2011 issues. You can download it from podbean or itunes, and you can listen to it below.


======================

And while I have you distracted, I will sneak in some recent fabric acquisitions. Although, I have to say, I am proud of my sustained restraint when it comes to fabric buying this year! Maybe I really have turned over a new leaf. But I shouldn't get self-congratulatory yet; I have historically had good restraint the first half of the year and then go nuts the second half. But my new technique of needing to be able to visualize a specific project for the fabric helps.

Liberian Wax Print, 5-2011
This fabric was a gift from a dear friend who is working in Africa this year. It's a wax print that I know is genuine because it still has the wax in it! I'm going to have to figure out how to launder that out. She has become the expat expert on Monrovia's fabric market and has had so many gorgeous outfits made while there. I can't wait to see them all when she finally returns home! The fabric is sold in 3 yard cuts, so I have plenty here. Any pattern ideas?


Michael_s Fabrics 6-2011-1 For this fabric, I must take full responsibility. When Cidell and I visited Michael's/A Fabric Place in February, he had just put out a whole table of gorgeous silk jerseys. They were priced around $24/yd and I just couldn't pull the trigger. But when I heard through the grapevine that he had recently put the silk jerseys on sale on his website, my ears perked up. Alas, the butterfly print I'd fallen in love with was long gone, but Cidell picked up this beautiful print for me at half price. It's probably just as well, as this print is more professional (to the extent that a bright print is ever professional!). It will become a fabulous wrap dress in the luxurious style of DVF, using Butterick 5454. I will try to figure out how to get a bigger underlap, though.

Now I really can't buy any more fabric until I do some sewing! I have made one dress and a helmet cover since I got back from the Netherlands, that's it! I have been so busy every weekend. I haven't spent a Saturday night at home in 6 weeks and it shows in my sewing. I cut out a nightgown two weeks ago and haven't even started constructing it. Well, that is going to change this weekend. It is a weekend of me and sewing! Or at least a weekend of sewing up the freaking nightgown already.

Tuesday, June 7, 2011

Burda 05-2010-122, Ruffle Waist Skirt

Burda 05-2010-122 Thumbnail

When I was looking for biking skirts my only criterion is really that it had plenty of volume for leg mobility. I liked the details on Burda 05-2010-122. The front waistband ruffle and the yoke pockets are nice details that take it up a notch from your average A line skirt.

Reinforce Pocket Edge As with any yoke pocket, I felt that the yoke edge needed to be reinforced to prevent stretching. However, the fabric I used here is fairly stable and because the skirt is not fitted around the hips the diagonal pocket seam is not under too much stress. I ironed strips of fusible stretch interfacing along the edge of the yoke, but not the pocket. The finished product is very stable.

Mark Pocket Placement Because of the upper ruffle, the center front portion of the skirt is wider than the yoke, which goes all the way across the front from side seam to side seam. Therefore, you need to mark the pocket placement on the yoke. I am mostly showing this photo to prove that, yes, I do know how to thread trace and even do it on occasion! But only when there is no easier alternative. Heh.

The construction of the yoke and pocket on this skirt is a little unusual. As mentioned, the yoke is like a front apron that extends all the way from side seam to side seam. The pocket piece, which is stitched to the front, is shaped like a pocket. I had a little bit of a hard time figuring out how to layer all the seam allowances at the side seam. I ended up clipping the pocket and yoke seams so I could layer them and press the side seam open. The instructions did not cover this portion of the construction so I have no idea if this was the right approach.


Pocket Stitched to Yoke Once the pocket is sewn onto the front and the yoke in place, you stitch the pocket onto the yoke (again, marking is important). I've marked the pocket stitching line with yellow on the photo so you can see it better, and
here is a photo of the underside, where you can see the pocket piece. The marking for the end of the pocket stitching line is several inches below the waist seam. To me, that made the pocket a little unnecessarily insecure (in terms of things falling out of it), so I stitched it up closer to the waistband.

I went back and forth on the ruffle so many times while I was deciding on this skirt! On the one hand, the ruffle is the cutest feature. On the other, it means that this skirt can only be worn with a tucked shirt and I find tucking somewhat problematic--t-shirts always pull out so that it looks like I have a spare tire, while button shirts simply don't stay tucked. In the end, however, my sounding board pointed out that (1) I have a lot of skirts already, so this doesn't need to be The Skirt, and (2) I prefer cute. The ruffle is meant to have a drawstring through it, but that didn't appeal to me so I cut a length of elastic and permanently stitched it in. I probably should have used ribbon or some other stable item, but oh well. I can replace it if the time comes. While I interfaced the ruffle facing, I was still a bit concerned about my ruffle being floppy, so I invisibly hand-stitched it to the waistband to make sure it would stay up.

BackThe skirt is drafted with a side zip, but it seemed like too much trouble with the yoke/pocket situation. I've done the side zip/side pocket technique before (and actually here I think the zipper stops before the pocket meets the side seam so there is no particular technique involved), so I had nothing to prove. So I moved the zip to center back. The back of the skirt is not particularly exciting, except that I twinned the print along the back seam, argh!!!!

Burda 05-2010-122

I am really happy with the skirt. The design is cute--about as interesting as a skirt can be without going overboard into crazy town. The design is clever and other than the issue of the intersecting front/yoke/pocket seam allowances it went together easily and well. The fit at the waistband is great; I didn't take notes while making this unfortunately, but I am pretty sure I added an inch or a little more to the suggested waistband length and interfaced the waistband for stability.

All photos are here and the pattern review is here.

Thursday, June 2, 2011

Simplicity 4076, I Finally Make the Infamous Twist Top

S4076 Thumbnail

Simplicity 4076 has been a favorite on Pattern Review for *years.* Back at the beginning of the twist top craze I tried the Maggy London Butterick 4789 version of the twist top and it was a bust, with a huge wad of fabric below the twist. It wasn't just me, because shortly afterward I went to brunch with a friend who was wearing the Maggy London RTW version of the dress and it had the same wad. Though I've tried a couple twist variations since then, I never returned to the classic twist top.

When I was going through patterns for my bike trip, this one caught my eye. It was never available at my local Joann, and a kind sewist sent it to me (and I'm so sorry, I don't remember who).

Small Bust Adjustment Shortening

One of the multitude of PR reviewers (and I wish I could remember who to give her credit) noted that the front neckline of her top was a little gapey, just like the model photo on the envelope. Looking at the envelope, sure enough that neckline is rather suspiciously gapey. It looks like it's held in place by double stick tape over her boobs.

No Gape!

Not having boobs on which to stick double stick tape, I shortened the neckline by nearly two inches between the bust and shoulder. I twin needled over clear elastic in finishing the front neckline to ensure extra snugness. The end result is marvelous! The neckline, while low cut, is snug but doesn't pull, and is form-fitting without any hint or danger of gaping.

I added an inch to the length of this top in cutting, just because I am aiming for super long tops. In the end, I wished I had added another inch. This top appears to be quite short as drafted.

Back

I transferred the darts I had marked and drawn onto the pattern for Simplicity 2283, the yoked cowl top from a while back. The darts worked perfectly, though I had to make them even longer, almost to the neck, before I eliminated the puff at the top, and they extend into the hem allowance. I think I am eventually going to end up with a princess seam rather than back darts! I did darts here because I didn't want a CB seam, but I suppose one seam is better than two, so next time maybe I'll just do the CB seam.

I have not been doing the broad back adjustment on knits, because they stretch and are therefore not restrictive. But seeing the back view on the tops I made for this trip--the waffle weave wicking fabric from FFC does not have a ton of stretch--I see that I really need to bite the bullet and do this adjustment on anything fitted, stretch or woven.

S4076The shoulders look funny on this top, but it's because my preferred bra is a racerback; bra straps just slide right off my sloping shoulders and the racerback solves that problem. The neckline is a squidge too wide to cover the straps at the shoulders, as they are placed narrower than a regular bra. So I sewed in bra strap keepers, which artificially narrows the neckline and causes the outer edges of the shoulders to flare out and up. For the trip, I was willing to have funny looking shoulders rather than an uncomfortable bra. In real life, maybe I'll wear the regular bra. We'll see.

I'm so glad I finally got around to this pattern. With this twist top, I understand the fuss. It is flattering and fun to wear. It seems inevitable that I would finally discover it during the twilight of the twist top, but who knows, maybe I'll make another one anyway.

All photos are here and the pattern review is here.