Tuesday, November 30, 2010

Simplicity 7425, Vintage Coatdress

Simplicity 7425 Thumbnail

Reneeb4930 brought a box of amazing vintage patterns to PR Weekend Montreal and gave them all away! It was so incredible. Simplicity 7425
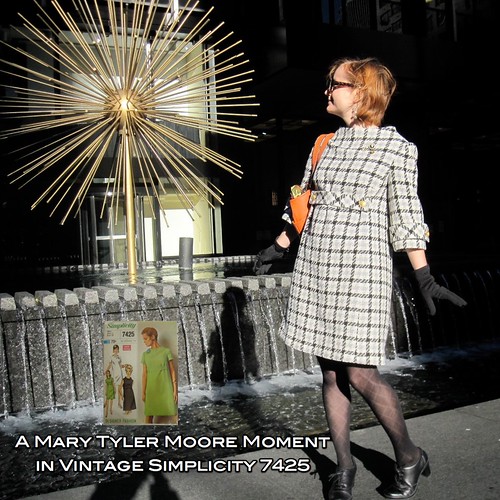
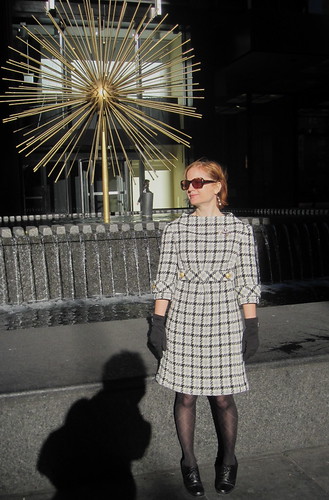
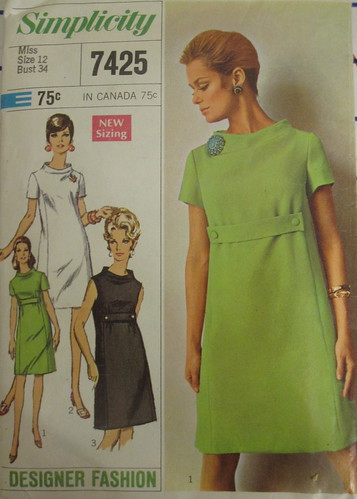
I was lucky enough to receive this one, among others. I am definitely more of a 30s/40s gal than a 60s/70s gal, but something about the simplicity (ha! no pun intended) of this 1967 pattern spoke to me. I really like the funnel neck, and it has an interesting construction--princess panels with no side seams. The fewer pieces the better for houndstooth (which we all know is just another way of saying "matching plaids").

You may recall my fail of a coatdress in black and white houndstooth last year. I was really disappointed in that one. Cidell came to my rescue with some very similar houndstooth wool, which was in turn causing her frustration because there wasn't enough for the project she wanted. I did warn her when it was done that she was going to be mad for giving me the fabric, but she graciously took these awesome photos anyway on our recent trip to NYC.

The pattern had been meticulously cut out, although it had been jaggedly chopped off above the marked hem line (odd). I wasn't going to make it the full length anyway so it was no problem. I think the cutter-outer was a similar pear shape to me, because this one size pattern (size 12, which was 34/25.5/36 in 1967) had been cut along the lines at the bust and then beyond the lines to add some width at the waist and hips. I continued that trend, though I ended up with too much of an A line and had to redo all the seams taking out width toward the hem.


Lining 
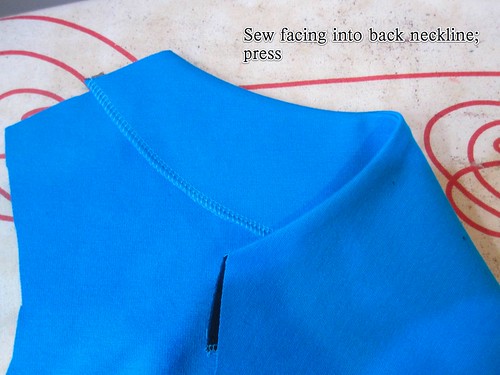
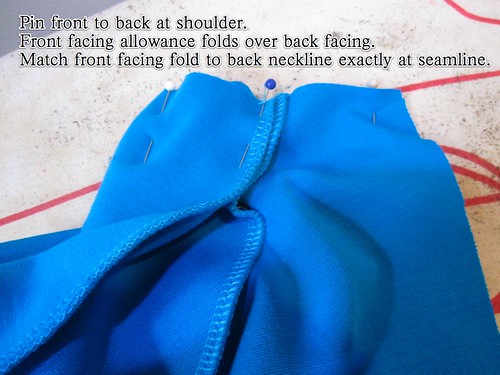
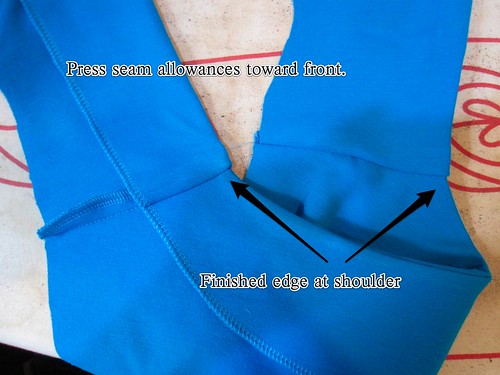
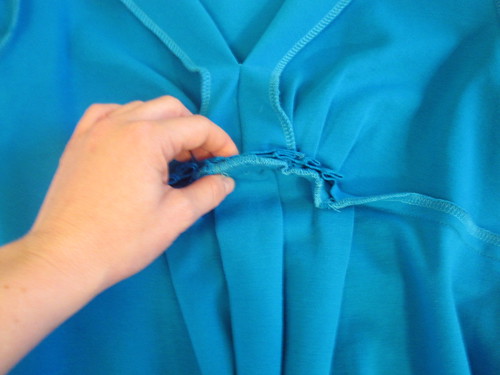
There's not much to say about the actual construction of this simple dress. It is meant to be underlined, basically, with the neckline finished with a facing. My fabric was too thick to use a facing, so I just lined the normal way, reinforcing the funnel neckline of the dress with medium-weight interfacing so it would stand up. I would have done well to carry the interfacing a few inches beyond the funnel neck, because it sags a little at the chest under the weight of my tiny brooches, but it's not an emergency. I hand-stitched the lining to the seam allowances along the zipper edges.

Exposed Zip 
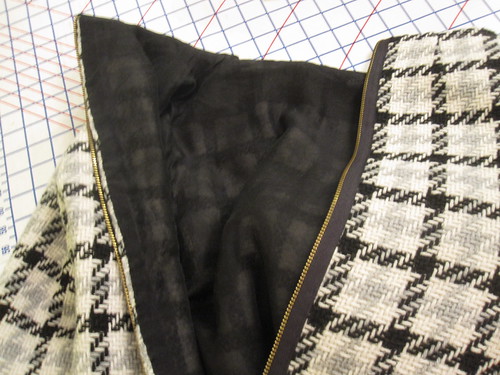
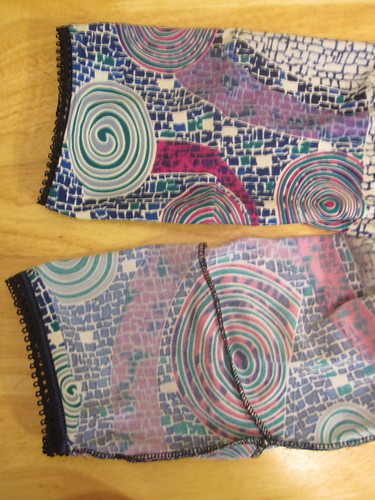
I decided to do an exposed zip to modernize the dress a little. Also because the fabric is too thick for an invisible zip and I have become crap at installing regular zips through lack of practice. I think next time I have to do one I will just hand-pick it. I had this one with black tape and brass teeth in my zipper drawer that was perfect, as I knew I wanted to use brass buttons for trim. It is longer than I would have preferred--I think it would look better with a waist length zip like I did on Butterick 5382, but stashers can't be choosers. I have absolutely no idea what project I had in mind when I bought this zipper.

Button and Pin details
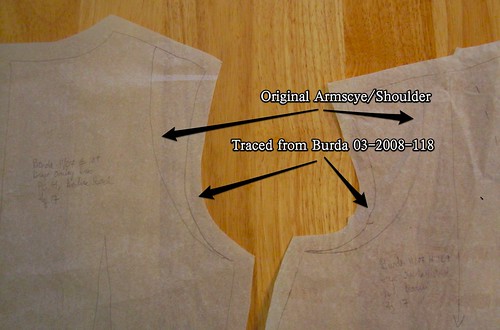
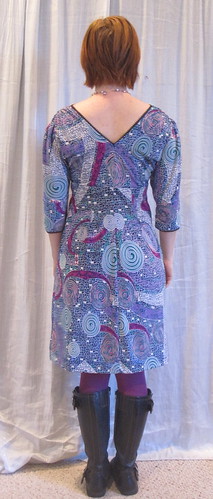
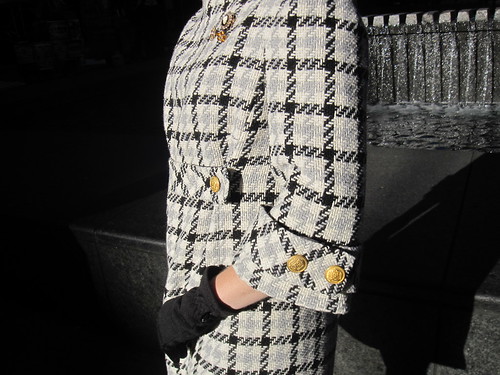
Because I was doing a coat dress, I lengthened the sleeve to just below the elbow. I never do sleeves that length, but it seemed to go with the style. I cut the front half-belt on the bias to add visual interest, and added sleeve belts as well. They are just sewn onto the dress using the brass buttons as a decorative detail. I realize just how clumsy I am when wearing this dress because the buttons are forever knocking against things and making very sonorous announcements of their presence!

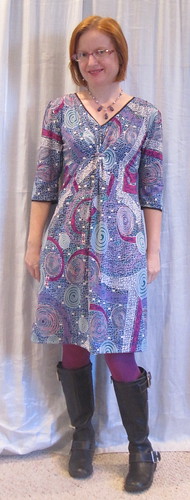
The pattern envelope does not lie when it shows a pin as the only possible jewelry to adorn this dress. A necklace looks hideous with the funnel neck. I don't wear a lot of gold in general so I only had three brooches in my collection (I need to show my brooch holder sometime--a very easy project) that went with the buttons. Love the little grouping!

Simplicity 2497 I just love this dress! Cidell almost got the last laugh when I realized I couldn't pull my coat's sleeves over the dress. That would make it a very niche item that could be worn only when it is cold enough for a heavy wool coat dress but not cold enough to require outerwear. I was afraid I was going to have to make a special cocoon coat that would go only with this dress, and I do not have a cocoon coat on my sewing list. Luckily, I found a coat in my closet that works with it, though it's a heavy coat so I can only wear it when it is cold enough for a heavy wool coat dress but not cold enough to require outerwear or when it is very cold indeed, such as during Snowmageddon.

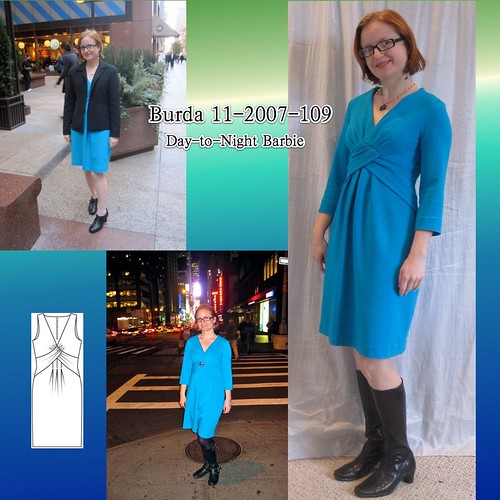
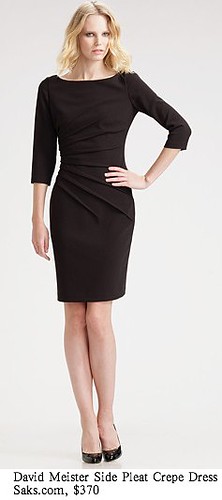
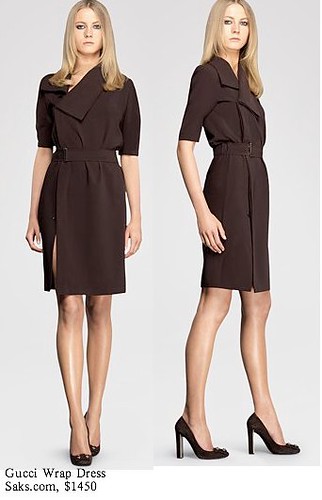
Though this dress is very retro, I think it is still very wearable. The silhouette of this DVF is much sleeker and more modern than this shift, but the funnel neck is quite similar. Simplicity 2568 is a similar look, though with a cut-on sleeve.

All photos are here and the pattern review is here.

Tuesday, November 23, 2010

Vogue 8307, The Armani Coat (that everyone else made four years ago)

V8307 Thumbnail

My light green wool cashmere coat from two years ago has officially bitten the dust. One of the closures is broken (again) and the coating is sort of disintegrating in places, not to mention it's so dirty I don't think it will ever be right again. My purple jacket for Turkey went so well that I was inspired to jump right into Vogue 8307. The purple jacket works for low 60s to low 50s. This should cover from the high-50s down to the upper-40s (around 8-13 Celcius). I have yet another coat planned to cover the mid-40s to around freezing. And below that we pull out the Inauguration Coat, which carries me down to as cold as it ever gets in DC (low 20s/around -7 C). It seems a bit ridiculous to have so many coats, but I am always wishing I had a different one for each 10 degree variation because wearing a not-quite-right for the temperature coat is so uncomfortable!

This coat is almost entirely from The Carol Collection. Included in the collection were two yards of 60" wide Kelly green Pendleton wool with the Pendleton remnants tag still on. So fun! The pattern calls for 2.5 yards of 60" wide fabric, so I cut the undercollar and front facing from a darker green wool, also from The Carol Collection.

The lining is a polyester charmeuse in a great print from, you guessed it, The Carol Collection. The lining is very thin and the wool is a medium weight, so I added a little more warmth with a layer of the Vera Wang silk/rayon slipper satin from Fabric.com at $1.95/yd. I treated the lining and underlining as one, with the matte side of the slipper satin to the lining and the shiny side facing the fabric fabric so the lining wouldn't catch on the coat in wearing. I didn't have enough to interline the front, but I'm hoping the quadruple layer of wool (wool-faced and double breasted, with heavy interfacing) will be adequate.

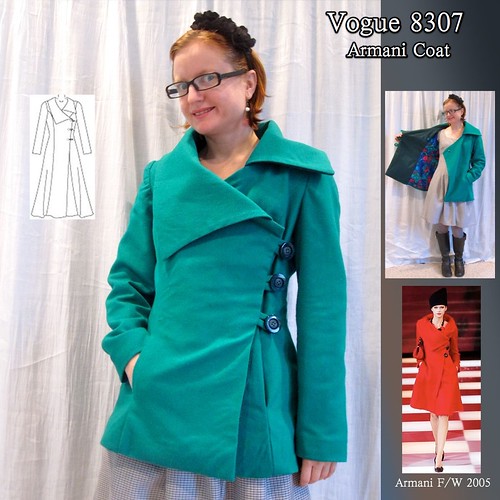
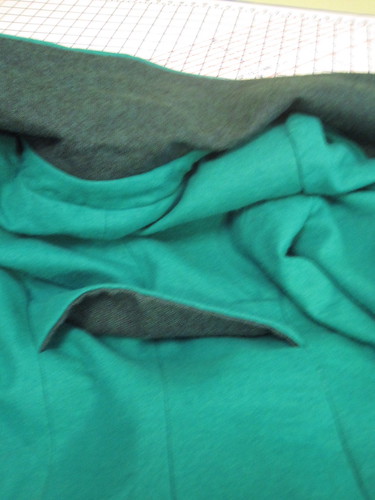
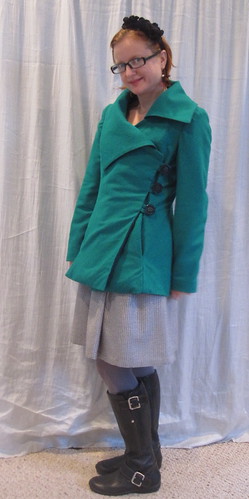
The problem with kelly green wool is that once you see it as a billiard table, you can't unsee it. It is the exact same color. The photos of the coat are not exactly true to life color. Trust me, it's the same. It is a very crisp wool with little drape. That made it awesome for the collar, which sits beautifully, but the rest of the coat looks very wrinkly in wearing--not because it *is* wrinkled, but because any movement I make causes a crease rather than a drape.

The coat as drafted has no pockets. Insanity. I added in-seam pockets between the front and side front at the high hip level. When I made a princess seam coat and added pockets in the past, this was the perfect location. On this double-breasted coat, however, I wish I'd put the pockets in the side seam. The pockets overlap each other and putting gloves in them makes the belly area very puffy. The Armani original has side seam pockets--should have looked at it before making the coat! The front pocket piece is cut of lining to reduce bulk and interlined for warmth.

Stabilize Pocket Seam with RibbonTo keep the pocket line from stretching out when I walk with my hands in my pockets, I reinforced both the front and side front pieces with ribbon along the pocket attachment line. By the way, am I the only one who didn't know that you could run ribbon through that slot on the foot? I recently got a new serger and that was a feature in the manual. I noticed that my regular SM foot has a similar slot and voila! Sooooo much easier than running the ribbon under the foot and trying to make sure it gets caught in the seam, which is what I've been doing all these years.

Interface Pocket Edge In addition to the ribbon, I also interfaced the interlining of the pocket along the joining edge. As with all pockets, I sewed it to the front/side front with a 3/8" seam, rather than a full 5/8" seam. That way, the pocket rolls to the inside when the seam above and below are sewn at 5/8" and it gives a nice, clean profile.

BackI added five inches of length to View A, tapering in the hip a bit where it begins to flare. I love the way the ladylike full-skirted coat looks on either people, but at my height I would feel like one of the flying monkeys from the Wizard of Oz in a full-skirted coat (even though it was the guards, not the monkeys, with the long coats, somehow I associate it with the monkeys). Because of the stiffness of the wool, even though I'd narrowed the width the final hem stuck straight out like a clown's frock coat in the back. I ended up taking in another 3 inches in the center back and side back seams and now the hem sits flat instead of flaring out.

Contrast Underside to Collar and BeltI found the back a bit boring--the front is dramatic with the collar sweep and the double breast with huge buttons and the back didn't match that drama. So I opened out the seams and added a back half-belt. I like this little touch for a coat; it adds a little visual interest to the back with truly minimal effort and doesn't affect the wearability or usefulness of the garment. I brought the contrast darker green wool fabric (my "design detail" forced by not-quite-enough fabric) into the underside of the belt as well as the collar. Actually, I think this "design detail" works quite well. The darker wool on the underside adds depth to the collar, half belt, and lapels by increasing the natural shadow that would be formed by these dimensional elements.

Broken Button The buttons for this coat were an issue unto themselves. I normally just use whatever I have in stash, but the best thing I had for this coat were more of the wood inlay buttons I used on my purple jacket. I was really not liking them, so I decided that I would splurge on fancy buttons on my trip to NYC. When I hit on the idea of black buttons, I started liking the coat much more. I found the perfect buttons at Botani. At $6.75 each they were way more than I'd ever paid for buttons before, but since the rest of the coat cost me about $5 in thread, interfacing, and interlining I figured it was worth it. I sewed the buttons on in the hotel room. When I wore the coat that night the top button popped off as I buttoned it for the first time. I was surprised I'd done such a poor job sewing it on. It was only later that I realized the shank had snapped off the button!!! So much for that.

Side It was actually a blessing in disguise--although I *loved* the look of the jeweled buttons, it was nearly impossible to pull the button loops over the jagged edges of the buttons and it made the coat too hard to wear. So I went to G Street and found much more sensible smooth-edged round buttons in a deep pearled green that match very well but still give a tiny bit of drama because of their size.

Also on the closure issue, I made a beautiful covered snap to hold the underlap lapel in place. Alas, the covering makes the snap very difficult to snap and it instantly pops open once you do manage to snap it.

The construction on this coat was smooth and, dare I say, easy. I started it on the Saturday before I was leaving for NYC on Thursday. I told myself there was no way I would finish it on time for the trip so I took it slow, just sort of poking along. But by poking along for maybe 3 or 4 hours each on Saturday and Sunday and then an hour each night after work it was nearly done by Wednesday night.

Pocket I fudged the hem (always the worst part of any coat project) and brought it along but, alas, was not able to get exciting outdoor photos in the City because of the button issue. So you're stuck with my boring indoor photos, as usual.

The pattern is well drafted. Love that the undercollar is separately drafted from the upper collar--slightly smaller and on a different grain for great turn of cloth. Everything fit together well, although the back sleevecap had more ease than necessary.

Before making it I paid attention on the streets to see that a dramatic collar is still in style for coats and there are still plenty out there. Although this pattern is four years old (and the Armani model over 5 years old) it has staying power. If you're looking for a high drama coat without a lot of drama sewing it, check out this pattern.

All photos are here and the pattern review is here.

Friday, November 19, 2010

Burda 11-2007-109, Drape Front Dress

Burda 11-2007-109 Thumbnail

When I went to NYC recently for work, my plan was to catch the 7 am train and head straight to the luncheon and then on to speaking, so I wanted a dress that would be professional under a jacket but wouldn't wrinkle too badly if I sat in it on the train for 3.5 hours. I wasn't satisfied with the professionalism of any of my current knit dresses and was thrilled with the Cache ponte knit I had just received from Fabric Mart (who knew Cache, such a tacky store, used such good quality fabric?), so I went pattern hunting.

Burda 11-2007-109 caught my eye. The skirt pleats with plenty of belly room (I sewed the pleats down only as far as they would be covered by the drape, not as long as Burda marked) and the drape overlay to disguise same were appealing. I remember liking the dress when it first came out, but it was only my 4th issue of Burda magazine and I was very intimidated by the sparse and indecipherable instructions. There are still some Burda patterns that scare me, but once you figure out which edge of the drape goes where this one isn't complicated.

I wanted sleeves, so I went through the previous and following issues until I could find a dress with set-in sleeves to copy. I figured the closer I was in time to the 11/2007 issue, the more likely the dresses were drafted from the same block. I ended up using the armscye and sleeve from Burda 03-2008-118 (graded down to a 34). Yes, Burda went four months in Winter without presenting a woven dress with a sleeve! Well, not exactly true, there were a couple dresses with specialized sleeves and/or armscyes, but really! How many sleeveless dresses can you have in your wardrobe? In the months of November, December, January, and February???? There are some occasions--like snow, ice, and sleet--that require sleeves.

Extend Armscye_Shoulder for SleeveTo copy the armscye, shoulder, and sleeve, I laid my traced sleeveless pattern over the (graded) sleeved pattern sheet, lining up the lower curve of the armscye. Then I followed the line for the sleeved armscye. I used the shoulder as a check--on both pieces, the shoulder from the sleeveless dress extended out in a perfect straight line to the top of the armscye on the sleeved dress. In all other respects everything worked perfectly, but I should have walked the shoulders on the finished pattern. For some odd reason the front shoulder ended up being longer than the back shoulder by nearly 3/4 of an inch. In fact, I can clearly see they're different lengths in the photo of the pattern pieces, but I was obviously too excited at the time to notice! I just folded the excess into the front self-facing, because I am slapdash like that.

Face Back Neckline The instructions call for the bodice to be lined. One is to finish the back neckline and armscyes with lining and then treat the lining and fashion fabric as one for remaining seams. As my fabric was quite thick there was no need to line and with sleeves there was no need to finish the armscye.

To finish the back neckline, I drafted a back neck facing. I serged it on so as to have the smallest possible seam allowance, then turned and pressed. The facing line shows through on the finished product, so it might have been better to turn under or use a bias strip.

Shoulder Seam The front is cut with a self-facing for the neckline. To sew the shoulder seam, I used the same technique as for a self-faced cowl, as explained in depth here. Place the finished back neck edge, with the facing already applied and pressed to the inside, at the self-facing fold line. Wrap the front's self-facing around the back facing, so that the finished back neck edge is sandwiched, right sides together, between the front and front self-facing. Stitch the shoulder seam. I stitched by machine, then used the serger to finish and trim the allowance close to the stitching.

Finished Neckline Lining up the self-facing fold with the back neckline at the seamline is key. I found it very difficult to keep the fold flush against the back neckline in this thick fabric, so my neckline is a couple millimeters off from perfect, as you can see. Turn the front self-facing to the inside, which will automatically fold the shoulder seam allowance to the front. Press. This gives a neat finish, though in my thick fabric all those layers cause the neckline to stand out from my body a little bit at the shoulder.

Previous reviewers mentioned the very low neckline. The instructions have you sew the center front seam only up to the joining point with the skirt. It was very easy to raise the neckline by sewing beyond the joining point. If I didn't plan to wear this in outside-the-office professional contexts, I would have kept the neckline about 1 inch lower (not obscene or even sexy on me because of my small bust), but figured conservative is better.

Crazy Thick Front Seam Although this pattern translated surprisingly well to double knit, I wish I had calipers to show how thick the front seam is. It is so thick! You've got the bodice front seam and allowances, bodice pleats, skirt pleats, and gathered drape (with self facings). That's a whole lotta thick double knit in a small space.

I really love the way the three tiny pleats at the bodice look--much nicer than gathers--and love the shape the center pleats in the skirt make. I think the gathering on the drape overlay is a little incongruous with the pleats. If I had been working in a lighter weight fabric I would have pleated the drape as well, but it would have made that seam so thick it wouldn't have fit under the presser foot! Despite the thickness of the many layers there, it doesn't look bulky or sit funny while wearing, which is kind of miraculous.

I traced out my usual sizes, 17(=34) at the shoulder and bust, transitioning to a 19(=38) at the hip. While the upper bodice fit well, even without an SBA, the hips were oddly voluminous. I ended up taking it in about two inches at the lower hip, tapering at the waist and near the hem. There is still plenty of ease and my very stable knit wears like a woven when it's not being stretched, so I don't know what the sizing was about there. Burda is not usually guilty of excess ease and my saddlebags have not magically shrunken. The pattern was drafted for cocktail fabrics such as floaty silks, so it could be a fabric choice issue.

Back I did the usual swayback adjustment in the back. I am not in the habit of doing a broad back adjustment on knits or on Burda patterns, but I can see that the back is not perfect. When wearing it is quite comfortable, but I think a broad back on the bodice would probably release those upper wrinkles. For the hip wrinkles, if I were a muslining kind of gal it would probably have been good to transfer some of the excess width from the side seams to the CB seam for my capacious booty. But I'm not a muslining kind of gal and I really don't care much about minor fitting wrinkles as long as it wears comfortably, which it does.

FrontI think that I no longer believe that Burda makes petite patterns. I think they *label* some patterns petite, but don't actually do anything to them. First there were the crazy long sleeves on my jacket. And then the length on this one was way too long. It's shown on the (tall) model as an above the knee dress. It seemed to be measuring long so I only cut a 1/2 inch hem allowance, and ended up taking a three inch hem, making the final result 2 1/2 inches shorter than drafted. Granted, I am 2.5 inches shorter than the official definition of petite, but 2.5 inches is a lot for me to have to shorten even a "normal" height dress (usually it's closer to 2).

I started tracing this dress at 11:30 am and was done by 4:30 in the afternoon. Looking at my recent reviews, I feel like I have been dipping into the knits well a little too often. But dang, they go so quick! They are addictive like popcorn. Or crack.

I had some Barbies when I was little that I enjoyed but my sister was Barbie crazy! My favorite of her Barbie outfits was a blue skirt with a long ruffle attached and a sequin tube top to wear underneath. You could configure the ruffle in all different ways to change up the look. My favorite Barbie accoutrement of hers was a Barbie hot tub. It had a mechanism whereby you could push on a little plastic disk that served as a pump to make it bubble.

I always thought this ruffle thing was the Day-to-Night Barbie outfit (I guess I thought it was ok if you wore a sequin tube top to the office as long as your giant ruffles were properly arranged?) and I LOVED the concept. When I found out that the real Day-to-Night Barbie is a pink suit I was sadly disappointed. But whatever, the point being, I love the Day-to-Night Barbie concept. It is one of my childhood fantasies that I live through sewing. This is a classic Day-to-Night Barbie dress. Looks great under a jacket with professional shoes, but can be totally vamped up for evening with lots of sparkle (and a seam ripper to lower the neckline, if you want to go extreme).

All photos are here and the pattern review is here.

Tuesday, November 16, 2010

Stasholism Confessional: NYC and Otherwise Out of Control Edition

Life is funny. When I got back from Turkey, Cidell asked if I wanted to go to NYC for Veteran's Day. Since I had just returned from traveling and have some expensive travel planned for next year, I said I'd have to think about it. The next day at work an opportunity to speak in NYC on Veteran's Day came up and I took it. So fortuitous! It was a quick trip and I was working for a lot of it, but I did manage to squeeze in some meetups (and just a wee bit of fabric shopping).

LindsayT and Cidell Even in such a quick and busy trip, I was lucky enough to meet up with sewing friends. On Thursday, I hustled out to the garment district during a break in the conference in time for coffee with Ann and Cidell. I hadn't had the chance to meet Ann and it was very exciting. I was a little intimidated as I was wearing a new coat (will post it soon, once it is *ahem* entirely finished) that Ann had also made, but she was just so sweet!

Nancy K and RosieOn Friday evening, I was thrilled to see LindsayT, Elizabeth, and Peter again over cocktails, and excited to meet Ann, Nancy K and Rosie. (Yes, these are the same photos Cidell showed on her blog, but they were taken with my camera so whatevs.) I felt very sophisticated drinking prosecco in New York City with such a great group of stylish sewists! Everyone was showing off their style and sewing skilz. Elizabeth, Peter, and Trena Peter's shirt was impressively tailored, loved Elizabeth's coat, Nancy K was wearing one of my favorite colors, LindsayT had impeccable casual-chic-professional style as always, Cidell was exhibiting yet another great version of the Burda turtleneck (she might have sold me on the super-long bunched sleeves), and Rosie had on the absolute perfect color for her.

Unfortunately, it was all too short a dream and I had to run off early like Cinderella, but a great time was definitely had by all and I am looking forward to the next visit, which I hope will be less work and more play!

============================

What's that? You were wondering if I had any time between work and my jet-setting social life to do any shopping? Well, I might have squeezed in a little bit of fabric buying. Only a little. OK, fine, a lot. Too much, maybe. Agh!

First, a public service announcement: Remember when I was looking for bra strap keepers? The little ribbons with snaps that you sew into the shoulders and snap over bra straps to keep them in place? Found! At Steinlauf and Stoller for 75 cents per pair (the overpackaged Dritz ones are about $3/pair), in white, black, and beige. They don't appear to be listed on the website but they have them.

NYC Technical Fabrics, 11_2010 After successfully making gym pants, high on my list to acquire was actual technical fabrics. I expect the cotton-poly blend of my new workout clothes will pill and fade within a year and I'll want to replace them with something more durable and hopefully sweat wicking. Cidell did our research for us (thank you!!!) and found that Stretch House carries Supplex in lots of colors at $6/yd, a crazy bargain for that sort of fabric. I bought four colors for tops, along with some heavy duty powernet-type fabric for sports bras. The downside of buying at a bargain is that I'm not *really* sure what I got. The turquoise and the pink have the same texture and appear to be Supplex. The royal blue is a little thicker and doesn't seem to dry as quickly, while the green is much thinner and less sturdy. So who knows what I really got but I think all will be suitable for workout gear. Then we hit up Spandex House for heavy duty technical fabric (again, not exactly sure what it is) for bottoms. This stuff is sturdy with great stretch and recovery--at $12/yd, you pay for quality.

H&M Fabrics, 11_2010 Well, I probably should have left well enough alone there but of course I had to do a little more browsing. I was looking for fabrics I could make into relatively warm winter dresses. I didn't do so very well at that in H&M Fabrics (the location on 35th). This is the famed "Kabbala Man" that SarahinNYC turned me on to. The store has been "going out of business" for years. Who knows, maybe someday they'll succeed, but until then it has great bargains. With the news about the price of cotton increasing significantly next year because of crop losses, how could I pass up adorable cotton prints at $2/yd? The green and the polka dots are batiste weight, while the print is a little thicker. Cotton dresses are so great for hot weather. I wore the heck out of my Vogue 1086 Tracy Reese cotton sundress last summer. Seriously, I could have worn it every day. So these fabrics should give it a little break next year.

Wait, that doesn't help my winter clothing situation, does it? (Except that I think I will make a long sleeved blouse out of the polka dot--bought 3 yards for a blouse and a dress.) I have been in the mood for a red dress lately, I don't know why. I wore my Simplicity 4074 red dress last week--I think I only wore it for Christmas last year. So the red knit (almost as sturdy as a double knit) had to go into the stack. I haven't decided on a pattern. The black and pink houndstooth wool called to me. At $12/yd, it was a little expensive. After I bought all the cotton the girl helping me knocked the price down to $10, which was nice. It's a little thick for a dress, but I have visions of an 80s revival out of Butterick 5520 with the peplum. I'll have to contemplate the fabric a little more. I think it will work with judicious steaming and clapping, it's just the darts + peplum + waist seam that worry me.

Metro Textiles, 11_2010 A visit to NYC isn't complete without a trip to visit Kashi at Metro Textiles so that was my last stop. The last time I visited he had some nice double knits that I had considered but not purchased, so this time I bought some in black, gray, and deep green (I had a devil of a time getting the colors anywhere approximately close to real life in the photos). I think the green is for Butterick 5559, the Maggy London with the diagonal stitched-down tucks. I also bought a crazy expensive wool suiting for $18 yard (down from the quoted $22/yd). I have a bit of buyer's remorse about it because it's going to be so wrinkly to wear (and yes, I know about silk organza underlining and no, I really haven't found that it helps me), but it is gorgeous and totally my color.

============================

Fabric Mart, 10_2010 Hmm, you're thinking. That's quite a lot of fabric, but Slapdash hasn't been buying that much fabric lately and she's been sewing a ton so maybe it's ok. If only that were the case. But really, I've just been lax about confessing. First, there was the mustard wool from Fabric Mart. Since they have flat-rate shipping, it didn't make sense to buy only one piece so I added some of the Cache ponte double knit, now unfortunately sold out. This is some good stuff. I've already sewn it into a dress, which I wore in NYC and was much complimented by Ann, so you know it's good as she knows quality!

G Street, 10.2010 Then there was some hometown shopping. I couldn't resist this gorgeous silk chiffon remnant. Snakeskin print never appealed to me, but then someone (Tany maybe?) made a silk chiffon blouse with a snakeskin print and I thought it was so chic. This will be made into yet another Burda 02-2009-123 self-collar wrap blouse, intended to be part of an Endless Combinations set for the PR contest.

G Street & Joann, 11_2010 I made an emergency run to Joann for some thread (thank goodness for car share!) and was happy to see flannel on sale for $2.99/yd. I picked up two prints, which are already made into pajama pants. At G Street I got some aqua waffle weave to make a pajama top and a knit border print with huge red flowers (told you I was having a red mood). The border is so big that if I made it into a hem border it would start at my waist, which would just be weird. I bought the whole piece, which was about 3 1/2 yards, so I may be able to get a dress just out of the "border" and then use the remaining black half of the fabric for other projects. I was also considering another Duchess of Windsor dress, maybe with a long bell sleeve, but cutting it with the border at the top rather than the hem. I don't have immediate plans to sew this up so I have plenty of time to think about it.

Well, I think that's quite enough! I say this with fear and trembling, but I think I will try not to buy any more fabric for the rest of the year*. I was feeling good because I sewed so much for my trip and have continued to be productive since getting back, but this has more than replaced everything that came out of stash and I am feeling a little anxious over it again. The power to control that anxiety is in my hands!

*I plan to make a coat in December, for which I will need blue velveteen and possibly a lining. Those purchases will be allowed. Stash purchases will not be permitted.

Tuesday, November 9, 2010

Utilitarian Sewing: Gym Pants

Gym Pants Thumbnail

The glaring exception to my Look Cute Every Day philosophy is gym clothes. I spend a lot of time in the gym, and all of my gym clothes are horrible. Hideous Old Gym Pants The worst of the pants is exhibited on the left (but were they really the worst?). Seriously, is there anything worse than a sagging crotch? The waist on these stays up with a drawstring, just a regular drawstring and not an elasticated one. The little shoelace drawstring came through small eyelets so I couldn't really add elastic to it. As I worked out the waist and crotch would droop lower and lower, exposing my belly. Also, they have side seam hip-height pockets. Worn Out Old Gym Pants Because when you're doing squats what you're really hoping for is gaping pockets to widen your hips (I stitched the pockets closed). The pants at right were not quite so ugly, but I had worn them to DEATH as you can see by the fuzziness. I also had a pair of Kardashian-esque black drawstring pants with white stripes down the side that were clearly not actual athletic wear but fashion athletic wear (shudder). With a saggy crotch.

I have been planning to make new gym clothes for, like, two years. My failure to do so was a combination of procrastination and letting the perfect be the enemy of the good. I bought some heavyweight cotton-poly knit from Spandex House in March 2008. I traced a pattern from my one pair of non-horrible gym pants about 4 months ago. But then I was like, "Well, that cotton-poly knit is not really a technical fiber. And shouldn't I try to find/draft a pattern with a crotch gusset?" But really, what could possibly be worse than the horrible pants I kept wearing week after week? I will answer that question: nothing. Piecing together strips of rags and just tying them around myself would have been better than the horrible pants I was wearing.

RTW Gym PantsBut still, I kept putting off this boring, non-cute sewing until finally the day arrived that I could not face wearing horrible saggy-crotch gym pants for one more workout. So I pulled out my non-technical fiber and my non-gusseted rubbed off pattern (they don't ride up into the lady area and have all the movement I need so I don't know why I got hung up on the gusset issue) and got to work. I liked the wide, tall waistband of the original (Danskins purchased at WalMart while visiting my parents last holiday season) because no matter how much I raise my arms my shirt doesn't ride up above it and show my belly. I also like the little bit of color contrast at the waistband but I don't care for the volume-adding ruching.

I did one pair of pants as a construction test, and it worked well with the minor tweak of needing to add 3/4" to the top of the colored contrast inside waistband so I went ahead and cut out the other three pairs.

I probably should have waited until I actually did a workout in them because having done so now I should have used shorter elastic in the waist as they can slump down a little during vigorous cardio. And not being versed in the ways of pants, I can't tell if those arrows on the front mean that I need more room in the front crotch or need to shorten the front crotch (input appreciated) but whatever. Nothing could be worse than my old gym pants!

Construction:

Note: I constructed these almost entirely by serger. I used the sewing machine only to zigzag the elastic in place and to twin needle the hem.

1. Cut out. Add 3/4" inch to the top of the inside waistband (or take 3/4" from the top of the outer waistband if you prefer a lower waistline).

2. Inseam.

3. Outseam.

4. Crotch.

5. Waistband side seams.

6. Cut a piece of elastic to fit very snugly around your waist (will stretch out a little when applied).

Elastic Pinned 7. Place waistbands right sides together, with the inner waistband on the inside. Line up upper edge. Pin elastic through both layers about 1/2 inch below the upper edge, stretching elastic. Zigzag elastic in place along the upper edge.

8. Trim the upper edge seam allowances so it extends about 3/8 inch above the elastic. That extension above the elastic is what will cause the colored inner waistband to peek out at the top. I used the serger to trim out of laziness, though I really shouldn't as it stretched and mis-shaped the waistbands. Again, whatever.

Waistband Application9. Turn pants right side out. Fold inner waistband over the elastic, so the waistbands are right sides together. Line up lower edges of waistbands. Pin both layers of waistband to pants, outer side of waistband to right side of pants. Serge.

10. Hem.

Once the pants are cut out, it takes just about half an hour to sew them. Really, what took me so long?

Catalog Shot of All Four PairsHere's the catalog shot of all four pairs. The different colored waistbands are mostly so I can try to rotate them evenly, and because I like to have some color on anything I wear but black is the only practical color for gym pants due to the embarrassing sweat location issue.

My gym tops are similarly old but slightly less horrible than the pants so I'm not pressed to replace them now. And for the tops, I think I actually do need technical fabrics. I am lucky to have a fairly high tipping point for sweating, but once I reach it I am a faucet. Cotton poly is not good with faucet sweat. Also, I'd like to get a good supportive mesh for built-in bras. Of course, this means I will continue to wear my up to 8 year old horrible gym tops in perpetuity.

Side view You can see in the side view why I get so frustrated about my belly. I have a four pack and a curving line of muscle alongside it and then...a five-month-pregnant-looking belly. It's not for lack of trying (although laying off the sugar would trim it down a little, I know).

Back The back fit is good, and the waistband goes up high enough that I never feel like I'm going to expose my bum. And it is quite a bum. In yoga when we're in Warrior II the instructor is always saying, "If your bum is sticking out in this pose, tuck in your pelvis" and I feel like he is looking directly at me. I'm like, "Seriously, unless I can tuck my pelvis into the next county, my bum is going to stick out." I think he thinks I'm not trying. In fairness, I should add the I love the instructor, he is awesome and kind and gives a great yoga class. But, like so many male gym teachers, he has no concept that the architecture of the female body is quite different from the male body, especially in the pelvicular area (how I love making up words).

While making these I kept singing "Gym Pants, Gym Pants, I need gym pants!" to the tune of Sex Bomb by Tom Jones (link goes to video--mildly unsafe for work). I was practically giddy to get rid of the old pants. I don't think I have quite achieved Look Cute Every Day with these pants, but I am content to have moved up a notch from Look Horrible In Saggy-Crotch Pants Every Day. Now that I know how quick they are to make hopefully I won't put off replacing this set once they reach their expiration date! Although I would like to alter the pattern for those front crotch arrows--suggestions welcome.

All photos are here and the pattern review is here.

Thursday, November 4, 2010

McCall 6032, Gathered Loop Front Knit Dress

M6032 Thumbnail

McCall 6032 is totally my kind of pattern: a knit dress with a bit of volume in the front. I like the double V front and back neckline and the choice of sleeves as well. When I found the fabric at Fabric Mart ($5.99/yd) it seemed like a great match. The front of this dress is cut as one piece so it's a good pattern for a large motif like this, though the back has a separate bodice and skirt and a CB seam, and I did not handle the cutting layout very well I found when it was done! My main concern was not to get a giant circle over my boob, so at least I succeeded in that.

This calls for a center back zipper and for the bodice to be lined. To add insult to injury, the bodice lining is done the Bad Old Way where you have to sew the shoulders at the end, rather than the new, all-machine clean-finish way. This is a nice sturdy knit so it didn't need to be lined and as for a zipper in a knit, pfft.

Sewed Darts at CF and CB for elastic application When I made some unmentionables recently I finally pulled out the picot elastic I had purchased from Sew Sassy and I thought it was really cute and decided to use it as a neckline finish at the next opportunity. This presented the perfect project!

The front is cut on the fold, and I had cut the back bodice on the fold as well since I was not putting in a zipper. While cutting, it seemed like the back neckline was really low. When I put it together, the back neckline was indeed really, really low. The dress was overall a bit too large as well. And I was a little stumped as to how to get a good elastic application only by clipping into the seam allowance at CF and CB. I took a rather large dart at center back, taking up about 1.5 inches of fabric and finishing it a little above the waist. I cut it open and unstitched the first 5/8" for seam allowance. At the center front, I took a tiny dart only slightly longer than the seam allowance and slashed and unstitched it 5/8" as well. I cut two pieces of elastic, each slightly shorter than the distance from CF to CB, folded down the seam allowance on the neckline, and stitched in place with a twin needle, overlapping at CF and CB to make a point. I trimmed away the seam allowance only so it would like nice for the picture. Ha!

I was happy with the way the neckline trim looked--it adds a little pizzazz without being too obvious and using trim like this makes for a nice sharp V at center front and back.

Sleeve Miscalculation Here's my dumb move and slapdash finish for the project. I cut the 3/4 length balloon sleeve, even though every time I've tried this look in the past it is a disaster on me. It makes me look shorter and like I have tiny Tyrannosaurus arms, and also widens me across the middle. And also looks like an old-fashioned nightgown. This look works for many people so I'm always lulled back into temptation, but on me it is all around bad.

Instead of first going to narrowing the sleeve to be fitted, I decided to chop them off in a fit of mania and see if I could do a puffed elbow length sleeve. That didn't look good either. So now I was stuck with voluminous, unflattering sleeves. I could have cut out a new set, but then I wouldn't have enough fabric to make the Simplicity 2580 empire waist cowl top. So I carefully serged my cut off lower halves back on using the tiniest seam allowance possible and narrowed the sleeves. Luckily, the joining seam really doesn't show from 5 feet away so I think I got away with it...this time. I hemmed the sleeves with picot elastic to echo the neckline.

Back You can see that the low back neckline creates room for it to slip off my shoulders a bit. I don't have to constantly pull it back up into place, thank goodness, but I might need to make some sort of sloping shoulder adjustment if I were to make it again. Bra strap keepers would help, too. The way it opens up creates those little dewlaps at my underarms, but at least there's no swayback! I made my usual swayback adjustment, of course. But perhaps swayback puddling would distract from the terrible pattern repeat there at center back.

M6032 This was another piece that got a lot of wear on my trip to Turkey. Love the bright colors and sturdy knit, and the cut flatters my shape well.

All photos are here and the pattern review is here.

So, it's cold now. Sadness. Cidell and I were talking about Fall/Winter sewing and she expressed skepticism that my knit dresses for winter actually keep me warm. They don't. The dresses are barely an afterthought in the scheme of keeping warm. First, you start with tights. Then come the wool knickers made out of thrift store merino wool sweaters. Lightweight, form fitting, and oh so warm. I think the wool knickers are the smartest sewing I have ever done. Now, don't get me wrong--they are so ugly that they are the anti-sex. Much worse than a chastity belt, because the chastity belt implies that someone wants to get at what's under there. With the wool knickers, it's like, "I wouldn't go near that with a 10 foot pole." But so warm.

Then you add knee high boots, a coat, a scarf, a hat, and gloves. Oh, and throw on a dress somewhere in there. The only place that isn't covered in a double layer is your knees, and if it's really cold you can put on some black Cuddl Duds (big fan of the product, despite the inexplicable spelling) or silk long johns, which can pass for tights on the commute to work but have to be removed in the office because they don't *really* look like tights. My office allows jeans on Friday so I usually do that, but other than Fridays I wore pants only one time last winter when it was too damn cold for a dress. Otherwise wool knickers/boots/coat/hat/scarf/gloves keeps you warm, despite the flimsiness of a knit dress.

Tuesday, November 2, 2010

Designer Inspiration: Fall/Winter Dresses

Yesterday was the most perfect day of the whole year, I think. Blue skies, breezy, not humid and not dry, not cold and not hot--somewhere in the mid to high 70s. The leaves are starting to fall and it was just like Hollywood's idea of Autumn, where the heroine walks through brilliant, drifting foliage in a sleeveless shift dress with boots and bare legs and it never rains or requires outerwear.

However, I know this enchanted Indian summer can't last (and indeed, it's much cooler today) and so my thoughts turn to what in the world to sew for Fall and Winter. After having inventoried my summer dresses and finding that I have over a month's worth I became sad when contemplating a long cold season with my paltry eight or so winter dresses. That's not even two weeks' worth! So I went on the hunt for some designer inspiration.

Saks.com - David Meister - Side Pleat Crepe Dress


One of my top picks is this David Meister side pleat dress.
Vogue 7762 is a reasonable facsimile, especially if it is feasible to pleat rather than gather the side seam.


I loved the yellow and green colors shown in this recent post on Capitol Hill Style, especially the mustard and chartreuse. I will be heading to NYC for work in a couple of weeks and am hoping to fit in a little bit of fabric shopping on the day I'm not speaking, so I tried to tell myself I could look for a wool crepe in New York. But then I found a mustard wool crepe on Fabric Mart (still a few yards left) and was done for. I haven't received mine to verify that the hand is suitable for dresses nor that I can wear this tricky color, but I am in eager anticipation.

Saks.com - Akris Punto - Wool Challis Print Dress


The mustard dress project will probably take a backseat to a quickie version of this Akris wool challis dress.
I'm thinking McCall 5661 is pretty much a dead ringer if lengthened into a dress, and with little fitting and the only complicated details at the sleeve and the neckline, this should be an easy $1390(!!!) dress.


I am still thinking on how, exactly, I will do the lining (wool voile is too sheer and lightweight to be unlined), but it's not going to be complicated. This will be great for Fall, and can transition into winter with a turtleneck underneath.


Saks.com - Michael Kors - Twist Front Shirt Dress


I thought I'd seen every variation on the twist but this Michael Kors is new to me and I *adore* it. How in the world you do a twist on a functional (?-so it appears) button placket is beyond me. It brings to mind a little bit Meli88a's fantastic Vogue 2742, but of course this out-of-print pattern doesn't appear to be available anywhere. Curses!!!! If you have this pattern sitting unused in your stash, I will happily purchase or trade for it.

Saks.com - Dior - Aurora Wool Dress


Ah, Dior, you are so scrumptious. I could probably cobble together something like this from various patterns (hint: Vogue 2975 (now OOP) and Burda 08-2009-128) but I would not look like a 6 foot tall Amazon in it, more like a neckless pygmy with an abdominal growth, so it will remain in the realm of eye candy if I know what's good for me. But I love the demure high neck and knee length, with the fitted bodice adding a little frisson of sexy to the schoolmarm.


Saks.com - Gucci - Wrap Dress


How is it that I don't have a pattern for this? It is such a great, simple shirtdress silhouette with the single drama element of the collar.


The closest I can come is Burda 01-2008-121 (starting size 38, ugh). Hmm. I guess the BWOF isn't actually that different, I'd just have to chop off the cut-on collar and add a new one. I would not wear it slit up to there, though.


Saks.com - MaxMara - Ruched Dress This one struck me only because it is similar to vintage reissue Vogue 2787, although with the "coffin dress"* problem remedied with the S seam continuing onto the back. It had never occurred to me to consider this pattern in a knit, but I can definitely see it working (with a lowered neckline--when I made this I found it way too high--and more relaxed armscye).

*Although I wholeheartedly concur with Kathleen Fasanella's distaste for clothes that are fancy in front with nothin' going on in back, in the case of this circa 1948 pattern, I would guess it has something to do with lingering wartime shortages/fashion preferences for fabric-economical designs.

Saks.com - Emilio Pucci - Zip-Front Jersey Dress-1 Saks.com - Carolina Herrera - Pleated Plaid Dress-1I found lots of other great pieces with great details that are beyond my capability to create, I just like to look at them. This vavoom Pucci is to die for! It would make for some hot winter date nights (I am already tired of my winter date night staple Vogue 1020 and I haven't even worn it yet this season!). And of course we have the magnificent Carolina Herrera.

Can I just say that I'm so happy I sew in a world where taupe is apparently the "loud" color? Ick! When skies are gray and all the trees and plants are hibernating, you have to bring your own color to the world, not succumb to the dreariness of black, gray, and taupe. I think that's why the Akris dress caught my eye--it's a (very very subdued) print with (very very subdued) color. Shocking!

There are plenty more pieces to drool and plot over in my inspiration folder.

What's on your sewing list? Seen any great dresses I should check out?