Thursday, August 26, 2010

Silk Jersey Self-Drafted Tunic

Silk Jersey Self-Drafted Top

So I found an amazing silk jersey print at G Street Fabrics while they were having a sale so it was $5.22/yd. This border print was printed not with the border along the selvage but in panels. There were three panels in the bin. I bought all three.

I turned two of them into the BWOF 06-2010-123 sack dress. Diane Drexel asked on that post what the dress looks like when worn backwards. I couldn't believe I hadn't thought to try it! So I did. But while some things can be worn frontwards and backwards for different but cool looks, some things cannot. This dress looks like a nightgown when worn backwards, and not in a sexy negligee kind of way. It was worth a shot.

Anyway, I had one panel left, plus a few small bits leftover from the dress. I wanted to make work pieces out of them. So I turned the bottom half of one panel into a simple elastic waist skirt. Then I used the top half of that panel and the leftover bits I could scrounge into a simple self-drafted top. I am pretty pleased!

To make the top, I sort of used the method outlined in this Craftster tutorial and sort of based it on the principle of my Burda 7866 top.

Shape of Top

When laid flat on the table, you can see how simple it is, just a rectangle for the upper bodice and a contoured tube for the band.

Neckline and Armscye Finish I cut two rectangles for the upper bodice. I just used the full 45 inch width of the fabric and then cut that in half along the fold. The length was determined by the length of the fabric I had remaining after the skirt, which was about 18 inches.

Then I sewed the shoulder seam, adjusting the neckline opening until it was narrow enough to cover my bra straps but still a wide boat neck.

Next, I figured out the length of a comfortable armscye (about six inches for me) and sewed the side seam below the armhole opening.

I finished the neckline and armscye simply by turning under twice and stitching. I turned under the front neckline about twice as much as the back neckline because I feel chokey if a neckline is too high.

Elasticated Waist Seam For the lower bodice, I made a contoured tube, larger at the hip. Because of the size of my scraps, my lower band is made of three pieces, but if you have ample fabric two pieces with shaping at the side seams will be fine. The lower band has about an inch of ease at the waist and inch a half ease at the hip.

I gathered the upper bodice to the waist edge of the band and stitched together. I pressed the seam down and then stitched in place to make an elastic casing. I wasn't sure I wanted to do the casing, but I prefer the way it looks with the seam right at my waist rather than falling below.

Then hem the lower band and you're done! This is super easy and turns out a stylish top, as you can see from the examples below (but they are boring solid colors--fie upon boring solid colors).

Saks.com - Ralph Lauren Blue Label - Adina Dolman Pullover Saks.com - Ella Moss - Madison Banded Tunic


Silk Jersey Top and Skirt


This is a great piece for work, as is the skirt. I feel that I got quite a versatile wardrobe out of this purchase! The skirt and top can be worn as separates or they can be put together (tucking the hip band into the skirt and using a belt to cover the join) for a two piece dress. I'm not sure I'm crazy about the dress look so I might never put it together that way, but having the option is nice.

If you have a great knit print to show off but not much of it, I highly recommend this pattern/method. It is really so simple!

All photos are here and the pattern review is here.

Tuesday, August 24, 2010

Bye Bye Baby, Baby Goodbye


As many people have speculated based on my sewing output (keep in mind that I don't buy RTW, so what you see is what I get), I have a very full closet. I like to delude myself into thinking that I have a normal amount of clothes, but then I visit friends and even the fashionable ones seem to have fewer pieces than I do. Clearly I need to make some more clothes-horsey friends. However, I am good about purging unworn pieces from the closet on a regular basis. I really do wear (almost) everything in there.

I used to have a hard time getting rid of clothes I had sewn. I think we all have a primitive instinct to preserve pieces of ourselves, and an item I've made with my own hands seem like a piece of myself. However, my discovery of Pattern Review in 2006 and blogging in 2007 means I have photos and recollections of most of the things I make and that is enough to satisfy me. I do fret a bit that my custom clothes are probably thrown away/recycled by the good people at Goodwill because they don't have size tags and the perception that homemade=low quality, but once I part with them I must relinquish control over their anthropomorphic fates (in the other direction madness lies).

I don't have a car but do car share with a neighbor: in exchange for parking in the parking space that I purchased, he lets me drive once a month (or more often if I ask, but I don't usually need to). However, he got rid of his car in January and didn't get another one until this month so I had a MOUND of stuff to take to the Goodwill (exhibit A on the left--and that's before I cleaned out shoes and skirts).

I said goodbye to several old friends as shown in the photo at the top of the post, such as my Sherlock Holmes dress (the swayback problem was just too awful), my Tippi Hedren dress (ditto, and I hate the offset on the front stripe and the bagginess under the arms), and this Butterick 4792 retro dress (the front bodice/neckline is just awful on a small bust and there's no getting around it)...and many, many more.

McCall 4444Another old friend pre-dated my PR/blogging days. I made it for the 4th of July 2005--the contrast red band has little stars on it for the holiday. I love this little dress, classic Laura Ashley McCall 4444. However, the time had come to acknowledge that the print (it's fish and flowers) is too juvenile for my nearly 36 year old self and I was uncomfortable when wearing it as my belly pops the skirt out a little. To ease the pain of parting, I took some photos. Now it lives on and will hopefully be enjoyed by someone a little more age (and size) appropriate for it.

And now I have to acknowledge: the bad thing happened. Even though I cleared out at least 35 pounds of clothes and shoes, the closet was still full to bursting. My suits (I do own some, but wear them only under duress) were getting creased and wrinkled from being shoved together too tightly. So I bought a freestanding clothes rack and set it up outside the closet. Yes, the clothes are invading the living space. Well, not really--there is a little niche next to the closet that's not good for much. It's practically part of the closet.

External. ClosetI moved (most of) the in-season dresses to the rack and arranged them by color. I love to look at them. I made the mistake of counting them and I have--to engage in some spin--only a little over a month's worth. That's not too many, right?

What do you do with the clothes you've sewn when it's time to let them go?

Thursday, August 19, 2010

Butterick 5283, Asymmetric Twist Top

B5283 Thumbnail

T-shirts are serviceable but boring. I mentioned before that when I didn't have time sew my uniform for, like, 10 years was a solid colored tee (H&M, mostly) and a bright printed skirt (half quickie hand-made, half RTW). I still enjoy seeing this look on other people, but I feel so bored I'm going to throw up when I put it on myself. However, I do have a few printed skirts that I love to wear (like the one on the left of my silk jersey score), so I'm always looking for a way wear a tee but still be interesting. I liked this variation on the twist top, Butterick 5283. I made this over the winter out of the leftovers from my Duchess of Windsor dress from a couple of years ago and brought the pattern out again for the turquoise rayon jersey from G Street.

The method devised by Butterick to finish the front is creative, but a little strange. You're supposed to cut two fronts, then sew them right sides together at the neckline and the little area that will be exposed at the twist. Then turn right side out. This seemed both needlessly wasteful of fabric and like it would turn out a shirt with weird texture issues if you didn't also double the back. My construction method:

Construction

1. Fold the allowance of the front neckline over clear elastic and twin needle to finish.

2. Clip into the seam allowances at the twist marking, turn under, and stitch the allowance in place to finish.

3. Stitch the diagonal seam from side to finished twist edges. Twist. (The instructions have you twist and then stitch, I found it easier to stitch then twist, but it's just personal preference.)

4. Stitch front to back at shoulders, ensuring that back neckline allowance overhangs at the inner shoulder seam. This has a long drop shoulder so I stabilized with ribbon.

5. Press shoulder seam allowance toward back, including allowance on the overhanging portion of the back neckline.

6. Fold back neckline allowance over clear elastic and twin needle in place taking care to match up with twin needle stitching at front neckline.

Drafting sleeve For the turquoise version, I got in my head to do a bubble sleeve (gotta make it interesting, right?). I traced off a stay (the sleeve as drafted) and a longer bit of the sleeve for the bubble (marked lines here--although it turns out the bubble should only be 1.5 inches longer than the stay, see below). Then I slashed and spread the bubble part of the sleeve as shown at left.

Sleeve Assembly To make the sleeve, I gathered the lower edge of the bubble and the sewed it right sides together with the lower edge of the stay. I folded the bubble up over the stay to enclose the seam and then treated the sleeve as one unit in sewing to the armscye.

Before Shortening Bubble Sleeve I had been a little worried after assembling my sleeve, as the bubble did not really seem to be in evidence so I basted it in place to see how it looked. Didn't look like much! Although I added a generous amount of width to my bubble pattern, the volume wasn't showing with the sleeve stay being so much shorter and pulling most of that volume to the inside. So I took it off, shortened the bubble to about an inch longer than the stay and put it back in place. Much better!

For the blue version, I put darts in the back (should have added a CB seam and done a swayback adjustment). For the turquoise version, I also added a little width to the side seams below the bust to match the current styles. Shapeless is in, it seems.

MICHAEL Michael Kors Asymmetrical Blouse - Nordstrom Saks.com - Boss Black - Illary Knot Top In doing some virtual snoop shopping for Spring/Summer inspiration, I ran across not one but two versions of the asymmetric twist top. I'm not sure that the Kors piece is actually a twist, it looks like it could just be a gather, but the Boss Black is almost the same design (except in a woven). Fancy!

All photos are here and the pattern review is here.

Thursday, August 12, 2010

Butterick 5450, Easter Dress

B5450 Thumbnail

I think my marinating time for fabrics is about a year, because this is another one from from Hong Kong, right on the heels of my McCall 5579 kimono from another Hong Kong fabric (they were sewn about a month apart).

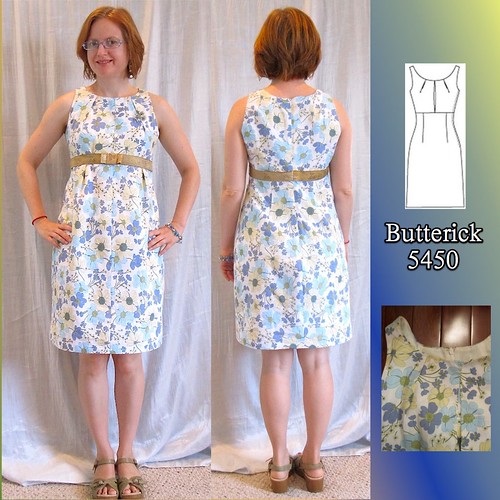
I had originally intended this fabric to be for the Simplicity 2827 vintage dress pattern I made in May, but I kind of fell out of love with the fabric. I felt like the colors were a little too pale. I like saturation. So I skipped it for that project, but thought it would work with 
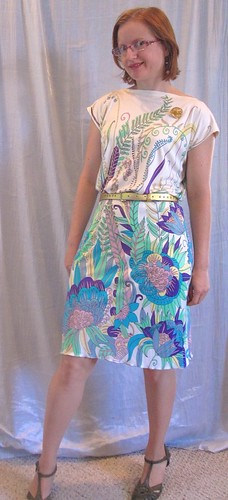
Butterick 5450. It looks a bit like an Easter dress with those colors, but it is cuter made up than I was feeling it on the shelf.

Broad Back Adjustment 
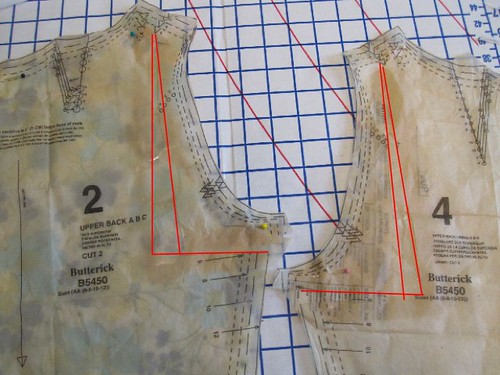
I started with my usual adjustments, now including broad back. This has separate pattern pieces for the bodice and bodice lining, which is a nice touch for a simple pattern. But that meant I needed to adjust both the back and back lining. In the course of this project, I realized that the L shaped adjustment ends up adding length to the back side seam. I was really confused at first when my side seams were about an inch offset. That's a lot even for my imprecise self. However, the back fits well and doesn't pull across the shoulderblades. I also did a swayback adjustment. However, because of the bodice design, with its very deep center pleat and smaller side pleats, I wasn't sure if it would need a small bust adjustment or how to do one, so I left that to the fates. Luckily, the bust fits well and is not too large or baggy.

Increase A Line of Front Skirt When I made this there were only a few reviews of this pattern on Pattern Review, and the photos were all on flat-bellied dress forms and one flat-bellied person. I really, really did not want to deal with this clinging to the belly and decided to add a little width to the front skirt, which is meant to be cut on the fold. I must have been tired when cutting this out because I remember thinking, "Do I need to add any width at the very top? No, I don't think so." That would have been ok were it not for that pesky "seam allowance" requirement. Duh. I sewed CF with a very narrow 1/4 inch SA. I also added width to the sides at the upper edges and turned the front dart into a pleat. The front has plenty of belly room. In fact, I probably would have been fine with the skirt as drafted on the fold.

To get the skirts out of my fabric I had to cut them on the cross grain, which results in that awful pattern repeat on the front. That really bothered me when it was first made, but luckily I can't see the front skirt while I'm wearing it.

Weird Shark Fin in Back 
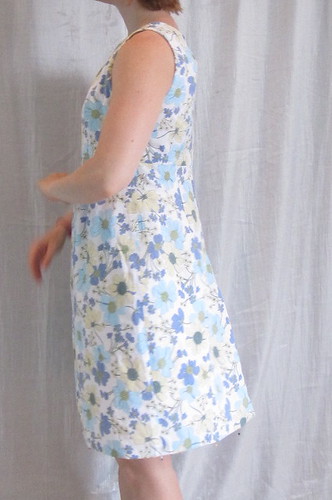
I don't know if it was a result of creating a slight A line in the front skirt or what, but the back skirt was making a terrible shark fin when it was all put together. It looked ridiculous! I had installed the zipper pretty far down and could only take in the center back for about the last 10 inches, but it remedied the problem.

Bodice Closeup Ever since I saw this fabulous jacket by Couture Arts in person in Philly at 
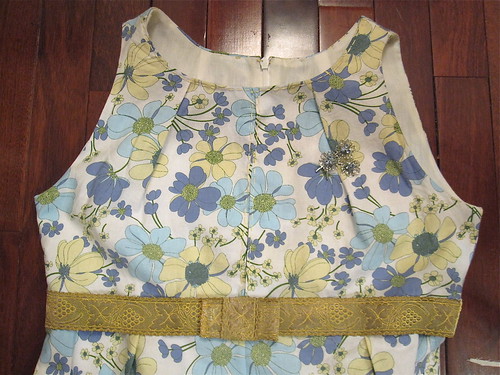
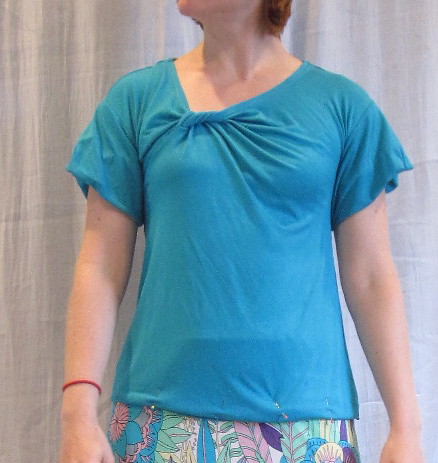
PR Weekend I have been wanting to do some decorative hand-stitching with embroidery floss. I chose a yellow very slightly more saturated than the yellow in the print to try to bring some brighter color into it. I hand-stitched around the neckline and down both edges of the center front deep pleat. In the end, the stitching barely shows even up close, alas (click on the photo to enlarge--you can also see the pin my mom gave me that goes perfectly). But I like the technique and will keep it in mind for embellishing other projects. Embellishment is always hard for me because I don't have an eye for it (even though I love to make jewelry--I don't know why the disconnect) and fear it will always end up Becky Home-Ecky.

B5450 
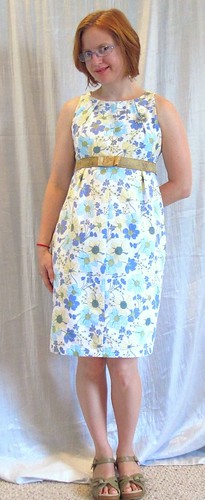
When the dress was done, the pale colors were definitely missing something. I figured I would probably want to wear it with a belt anyway, so I dove into stash to see what I could find. I came up with this vintage ribbon I purchased from the Goodwill trunk show I went to last year. It pained me to cut into a bit of vintage ribbon, but saving it forever is not why it was made and it was the perfect finishing touch for this dress.

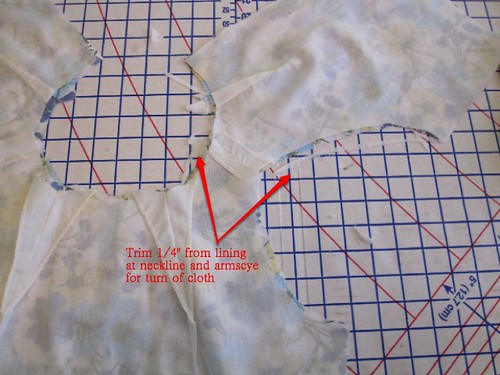
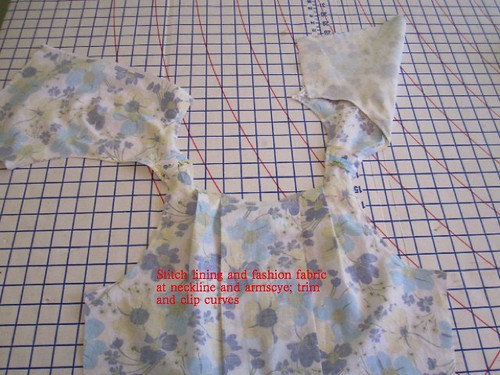
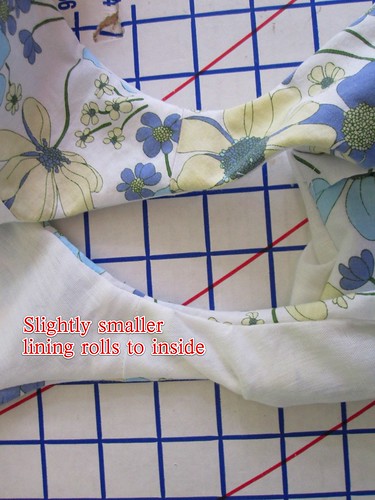
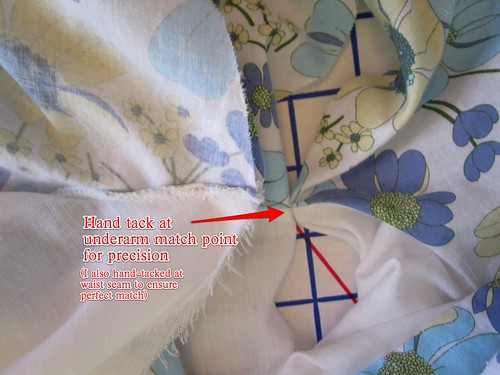
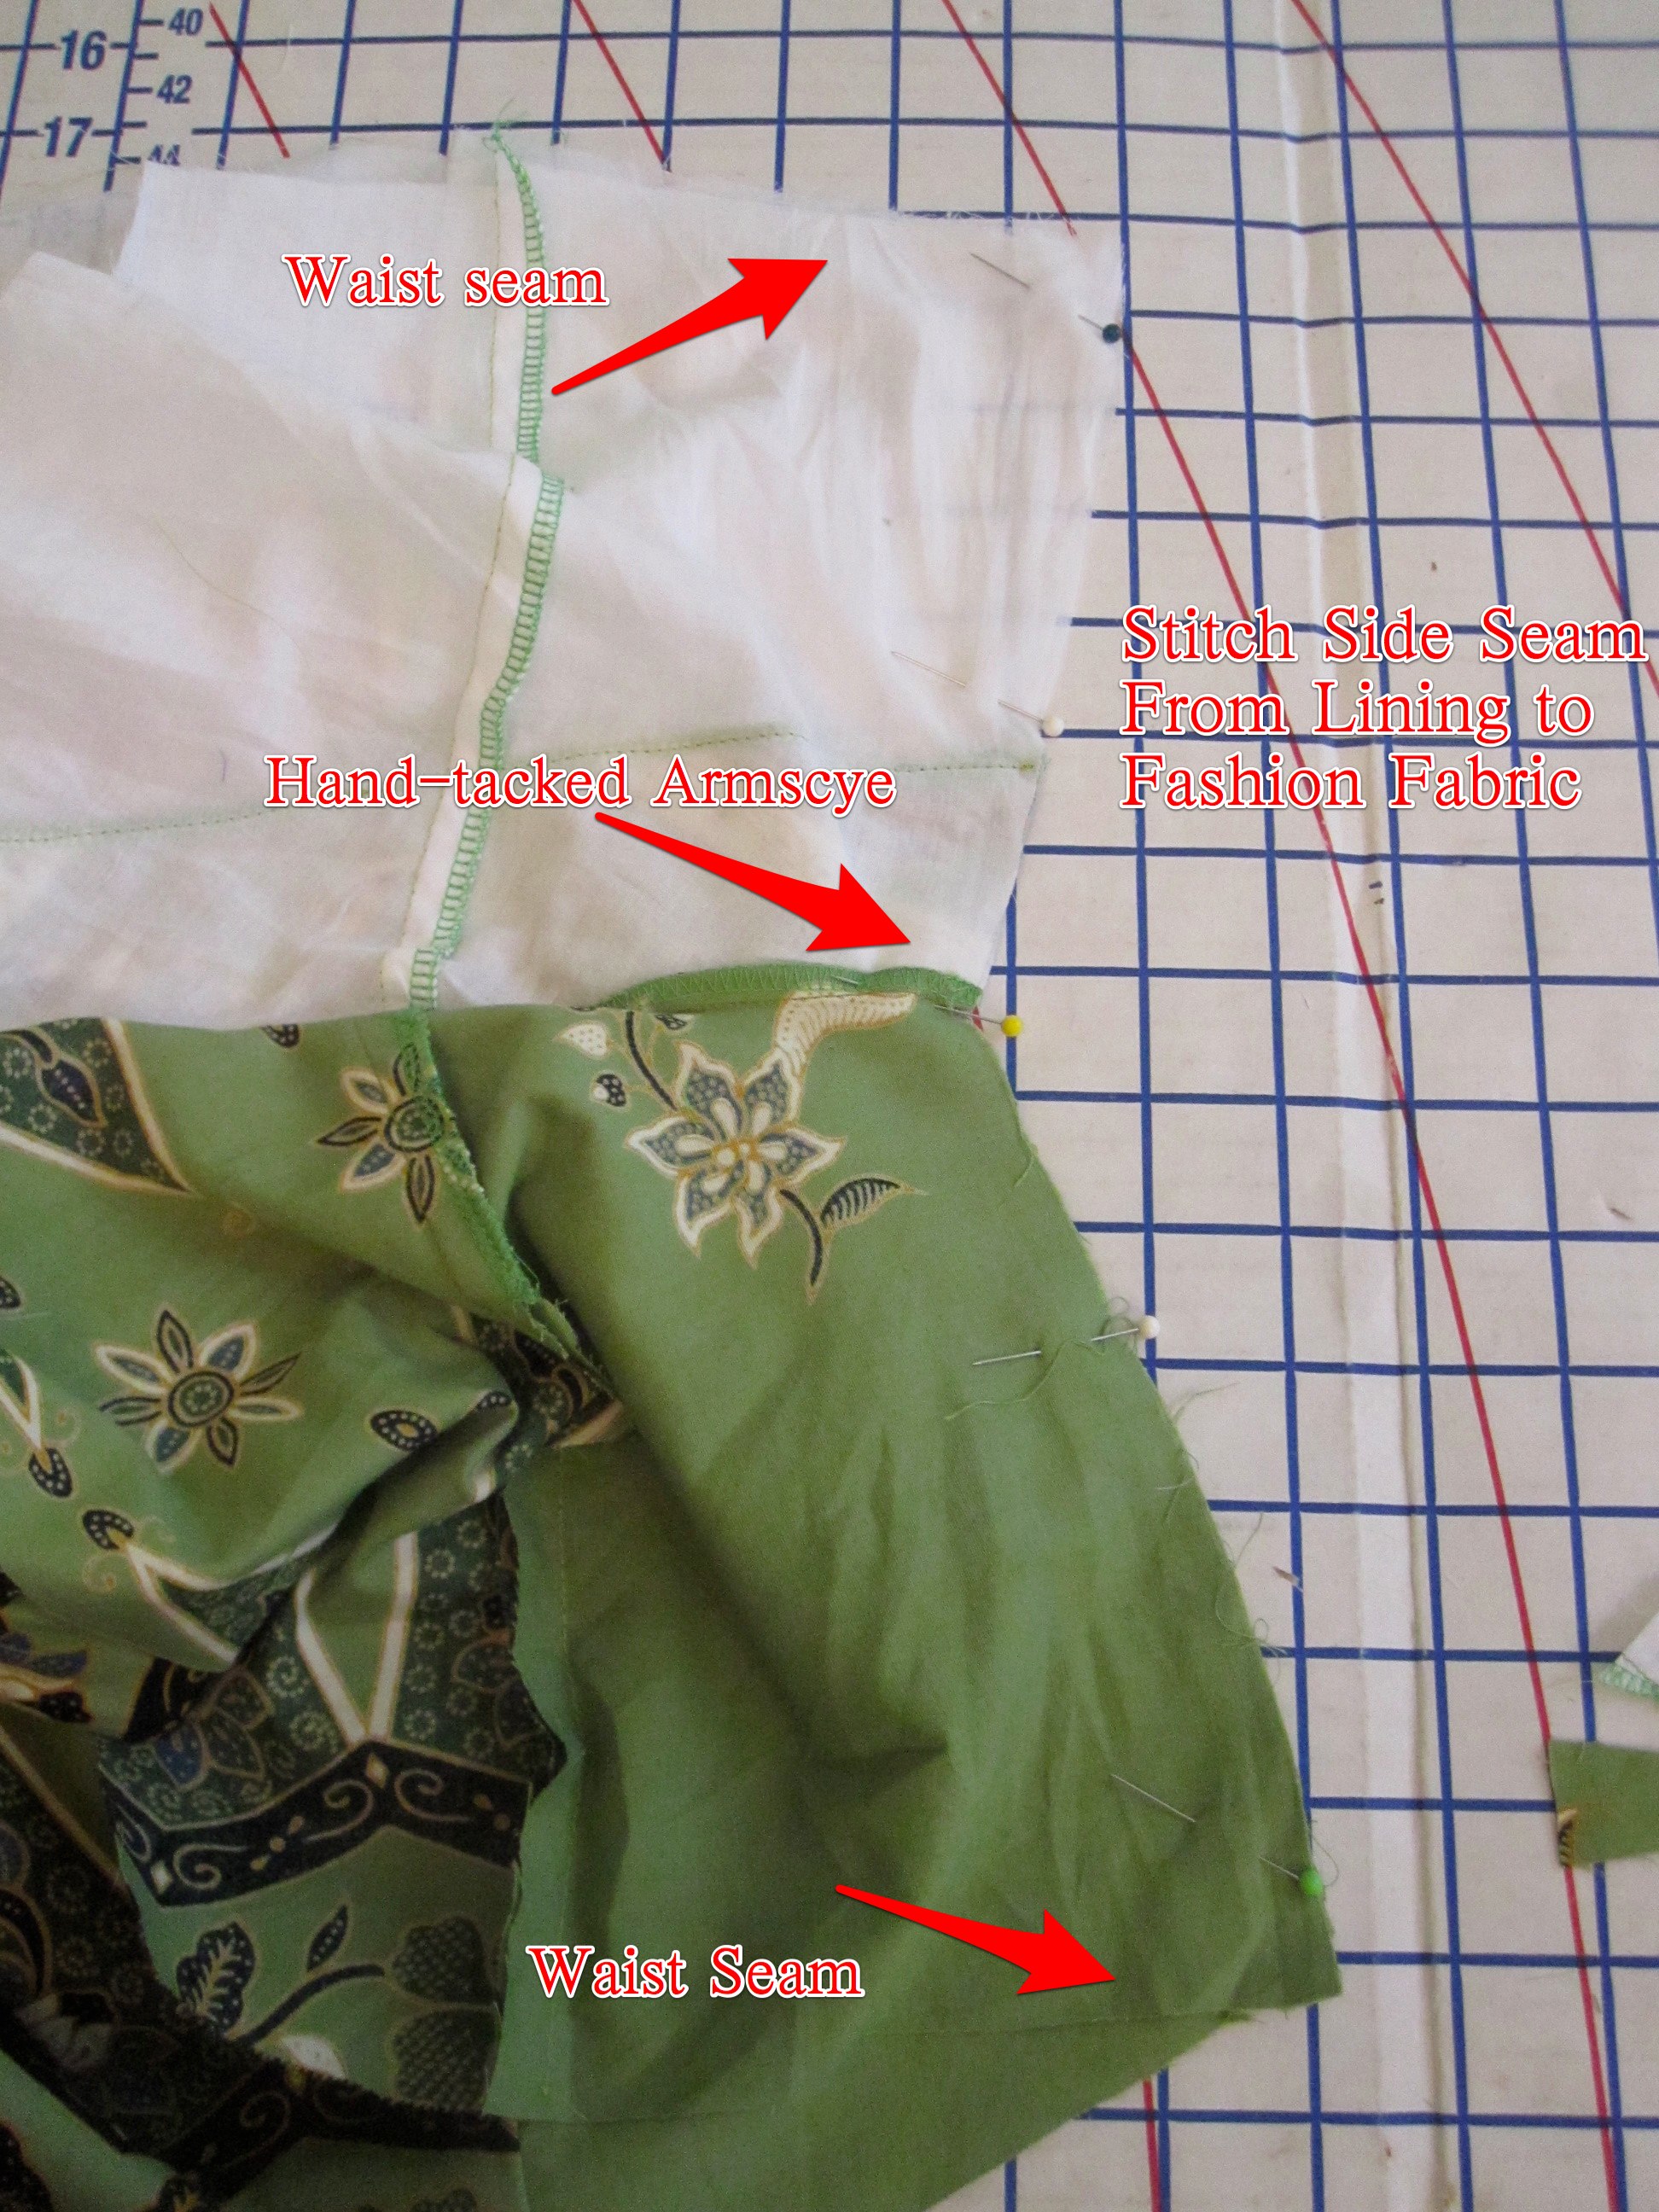
It is a cute, well-drafted pattern, other than the Bad Old Way directions for lining the bodice (see my tutorial of earlier this week for the new, better way). I really like that there are separate bodice lining pieces. It puzzles me that the skirt is not supposed to be lined; I lined it. LOVE the back neck darts, something that was standard on older patterns yet all but disappeared today. Most of us have somewhat rounded shoulders and the dart makes for a nice fit.

The only thing I don't like about the pattern is that the straps are quite narrow. I should have paid attention to the drawing and the width of the straps in cutting, because the drawing fairly accurately depicts their width. I am comfortable wearing sleeveless pieces to work, but generally prefer a little more shoulder coverage, so if I made this again I'd widen those straps out toward the shoulder.

All photos are here and the pattern review is here.

===============

PRODUCT/SERVICE RECOMMENDATION. Not affiliated or compensated in any way.

I wore my old pair of Gingher scissors--a gift from my mom with my first sewing machine in 1996--into the ground, and bought new ones when they got painfully dull (literally--they hurt my hand). I kept the old ones on the ironing board for cutting interfacing and quick jobs. I took them to the hardware store to get sharpened, where they managed to dull with finality the last little bit of cutting edge. I don't think they could even have cut paper; they certainly couldn't cut crisp cotton batiste, possibly the most easygoing fabric to cut. I took them to the G Street Fabrics Scissor Sharpening Event team (I hope the response convinced them to repeat it on a regular basis), who probably could have restored the cutting edge if they weren't trying to sharpen 200 other pairs of scissors in a four hour time span. They brought them back to almost being able to cut interfacing.

I visited the Gingher website and they promised that for $7.50 they would restore my scissors to like-new working condition and send them back to me (no extra shipping charge). I figured I had nothing to lose, as otherwise I would have to try to find a way to recycle the metal of the scissors so I sent them along with a check. A check--so quaint!!! But they don't take credit cards. The website says 3-4 weeks; I think mine was right at three.

I got them back yesterday, complete with the sheath. I had meant to tape my name and address to the sheath but forgot; I was glad they kept track of it. They really are like new!!!!! I wish they had loosened the screw a teeny bit as they've always been a squidge stiff, but the blades can chop through multiple layers of fabric like butter again. This from literally not being able to cut *at all*. They have been raised from the dead. I highly recommend this service for your Ginghers!
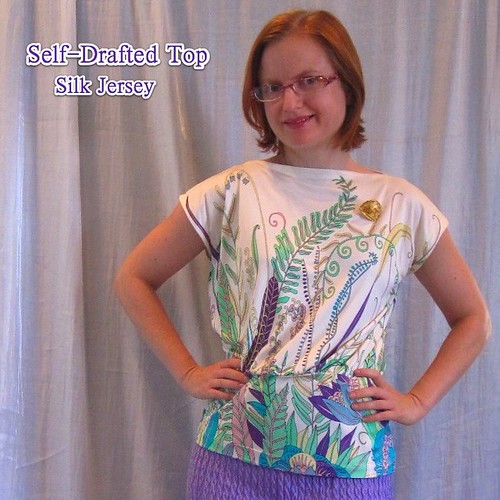
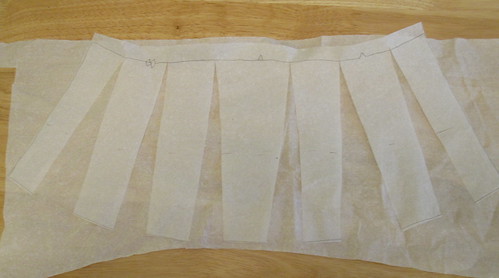
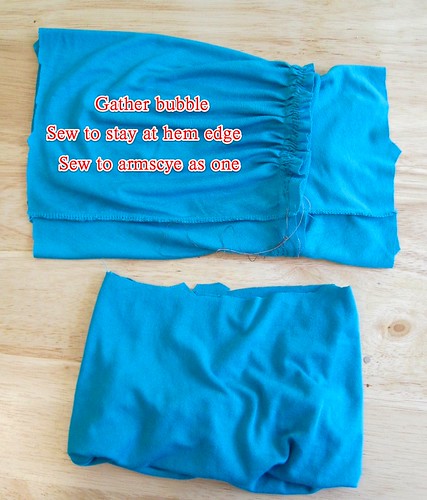
Tuesday, August 10, 2010

All-Machine Clean-Finish Sleeveless Bodice Lining Technique Tutorial

This has already been done several times, and unfortunately what it really needs is a video to demo how to turn it right side out as photos just cannot convey (done!), but redundancy never hurt anybody, right?

Back in the Olden Dayes, commercial pattern companies had you go to ridiculous contortions to line a sleeveless dress. You were to sew the fashion and lining fabrics together at the neckline and armscye to within a few inches of the shoulder. Then you were to try to roll out the fabric and hold it steady to put in a straight shoulder seam. Then you had to finish the shoulder by hand. Ridiculous!

There is a new, modern way to do this all by machine with no hand futzing at the end.

Requirements: Your pattern must have a center back or front seam and two side seams. Three open seams are required, otherwise the geometry of this won't work and you'll find yourself with an endless tube resembling a Mobius strip or a water weenie.

For a pattern not suitable for this technique, such as with both the front and back cut on the fold, see this alternative method that involves only a little bit of easy hand sewing.

First: Sew the shoulder seams of your fashion and lining fabrics. Finish and press. Do NOT sew the side seams. Your two side seams and front or back seam remain open.

Second: Trim 1/4" or 1/8" (or the skinniest you can go) from the neckline and armscye of your lining. This makes your lining smaller than your fashion fabric. The lining will automatically roll to the inside when the two pieces are sewn together, for a nicer look.

Trim Neckline and Armscye

Third: Sew your fashion and lining fabrics right sides together at the neckline and armscyes. Trim close to stitching at curves (I use my serger). You may need to clip into the curves.

Stitch Armscye and Neckline

Fourth: Pull the bodice right sides out through the shoulder tunnels, as described in this video:


Here's a still photo representation and this is what it looks like when half turned right side out.

Fifth: You can see that even before pressing, the lining is pulling itself under to the inside (here's a view before it's turned). Press. Understitch if needed. Your trim job on the lining should eliminate the need for understitching, but it is not always enough.

Turn of Cloth

Sixth: Hand tack at the underarm to ensure perfect matchup at the seam. I don't find it necessary to baste the whole seam, just that junction (and the waist seam and/or midriff junction, if there is one). Your hand tack will ensure that the underarm match point doesn't shift.


Hand Tack Underarm

If you are inserting the zip into one of the sides, do the hand-tack at the back or front and one of the sides, sew one side seam and the back or front seam, and then insert the zip into the remaining open seam.

Seventh, sew the side seams "all at once"--one continuous stitching line from the lining to the fashion fabric.  Pin and stitch the side seams, from the lower edge of the lining to the lower edge of the fashion fabric.

Side Seams all at once

And voila! A beautifully finished bodice with no* hand-sewing.

*Ok, you've got me. Almost no hand sewing. You can skip the hand tack at the underam if a perfectly precise matchup isn't important to you, but it takes about 15 seconds and it's worth it to me.

To clean-finish by machine at your zipper, visit this tutorial I posted previously.

And here it is once the zipper is installed, a thing of beauty to behold! The completed dress is here.

Completed Lining


====================================

Cap Sleeve Variation

Cap Sleeves in All Machine Finish

This method can be used with a cap sleeve.  However, you must consider the bulk of your cap sleeve against the width of your shoulder strap.  The narrower the shoulder, the tighter the squeeze and the smaller the cap sleeve must be.  For the project pictured above, I had a hard time pulling the bulk of the sleeve through the strap tunnel--I used a large safety pin to give me some grip.

First, finish your sleeve's hem.  In my case, I lined the sleeve. Finishing the hem before attaching is the normal procedure for any cap sleeve that does not reach the armscye, so this will be in your pattern's instructions.

Second, stitch the cap sleeve into the armscye, again as directed by your instructions.  Do not serge off the seam allowances.  Remember, at this point the shoulder seams should be sewn but the side seams and front or back seam must be left open.

Third, fold the cap sleeve toward the bodice, right sides together, so the seam allowance extends.  This is what you did when you sewed the cap sleeve--sleeve right sides together against the bodice.  Pin and stitch your lining to the armscye and neckline seam allowances as described above, like normal, enclosing the cap sleeve  When you pull the fabric through the strap tunnel to the right side, your cap sleeve will pop out.


I am not aware of any way to use this method with a full sleeve.  For a full sleeve where the sleeve is not lined, if you want to enclose the seam allowances inside the lining, first stitch the fashion fabric and lining together at the neckline.   Clip the neckline and turn the lining to the inside.  Set in the sleeve.  Then at the armscye turn the lining's seam allowance under and stitch in place by hand to the armscye seam allowance.  It will be easier to do this if you set the sleeve in the flat.

Thursday, August 5, 2010

Book Review, Stashoholism Confessional, & Sewing Injuries

Bag Bazaar Cover

I found Bag Bazaar by Megan Avery in the DC Library catalog and put it on hold. Their sewing holdings are sparse and I like to check out the books so they know there is some demand out there.

Bag Bazaar instructions I do not give a high rating to this book. The biggest issue is that I don't think the author spent much time thinking about who the audience would be. It seems aimed at beginners and includes fairly good introductory information on basic techniques, if sparse (particularly for a welted zipper). But the instructions for the actual projects are almost entirely written, and contain very few diagrams, as illustrated on the left. No matter how good your technical writing is, it is difficult to convey sewing instructions without copious illustrations. So I think beginners would find the instructions difficult to understand and follow. Also in the graphics area, there are drawings of each completed project, but no photographs. This makes me suspect, rightly or wrongly, that you can't make a really cute, professional-looking piece using the instructions.

There is only one pattern included in the book (which must be massively enlarged on a copy machine). The other projects are self-drafted rectangles. An intermediate sewist who would be able to follow the instructions wouldn't really need a book to tell him or her how to combine rectangles to make purses.

I also didn't like the patternmaking technique, which involved cutting your rectangles out of interfacing and then fusing the interfacing to the fashion fabric and cutting out the fused interfacing from the fashion fabric. Placing the interfacing on grain on the fabric and then fusing it perfectly would be annoying for an intermediate sewist and incomprehensible for a beginner.

========================

Fabric Mart 7-2010

Somebody on PR pointed out that Fabric Mart had Gore-Tex for $9.99/yd. I have gotten into biking lately (again)--I rode to Mt. Vernon last Friday (blog post here)--and may go on a biking vacation next year and I thought it would be nice to make my own bike rain pants rather than buy the very expensive products available. I watched the stock and prices, hoping the price would move, but when they sold out of the navy I decided to make my move.

I bought the silk organza because, hey, silk organza for $3.99/yd. Actually, I loved the colors and thought it might make a good pleated full skirt for bike-riding. I like to wear a skirt (with bike shorts underneath) so people understand that I am not an athlete, I'm just out for a ride, and seriously you should just pass me, I really won't mind. Fabric Mart described it as having a crisp, pebbly texture. It is crisp but I found it to have the standard smooth hand of organza. I washed in the wash machine to remove as much stiffness as possible (I want a skirt, not a tutu). It remained quite crisp, so it would be good for underlining. I think I'll still make the skirt...you know, eventually.

I couldn't resist the swiss dot with its red, white, and blue print. I am always looking for cottons in my stash and not finding them, so I indulged.

But now, I really really need to stop buying fabric!

========================

I have been sewing like crazy, including several projects from >Drape Drape 2, but I am in Rhode Island for a few days visiting a friend at her parents' beach cottage. Good for relaxing, bad for blogging!

========================
IF YOU ARE SQUEAMISH STOP READING.

I gave myself the GROSSEST sewing injury over the weekend. Ew ew ew. I was pinning the hem into a top and kept putting it back on and adjusting and refining. My full length mirror is in my bedroom, so rather than keeping going back into the sewing room I decided to sit down on my bed to re-pin. I set the shirt down and then went to sit with one knee on the bed and managed to kneel directly down onto a pin that went so far into my knee it bent at the end and I had to pull it out with a fair amount of force. So gross. It didn't bleed even though I tried to make it to (I learned in Girl Scouts first aid to make puncture wounds bleed).

My knee was pretty tender for a few days. In the gym we did hamstring curls, where you are one one knee and stick the other leg out straight and then bend at the knee, as demonstrated here. I couldn't put any pressure on my left knee, so I did the right leg hamstring curls from a one-legged plank position. Actually, I felt pretty bad-ass so maybe the most disgusting sewing injury ever was a blessing in disguise.

What is your most disgusting sewing injury?