Thursday, April 30, 2009

BWOF 03-2009-102, Empire Waist Knit Dress

Thumbnail

This 03-2009-102 dress was yet another casualty of BWOF's nonsensical styling, so I didn't even give it a second glance in the glossy portion of the magazine. Seriously, what is that? Scarf, paint splatters, pretty hair, and oh yeah that appears to be some kind of dress. However, when I got to the line drawings I was intrigued.

When I get a new issue I am always itching to go straight to the line drawings so I can really find out what's in the magazine. The photo preview at the beginning generally doesn't do anything for me and the editorial content is nonsense. But, I am one of those delayed gratification people. So I patiently page through the magazine, reading the hilarious descriptions, trying to discern styling details. I don't go so far as to skip over the line drawings to finish the glossy portion, however. Once I get to the nitty gritty then I'm allowed to see what these things allegedly are. It's kind of fun.

This is the sewing course for March. I always think that will make it easier to trace the pattern because the pink shading stands out easily, but it's a little hard to see the size lines. At least I didn't have to size this one down, as it comes in a generous 10 sizes, 34-44. The instructions are clear and the illustrations useful, although this is certainly not so complicated that one couldn't do it without the course.

Fabrics:
-An ITY polyester knit from Fashion Fabrics Club, purchased in June 2008 for $4.75/yd. I haven't bought fabric online yet this year, but this print is tempting me back onto the internet. Interestingly, this was part of the first internet purchase of last year. I can't believe I held out until June! I thought I was doing so well to make it through April this year.

-The contrast midriff fabric was purchased from G Street Fabrics' $2.97/yd table in April 2008. This was leftover from BWOF 04-2008-128.

-The white knit used to line the bodice is too old to know where it's from. It's just a cheap-o poly, either from Joann or Hancock.


I made only a few changes:

Back-In tracing the back neckline I saw that it was nearly straight. I don't like a low scoop neck paired with a high back neck, I think it looks unbalanced. So I lowered the back neckline 1.5 inches.

-I did a swayback adjustment to the back skirt pattern as for 10-2008-115. This added a back seam, which breaks up the print, but I'd rather have broken print than swayback ick.

-Rather than use bias strips to finish the neckline, I lined the bodice as for the 02-2009-119 bubble sleeve dress. I sewed the shoulder seams of the bodice and lining, placed them right sides together and sewed the necklines together, trimmed, and turned. Then I trimmed the lower and armscye edges of the lining so turn of cloth would keep it under.

-Left out the zipper. Knit dresses do not need zippers. Really they don't.

-Contrast midriff instead of grosgrain belt. I like this, but I needed to tone down the pleat area a little bit so I put a butterfly pin that is about the same color as the midriff over the pleats, which you can see here, and it's perfect.

-I had to shorten the elastic for the sleeve quite a bit from the recommendation. I have fairly large biceps (based on past fitting experience), so I suspect this will be universal.

OK, added up that sounds like a lot of changes but it really wasn't!

I totally love this dress. One thing that's not evident in the line drawing or the picture is that the skirt lays sort of diagonally from the pleats on the right down to the hem on the left. You would think this would be annoying, but I think it creates a flattering line that skims over a tummy and keeps the eye moving past it.

I enjoy having my quirky Retro Fantasy style, but sometimes I just want to look like everyone else. This dress is perfect for that. It feels like me, but is completely on trend and blends in on a city street. I wore it on a date and it was quite a success. The guy not only noticed it but said, "You look good in a one-piece dress." I'm not sure there is any other kind of dress, but it was a sweet compliment.

All photos are here and the pattern review is here.

Monday, April 27, 2009

Podcast and Stashoholism Confessional

I started to make the 03-2009-104 high waisted pencil skirt and found to my horror that I had no medium weight white interfacing at all! I would have used a heavy weight, but my fabric has some stretch that I wanted to preserve. So I had to take a trip to the Joann for some white stretch interfacing and some medium weight white interfacing.

4-24-09 JoannI looked at the fabric while I was there, as this was not my normal Joann and it seemed a little larger with a little better selection. There were some cute cotton prints, but nothing I absolutely had to have (especially at Joann's inflated prices) so I picked up some patterns and headed to the cutting table with my interfacing. The woman in front of me was buying a bunch of denim, and one of the bolts was a great medium weight stretch dark denim and I suddenly had the vision of 04-2009-115 made up in denim for a flirty going out dress and had to have it.

I didn't have time to sew over the weekend, alas, so no progress on the jacket. I was going to do it Sunday night, but then Cidell called and said she was on her way over! Very exciting. DC and Baltimore aren't so very far apart, but far enough that we don't get to see each other in person very often so it's a real treat when we do. Our main goal was to get pizza at Pete's New Haven Pizza, but before we headed out to dinner we did a podcast!

After a few requests, here are some show notes:

Tracy Reese Sally Hanson nail colors from All Lacquered Up

Cidell's post on the Anthropologie Dress

Vogue 1086 Tracy Reece sun dress design

Burda [World of Fashion] April

Burda [World of Fashion] May

Cynthia Rowley for Simplicity

You can listen to the podcast below, download it on Podbean, or subscribe to us on iTunes.

Thursday, April 23, 2009

UFO Watch: Suit Jacket

I Want To Believe

So for the conference I ran in March 16-17 I had the idea of maybe making a new suit-like outfit to wear. My time was limited as I was needing to work on the weekends, so I wasn't totally optimistic (especially considering that jacket tailoring is not my usual type of sewing), but I figured I'd give it the college try.

I decided to cut into some really nice fabric I got at Paron about a year ago when I went to NYC to see Xanadu. It's a gorgeous color of crosswoven teal and peach that has a lot of depth. The fabric content is a scrumptious silk/cotton/wool/lycra.

I love the idea of dresses with matching jackets. I say idea because (1) I have never actually made or owned such an item, (2) I never wear jackets unless I'm speaking or meeting with opposing counsel, and (3) I really hate making jackets. There are so many steps involved and it's such a time-consuming project for something that I never wear and resent wearing when I do. I don't know why I hate having to dress in suits so much but I really, really do!

I actually finished the dress, BWOF 05-2008-128. I'd been wanting to make that one since the issue first came out, and when considering what would be a nice looking sheath to go with a jacket it immediately popped into mind. It actually didn't take unduly long and is indeed very cute. But I didn't get a chance to wear it because I did not have time to finish the jacket.

Line DrawingFor the jacket, I was drawn to BWOF 12-2008-116. I like the shoulder princess lines (easier to ease in a heavier fabric than an armscye princess) and the single button closure, which will make the most of the fact that I'm wearing a dress underneath. A jacket that closes higher up makes it hard to tell if it's a dress or a skirt.

I actually got pretty far on the jacket. I traced it and cut it out, which was quite a chore because I wanted to make the dress, jacket, *and* a skirt out of my not quite 4 yards. My reasoning for this was that I didn't want to feel like I could only wear the dress when I was also wearing the jacket. So if I had a skirt to go with the jacket, it wouldn't render the jacket useless to wear the dress more often and have it look noticeably worn/faded with the jacket. But getting all the pieces for all three items to fit onto the fabric was a huge challenge (and the skirt will have an interesting "design feature").

OK, done. Then I fused all the pieces, which is another boring chore. Then I sewed the body seams of the jacket and found it to be HUGE. I had to grade down a size because the smallest size is 36, which is fine and I did so at the tracing stage. The style doesn't look oversized but really it was gigantic. I had to take in all the seams 1/4" (meaning 1/2 inch total per seam) and I think it's still a little big. Ugh. It was a lot of ripping.

The next step was to put in the welt pockets with flaps, something I've not done before and I just ran out of steam. I was too stressed about the conference to undertake such a stressful sewing endeavor. And I am not at all confident that it's going to end up fitting well or looking good.

I have basically done nothing since (I made the pocket flaps, that's it), and it's been over a month.

However, I now have a speech to give on May 7 and am trying to motivate myself to turn this from a UFO back into a Work In Progress.

UFO or Work In Progress?

Things left to do
-Mark pocket placement and do all the fiddly markings on the welts etc.
-Put in welt pockets with flaps.
-Sew shoulder seams
-Figure out collar and facing
-Cut out lining (double/triple/quadruple ugh, as I have chosen a beautiful but fiddly silk that squirms around while I'm trying to cut it)
-Construct lining
-Insert lining

==========================

This is sort of compounded because I have not been sewing too much lately. In my end of year post from last year I said I might experiment with sewing less and I've been doing this. I'm not being any more productive in any other area of my life (*ahem* cleaning) so I don't know if I'm serving any particular end. It's not really a lack of mojo, it's just a slowdown. I don't want to feel obligated to something that is supposed to be a fun hobby! And since I'm not sewing as much as usual, I'm not interested in something tedious, drawn out, difficult, fiddly, and draining like a jacket.

But it would be nice to wear it May 7.

I will make a goal of doing the pockets this weekend. I will be at a volunteer event all day Saturday, but I should be able to find enough time the other days to do the pockets.

It will be a (re)start.

Tuesday, April 21, 2009

BWOF 02-2009-119, Bubble Sleeve Dress

Thumbnail

This was my last minute sewing for my trip to Miami with my sister. I planned the trip tp run Monday through Friday so that I would have a weekend on both ends, figuring I would want to sew up my wardrobe the two days before I left! I had finished the McCall 5752 dress by Sunday late morning and decided I'd go ahead and get this one started. The February issue of BWOF was one of the best ever, in my opinion, and I was excited to sew this dress 02-2009-119 and get started using the issue.

I bought this fabric in August from (of course) G Street Fabric's $2.97/yd table. I was drawn to the large, somewhat abstract floral motif and the colors. I don't wear a lot of purple but theoretically I like it. I don't wear a lot of large prints either. And there are ink stains all over the fabric, which I didn't realize until after I'd washed it. So this sat on the shelf for quite a while, and sometimes I would regret buying it and sometimes I would like it. I figured that the print was either going to work for this fairly simple t-shirt style dress or it wasn't going to work at all, so I might as well get it over with.

The print fabric is quite thin. I made the Tippi Hedren dress out of a similarly thin cotton-ish knit print purchased at the same time and found that the fabric really did not have enough body to be a dress. Here, I felt like I was going out on a limb with a t-shirt style dress anyway because of my self-consciousness about my belly, so I underlined it with a fairly heavy cotton/poly knit (also from the $2.97/yd table) so it wouldn't be too clingy or show too much.

Although it is oddly complicated, enough people had made it before me and shared their tips and tricks (including Dawn's photo tutorial) that it wasn't too hard to figure out. Not that the directions were very helpful. "Lay inside sleeve pieces down and stitch to seam allowances"? Huh? It took me a while to work out that they meant "Understitch."

I didn't want to try to install piping into the neckline of my flimsy fabric, knowing it would just stretch out and plus I was lining the whole thing so I sewed the shoulder seams of the yoke fashion fabric and lining and then stitched together at the neck, right sides together. This created a clean finish. I trimmed the armscye and lower edges of the lining about 1/4" so the turn of cloth would keep it from showing and then treated it as an underlining for the remaining yoke seams.

Side I did a swayback adjustment as I did for BWOF 10-2008-115, knowing that otherwise the puddling above my booty would be dreadful. This added a center back seam, which broke up the print some, but with this large abstract print it wasn't much of a problem and the fit is so much better than it would have been without the adjustment. You can see the wrinkle-free back here.

Sleeve StayMy only gripe with this pattern is that the sleeve and stay are the same length. A bubble shouldn't be drafted that way! I cut the stay out of my underlining fabric, so I needed to make sure it wouldn't show. To do that, I took a double-width seam allowance when stitching the armscye edge of the stay to the armscye seam of the sleeve/yoke, as you can see in the photo. If I make this again, I will lengthen the sleeve by 1.5 inches so that the bubble gets a nice overhang and poof over the stay.

I totally love this dress. I was worried about how the t-shirt style would look on my figure and figured this would be sort of a throwaway project. But it works quite well. I think this is to do with (1) my heavy underlining, that smooths over lumps and bumps, and (2) the relaxed fit at the waist. It is my general inclination to fit narrowly at the waist to emphasize that I have one, but had I done so here it would have emphasized the width of my hips and stretched the dress across the belly.

All photos are here and the pattern review is here.

Friday, April 17, 2009

BWOF 12-2007-117, Pleat Sleeve Blouse

Thumbnail

We have been having somewhat unseasonably cold weather in DC the past couple weeks. I am trying to transmute my bitterness about it into excitement about one last chance to wear my favorite Fall/Winter clothes before they go into the closet for the season. I made this blouse late in the season (January or February, I can't quite recall now) and only had a few opportunities to wear it, so I wore it yesterday. I still love it!

You may remember the hilarity of BWOF's helicopter photo shoot for this one. Despite the more ludicrous than usual photo styling, I totally loved the blouse and lots of people made really cute versions of it so it went on my someday list. When sort of planning a sort of mini wardrobe centered around my thrift store Bennetton jacket and Simplicity 5419 skirt, I definitely wanted to include a blouse or two. I found this fabric in December on the $2.97/yd table at G Street and I can never leave shirtings behind. It goes well with the skirt, though the giant sleeves are a little too uncomfortable underneath a jacket.

Fix ClipMy dumb move on this project was not clearing the pieces out of the way while I was still cutting, as a consequence of which I clipped into the hem of the front pieces. Dumb. I fixed the clip by carefully lining up the cut edges and fusing interfacing to the back side and then doing a narrow zigzag/satin stitch over the clip. The fix was almost completely invisible.

When I was planning this project, Cidell warned me that the sleeve pleats hadn't really worked for her--they were too narrow and the sleeve was not as fitted to the arm as pictured. I first put in the pleats as drafted and I think there is a misprint in the pattern. The drafted pleats are about 1/4" and even though there are many many (many) of them, they barely make a dent in the sleeve volume. I went through and doubled the width to 1/2" and that created the look shown in the magazine. The sleeve is not too tight in any way--though it is rather stiff with all the pleats--and the poof at the sleeve cap and above the wrist look just right.

Sleeve Vents I made my first sleeve vents on this project! BWOF does blouses as the illustrated sewing course often enough that I had read the directions on how to do them many times. Since this poofy sleeve doesn't require the vent to lie flat or look perfect, I decided it was time to try a new technique. I clipped into the sleeve (deliberately this time!), worked my magic with some bias strips, sewed the little "dart" at the top of the binding, and voila! They are not perfect--nothing like Karen's amazing shirt-tailoring skills--but they are not half bad either. I don't think I'm ready to take this technique to prime time, aka a blouse with a traditional sleeve that is supposed to sit flat, but I'm glad I took a stab at it.

There wasn't too much tricky about this blouse, although I had a bit of a time with the length. I still have not figured out the ideal length for a woven blouse, but since I have a relatively long torso I generally lengthen to give me room to maneuver when it comes to hemming. This blouse has a curved hem at the center front, which is formed with the front facing, which extends along the hem to the front dart. So to lengthen the blouse I had to add length not only to the body but also to the facing. I found that I had lengthened it too much at the end and had to cut and overlap the facing, so it's a bit ugly on the inside but doesn't affect how it looks on the outside.

Back Before Adding Double Darts I made this before I had my conversion to "I must add a center back seam to anything fitted for a swayback adjustment and that's all there is to it." So the original back was pretty bad--if you click on the photo to enlarge you will see that there are not just wrinkles but an actual fold of fabric along the swayback. I went in and added a second set of darts to the inside of the first. This improved the fit, but did not eliminate all wrinkles.

FrontThis is designed to use snaps; the right front has an underlay and the two edges of the placket are supposed to meet instead of overlapping. I have not had consistent success installing snaps and didn't want to risk it on a blouse. I was going to sew the buttons to the underlay, but then it turned out to be just large enough that I needed to overlap a little to get it to fit well. This sort of defeated the purpose and difficulty of that curved center front hem, alas.

It has BWOF's usual low neckline. My small bust, while creating fitting challenges, has the benefit that I don't really need to worry about that because there's nothing to show. If you have something you want to keep under wraps, you'll need to raise the neckline.

I think this blouse is really cool. The sleeves are totally crazy and outrageous, but the rest of it is pretty normal so the sleeves don't look unprofessional. Made in a sober, traditional shirting it is completely work-appropriate (dressier than my usual work attire, even) but still expresses my personality. It's too late in the year for most of us (Southern Hemisphere excluded!) to get started on this blouse, but don't forget about it! This is another pattern well over a year old that is aging very well.

All photos are here and the review is here.

Wednesday, April 15, 2009

McCall 5752, Palmer-Pletsch Perfect Knit Dress

Thumbnail

When I was visiting Texas over the winter holidays, my sister (yes, the one I went to Miami with--my only sister) showed me this pattern that she had bought for herself. I hadn't seen it in the book and really liked it, so the next time I was in a Joann I picked it up. After my experience with Simplicity 3775 I am all about midriff ruching, and I liked the interesting shape of the midriff here, the surplice top, and the tie option.

When I found the fabric in January on G Street's $2.97/yd table (a nice, heavy, good quality knit) I immediately thought of this dress. I wanted to get it done for Miami so I put it on my Spring sewing list. I had fun with the print; I don't know how noticeable it is but the arrows go down on the bodice and skirt (I felt like this was the most slimming direction) and up on the midriff and the ties.

Bodice AdjustmentsI think this is the first Palmer Pletsch pattern I've sewn and I was suitably impressed. There is a whole sheet of instructions on alterations, and many alteration lines on the pattern pieces, including (yay for me) bust adjustment lines and swayback adjustment lines. My only grip is that there are detailed instructions for a Full Bust Adjustment but not even a mention of a possibility of a Small Bust Adjustment, even though it would take only a sentence. It's hard enough being small busted in a culture that prizes large breasts so highly as "the" way to be attractive, and little things like this--although I don't know how "little" failing to acknowledge that I actually exist is--are just so frustrating and discouraging. But I will try not to hold it against them because I've had to work out how to an SBA on my own. It's very easy, just cut along the marked bust adjustment line and overlap.

However, a small bust generally needs a shortened wrap as well, which the adjustment lines don't take into account. I actually cut it out and sewed it up as drafted, but found that the wrap was a little gapey for my taste. I ended up taking a wedge out of the center back neck (which is part of the front pattern piece), which tightened it up. Next time I will cut it out with the pattern adjustment shown above.

I didn't like the instructions for the midriff, which call for the overlay, a stay, *and* a lining. That is just way too many layers! Instead, I constructed it the same way as I did Simplicity 3775. I cut out only one set of stay/lining, sewed the side seams of the stay and of the overlay, put in the gather seams on the overlay side seams (but did not yet pull them up), lined up the stay and overlay along the top and bottom and stitched them to the bodice and skirt, pulled the overlay gathering threads to fit, and stitched in the ditch along the side seam to keep it gathered. I feel this results in reduced bulk at the side seams (too much bulk would defeat the purpose of the ruching!).

Front CloseupAt first I didn't intend to use the ties, but when I finished it I found that the shaping of the front midriff provided a lovely frame for showcasing my round belly. Hmm. I didn't use the pattern piece for the ties, just cut them the length of one of my scraps. I folded out pleats at the tops of them and sewed both to the bottom of the center front midriff, instead of one on top and one on bottom. They don't show up much in my busy print, but I think they provide enough obfuscation to do their job.

I put in the hem and sleeve hem using fusible web, because I didn't want to have lines of stitching. It worked well.

All photos are here and the pattern review is here.

Monday, April 13, 2009

Recipes for Fun

Easter Nest

I hope everyone had a nice Easter. It was chilly here, but sunny. I am not religious, but my family is and we have traditions for all the holidays. One of our Easter traditions is what we have for breakfast, which is Easter Nest. Traditionally, there should be one egg for each member of the family, but since I am a family of one I took a little license.

The important thing is that each egg is decorated differently! The nest is decorated with shredded coconut mixed with a drop of green food coloring. For those inexplicable people who don't like coconut, in the past I have substituted sliced almonds colored with a drop of green food coloring.

Easter Nest

Warm over low heat until melted
1/2 Cup Milk
1/4 Cup Sugar
1/4 Cup Shortening
1 teaspoon Salt

Cool.

Dissolve
1 package (2 1/2 teaspoons) Yeast
1/4 Cup warm water

Stir in
1 egg
milk/sugar/shortening mixture

Stir in
3 Cups flour (starting with 2 1/2 and adding more as needed)

Knead until soft, 8-10 minutes.

Let rise in greased bowl until doubled in bulk, about one hour. Punch down and divide into thirds. 2/3 will be the nest and 1/3 the eggs. Let rest 10 minutes. Form nest by dividing dough into thirds, making ropes, and braiding. Form eggs. Arrange on pan, leaving space between eggs and between nest and eggs (otherwise it will be doughy in the middle). Let rise until doubled, about 1 hour.

Preheat oven to 350. Bake 17-23 minutes, until browned.

Glaze with
1 Cup Powdered Sugar
1/4 Teaspoon Vanilla, Lemon Extract*, or Lemon Juice
1-2 Tablespoons Milk


*I make my own lemon extract be zesting lemons to fill a small glass spice jar, pouring vodka over the zest to cover, tightly sealing, and allowing flavors to meld for a month or two. It requires patience but is cheap and high quality.

=====================================

Name Badges Mary of Sewfast Embroidery really is sew fast! Last Monday I mentioned my project idea and asked if anyone could help me out. Mary immediately volunteered to do me name patches for my twin nephews for free! And look what I got in the mail over the weekend. Aren't they adorable??? When I opened the package I just could not stop giggling at their cuteness. Now I have to come up with some projects!

The sewing world is so friendly and helpful! I got many responses to my request for a favor, including Nicole, Beth Conky's daughter, whose Etsy shop is Cole's Creations.

Thursday, April 9, 2009

BWOF 07-2008-128, Gather Back Tank

Thumbnail

I didn't think much of this 07-2008-126 tank when the July issue came out. I liked the idea of the interest being in the back, but it's much more casual and sporty than my usual style.

However, when I started planning for my beach trip it came back to me. I was also thinking about a tank BWOF published sometime in the past year or two that has a split back, but I ran across this one first. I had the fabric left over from the batwing top view of Simplicity 4020 I made about two years ago. I didn't have much left and I love the print and colors so much that I had been "saving it." "Too good to use," for me, sometimes has nothing to do with cost, as I'd gotten this from the $2.97/yd table at G Street. I decided to just go ahead and do it, even if I would end up with a trendy, rather than a timeless piece.

Increased Gather HeightIt's an interesting pattern--the tank is one piece with only a CB seam and then the inset piece. To get the back hem to hit me in the right place--right above the curve of the bum rather than sort of pulled over it, I increased the height of the cut out/the gather distance. I liked this better anyway as it wasn't quite gathery enough along the sides as drafted. I don't know how many people would need this adjustment. I'm petite but long waisted, so I think it had more to do with my curvy bum than my height.

Back Panel The first thing I did to the back inset is interface the fold line with knit interfacing, which is not recommended in the instructions. I actually wish I had interfaced the whole thing. I don't know why they don't recommend this, as very few knit fabrics have the body to hold a press without interfacing. The instructions have you fold the inset in half along the foldline, wrong sides together, and basically treat it as one piece after that. I creased the fold line, and the sewed the upper/out half in place with the sewing machine. Then I turned up the inner/facing half and stitched that to the seam allowances by serger, just to make sure I got it right. You do need to put in the hem before setting in the inset.

Binding The instructions have you make a bias binding, fold in half wrong sides together, sew right sides together with front, and turn over and topstitch. I didn't have enough fabric to cut the binding on the bias, which was really no problem in this stretchy jersey. I cut the binding an inch shorter than called for and stretched as I sewed. I actually liked the way the binding looked before turning it under so I left it out. This is the first time I've done that sort of look and I am a fan. I will try it again the next time I am binding the neck of a t-shirt.

Front This isn't much to look at from the front, but it's a fun little top. I am considering making it for the gym, scooping out the back armscye to give it more of a racerback. I always wear fitted tank tops in the gym because that way the fabric doesn't get in the way, but I think this could be a really cute look. If I don't end up liking it to work out, it won't be too much wasted time or fabric. For all I go to the gym twice a day, I have never made any workout clothes! I'm just not a sporty person so I have not been motivated/interested in sewing for the gym.

This is actually the first project I've sewn from the July 2008 issue, though I have another one planned, the 107 dress. Yes, I am shamelessly copying Christina; I even plan to use a hem trim. Imitation is the sincerest form of flattery, right? Depending on how long I subscribe to BWOF, I assume that eventually I will end up sewing at least one thing from each issue. I love having the library to flip through when I'm looking for ideas.

All photos of this project are here and the review is here.


=====================

Mood Fabrics Thank you for the encouragement on the yellow eyelet dress. I really didn't think before posting the picture. I really, really, really did not intend it to be "Look at me! I'm skinny but I think it's cute to act like I believe otherwise! Say nice things to me!" and I apologize deeply if it came off like that. I try to avoid inflicting my neuroses on the general public! I just looked in the mirror that day, and whoa.

It's not that I think I look bad in the Vogue dress. I am very happy with my body and proud of how strong I am from working out (millions of pushups yesterday at boxing--ok, only 50--and I didn't have to drop to my knees for any of them). It's more like this story: I have a friend who is well endowed in the chestal region and one day she said that she felt like her boobs were unprofessional. I was like, "That's ridiculous! They are a body part. A body part cannot be inherently unprofessional. Inappropriate excessive cleavage, sure, that can be unprofessional. But the ownership of boobs cannot." And yet, I guess I sort of feel like that about my booty. It is just so out there! But I don't have to hide the fact that I'm a woman to be professional, especially in my very female-empowered office.

I think I will make the eyelet into BWOF 04-2008-115 instead. I love the lines of it, and the CF and CB seams give me room to adjust the fit. And it's a petite pattern! Do you think the pieces of this one will break up the eyelet too much? The motif is fairly large; the flowers are about 2.5 inches in diameter. But it's a graphic/stylized pattern that doesn't immediately read "large flower," which I think will avoid choppiness. (And I'm still looking for the perfect pattern for my 1.5 yards of silk jersey also in the pic. Why oh why didn't I get 2 yards????)

Wednesday, April 8, 2009

(More) Spring Stash Sewing

I have enjoyed making collages of projects to sew from my stash, so here's the latest iteration:

Projects 4-6-09

BackI finished the last plan except for the yellow eyelet dress that reappears on this one, with of course a few little detours along the way (like the BWOF 10-2008-115 gather front dress and the BWOF 07-2008-126 gather back tank, among other unphotographed projects). The issue is partly that I can't wear it until it's sandals weather so I don't want to put the effort in yet. But it's also that I'm not wild about the pattern. I love the princess lines and even the little horizontal bust dart (which I'll have to narrow), but as mentioned in my pear post I'm not crazy about A lines right now and would prefer a straight shift.

What stops me is the rear view of Vogue 8408, displayed to the right. It looks OK in the photo, but in real life...I'm not sure. When I was working in our headquarters building, the bathroom was set up with mirrors over the sinks and then a full length mirror on the opposite wall. It was impossible not to catch a glimpse of your butt while washing your hands. And on the day I wore this dress, I was in for quite a rude awakening. I mean, I know I have a large booty. But since it's behind me, I sometimes forget that. I learned that day that even if I forget about it, it has not forgotten about me. For the eyelet dress, I'll make the lining first and then see if/how much I can narrow the skirt, but I don't think I'll end up with the classic shift I hoped for so I'm less enthusiastic about the project.

I am kind of in the groove of stash sewing and sticking to my 6 yards/month fabric buying allowance--in fact have saved up 6 yards from the past two months--so I don't feel so "obligated" to this plan. I have sooo many other ideas that it's hard for me to maintain focus!

Sustaining focus on moderated fabric buying is even harder. I usually do very well the first several months of the year. It's only later that I throw up my hands and then buy enough to fill them and then some. So far I'm still feeling good about moderation and staying away from online shops hasn't been too hard. But I would love to go to NYC or Philly for a nice big shop!

The upper left fabric for Vogue 1086 is from Joann over the weekend, so it isn't stash.

The next newest fabric is the lace in the lower right for BWOF 02-2008-108, from Jomar during the Philly get-together in November. I was thinking that was just a couple of months ago. It turns I bought this nearly six months ago. Seriously, had you asked me I would have guessed about 6-8 weeks. Can you believe how long ago November was?

I only have 1.5 yards of 45" wide for the pink underlay--incidentally, the oldest fabric in the plan, from Summer 2007 as I recall but possibly 2006--so I may not be able to make that dress as planned. I might also have to abandon the BWOF 02-2009-129 exclusive design blouse (the last exclusive design ever???) made from the Paris fabric I used for my birthday dress. I don't have much complete yardage left, but I have some long strips that are fairly wide (approx 12 inches) so I needed a pattern that had lots of little pieces. When the magazine arrived I knew this was perfect. I feel pretty confident I'll be able to eke it out somehow, with a contrast midriff band if necessary, but I haven't traced out the pieces yet to make sure. The fabric has some crosswise stretch so it won't be as simple as cutting some pieces on grain and some on cross-grain, which I'd normally do in such a limited fabric situation.

The Tracy Reese Vogue 1086 is on my cutting table now. Who knows where I'll go from there. I am crazy, erratic, and unpredictable...at least when it comes to sewing.

Tuesday, April 7, 2009

Butterick 5209, Retro '47 Dress

Thumbnail

This one had been on my project list since June so as soon as it was conceivably early enough to start Spring sewing, it went to the top of the pile. It was so perfect for Miami that I had to get it done for the trip!

I love that the pattern has both a halter and a sleeve variation, but the dress is otherwise the same. It's unusual to find an evening dress and a day dress with the same lines. It sort of glams up the day dress, to my mind.

Bodice PatternI started where I always start, with an SBA. I pulled out some of the gather width based on my tissue fit. In the end, I think it wouldn't have been so bad had I made it as drafted and it takes away a little of the shape, but the horror of having a baggy, saggy bust on a dress often leads me to the more extreme end of SBA. I considered, rejected, but later realized I should have slightly shortened the V neck distance, which is a usual part of my SBA arsenal.

Hand Baste ZipI also used my usual invisible zipper insertion technique: Start by sewing one half of the zip in by machine. Then zip it up and carefully pin in place on the other side, matching lower midriff seam and marking bottom of sewn line. Hand baste a few inches in either side of midriff seam, then hand baste remaining length of zipper. (Sometimes I get lazy here and don't hand baste the remaining length; the important thing is to get the midriff/waist/whatever seams to line up exactly on both halves of the zipper.) Then sew in by machine. This gives excellent results. To my mind, there is really no need to hand baste both halves of the zipper.

Hem MethodI lined the skirt, which was not called for by the pattern. I decided to hem it by sewing the fashion fabric to the lining so it would have a nice invisible hem. When I pinned it in place, I found that it created a cute bubble-type hem so I decided to keep that effect rather than press it down.

I had stitched the bodice and midriff lining to the zipper, but left the lining free at the bottom of the zipper. This pic also shows that I pleated, rather than gathered, the skirt lining to reduce bulk. To sew the hem, I pulled the lower edges of the skirt through the hole between the lining and the zipper and stitched together.

Ok, the real truth is that I first pulled the skirt over the bodice and the lining up through the bodice and sewed together that way. This created a Moebius Strip that could not be worn by a human-shaped person. I had to unpick it and then figure out that I needed to pull the lower edges through the zipper opening. I should have thought to sew a layer or two of tulle there to keep the hem from flattening out, but so far it's still poofy.

I loooove this dress. It is so retro fantasy. My only disappointment--and really, that's a strong word--with this pattern is that the midriff cannot be piped or made in a contrast fabric. It's obvious if you look at the line drawings but my 2D mind did not grasp it until I was making it. The front midriff is an upside down V and the back midriff is a V. So the top edges of the midriffs are offset at the side seam by about 3 inches (higher in the back, lower in the front), and I think it would just not be pleasing to the eye to have the contrast or piping offset like that.

All photos are here and the pattern review is here.

Monday, April 6, 2009

Monday Miscellany (and stashoholism confessional)

My neighbor/best friend is out of the country for two months, and asked me to drive her car every two weeks. I gave up my car last July and have a fantastic car-sharing arrangement with another neighbor. He parks in my parking space (we had to buy them separately and there were only five for seven units) and I drive his car once a month, to Fashion Sewing Club on the second Saturday. Once a month is really enough for me to run errands (I can walk to several grocery stores and take a quick metro trip to Target), but Joann seems to have a pretty fixed schedule for when pattern brands are on sale. Simplicities are always on sale the second Saturday of the month. I haven't caught any other sales in almost a year!

So when I saw that Vogue was on sale this week, along with McCall, I decided to head to the suburbs (braving cherry blossom traffic to do so).

My Joann is somewhere between Lindsay T's Pit of Despair and Cidell's Shiny Shiny one. It's clean and the employees are friendly, if not knowledgeable. The pattern drawers work. But they are never fully stocked and they are slow to put out the new books. And the fabric selection is abysmal--rows and rows of shiny polyester with one or two knits (literally one or two) and one or two cottons. So the new Vogue book wasn't out, nor were the new patterns stocked. That's ok, as I had almost a year of Vogue to catch up on.

Patterns, 4/4/09

So I like dresses, maybe? I didn't even realize until I got home that it was all dresses, other than the Alice + Olivia pant. Now, I am still not convinced I will ever make pants, ever. The fly front fills me fear and trembling, and I hate wearing pants (partly because RTW don't fit me and look pretty bad), but I've seen so many great pants from these patterns I figured I should pick one up while I could.

I was thinking about the dress obsession and I recovered a suppressed memory: When I didn't have time to sew, I didn't wear dresses. Because I am a pear I am three different sizes, at least (small on top, medium in the middle, large on the bottom). If we can reach far enough into our memories to remember "back in the day," there was a time when dresses were fitted rather than billowy and empire-y. So I simply couldn't buy RTW dresses that fit. If it fit at the hip, it was grotesque at the bust. If it fit at the bust, I couldn't even pull it all the way down past my booty. Apparently, I am now making up for lost time! According to my stats from last year, dresses are a little over half of what I make.

The Vintage Vogue 2401 will be interesting to sew. It's a little bit like the Butterick 4790 Walkaway Dress, but I love the collar and that it ties rather than buttons. They really don't make sewing patterns like this anymore. The pattern pieces are seemingly random shapes and the sewing is non-intuitive, based on my somewhat confused reading of the directions. But the result is cool. Nowadays, other than a few Vogue patterns, the companies don't want to make it so challenging for the sewist.

I didn't find a single McCall I wanted. When I used to sew exclusively with the Big Four I think I sewed more McCall than anything. But other than McCall 5752, which I bought ages ago at regular (40% off) price and made up for Miami I wasn't interested in anything. Partly because I have half the patterns in the book already, ahem, but I'm ignoring that part of it.

I bought Butterick 5318 at regular (40% off) price, because they never seem to go on sale and I never have enough knit dress patterns. It looks a little bit fussy to make with all the tiny pleats, but the result looks really cute.

And speaking of Butterick--the Joann I go to (Seven Corners in Virginia) is right next to a Dress Barn, where they had Butterick 5130 in the window. I am serious. It was identical. I hope that Butterick has sued them for copyright infringement. I hope Buttericks go on sale while I still have access to a car, because there were a bunch more I wanted to get.

=========================

So despite the abysmal fabric selection, I gave it a once over. I found this cotton print misfiled with the knits.

4/4/09, Joann

I hemmed and hawed over for quite a while. I love the colors and the print but it is perhaps a tad juvenile for me. I am trying to look slightly (and I mean very slightly) more grown up at work and this print doesn't really fit in with the plan. But in the end, I was won over. On sale it was $4.79/yd and I am always thinking I don't have enough cotton prints.

It's going to immediate use as the Vogue 1086 Tracy Reese dress. I know I recently said I wasn't wowed by this dress, which I'm not. But if you put aside the fact that it's Tracy Reese and what a bummer it is that she chose this rather simple and conventional look to share with the sewing world rather than, say, this fabulous blouse and high waist sailor pants, this Roaring 20s throwback, or this very similar dress but with flirty frilly sleeves, all from her Spring 2008 collection, it's a perfectly cute little dress.

I can't even find Vogue 1086 in her show; is it a toned down version of this? The Vogue 1092 suit, on the other hand, is directly off the runway.

=========================

I've had a few comments lately asking me about the shoes I'm wearing.

The green sandals I wore in Miami are Dansko Mirabelle, which Dansko doesn't seem to be making anymore (boo!) but a few places seem to still have it in limited size and color range. I have flat feet, bad ankles, and a very bad lower back--not to mention I walk at least three miles a day for my commute--and I absolutely have to wear comfortable shoes. Finding Dansko several years ago literally changed my life. I cannot say enough good things about them.

I need the staple clog style bottom and I bought Mirabelle in black, brown, green, lilac, and red. The only color I don't have is blue, but by the time I realized Dansko had stopped producing the Mirabelle I couldn't find them anywhere. If anyone ever runs across Mirabelle in blue in a Size 37 PLEASE let me know!

I'd recommend trying them in the store first before buying, if you can, to determine your size. I wear a 37 in staple clogs and a 36 in the other styles. Zappos carries the full line of Dansko, and they have free shipping and returns. And don't forget to check their closeout site, 6pm.com, to see if they happen to have your shoe in your size at a discount. I also periodically pop by the Dansko Outlet; these are "seconds" but I've never managed to find the flaw in any of the pairs I've purchased, and they are discounted by about 1/3. You have to keep checking, because they don't have much of a selection

Danskos are not cheap (but not so very expensive either, compared to department store shoe prices), but are absolutely worth every penny and more.

I also got a question about the crazy beaded cowboy boots I wore with my tulip skirt. Those I cannot help with, unfortunately. I got them at Ross several years for $15. Ross is not a pleasant shopping experience, but you can find great stuff there. When I used to buy clothes that was my main source. There is one next to the G Street at 7 Corners and I sometimes stop by to check out their shoe collection. It's mostly crap and I am really working on not buying crap shoes, but they do have a fair amount of Aerosoles and Easy Spirits and sometimes Born (I got Born boots for $15 a couple years ago) and even Dansko. To me, the shoe prices at TJ Maxx are not really worth the effort of shopping there; I'll just go to DSW instead for a slightly easier and nicer experience. But the prices at Ross are significantly lower than either of those two places.

=========================

I have a favor to ask. I mentioned a while back that my twin nephews, Cash and Fox, had been born. Lots of pictures on my SiL's flickr! My SiL loves twin outfits for them and she and my brother both love kitschy things and I thought it would be so fun to have little garage mechanic style name patches for them. I could embroider them by hand but it won't look the same. I don't own or have any desire or use for an embroidery machine, but it would be handy for this project. Is anyone willing to make me name patches like this? Just let me know and we can work out a price!

=========================

It's cherry blossom time and I finally made it over there on Saturday. It was very windy starting on Friday and I was afraid all the blossoms would be gone by the time I got there. There were HORDES of people (good for the DC tourist economy) and it was windy and a little chilly, but there were plenty of blossoms and I was satisfied for another year.

Here's my parting shot. The rest of the photos are here.

Monument Postcard Shot

Friday, April 3, 2009

Dressing a Pear Shape: End the A-Line Tyranny!

There's an interesting thread on PR about how to best flatter a pear shape. I spend a fair amount of time on my blog talking about how to fit (and implicitly flatter) a small bust, but my pear shape influences my style as much as my small bust so I'll give it a little attention here.

Pear Shape
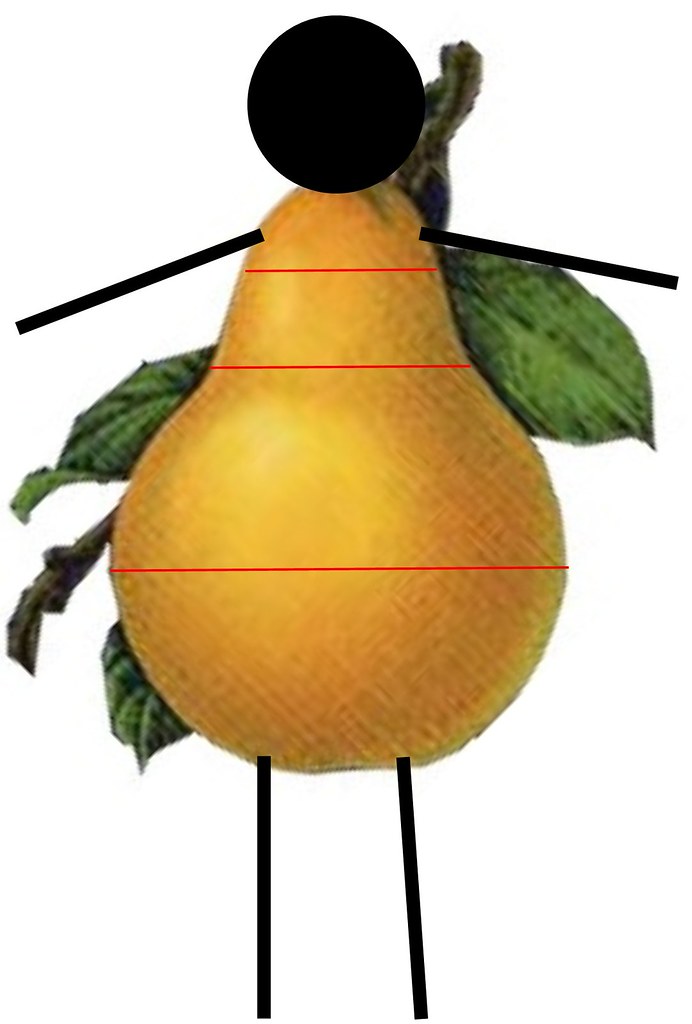
First, what does "pear" mean? Every pear is different and we all have our unique insecurities. I think the most basic definition is that your hips/thighs are wider than your shoulders, with a more or less defined waist somewhere in between.

I would add to that definition "smaller bust than hip measurement." Some argue there's such a thing as a "bosomy pear," which is different than an hourglass, because when viewed from behind the hips are the widest part of the body. I'm not really sure I buy that, and at any rate I am no help in dressing a bosomy pear body, LOL.

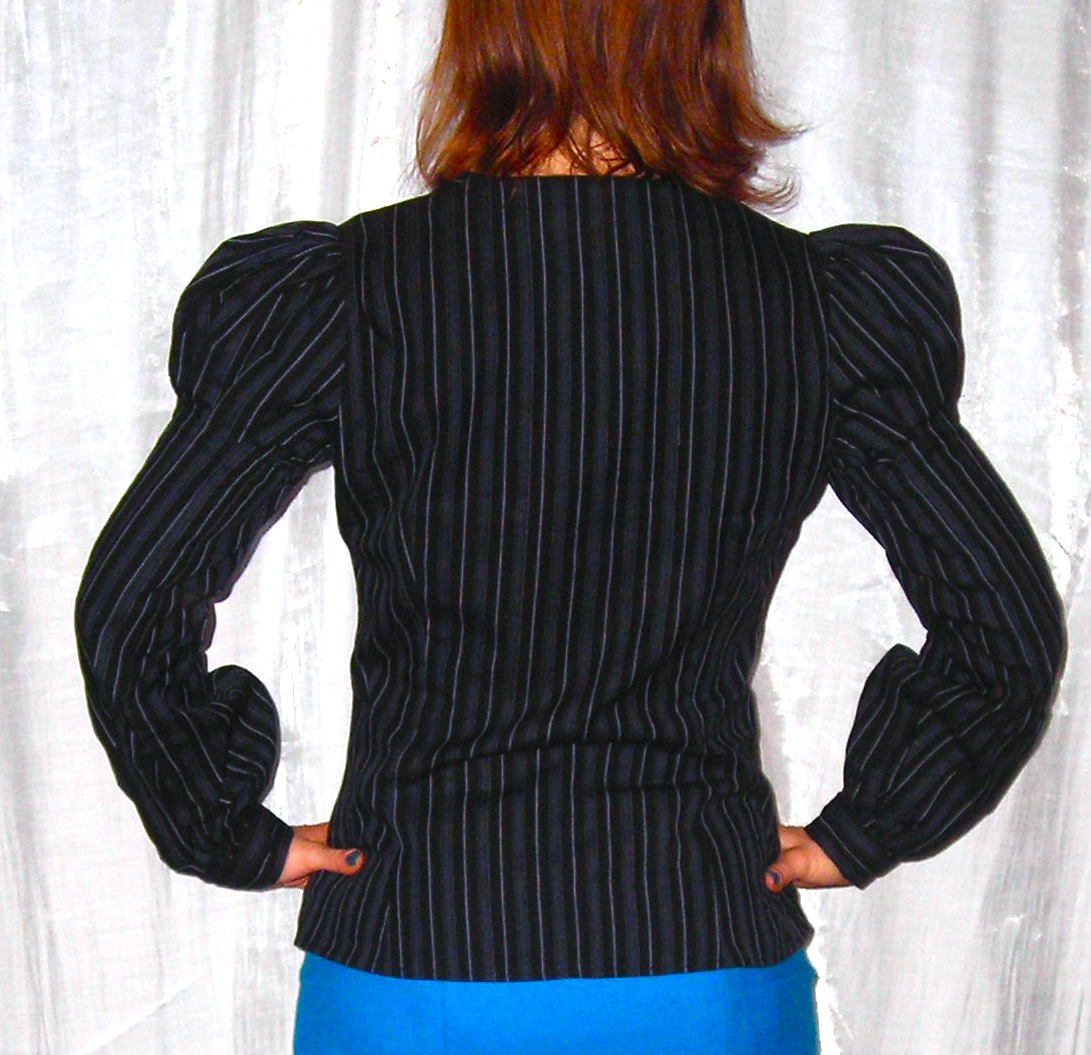
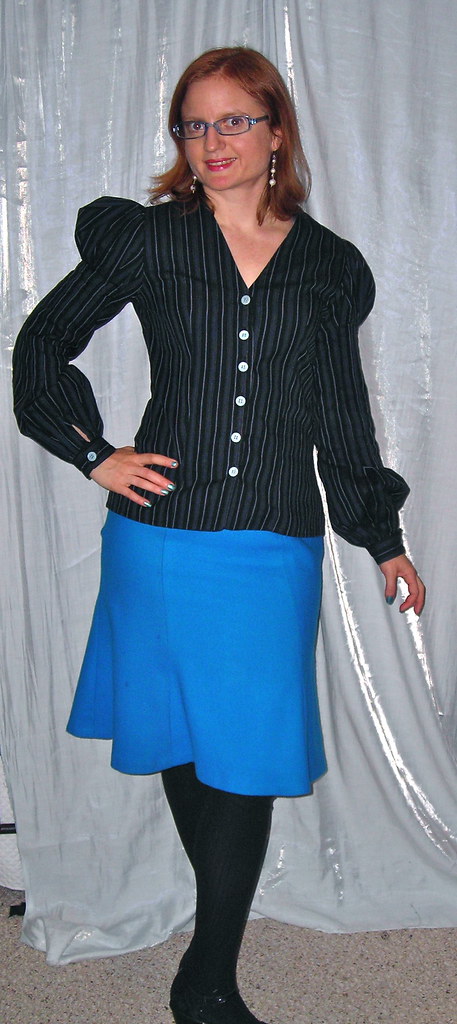
My particular pear shape has the following additional elements: very small bust, high waist, protruding tummy, wide thighs (meaning my widest part is actually a little below the hip), long torso, short legs, and very short overall (5' 1.5").

The PR thread links to You Look Fab's 2006 and 2007 posts about flattering styles for pears, which are quite detailed and useful. I completely agree on her advice for top/jacket length (never ending at your widest part) and plain flat front pants. She makes an excellent point about emphasizing the waist, and not going too shapeless because when you wear something too sacky everything looks as wide as the widest part of you. I take issue with the fact that we're all supposed to wear the highest heels possible at all times. Some of us have lives that require a little more mobility than just sitting on a barstool drinking a cocktail! Her advice is pretty much standard for pear shape dressing advice.

The big place I depart from the usual advice is skirt shape. I have always accepted the conventional wisdom that an A line is better for a pear shape, but I am questioning that lately. I feel like the flare of an A line actually widens me across the hips and saddlebags and almost negates having a smaller waist.

I am still not entirely comfortable wearing more fitted skirts and I feel like I look unproportional and larger than I am in them. But objectively, I think straight and pencil lines are flattering to me (as long as the bodice isn't too fitted to emphasize how small I am on top). It's a matter of getting past the discomfort of all the good advice out there that advises you to hide, disguise, cloak, and misdirect your shape. I have a curvy bum and thighs. That is fact. Whether that's good or bad is all a matter of taste.

Front 
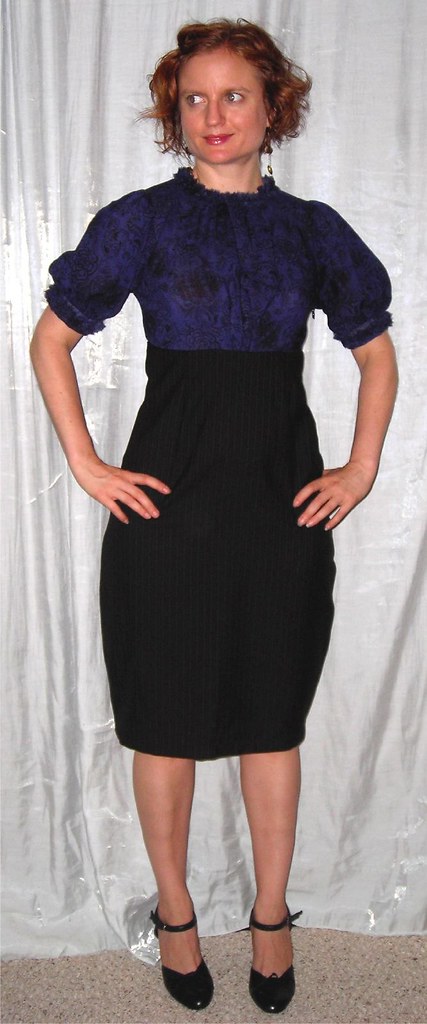
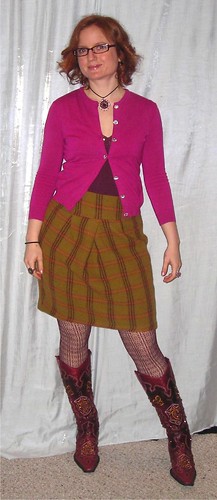
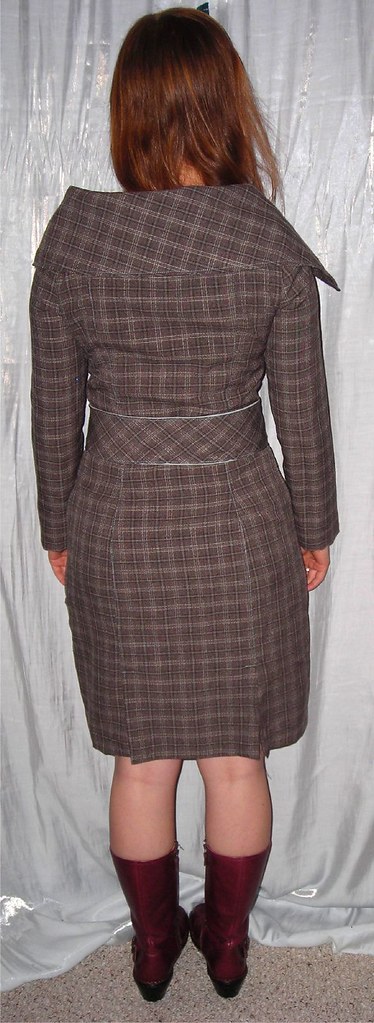
A good example for a pencil line is this dress, BWOF 11-2007-106. When I first made it and wore it I felt like I was all hips and saddlebag (and belly, but that's sort of another topic), but looking at the pic I can see that it's a very feminine silhouette and although I am clearly wider at the bottom than the top, it doesn't look off balance. I think that's because it has the perfect confluence of elements that allow a pear to wear a pencil line:

-Less fitted top

-Ruffle detail at neck and sleeves draws eyes upward

-Puffy sleeves balance larger lower half

-Empire line shows off narrow ribcage and waist

-Narrowed bottom hem gives visual effect of "curvaceous" not "wide"
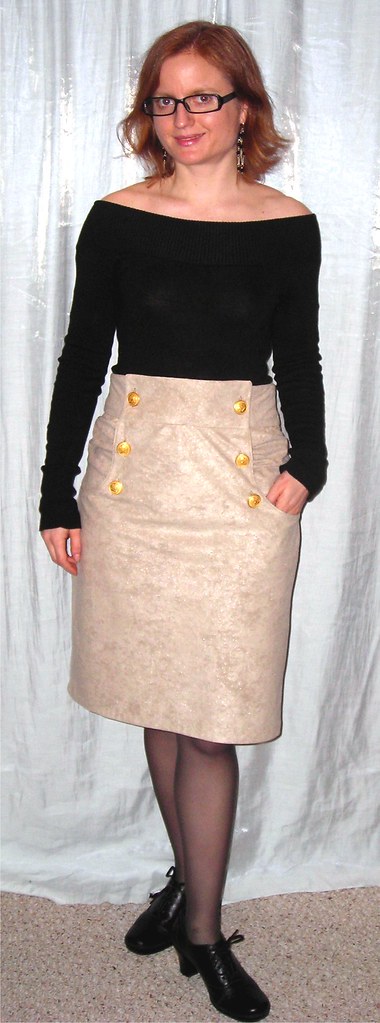


Pocket The trend toward high waists is good for the pear. I have a high waist, which I don't think is necessarily a defining characteristic for a pear but I would be surprised if there are many pears who have a low waistline. My narrowest part is my ribcage and I start flaring out from there. A high waisted skirt, like the Burdastyle Kasia, takes advantage of that narrow ribcage and emphasises a high, narrow waist. Key elements here:

-High waist captures narrow ribcage/higher natural waist

-Long waistline mitigates flare of hip/thigh by visually stretching the body, so the hip/thigh flare doesn't seem as abrupt

-Side buttons divide hip area into three "blocks," with each block narrower than a traditional center closure two block look or side/back closure unitary front. Contrast color side panels (as in this project Carolyn is contemplating) would give the same effect.

-Ruching at side and back yoke panels makes wider hips look like design detail rather than body contour


I think I'm in Love... 
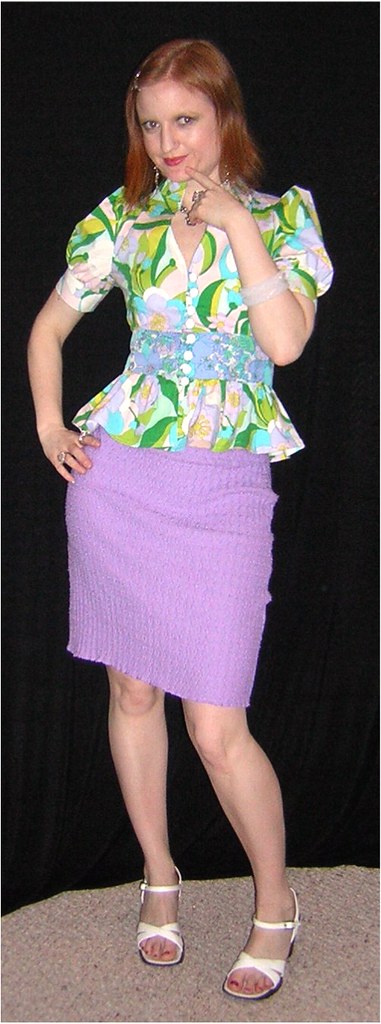
Another way that a pear can wear a straight or pencil line is with a peplum blouse, like this Vogue 8196. I am a huge fan of the peplum for a pear shape. In this instance the outfit works because:

-Midriff band emphasizes waist, making peplum flare look like a design choice rather than a necessity to accommodate hip

-Relatively high waist, as with high waisted skirt, stretches the distance between waist and hips, making the hip/thigh flare look more gradual and proportional

-Peplum flare is wider than hip, so hip looks relatively small in comparison

-Blouse is long enough to obscure high hip, but does not cut off body at widest spot


If you're not ready for a straight or pencil line, a trumpet shape is very flattering for a pear. The flare at the bottom works like the flare of a bootcut jean: where the hem is approximately as wide as your widest part, it balances the heaviness of hips/thighs. It creates a "mini hourglass," which gives an overall impression of the entire outfit and body as balanced and hourglass. I think it is more classically feminine and sophisticated than a straight A line with the same balancing effect.

5-16-07 Simplicity 5914 is a perfect example (though remember that I had to dramatically shorten the distance between hip and hem flare to get it to suit my proportions).

-Hugs curves of bum and upper thigh for ultra-feminine look

-Flares out at lower thigh to de-emphasize saddlebags

-Reaches full flare at knee, so that skirt has hourglass proportions, meaning approximately equal widths in approximately equal proportions.

If the flare is much lower, as in the first iteration I made of this skirt, you lose the sense of balance--there is a short stretch of width at the hip/thigh, then a narrowing, and then a much longer stretch that gradually flares out to below the knee. That just creates another pear shape!

-In a length that can be viewed in a quick glance for instant hourglass perception(rather than having to sweep the eyes down to the calf or floor to get the full visual effect).


1-16-09 The tulip skirt (this one is BWOF 9-2007-116) is another style that pears are told we should never ever wear. I completely disagree! As with a peplum, the tulip skirt exaggerates the hips. That sounds bad but again, as with the peplum, the skirt is clearly larger than the hips underneath, which makes them look smaller. The tulip skirt looks like a style choice, rather than a necessary accommodation.

In this outfit we see:

-Fitted top to emphasize smaller shoulders and waist.

-Sweater buttoned just under bust to increase the illusion of curve there and build up the bust.

-Tulip skirt that hits right at natural waist showcases waist and disguises true size of hips.

-Shorter hem on skirt avoids heaviness and shows a few inches above knee, where the pear's legs start to narrow.


Admittedly, it is trickier to wear a straight dress than a straight skirt. I am definitely still working on this. After I was unhappy with BWOF 04-2008-128, IreneQ suggested on the pattern review that I make such styles to skim rather than fit.

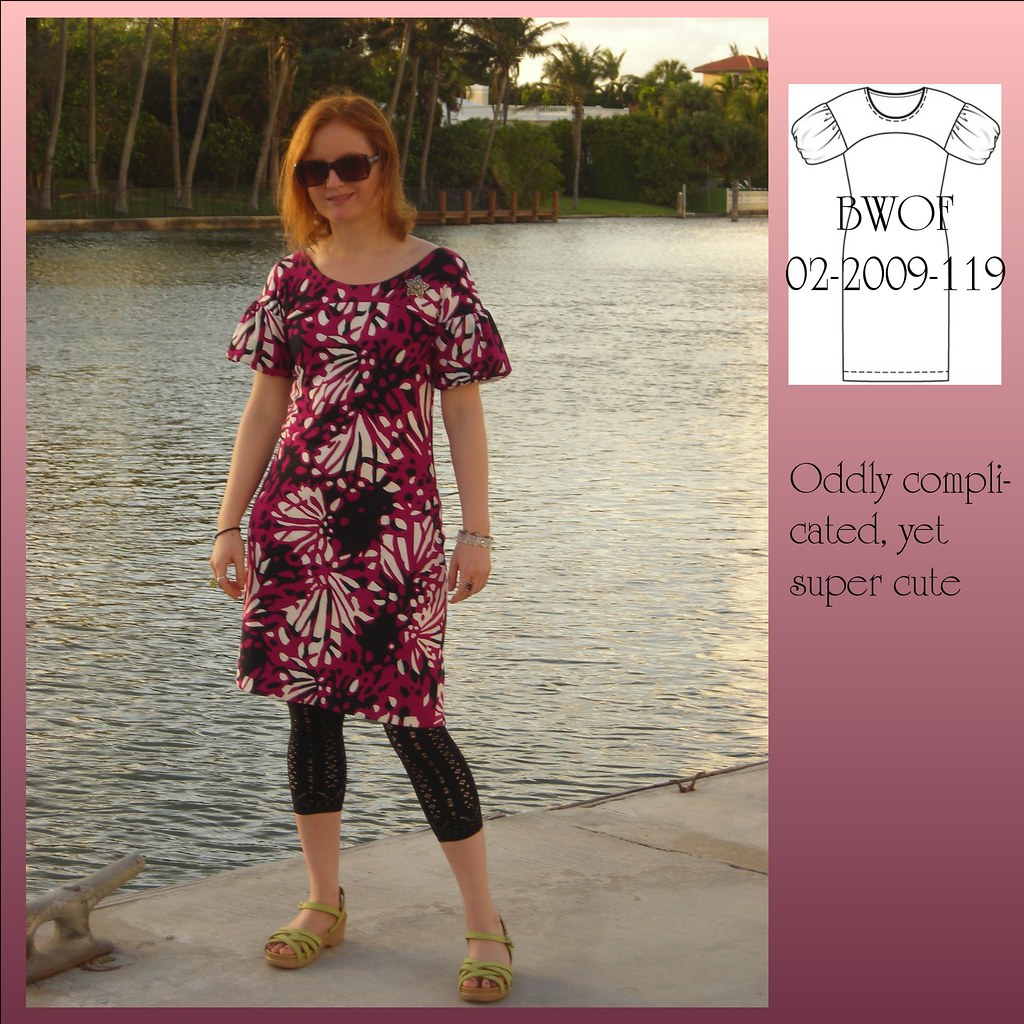
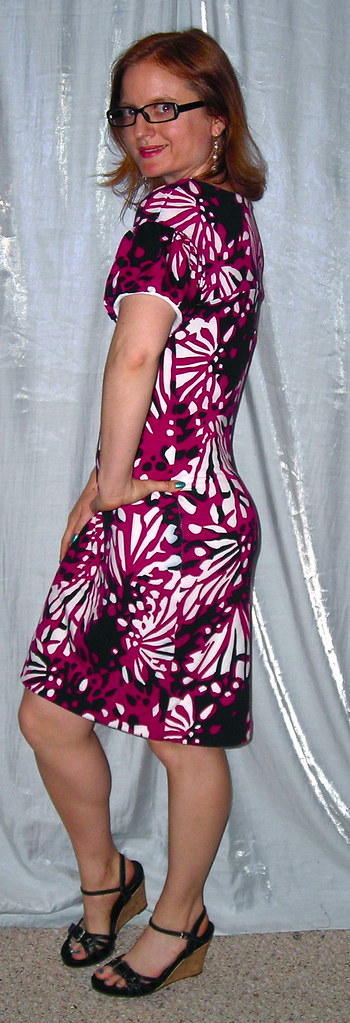
I have shied away from t-shirt style dresses because of my pear shape, but I really loved 09-2009-119 so much that I had to try. I haven't reviewed this yet but I'll give a sneak peek of what I'll say:

Front-I added a CB seam so there would be shaping over the booty

-I made sure it had shape at the waist BUT I didn't bring it all the way in--this is much more ease than I'd usually have at the waist, 3-4 inches--so there wouldn't be such a huge difference between waist and hips

-Plenty of ease at hip as well, to continue the easy fit style

-I underlined with a fairly thick knit that smoothes over lumps and bumps

-As with the first example, the wider sleeves help balance out the hips/thighs, while the drop shoulder and wider neck add a little perceived width to my frame


Casual!


Contrast the above with a traditional A line skirt, supposedly the best for a pear shape. Now, I love this skirt. I love the color and I love the tulle trim on the bottom, and it happens to be a lovely Italian silk.

But I never wear it because I think it makes me look needlessly wide. Rather than emphasizing my waist (also partly the fault of the less fitted top in that photo) and my feminine curves, it just sort of makes me look like there's nothing interesting under there and that I get wider and wider as you go down.


Front2


I still wear plenty of full skirts! I love dresses with a fitted bodice or midriff and a wider skirt. They are easy to wear and I don't at all think about how my belly, booty, hips, or thighs look because they're safely tucked away under lots of fabric. But even for those, I almost always go either for a gathered dirndl-style skirt as with McCall 5382 here, or a circle skirt as in BWOF 05-2008-127. The gathered skirt doesn't get too much wider at the hem, the way an A line has a flare that echoes the flare of the hip/thigh. The circle skirt widens quickly and dramatically, so it doesn't really reveal the size of the hips underneath; plus, the bias helps it flow well.

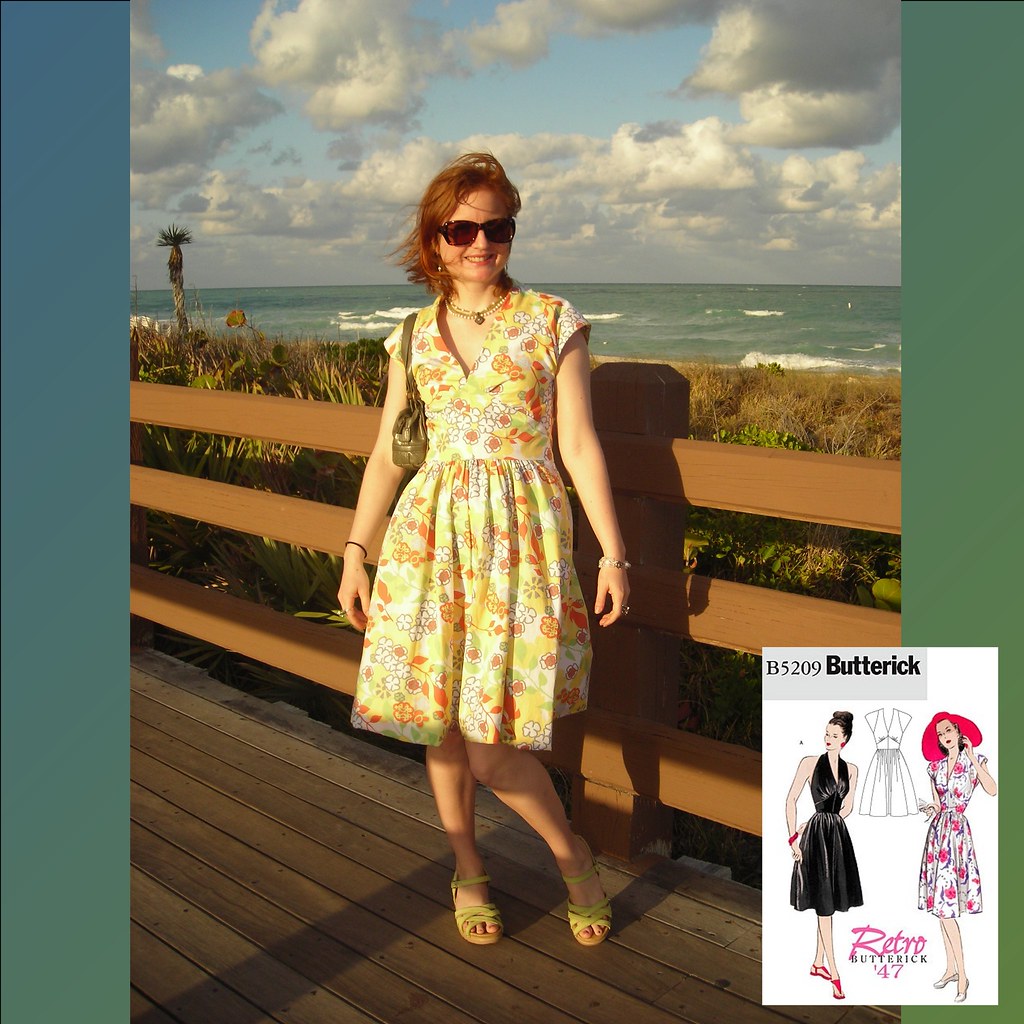
In addition, when making a dress with a full skirt I almost always have a fitted waist that is right at or (even better) above natural waist, as with Butterick 5209 or New Look 6394. This takes advantage of the narrow ribcage/waist and makes the full skirt appear to be a style decision rather than a necessity.


More versus less A Line

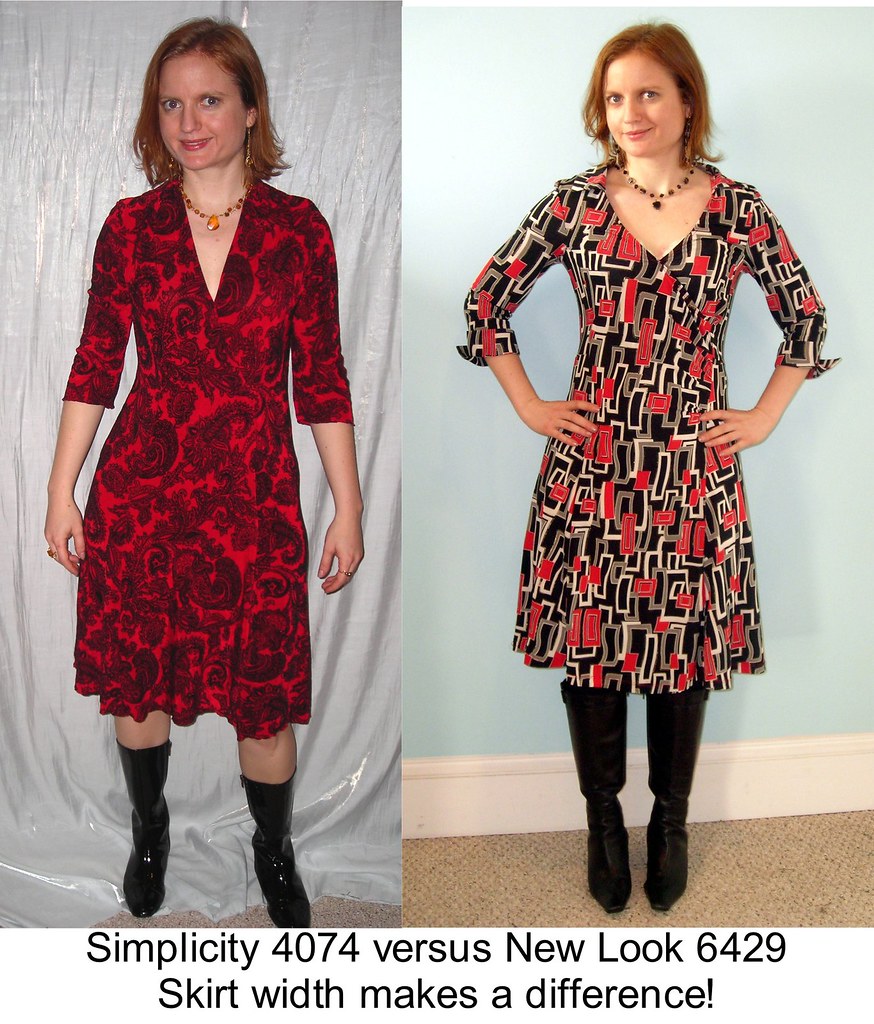
If it as an A line, I want it be gradual and tame. Compare Simplicity 4074 versus New Look 6429. The New Look is at a bit of a disadvantage here because it's too long, but if you can set aside the length you can see that the A line flare is too much, and it widens rather than complements my hips and thighs. Whereas the gradual and slight A line of the Simplicity creates a longer, leaner line.


I am in no way trying to create an Unbreakable Rule here. Style depends so much more on your personal body than on a generic way of describing your shape. Which is why I think it's a shame that pear shaped women are invariably admonished to wear an A line. Everyone needs to experiment and find out what makes her look and feel her best. And by "best" I don't mean most decorative, most traditional, or most feminine--I mean most confident. If you're too uncomfortable in a straight skirt to wear one, the world is not going to come to an end!
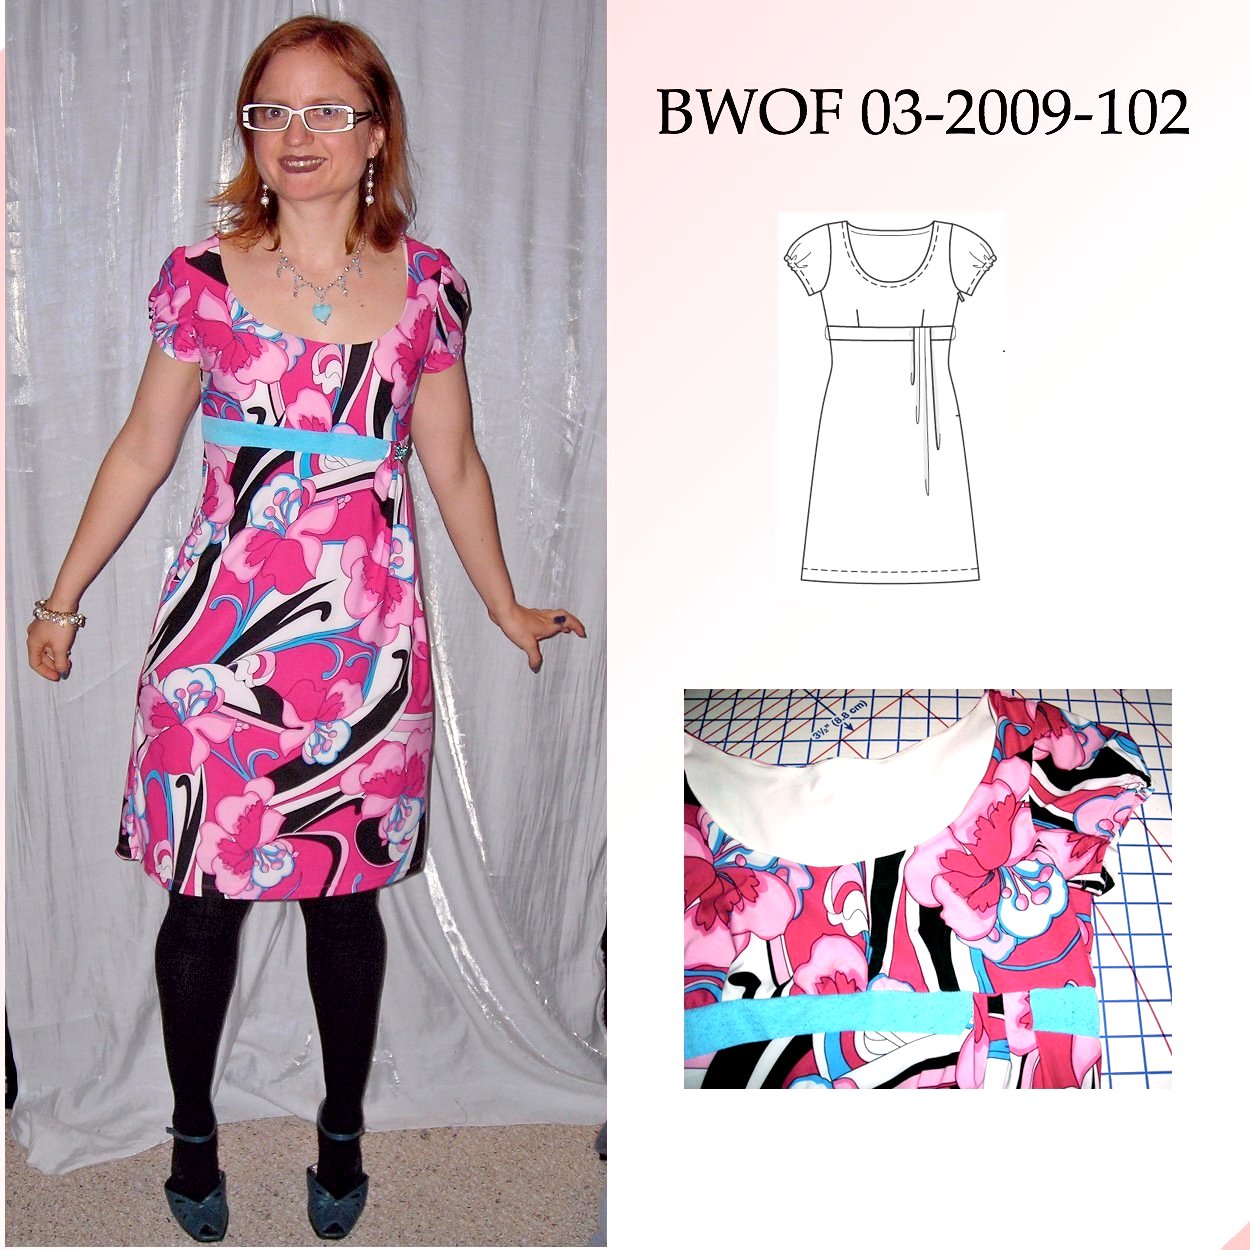