Sunday, June 29, 2008

Mailbox Squee

My debit card got demagnetized when I was in France or shortly thereafter so I have no access to cash for over a month. I called 2 1/2 weeks ago to get a replacement and it still hasn't come. Every day I run to the mailbox hoping today is the day, but so far no luck (so I'm going to have to call again and they're going to cancel the old card and make me get a new one and they assign you a PIN that you just have to memorize so I'll have to learn a whole new PIN and I'll have another two week wait).

Anyway, when I checked the mail Friday I didn't have a new debit card but I did have a mysterious package. I thought I might recognize the return address so I didn't fear anthrax and very curiously opened it up.

What to my wondering eyes did appear but...a Patrones! And a lovely card from Lisette of La Cubanita Cose.

Patrones Joven 05/2006

She said the Joven edition was a little too joven for her, and hoped I would enjoy it. Claro que si! I love Patrones, as you know, and only have a few of them. This one definitely has a young vibe, with lots of fun little patterns for a hot summer day at the beach. Now I need to plan a beach vacation....

Here are a few of my favorites:

Some of the Great Patterns

I love the sleeves on the dress, the concept of a wrap halter, the classic tunic (I don't have a pattern for one, believe it or not), and playing with stripes on the skirt.

A big thank you to Lisette for the wonderful and unexpected gift! Now I have new bedtime reading.

Thursday, June 26, 2008

McCall 5577 Jumper

Since I am so behind on photos and hate taking them so much, I am trying to combine project photos with travel. When I was going to NYC over the weekend for Mermaid Parade, I wore my new McCall 5577 jumper on the bus, and had my friend take photos of me at the giant button.

Pockets

They're not the best, clearest pictures but at least they're done! I kind of love this little number. I bought the Ikea fabric last year sometime and have been looking for just the right project. Which is kind of ridiculous, because it's from Ikea for heaven's sake! It was more expensive than I thought it would be though, around $5/yd. It being Ikea I thought everything would be $2 and $3. I have another one that is similar circles but more widely spaced; it is still looking for a pattern, something with a little fullness because otherwise the circles will look too lonely because there will be only a few of them.

I was hoping I could wear this to work, but I'm not so sure. To get it to look right I had to hem it pretty short (though I accidentally wore a short skirt to work yesterday--it kept riding up and nothing I did kept it down--so I suppose that barrier is broken). Also, I mean, it is a little child-like (I refuse to use "childish"). However, I think for Fall with a 3/4 sleeve tee and bright colored tights I'll probably be wearing it to work anyway! Maybe for Summer it will just be play clothes.

What's slapdash, easier to see in a closeup shot*, is the little bubble at the right front yoke (right when I'm wearing it, left when you're looking at it--even though I interfaced the outer yoke) and that despite my best efforts, ripping it out once, and sewing from the center outward in each direction, the center circle motif is not at the exact center of the yoke. I'm frustrated about that. All photos are here, and the pattern review is here.

*It's not really a closeup, I just cropped the picture. It's a little pixielated and low quality because it was dusk and there wasn't really enough light, but you can see well enough.

Tuesday, June 24, 2008

BWOF 04-2008-108 Pleat Front Skirt

Thumbnail

For my Mini-Wardrobe for Paris I needed at least one skirt, and I had the perfect navy fabric for it. Last year Cidell made a cutie cute pleat front shirtdress out of some fabulous cotton eyelet and had some left over. After making her think about it for several months--I am way too selfish ever to have given up such lovely fabric--I finally agreed (gleefully) to take the leftovers. It was one of my inspiration fabrics for creating a navy and red wardrobe.

The #108 skirt was one of my top picks from the April edition of BWOF, and it seemed a great vehicle for the fabric. I don't know that I picked the platonic ideal project for this fabric, because the slight A-line of the pattern is exaggerated by the stiff eyelet, but I don't think it was a gross mistake either.

There are more details in the pattern review, but I wanted to show a method for getting a nice bias binding waistband opening above the zip (as always, click on the photo for a larger, clearer pic).

Fold Waistband Over Zip

My method:
1. Cut 2 1/2 inch wide bias strips.
2. Fold and iron the bias strips in half (the long way).
3. Match up the raw edges with the raw edge at the top of the skirt. The key step is to wrap the waistband around the zip at the top for about an inch or so.
4. Sew the bias tape to the waistband with a 1/2" seam allowance (or slightly smaller), catching the inner wrap and outer layer of the waistband as one.
5. When you turn the waistband up, it will encase the raw edge and create a nice flat line above the zip.
6. Turn the folded edge of the bias tape to the inside and either pin in place over the seam allowance and stitch in the ditch on the outside, or handsew it down to the seam allowance. You'll find if you want to do the first method it's very important to make sure you didn't take too large of a seam allowance, because then there's not enough bias tape left to fold all the way over past the seam line.
7. Sew in a hook and eye to hold the waistband closed.

BWOF wanted you to sew the zip all the way to the top of the waistband; I can never get an invisible to zip up past that much bulk, no matter how much I trim the seam allowances.

Monday, June 23, 2008

Mermaid Parade (and a quick visit to the garment district)

Trena

Mermaid Parade was lots of fun again this year! I got a lot of compliments on my fin configuration though everybody kept calling them boots. I hadn't thought of building the fins onto boots, which would have totally worked but been HOT. It was a warm day with plenty of sunshine and no rain, which is really the best you can hope for. It was cold and drizzly the first year I did it (and then poured after the parade was over), so every year that there's sunshine is a good year in my book. You can see all my photos here.

Of course while I was in NYC I had to stop by the garment district. I took the Eastern Travel Chinatown Bus ($36.50 roundtrip when booked online in advance; the extra $1.50 is totally worth it to have reservations) up to NYC on Friday. I wasn't meeting my friend until 6:30 so I had to schlep my suitcase around with me. This was good because it restrained my fabric buying exuberance. I checked out Chic, Spandex House, Paron, and the store that took over the old Paron location. I only bought at the first two stores. For the first time ever I found nothing at Paron! I would have liked to have found more than one woven cotton print, but I didn't want to haul my suitcase into any more stores so I headed off to Bloomie Nails (which I found through yelp) for a mani-pedi.

6-22-08

Friday, June 20, 2008

Mermaid Fins and Notes on Costuming

I am heading out the door shortly to take the Chinatown bus to NYC for the Coney Island Mermaid Parade! So this will be short, but I wanted to talk a little bit about making costumes.

I love being somebody I'm not for a day. Instead of being responsible, dependendable, and perhaps a wee bit uptight I can be awesome and cool. I wouldn't want to be that person every day, but it's fun to trot her out a couple of times a year. So I have a whole closet full of costumes (I should take a picture of that someday) and a bit of slapdash experience making things work.

This is my third year to do mermaid parade.

Year 1:
MPTrenaCyclone3

I was a mermaid for Halloween and somebody suggested I go in the Mermaid Parade. I'd never even heard of it but was definitely intrigued. It was so much fun! I made the mermaid skirt as a tube with slits up the side. Made the fins out of an irridescent sheer that is still available at my local Joann and ran wire down the entire side seam and out into the fins (it didn't work to have wire only in the fins, they wanted to fold frontward or backward). It wasn't the most comfortable, but I think (humbly, of course) that this is the best mermaid tail style a home costumer can hope for.

Year 2:
07OnTheWay

While it had been fun to do the parade, I didn't really want to do it again by myself. So I recruited some friends. Since I was making all the costumes (they embellished their own), I kept it simple with the "traditional" style mermaid tail for the home costumer--a skirt with a frill.

This year I wanted to do something completely different and wear boy shorts and have individual fins for each leg. I have found hardware store supplies invaluable for costuming. 14 gauge coated copper wire from the electrical department allows you to shape pieces; the sharp ends need to be covered with duct tape. Cable ties make excellent plastic boning. I now own spiral steel boning, but I didn't want to waste any of it on a costume! Cable ties are vastly superior to the plastic boning you can buy in the fabric store because they're cheaper, the ends are less sharp, and they stay straight--they don't want to curl up like the plastic kind. They are a little less stiff than plastic boning, so I usually double bone seams by sewing both sides of the seam allowance into a channel and inserting a cable tie into each.

For the fins:
1. Cut out four fan shaped pieces out of the fashion fabric and lining.
2. Cut out regular loft batting in the same shape and trim the batting an inch all around so it wouldn't bulk up the seam allowances.
3. Quilt the fashion to the lining with the batting in between, to make four individual fans.
4. Sew the outer frill to two sets of the fashion fabric (make sure they're mirror images).
5. Sew the long diagonal seams; now you've got two fins instead of four fans.
6. Insert the invisible zip at the top of the inside seam.
7. Sew the rest of the inside seam.
8. Hand sew the seam allowance of the inner side seam (the seam with the zipper) to the lining without catching the outside to make a casing. Insert cable tie boning along both sides of the inner seam. This is to make it stand up while I'm walking so (hopefully) I won't be tugging at it. (I should have machine sewed the seam allowance to the lining before sewing the side seam. This would have saved me a lot of hand sewing.)
9. Hand sew a casing along the top, not catching in the fashion fabric, and insert elastic.
10. Cut a piece of wire the length of the hem and secure the ends together with duct tape.
11. Hand sew the wire into the hem
12. Gather the lower frill and sew by machine onto the outside of the fabric. (This would have been easier to do had I not already sewn the wire into the hem!)

Here are some construction details:

Construction Details


And here are the fins!
Fins

Don't worry, I'll be taking lots of pics. Please do a reverse rain dance for us.

Thursday, June 19, 2008

Stashoholism Confessional: I am Weak

So I thought maybe this year I'd try to buy fabric only while traveling, to keep with my parity goal.

Not so much.

Fabric Purchases 6-19-08


Last weekend, I went to Joann for their Simplicity/McCall/Vogue pattern sale. I have not purchased fabric in a Joann for a couple of years because it is all AWFUL polyester crap. But I really liked the cotton print on the left. It will be Butterick 5209, the version with sleeves.


The middle fabric is a crazy home dec-ish type thing from G Street's $2.97 table, purple with a metallic gold sheen. It was absolutely perfect for my Mermaid Parade costume. I got 1 1/2 yards and it's all gone. (Next post will be about my fins.)

The fabric on the right is also from the $2.97 table, a knit print. I was looking at my stash and realized that I sew up knit prints pretty much immediately. There are never any that actually sit in stash. So I'm allowed to buy them. I, um, made a huge order to FFC (first internet fabric purchase of the year) that included four knit prints, so I now I need to think about patterns. Woot!

Monday, June 16, 2008

Designer Lust: Alber Elbaz Edition

I am currently obsessed with this Lanvin blouse from Spring 2008 RTW:

Lanvin Blouse-Harpers May '08

This is from a photo spread in Harper's Bazaar from May 2008 (with Julianne Moore on the cover), given to me by KBB in Paris. I love the sleeves and the shawl collar with plunging-but-not-revealing neckline. According to Harper's, it's available at Bergdorf Goodman for a mere $2188. However, the only Lanvin I could find on the Bergdorf Goodman website are fragrances and stuff like that. Everywhere else only seems to have purses. It's not on Net-a-Porter.

I found it on the runway (along with a sliver of the back), but the photo isn't any more informative than Harper's, what with the tucking into the skirt and all.

Lanvin Spring 2008 RTW

If I were to make it, I think I would have end in a narrow waistband, only a couple inches tall, with buttons facing toward the inside for the crossover. I can't decide, though, if this style is too grown up for me. Also, there's the issue of what season to wear it. It would probably be too hot for summer, and could only be worn on those three days per year in which it is cool enough for 3/4 sleeves but not so cool as to require any outerwear, because you sure can't wear that thing under a coat. Or perhaps that's the reason I need a cape?

Does anyone have any ideas for finding a more technical picture? Catalog shots would be best, but I can't find anyone who has it in their catalog!

Wednesday, June 11, 2008

Notes on a Pattern Table, and Project Sneak Peek

So I always wondered why it is we don't speak when we're at the pattern table looking through the books. We obviously all have a common interest, and while I like to look at the patterns on offer with a critical eye it doesn't require sooooo much concentration that I can't also exchange pleasantries. It seems like the perfect setting for a modern day quilting bee kind of thing...you know, pick a little, talk a little.

Last Saturday I went out to the suburbs for the G Street Fashion Sewing Club meeting, only to discover that it was yet only the first Saturday of the month, not the second. I might want to look into something called a calendar. Anyway, I wasn't too annoyed about it because Joann had Simplicity, McCall, and Vogue on sale, so I headed up to the Joann and beelined for the pattern table. It was pretty crowded but I scored a seat and a book and was content.

I was wearing the seersucker version of Vogue 2859, and one of the women complimented me on it. I recommended the pattern, which just happened to be on sale, and this got all of us at the table chatting a little. It was so nice! The girl to my left had pretty much my figure (well, what I could see above the table, I didn't get a chance to check out her booty!) and so we were exchanging pattern recommendations and tips for dressing a flat-chested pear. When I left I handed her my card and she emailed me! On my recommendation, she is going to Fashion Sewing Club (which actually *will* take place this coming Saturday) and I'm looking forward to seeing her again. Yay for new sewing friends!

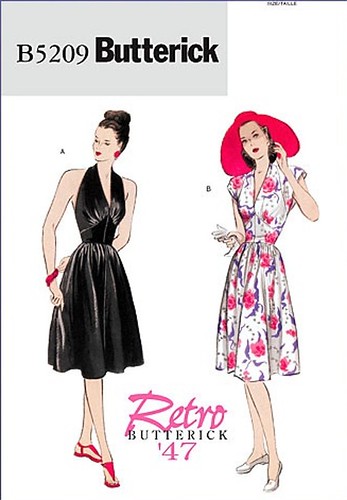
So I got a ton of patterns (and of course there are a few Buttericks that I must have, on sale this coming weekend at Joann), and one of them that really pulled me in was 
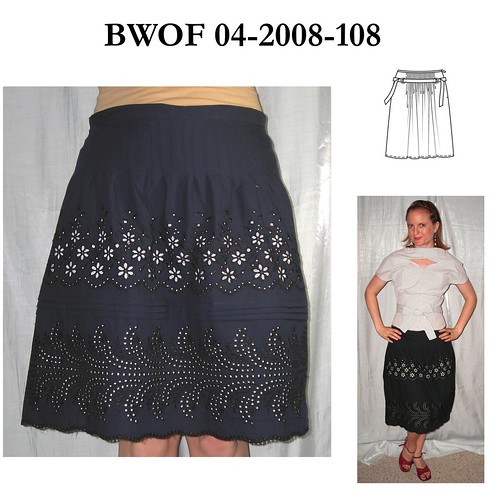
McCall 5577. Something about the upside-down U shape of the bodice and the witty (as BWOF would say) suspender-esque back that evokes the 80s but doesn't go full-on 80s just drew me.

It went to the front of the project queue, from some Ikea fabric I got last year and an old table cloth I bought from a vintage store. Cidell is coming to DC this weekend and will be taking photos of my recent projects. I don't think she quite grasps how many recent projects that is--I'm probably up to 9 or 10 unphotographed by this point. So I'll get her to take photos on Sunday, but for now I *have* to show off the buttons. Choosing buttons is one of my favorite parts of a project but I didn't have any really great options in my rather large stash for this jumper.

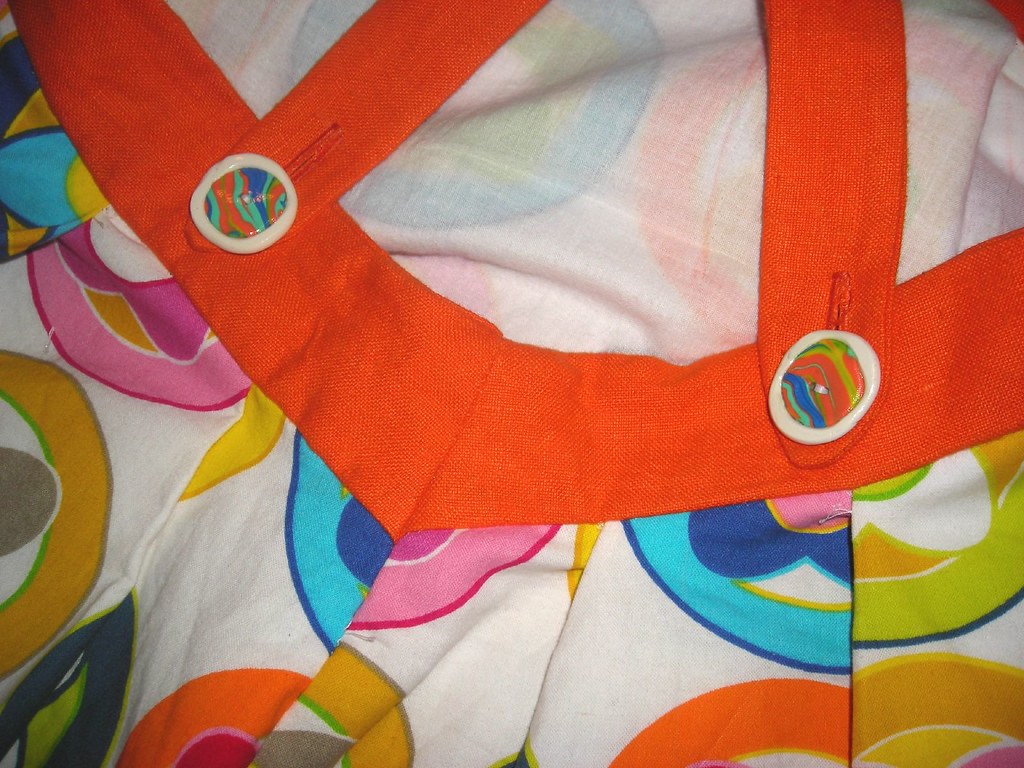
So I made some from polymer clay. I'd been wanting to try it for a while, and since this needed only two it was an easy project. I used to make a lot of beads out of polymer clay (aka sculpey, fimo, premo, etc.), but jewelrymaking has been put aside for sewing the last couple of years and I hadn't done polyclay in ages. One of the beautiful things about this medium is that the clay keeps almost indefinitely. All the clay is at least four years old (I am sure I haven't bought any since I moved into my condo), and I'm fairly certain some of it is over six years old, from before I moved to DC. Several of the blocks were quite hard and required a fair amount of conditioning (this is just a fancy way of saying kneading) and a few drops of mineral oil (aka baby oil) to become pliable, but I got it all to work.

I tried several styles before I decided on the buttons for the jumper. Here are the rest of them. The ones with the millefiori style design are only the second cane I've ever made! I have a lot to learn about canes, obvs. The colors were great when they were in fairly large doses, but unfortunately once I reduced it the tiny bands of red, green, and blue around the yellow cores just read dark. They'd be great for a safari style item, because they're a little animal print looking. If you want any of these leftover buttons, email me and I'll send them off (t r e n a [dot] b at g m a i l--take out the spaces, turn the [dot] into punctuation). I still have half the cane left, so there's plenty of those to go around.


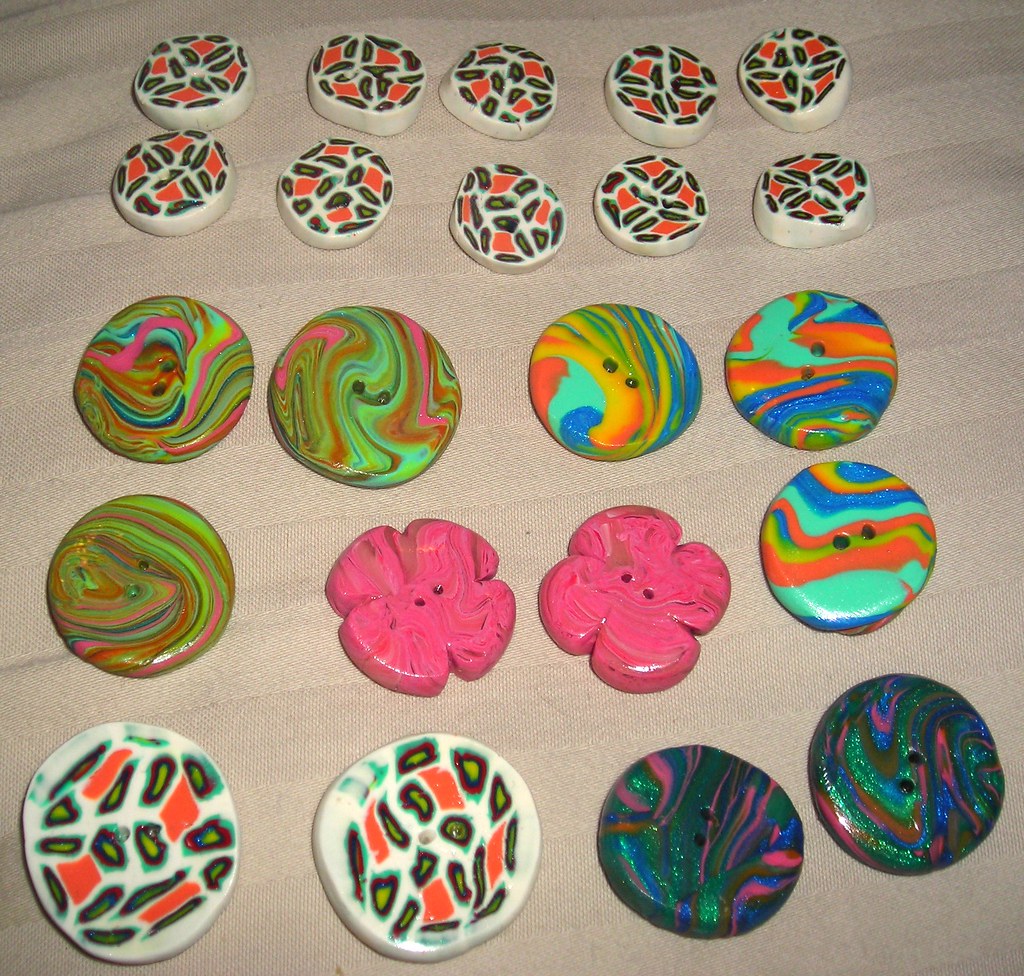
If it interests you at all, I highly recommend doing a project like this sometime. It's just fun! There are many tutorials out there, just google "polymer clay cane" or "clay cane tutorial" and you'll find them. To make the buttonholes, I used a commercial button as a template, put it over the clay disk, and used a yarn needle to poke the holes. Bake for 30 minutes at 275 F, sand with a couple of grits to smooth them out, coat with Future Floor Polish for shine, bake the glaze on at 275 for 10 minutes and they're ready to go.


============================

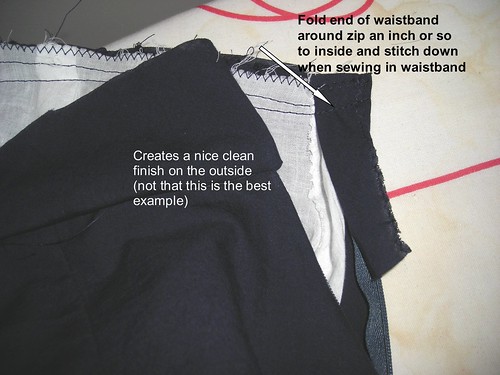
I wanted to give a better picture of my Paris Dress! When I got home I: unpicked the binding from the bottom of the armscyes, took it in four(!!!) inches at the bottom of the armscye to snug up the bust, reapplied the now-altered binding (and they had done it the cheap/easy/lazy way of binding the front and back and just doing the side seam; I sewed the garment front and back and then overlapped the binding so there's no obvious join/seam), and hand-sewed a batiste underlining for the skirt part to the yoke seam allowance because it was rather sheer. And this was what needed to be done to a well-made garment! Sheesh. Now I remember why I don't buy ready-to-wear. But once all that was done, I was very happy with my Paris Dress. I love the little details, like the pockets and the epaulet tabs. And the best part is, I can wear it with a blouse as a jumper or without a blouse as a dress to make it three seasons. It may only be in style for a few years, but I'll get as much wear out of it as I possibly can in those years!